ゼロから学べる!Nextcloudの始め方 ~その1 導入編~

以下の記事ですが、すでに提供を終了したCentOSをベースに記述しておりますので、適宜AlmaLinuxと読み替えください。そのうち書き直します。
こんにちは、Software Engineerの5umerag1です。
早速ですが、皆さんは社内やチームで仕事をするとき、どのようにしてファイルを共有していますか?社内のイントラサービスを含め、NASやGoogleドライブ等のクラウドストレージを活用しているという方が多いのではないでしょうか。
これらはもちろん便利なサービスですが、本記事では、プライベートオンラインストレージのNextcloudをご紹介させて頂きます。
1. Nextcloudの魅力とは
Nextcloudは、プライベート環境上にオンラインストレージを構築することのできるOSSです。Engineerでないとなかなか聞き慣れない言葉が飛び交っていますが、決して難しいことではありません。皆さんのノートPC上にGoogleドライブを構築できるサービスだと思ってください。
[メリット]
・大容量(ローカルのストレージに依存)
・コストゼロ
・セキュアストレージ
・使いやすいユーザインタフェース
・便利なアドインが豊富
[デメリット]
・構築の難易度が少々高め…ですが!本記事を読めば100%導入できます。
と、いろいろ語りましたが、実際にサービスを触った方がイメージできると思いますので、早速構築をしてきましょう。
2. 準備するもの
・PC(ハード)
・Virtualbox(ミドル)
・CentOS 7.x(仮想VM用のOS)
のみです。本記事では仮想上のCentOSにNextcloudを構築しますが、VM上にCentOSを構築する手順は割愛させて頂きます。「ゼロから学べる」と謳っているくせに、申し訳ございません。
※こちらを参考に構築してみてください。
3. 構築の全体像
本記事では、以下手順でNextcloud環境を構築します。
1. MariaDBのインストール
2. MariaDBの初期セットアップ
3. phpのインストール
4. Nextcloudパッケージのダウンロード
5. Nextcloudの初期セットアップ
4. まず初めに
仮想上のCentOSにTeraterm等のSSHクライアントを用いて、一般ユーザでログインします。また、インストール時はrootの方が何かと便利なので、ログイン後にrootに切り替えておきましょう。
※そもそもSSHのrootログインを許可している方は、rootでログインしても良いですが、セキュリティの観点から推奨できません。
5. 気を取り直して、MariaDBのインストール
※以降はすべてSSHクライアント上での作業となります。
# 念のため、インストール済みのパッケージをアップデート
> yum update -y

# MariaDBパッケージ用のリポジトリを追加
> vi /etc/yum.repos.d/mariadb.repo

# 以下は、上記コマンドで開いたviエディタに記載
[mariadb]
name = MariaDB
baseurl = http://yum.mariadb.org/10.3/centos7-amd64
gpgkey=https://yum.mariadb.org/RPM-GPG-KEY-MariaDB
gpgcheck=1

# なお、OSによってリポジトリの記載が異なるため、CentOS7.x系以外でインストールする方は、以下URLから記載要領を確認してください。
# https://downloads.mariadb.org/mariadb/repositories/#mirror=yamagata-university

# MariaDBパッケージのインストール
> yum install MariaDB-server MariaDB-client -y

# インストールの確認
> mysql --version
mysql  Ver 15.1 Distrib 10.3.15-MariaDB, for Linux (x86_64) using readline 5.1

# サービスの確認とサービスの自動起動設定
> systemctl start mariadb
> systemctl enable mariadb
> systemctl status mariadb
● mariadb.service - MariaDB 10.3.13 database server
  Loaded: loaded (/usr/lib/systemd/system/mariadb.service; enabled; vendor preset: disabled)
 Drop-In: /etc/systemd/system/mariadb.service.d
          └─migrated-from-my.cnf-settings.conf
  Active: active (running) since ~~

# 念のため、MariaDBサービスにログインできるかを確認
> mysql
Welcome to the MariaDB monitor.  Commands end with ; or \g.
Your MariaDB connection id is 8
Server version: 10.3.15-MariaDB MariaDB Server

Copyright (c) 2000, 2018, Oracle, MariaDB Corporation Ab and others.

Type 'help;' or '\h' for help. Type '\c' to clear the current input statement.

# MariaDBサービスからログアウト
MariaDB [(none)]> exit
Bye

# これでMariaDBのインストールは完了です!
6. MariaDBの初期セットアップ
# MariaDBサービスの初期セットアップを実施
# いくつかMariaDBから質問されるため、以下を参考に回答しましょう。
#
# 質問1:今のrootパスワードを入力(初回はパスワードが無いのでEnterでOK)
# Enter current password for root (enter for none): # Enter
# 質問2:rootパスワードを設定するか
# Set root password? [Y/n] # Enter
# 質問3:新しいrootパスワードを設定
# New password: # 新しいパスワードの入力
# 質問4:新しいパスワードの確認
# Re-enter new password: # 新しいパスワードを再入力
# 質問5:匿名ユーザ(誰でもログインできるユーザ)を削除するか
# Remove anonymous users? [Y/n] # Enter
# 質問6:rootのリモートログインを禁止するか
# Disallow root login remotely? [Y/n] # Enter
# 質問7:testデータベースを削除するか
# Remove test database and access to it? [Y/n]  # Enter
# 質問8:権限を管理するテーブルに対して設定をすぐに反映するか
# Reload privilege tables now? [Y/n] # Enter

> mysql_secure_installation
NOTE: RUNNING ALL PARTS OF THIS SCRIPT IS RECOMMENDED FOR ALL MariaDB
     SERVERS IN PRODUCTION USE!  PLEASE READ EACH STEP CAREFULLY!

In order to log into MariaDB to secure it, we'll need the current
password for the root user.  If you've just installed MariaDB, and
you haven't set the root password yet, the password will be blank,
so you should just press enter here.

Enter current password for root (enter for none): ##### 質問1 #####
OK, successfully used password, moving on...

Setting the root password ensures that nobody can log into the MariaDB
root user without the proper authorisation.

Set root password? [Y/n] ##### 質問2 #####
New password: ##### 質問3 #####
Re-enter new password: ##### 質問4 #####
Password updated successfully!
Reloading privilege tables..
... Success!


By default, a MariaDB installation has an anonymous user, allowing anyone
to log into MariaDB without having to have a user account created for
them.  This is intended only for testing, and to make the installation
go a bit smoother.  You should remove them before moving into a
production environment.

Remove anonymous users? [Y/n] ##### 質問5 #####
... Success!

Normally, root should only be allowed to connect from 'localhost'.  This
ensures that someone cannot guess at the root password from the network.

Disallow root login remotely? [Y/n] ##### 質問6 #####
... Success!

By default, MariaDB comes with a database named 'test' that anyone can
access.  This is also intended only for testing, and should be removed
before moving into a production environment.

Remove test database and access to it? [Y/n] ##### 質問7 #####
- Dropping test database...
... Success!
- Removing privileges on test database...
... Success!

Reloading the privilege tables will ensure that all changes made so far
will take effect immediately.

Reload privilege tables now? [Y/n] ##### 質問8 #####
... Success!

Cleaning up...

All done!  If you've completed all of the above steps, your MariaDB
installation should now be secure.

Thanks for using MariaDB!

# 設定したパスワードを用いてMariaDBサービスにログイン
> mysql -u root -p
Enter password: # 質問3, 4で設定したパスワードを入力
Welcome to the MariaDB monitor.  Commands end with ; or \g.
Your MariaDB connection id is 60912
Server version: 10.3.13-MariaDB MariaDB Server

Copyright (c) 2000, 2018, Oracle, MariaDB Corporation Ab and others.

Type 'help;' or '\h' for help. Type '\c' to clear the current input statement.

# testデータベースが削除されていることを確認
MariaDB [(none)]> show databases;
+--------------------+
| Database           |
+--------------------+
| information_schema |
| mysql              |
| performance_schema |
+--------------------+
3 rows in set (0.000 sec)

# anonymousユーザが削除されていることを確認
MariaDB [(none)]> select user,host,password from mysql.user;
+------+-----------+-------------------------------------------+
| user | host      | password                                  |
+------+-----------+-------------------------------------------+
| root | localhost | ***************************************** |
| root | 127.0.0.1 | ***************************************** |
| root | ::1       | ***************************************** |
+------+-----------+-------------------------------------------+
3 rows in set (0.000 sec)

MariaDB [(none)]> exit
Bye

# MariaDBサービスをfirewallサービスに追加
> firewall-cmd --add-service=mysql --permanent
success
> firewall-cmd --reload
success

# これでMariaDBの初期セットアップは完了です!
7. phpのインストール
# phpの最新をインストールするためにREMIリポジトリをインストール
> yum install http://rpms.famillecollet.com/enterprise/remi-release-7.rpm -y
> yum install epel-release -y
> yum install php73 php73-php php73-php-pear php73-php-mbstring php73-php-pdo php73-php-intl php73-php-gd php73-php-mysqlnd php73-php-pecl-zip -y

# php73に対してシンボリックリンクを作成
> ln -s /usr/bin/php73 /usr/bin/php

# phpのインストールの確認
> php -v
PHP 7.3.6 (cli) (built: May 28 2019 09:32:59) ( NTS )
Copyright (c) 1997-2018 The PHP Group
Zend Engine v3.3.6, Copyright (c) 1998-2018 Zend Technologies

# 同時にhttpdもインストールされるため確認
> httpd -v
Server version: Apache/2.4.6 (CentOS)
Server built:   Apr 24 2019 13:45:48

# サービスの自動起動設定
> systemctl start httpd
> systemctl enable httpd
> systemctl status httpd
● httpd.service - The Apache HTTP Server
  Loaded: loaded (/usr/lib/systemd/system/httpd.service; enabled; vendor preset: disabled)
  Active: active (running) since ~~

# http, httpdをfirewallサービスに追加
> firewall-cmd --add-service=http --permanent
success
> firewall-cmd --add-service=https --permanent
success
> firewall-cmd --reload
success

# これでphpのインストール(+ httpサービスの準備)は完了です!
8. Nextcloudパッケージのダウンロード
# パッケージをダウンロードするため、wgetをインストール
# なお、ローカルでダウンロードした後にSCPでVMにアップロードするでもOK
> yum install wget -y

# 解凍ソフトをインストール
> yum install unzip -y

# パッケージのダウンロード
> wget https://download.nextcloud.com/server/releases/nextcloud-16.0.1.zip

# パッケージの解凍
> unzip nextcloud-16.0.1.zip

# 解凍されたNextcloudパッケージをhttpdのルートフォルダへ移動
> mv nextcloud /var/www/html/

# 所有者およびグループをapacheに変更
> chown -R apache:apache /var/www/html/nextcloud
> ls -l /var/www/html/
drwxr-xr-x. 14 apache apache 4096  5月 15 23:44 nextcloud

# これでNextcloudパッケージのダウンロードは完了です!
9. Nextcloudの初期セットアップ(コマンド編)
# MariaDB上にNextcloud用のデータベースおよびユーザを作成
# まずはroot権限でログイン
> mysql -u root -p
Enter password:
Welcome to the MariaDB monitor.  Commands end with ; or \g.
Your MariaDB connection id is 18
Server version: 10.3.15-MariaDB MariaDB Server

Copyright (c) 2000, 2018, Oracle, MariaDB Corporation Ab and others.

Type 'help;' or '\h' for help. Type '\c' to clear the current input statement.

# Nextcloud用のデータベースを作成
# 以下では、データベース名:nextcloud
MariaDB [(none)]> create database nextcloud;
Query OK, 1 row affected (0.000 sec)

# データベースを確認
MariaDB [(none)]> show databases;
+--------------------+
| Database           |
+--------------------+
| information_schema |
| mysql              |
| nextcloud          | ←これが上記で作成したデータベース
| performance_schema |
+--------------------+
4 rows in set (0.000 sec)

# データベースに対して、ユーザを作成
# 以下では、ユーザ名:nextcloud パスワード:testtest
MariaDB [(none)]> grant all privileges on nextcloud.* to nextcloud@'localhost' identified by 'testtest';
Query OK, 0 rows affected (0.086 sec)
# 上記の構文は「grant all privileges on データベース名.* to ユーザー名@'localhost' identified by 'パスワード'」

# データベースへの変更を反映
MariaDB [(none)]> flush privileges;
Query OK, 0 rows affected (0.000 sec)

# 作成したユーザを確認
> MariaDB [(none)]> select user,host,password from mysql.user;
+-----------+-----------+-------------------------------------------+
| user      | host      | password                                  |
+-----------+-----------+-------------------------------------------+
| root      | localhost | ***************************************** |
| root      | 127.0.0.1 | ***************************************** |
| root      | ::1       | ***************************************** |
| nextcloud | localhost | ***************************************** |
+-----------+-----------+-------------------------------------------+
4 rows in set (0.000 sec)

MariaDB [(none)]> exit
Bye

# SELinuxを無効化
vi /etc/selinux/config
# This file controls the state of SELinux on the system.
# SELINUX= can take one of these three values:
#     enforcing - SELinux security policy is enforced.
#     permissive - SELinux prints warnings instead of enforcing.
#     disabled - No SELinux policy is loaded.
#SELINUX=enforcing ← この行をコメントアウトし、
SELINUX=disabled  ← この行を追加する。
# SELINUXTYPE= can take one of three values:
#     targeted - Targeted processes are protected,
#     minimum - Modification of targeted policy. Only selected processes are protected.
#     mls - Multi Level Security protection.
SELINUXTYPE=targeted

# ここまで来たら、一度VMを再起動しましょう。
> reboot

# これでNextcloudの初期セットアップ(コマンド編)は完了です!
10. Nextcloudの初期セットアップ(画面編)
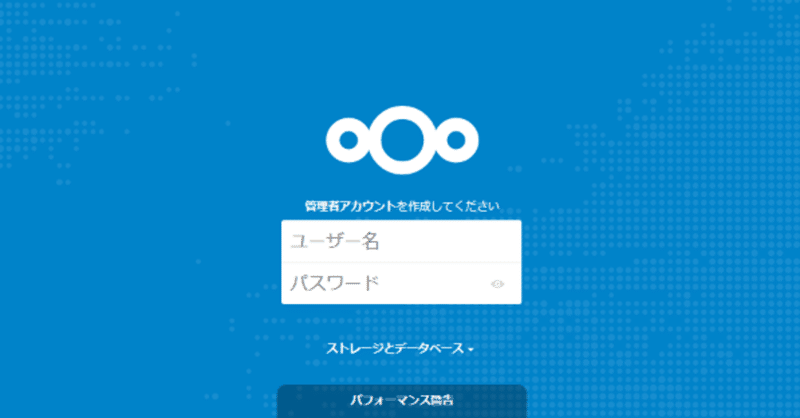
VMの再起動が完了したら、ホスト側のブラウザから、以下URLにアクセスします。
以下の画面が立ち上がれば、セットアップが正常に終了している証拠です。
※もし、上記の画面が出なかった場合は、5~9の手順を再度見直して、抜けている個所がないかを確認してください。
※もちろん、本記事のコメントで問い合わせ頂いても結構です。
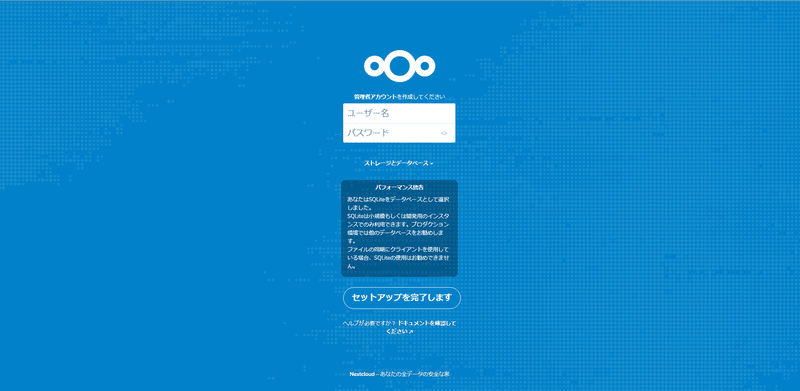
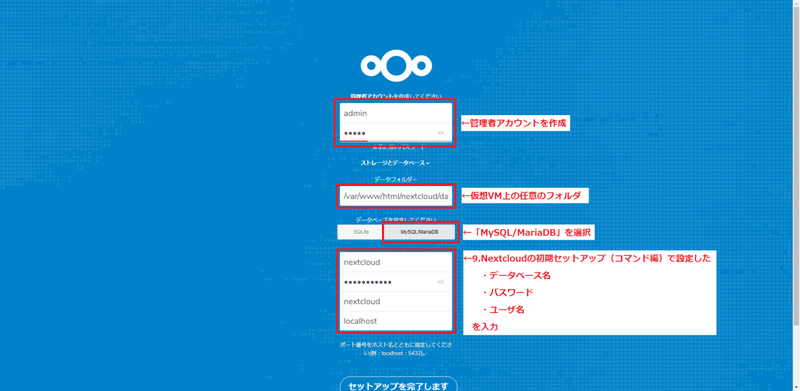
次に以下のように入力し、「セットアップを完了します」を押下します。
すると、しばらくセットアップに時間を要しますが、完了後は以下の画面に遷移します。
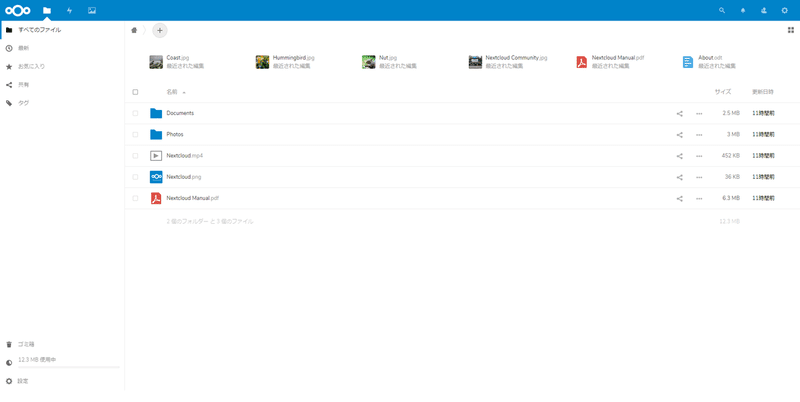
これで、Nextcloudの導入は完了です。ご覧いただくと判ると思いますが、GoogleドライブやDropboxに近しいデザインであるため、操作で苦労することは少ないかと思います。
次回は、NextCloudの利用方法と、私が活用している便利なプラグイン等をご紹介できればと思います。
拙い文章でしたが、最後まで読んでいただき、ありがとうございました。次からは、もう少々簡潔にできるよう精進します。
コメントやスキ頂きましたら幸いです。
参考文献
・windows10にvirtualBoxにてCentOS7.0をインストール[@sei_0419様]
この記事が気に入ったらサポートをしてみませんか?