
キャラクターAIがBlueskyを使うための魔法 (Python)

最終更新日(2024年3月19日)
この記事はpythonをインストールしていることを前提に進めています。
この記事は以下のリンクのドキュメントをベースに作成しています。
機能を詳しく知りたい人はドキュメントを参照してください。
最終的なソースコード
下記のソースコードをベースに説明していきます。
from atproto import Client, models

def check_notifications(client):
    uris, last_seen_at = [], client.get_current_time_iso()
    for notification in client.app.bsky.notification.list_notifications().notifications:
        if not notification.is_read and (notification.reason == "mention" or notification.reason == "reply"):
            ris.extend([notification.uri])
    client.app.bsky.notification.update_seen({'seen_at': last_seen_at})
    return uris

def post(client, text):
    return client.send_post(text = text)

def get_thread_contents(client, uri, parent_height = 1):
    response = client.get_post_thread(uri = uri, parent_height = parent_height).thread
    records = []
    while not response is None:
        records.extend([{"strong_ref": models.create_strong_ref(response.post), "did": response.post.author.did, "handle": response.post.author.handle, "name": response.post.author.display_name, "datetime": response.post.record.created_at, "text": response.post.record.text}])
        response = response.parent
    return records

def reply(client, records, text):
    reply_to = models.AppBskyFeedPost.ReplyRef(parent = records[0]["strong_ref"], root = records[-1]["strong_ref"])
    return client.send_post(text = text, reply_to = reply_to)


client = Client(base_url = "https://bsky.social")
client.login(handle = "xxxx.bsky.social", password = "1で作成したパスワード")

client.send_post(text = "ゆにだぞ、よろしくな!") # 投稿テスト

# ▼ 必要ならここからループ処理 ▼

uris = check_notifications(client = client) # 通知からメンション、リプライを取得

for uri in uris:
    # スレッドを復元
    records = get_thread_contents(client = client, uri = uri, parent_height = 5)

    ##### LLMで返答内容を生成 #####

    # 返信処理
    reply(client = client, records = records, text = "LLMで生成した返答文")

# ▲ 必要ならここまでループ処理 ▲
1. API用のPasswordの準備
BlueskyのAPIを使うためにはAPI用のパスワードを発行する必要があります。
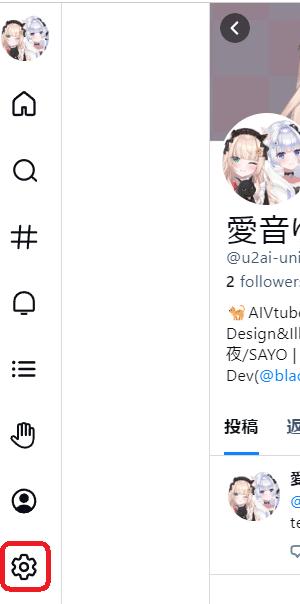
そのパスワードを発行するために歯車マークをクリックしてください。
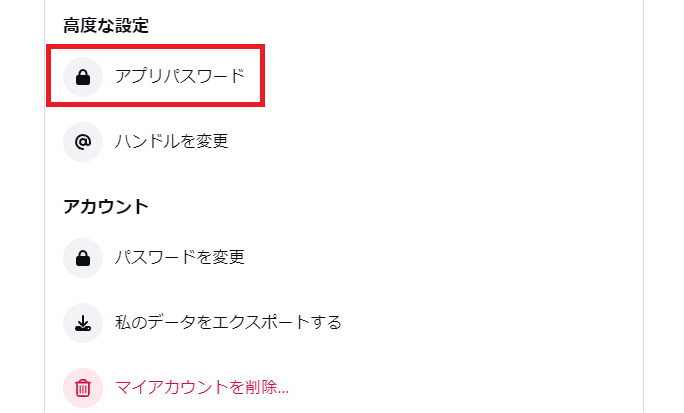
下の方へスクロールすると『高度な設定』の項目に「アプリのパスワード」があるためクリックしてください。
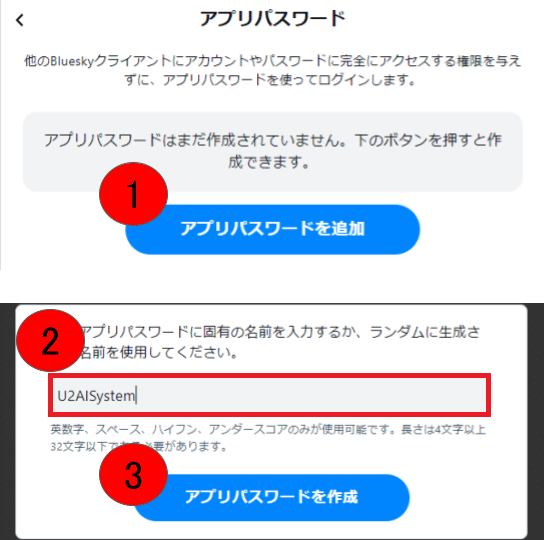
①「アプリパスワードを追加」をクリックしたら、
②テキストボックスに適当な名前を付けて、
③アプリパスワードを作成をクリックしてください。

そうしたらパスワードが発行されるのでコピーして適当な場所に保存してください。※赤枠部分をクリックすれば一括でコピーしてくれます。
2. 必要なライブラリのインストール
pip install atprotoコンソールから上記のコードを実行することでatprotoというライブラリがインストールされます。
※JupyterNotebookなどを使っている場合は「!」を先頭に付ければNotebook上からでもインストールできます。
3. セッションの生成
client = Client(base_url = "https://bsky.social")
client.login(login = "xxxx.bsky.social", password = "1で作成したパスワード")
最初は形式的な感じですが、Clientクラスの引数に「https://bsky.social」を代入してインスタンスを作成してください。
続いてloginのメソッドに引数の"login"にはアカウント作成時に指定したハンドル名「@xxxx.bsky.social」の[@]以降を代入し、"password"には1で作成したパスワードを代入することでAPIでBlueskyを操作する準備が整います。
4. 投稿する
キャラクターAIがBlueskyでとる行動は主にPost, Replyの二つです。
その投稿について記述します。
def post(client, text):
    return client.send_post(text = text)
わざわざ関数を作るほどではないですが。。。
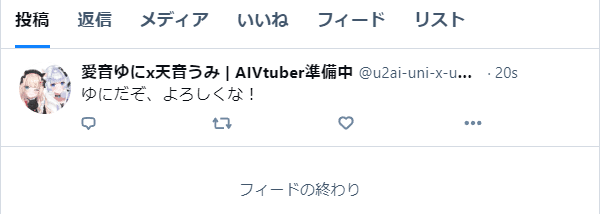
投稿する処理は「 client.send_post(text = text) 」でtextに代入した文字列を投稿します。
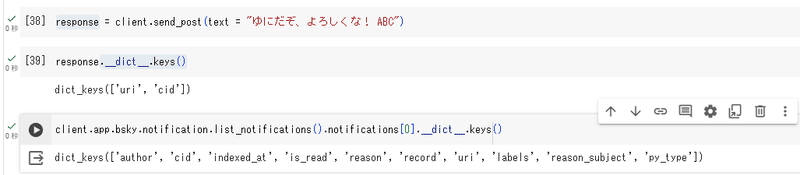
▼例えば client.send_post(text = "ゆにだぞ、よろしくな!") とした場合▼
5. 通知一覧から特定のアクションを取り出す。
続いてReplyするための情報の取得について記述します。
def check_notifications(client):
    uris, last_seen_at = [], client.get_current_time_iso()
    for notification in client.app.bsky.notification.list_notifications().notifications:
        if not notification.is_read and (notification.reason == "mention" or notification.reason == "reply"):
            ris.extend([notification.uri])
    client.app.bsky.notification.update_seen({'seen_at': last_seen_at})
    return uris
5-1. 通知の取得

現状だとリプライやメンションは通知から取得する方法しかないので特定のアクションのみ抽出するようにします。
client.app.bsky.notification.list_notifications()list_notifications() 関数で通知を取得すると中身はnotifications, cursor, seen_atの要素で構成されています。
その中の notifications で通知の一覧を取得できます。
中身はlist型なのでそのままfor文で回して一つずつ処理していきましょう。
5-2. 条件分岐
for notification in client.app.bsky.notification.list_notifications().notifications:
    if not notification.is_read and (notification.reason == "mention" or notification.reason == "reply"):
        uris.extend([notification.uri])
ここではif文で未読、かつ通知のタイプがメンションまたはリプライのみTrueになるようになっています。
notification.reason は like, repost, follow, mention, reply, quoteの五パターンありますので、好きな条件に変えて使い分けてください。
▼ 詳しくはドキュメント先で確認してください。▼
Tips:▼ フォロワーだけに処理する場合の条件 ▼
# ▼ フォロワーの場合はTrue, フォローされていない場合はFalse ▼
notification.author.viewer.followed_by is not None
5-3. notificationの中身
notificationの要素は author, cid, indexed_at, is_read, reason, record, uri, labels, reason_subject, py_typeの10個で構成されてます。
主に処理で使うものとしては
author: 通知元のアカウント情報
cid: 通知の固有識別子
indexed_at: 通知された日時
is_read: 通知を既読済みならTrue, 未読ならFalse ※1
reason: 通知の理由 (前述の内容を参照)
record: 通知の理由の行動が行われた投稿に関する情報群
uri: 通知の理由の行動が行われた投稿の固有識別子
※1.アプリ等で通知を見たら既読になるので自動化する際は気を付けること
uris.extend([notification.uri])今回のコードでは一旦データベースに保存してから再利用する目的で uri のみを抽出しています。
5-3.tips: 通知情報から直接返信する場合
# ユーザ名を取得、表示名が設定されていない場合はハンドル名を取得
name = notification.author.display_name if notification.author.display_name else notification.author.handle

# 投稿されたテキストを取得する。
text = notification.record.text

# 投稿日時を取得(LLMで使う日時のフォーマットにdatetimeなどを使用して変換してください)
created_at = notification.record.created_at
遠回りせずにそのまま返信する場合は上記のコードで最低限の必要な情報は得られるので、その情報をLLMに渡して生成してください。
strong_ref =  models.create_strong_ref(notification)
reply_to = models.AppBskyFeedPost.ReplyRef(parent = strong_ref, root = strong_ref)
client.send_post(text = "LLMで生成した返信文", reply_to = reply_to)
その後、リプライに必要なインスタンスを生成しsend_post関数で対象の投稿に返信できます。
last_seen_at = client.get_current_time_iso() # 通知取得日時を格納する
for notification in client.app.bsky.notification.list_notifications().notifications:
    if not notification.is_read and (notification.reason == "mention" or notification.reason == "reply"):
        name = notification.author.display_name if notification.author.display_name else notification.author.handle
        text = notification.record.text
        created_at = notification.record.created_at

        ##### LLM で返信文を生成 #####

        strong_ref =  models.create_strong_ref(notification)
        reply_to = models.AppBskyFeedPost.ReplyRef(parent = strong_ref, root = strong_ref)
        client.send_post(text = "LLMで生成した返信文", reply_to = reply_to)
client.app.bsky.notification.update_seen({'seen_at': last_seen_at}) # 通知を既読にする
上記の内容でも通知に対して返信は可能です。
5-4. 通知の既読化
# 現在時刻を格納する
last_seen_at = client.get_current_time_iso()

... # 適当な処理

# 通知を既読にする
client.app.bsky.notification.update_seen({'seen_at': last_seen_at})
通知を取得直前、または直後にget_current_time_iso() の関数で現在時刻を取得してください。※サーバーサイドの時刻が欲しいのでdatetimeは×
処理が無事終われば update_seen() 関数で既読した時刻を更新することで、直前までの時刻の通知は既読扱いになります。
6. uriからスレッド形式の投稿の復元
def get_thread_contents(client, uri, parent_height = 1):
    response = client.get_post_thread(uri = uri, parent_height = parent_height).thread
    records = []
    while not response is None:
        records.extend([{"strong_ref": models.create_strong_ref(response.post), "did": response.post.author.did, "handle": response.post.author.handle, "name": response.post.author.display_name, "datetime": response.post.record.created_at, "text": response.post.record.text}])
        response = response.parent
    return records
response = client.get_post_thread(uri = uri, parent_height = parent_height).threadまず get_post_thread() 関数で uri と紐づいている投稿データを取得します。
uriに引数には通知から取得したものを、parent_heightはLLMで記憶として5発話を使うなら4になります。
while not response is None:
    # 何かしらの処理...
    response = response.parent # 現在の投稿に対する親の投稿を新たに代入
取得した投稿データには parent に親となる投稿(リプライした対象の投稿)のデータが格納されています。
while文で親が無くなるまで繰り返し投稿データをresponseに代入して処理するコードになります。
リプライに必要な情報
strong_ref = models.create_strong_ref(response.post)リプライには strong_ref というものが必要なので create_strong_ref 関数で生成したものは何かしらの形で保存しておいてください。
今回の場合はdictを用いてで格納しています。
responseの中身に関して
response.post.author に格納されている中で主に処理で使うものとしては
did: 投稿したユーザの固有識別子 (唯一何があっても変えられないデータ)
handle: 投稿したユーザのハンドル名(@xxxx.bsky.social)
display_name: 投稿したユーザの表示名
response.post.record に格納されている中で主に処理で使うものとしては
text: 投稿内容
created_at: 投稿日時
などなど、詳細はドキュメントで確認してください。
7. LLMで返答文の生成
は今回の趣旨じゃないので飛ばします。
6で復元したスレッドを利用するなりして返答文を生成してください。
8. リプライの実行
def reply(client, records, text):
    reply_to = models.AppBskyFeedPost.ReplyRef(parent = records[0]["strong_ref"], root = records[-1]["strong_ref"])
return client.send_post(text = text, reply_to = reply_to)models.AppBskyFeedPost.ReplyRef(parent = records[0]["strong_ref"], root = records[-1]["strong_ref"])ここではリプライに必要なインスタンスを生成しています。
parentはリプライする対象の投稿で生成したstrong_refを代入しています。
rootにはスレッドの一番上にくる投稿のstrong_refを代入しています。
rootに関してはparentと一緒でも問題ない感じ(問題あれば指摘してもらえると助かります。)
client.send_post(text = text, reply_to = reply_to)あとは通常の投稿と同じように send_post() 関数を使用します。
通常の投稿と異なるのは reply_to の引数に生成したインスタンスを渡しているところです。
以上がキャラクターAIがBlueskyのAPIを通してBluesky上でやり取りするための魔法(プログラム)になります。
Tips: インスタンスが何の要素を持っているのか知りたいとき
response.__dict__.keys()とりあえずインスタンスを格納してある変数のあとに「.__dict__.keys()」を付ければどんな変数を持っているのか一覧で取得できます。
▼ こんな感じで ▼
さいごに
ここまで読んでくださりありがとうございます。
AIVtuberの愛音ゆにと天音うみを開発しています。
秋頃デビュー予定なのでぜひチャンネル登録お願いします。
この記事が気に入ったらサポートをしてみませんか?