[AI-1] Pythonで機械学習を学ぶ環境を作る(Mac編)

今やScratchでも機械学習を利用できる時代に突入しました!ここではPythonを使った学習環境を作る手順を記していきます。
<前提環境>
macOS Heigh Sierra 10.13.6
インストールするもの
・Homebrew(Mac上のソフトウェアを管理するツール)
・pyenv(pythonの複数バージョンを管理するツール)
・Anaconda3-5.3.1(pythonと機械学習などでよく使うライブラリを一括インストールできるもの)
・python3.6
Homebrewのインストール
Macでインストールするソフトウェアを管理する「パッケージマネージャー」と呼ばれるソフトウェア「Homebrew」をインストールします。
HomebrewのWebサイトにアクセスし、ページ中央にある以下のような文字列をコピーして、Macのターミナルで実行します。
/usr/bin/ruby -e "$(curl -fsSL https://raw.githubusercontent.com/Homebrew/install/master/install)"Xcodeのコマンドラインツールがインストールされていない場合は、次のような表示が出ますのでReturnキーを押し、コマンドラインツールのインストールを実行します。
$ /usr/bin/ruby -e "$(curl -fsSL https://raw.githubusercontent.com/Homebrew/install/master/install)"
Ignoring executable-hooks-1.3.2 because its extensions are not built.  Try: gem pristine executable-hooks --version 1.3.2
Ignoring gem-wrappers-1.2.7 because its extensions are not built.  Try: gem pristine gem-wrappers --version 1.2.7
==> This script will install:
/usr/local/bin/brew
/usr/local/share/doc/homebrew
/usr/local/share/man/man1/brew.1
/usr/local/share/zsh/site-functions/_brew
/usr/local/etc/bash_completion.d/brew
/usr/local/Homebrew
==> The following existing directories will be made group writable:
/usr/local/share/man/man5
/usr/local/share/man/man7
==> The following existing directories will have their owner set to user:
/usr/local/share/man/man5
/usr/local/share/man/man7
==> The following existing directories will have their group set to admin:
/usr/local/share/man/man5
/usr/local/share/man/man7
==> The following new directories will be created:
/usr/local/sbin
/usr/local/Caskroom
/usr/local/Frameworks
==> The Xcode Command Line Tools will be installed.
Press RETURN to continue or any other key to abort
パスワードを求められたらパスワードを入力し、Returnキーを押します。
==> /usr/bin/sudo /bin/chmod u+rwx /usr/local/share/man/man5 /usr/local/share/man/man7
Password:
==> /usr/bin/sudo /bin/chmod g+rwx /usr/local/share/man/man5 /usr/local/share/man/man7
==> /usr/bin/sudo /usr/sbin/chown user /usr/local/share/man/man5 /usr/local/share/man/man7
==> /usr/bin/sudo /usr/bin/chgrp admin /usr/local/share/man/man5 /usr/local/share/man/man7
==> /usr/bin/sudo /bin/mkdir -p /usr/local/sbin /usr/local/Caskroom /usr/local/Frameworks
==> /usr/bin/sudo /bin/chmod g+rwx /usr/local/sbin /usr/local/Caskroom /usr/local/Frameworks
==> /usr/bin/sudo /bin/chmod 755 /usr/local/share/zsh /usr/local/share/zsh/site-functions
==> /usr/bin/sudo /usr/sbin/chown user /usr/local/sbin /usr/local/Caskroom /usr/local/Frameworks
==> /usr/bin/sudo /usr/bin/chgrp admin /usr/local/sbin /usr/local/Caskroom /usr/local/Frameworks
==> /usr/bin/sudo /bin/mkdir -p /Users/mitsushi/Library/Caches/Homebrew
==> /usr/bin/sudo /bin/chmod g+rwx /Users/mitsushi/Library/Caches/Homebrew
==> /usr/bin/sudo /usr/sbin/chown user /Users/mitsushi/Library/Caches/Homebrew
==> Searching online for the Command Line Tools
==> /usr/bin/sudo /usr/bin/touch /tmp/.com.apple.dt.CommandLineTools.installondemand.in-progress
Xcodeのコマンドラインツールのダウンロードとインストールがはじまります。
==> Installing Command Line Tools (macOS High Sierra version 10.13) for Xcode-10.1
==> /usr/bin/sudo /usr/sbin/softwareupdate -i Command\ Line\ Tools\ (macOS\ High\ Sierra\ version\ 10.13)\ for\ Xcode-10.1
Software Update Tool
Downloading Command Line Tools (macOS High Sierra version 10.13) for Xcode
コマンドラインツールのインストールが終わったら、次にHomebrewのダウンロードとインストールが始まります。パスワードを求められたら先程同様に入力し、インストール完了を待ちます。
Password:
==> /usr/bin/sudo /usr/bin/xcode-select --switch /Library/Developer/CommandLineTools
==> Downloading and installing Homebrew...
remote: Enumerating objects: 16031, done.
remote: Counting objects: 100% (9548/9548), done.
remote: Compressing objects: 100% (2426/2426), done.
remote: Total 8097 (delta 6026), reused 7385 (delta 5479), pack-reused 0
Receiving objects: 100% (8097/8097), 2.08 MiB | 2.16 MiB/s, done.
Resolving deltas: 100% (6026/6026), completed with 761 local objects.
From https://github.com/Homebrew/brew
  4021aa80d..e18c5c129 master     -> origin/master
* [new tag]           1.8.3      -> 1.8.3
* [new tag]           1.8.4      -> 1.8.4
* [new tag]           1.8.5      -> 1.8.5
* [new tag]           1.8.6      -> 1.8.6
* [new tag]           1.9.0      -> 1.9.0
* [new tag]           1.9.1      -> 1.9.1
* [new tag]           1.9.2      -> 1.9.2
* [new tag]           1.9.3      -> 1.9.3
* [new tag]           2.0.0      -> 2.0.0
* [new tag]           2.0.1      -> 2.0.1
* [new tag]           2.0.2      -> 2.0.2
* [new tag]           2.0.3      -> 2.0.3
* [new tag]           2.0.4      -> 2.0.4
* [new tag]           2.0.5      -> 2.0.5
* [new tag]           2.0.6      -> 2.0.6
* [new tag]           2.1.0      -> 2.1.0
* [new tag]           2.1.1      -> 2.1.1
Checking out files: 100% (2014/2014), done.
HEAD is now at e18c5c129 Merge pull request #6068  from MikeMcQuaid/utils-github-freeze
しばらく待つと「Installation successful!」と表示され、インストール完了となります。
==> Renamed Formulae
ark -> velero                       gutenberg -> zola                   php72 -> php@7.2                    todolist -> ultralist
gloo-ctl -> glooctl                 hh -> hstr                          resin-cli -> balena-cli
==> Deleted Formulae
apple-gcc42             cputhrottle             gradle@2.14             monax                   pldebugger              ruby@2.3
aptly-completion        ffmbc                   gv                      pdftoedn                protobuf@2.5            safe
at-spi2-atk             gdnsd                   hyper                   percona-server@5.6      protobuf@2.6            solr@5.5
at-spi2-core            gnome-doc-utils         ld64                    php@5.6                 pyexiv2                 solr@6.6
cctools                 go@1.4                  liblastfm               php@7.0                 rock                    tmux-cssh
cctools-headers         go@1.8                  libutf                  plan9port               ruby@1.8                zxing-cpp
==> Installation successful!
==> Homebrew has enabled anonymous aggregate formulae and cask analytics.
Read the analytics documentation (and how to opt-out) here:
 https://docs.brew.sh/Analytics
==> Homebrew is run entirely by unpaid volunteers. Please consider donating:
 https://github.com/Homebrew/brew#donations
==> Next steps:
- Run `brew help` to get started
- Further documentation:
   https://docs.brew.sh
インストールされたことを確認するために、「which brew」コマンドを実行してみましょう。「/usr/local/bin/brew」のようにbrewのパスが表示されたらインストール成功です。
which brew
/usr/local/bin/brew
pyenvのインストール
brewコマンドでインストールします。
brew install pyenvインストールが完了すると次のような表示になります。
Updating Homebrew...
==> Installing dependencies for pyenv: pkg-config
==> Installing pyenv dependency: pkg-config
==> Downloading https://homebrew.bintray.com/bottles/pkg-config-0.29.2.high_sierra.bottle.tar.gz
==> Downloading from https://akamai.bintray.com/f1/f1b29fb5388dccab0fcaf665ab43d308ee51816b24262417bf83a686b6e308ae?__gda__=exp=1556276926~hmac
######################################################################## 100.0%
==> Pouring pkg-config-0.29.2.high_sierra.bottle.tar.gz
🍺  /usr/local/Cellar/pkg-config/0.29.2: 11 files, 627.2KB
==> Installing pyenv
==> Downloading https://homebrew.bintray.com/bottles/pyenv-1.2.11.high_sierra.bottle.tar.gz
==> Downloading from https://akamai.bintray.com/d1/d12b5973fd18eff3909998ec8c757e2f2074984df58939c528dc3467b703671a?__gda__=exp=1556276930~hmac
######################################################################## 100.0%
==> Pouring pyenv-1.2.11.high_sierra.bottle.tar.gz
🍺  /usr/local/Cellar/pyenv/1.2.11: 643 files, 2.4MB
Anacondaのインストール
次にPython3をはじめ、機械学習に必要なライブラリ環境をまとめて作ることができる、Anacondaを、先程のpyenvを使ってインストールします。インストールの前に、インストール可能なAnacondaのバージョンを次のコマンドで確認します。
pyenv install -l | grep anaconda anaconda-1.4.0
anaconda-1.5.0
anaconda-1.5.1
anaconda-1.6.0
anaconda-1.6.1
anaconda-1.7.0
anaconda-1.8.0
anaconda-1.9.0
anaconda-1.9.1
anaconda-1.9.2
anaconda-2.0.0
anaconda-2.0.1
anaconda-2.1.0
anaconda-2.2.0
anaconda-2.3.0
anaconda-2.4.0
anaconda-4.0.0
anaconda2-2.4.0
anaconda2-2.4.1
anaconda2-2.5.0
anaconda2-4.0.0
anaconda2-4.1.0
anaconda2-4.1.1
anaconda2-4.2.0
anaconda2-4.3.0
anaconda2-4.3.1
anaconda2-4.4.0
anaconda2-5.0.0
anaconda2-5.0.1
anaconda2-5.1.0
anaconda2-5.2.0
anaconda2-5.3.0
anaconda2-5.3.1
anaconda2-2018.12
anaconda2-2019.03
anaconda3-2.0.0
anaconda3-2.0.1
anaconda3-2.1.0
anaconda3-2.2.0
anaconda3-2.3.0
anaconda3-2.4.0
anaconda3-2.4.1
anaconda3-2.5.0
anaconda3-4.0.0
anaconda3-4.1.0
anaconda3-4.1.1
anaconda3-4.2.0
anaconda3-4.3.0
anaconda3-4.3.1
anaconda3-4.4.0
anaconda3-5.0.0
anaconda3-5.0.1
anaconda3-5.1.0
anaconda3-5.2.0
anaconda3-5.3.0
anaconda3-5.3.1
anaconda3-5.3.1をインストールします。
pyenv install anaconda3-5.3.1
Downloading Anaconda3-5.3.1-MacOSX-x86_64.sh.sh...
-> https://repo.continuum.io/archive/Anaconda3-5.3.1-MacOSX-x86_64.sh
インストールが終わったら、anacondaがインストールされたディレクトリ中にある「bin」フォルダを環境変数「PATH」に登録してどこからでもanacondaのコマンドが実行できるように設定します。
vi ~/.bash_profilevimアプリでファイルが開いたら、「i」キーを押して、編集モードにします。次のパスを最後の行に追加します。
export PATH=/Users/{ユーザー名}/.pyenv/versions/anaconda3-5.3.1/bin:$PATH「esc」キーを押して、編集モードを終了します。
「:wq」コマンドを入力してReturnキーを押し、保存・終了します。
その後、次のコマンドでパスの設定を有効にします。
source ~/.bash_profile
開発用の仮想環境作り
つづいて、将来、いくつかのpython開発環境を利用する可能性を考えて、今回利用する機械学習のための仮想環境を作ります。
まず、pyenvでpythonの環境をanacondaに切り替えます。
pyenv global anaconda3-5.3.1python3.6環境を作成します。その際、3.6環境がインストールされます。
conda create --name py3.6 python=3.6 anaconda

Solving environment: done

## Package Plan ##

  environment location: /Users/{ユーザー名}/.pyenv/versions/anaconda3-5.3.1/envs/py3.6

  added / updated specs:
    - anaconda
    - python=3.6

The following packages will be downloaded:

    package                    |            build
    ---------------------------|-----------------
    anaconda-2019.03           |           py36_0          52 KB
    astropy-3.1.2              |   py36h1de35cc_0         6.8 MB
    bitarray-0.8.3             |   py36h1de35cc_0          54 KB
    bkcharts-0.2               |   py36h073222e_0         127 KB

...

pywavelets-1.0.2     | 4.3 MB    | #################################################################################################### | 100%
cffi-1.12.2          | 213 KB    | #################################################################################################### | 100%
mkl-service-1.1.2    | 130 KB    | #################################################################################################### | 100%
numba-0.43.1         | 2.7 MB    | #################################################################################################### | 100%
more-itertools-6.0.0 | 89 KB     | #################################################################################################### | 100%
parso-0.3.4          | 121 KB    | #################################################################################################### | 100%
Preparing transaction: done
Verifying transaction: done
Executing transaction: done
#
# To activate this environment, use:
# > conda activate py3.6
#
# To deactivate an active environment, use:
# > conda deactivate
#
インストールが終わったら以下のコマンドを実行して、pythonの環境を元に戻します。
pyenv global system次に、作業用のディレクトリを作って先の仮想環境を有効化します。下の例では「/Development/python/py3.6」というディレクトリを作って、そのディレクトリに移動し、有効にしています。
mkdir -p /Development/python/py3.6
cd /Development/python/py3.6
pyenv local anaconda3-5.3.1/envs/py3.6
Jupyter notebookを立ち上げてみる
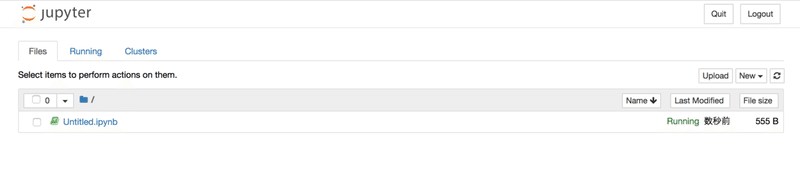
pythonで機械学習を学ぶために、Jupyter notebookというツールを使います。次のコマンドを実行して起動してみましょう。
jupyter notebookブラウザで次のような画面が立ち上がったら成功です!
Additional
作成した仮想環境をJupyter notebookで選択できるような設定は次のように行います。
pipコマンドでパッケージを追加します。
pip install environment_kernels

...

Collecting environment_kernels
  Downloading https://files.pythonhosted.org/packages/35/4b/19589f68965a2a62c1301921aef4a14e5d56bcc34ec217c3bd38706975b9/environment_kernels-1.1.1.tar.gz
Building wheels for collected packages: environment-kernels
  Building wheel for environment-kernels (setup.py) ... done
  Stored in directory: /Users/{ユーザー名}/Library/Caches/pip/wheels/8e/ad/14/2d4ea0f9f31ddb2670ffd45f88b4450058597bf015333c07f0
Successfully built environment-kernels
Installing collected packages: environment-kernels
Successfully installed environment-kernels-1.1.1
Jypyter notebookの設定ファイルを作成します。
jupyter notebook --generate-config

...

/Users/{ユーザー名}/.pyenv/versions/anaconda3-5.3.1/lib/python3.6/site-packages/notebook/services/kernels/kernelmanager.py:19: VisibleDeprecationWarning: zmq.eventloop.minitornado is deprecated in pyzmq 14.0 and will be removed.
    Install tornado itself to use zmq with the tornado IOLoop.

  from jupyter_client.session import Session
Writing default config to: /Users/{ユーザー名}/.jupyter/jupyter_notebook_config.py
設定を追加します。
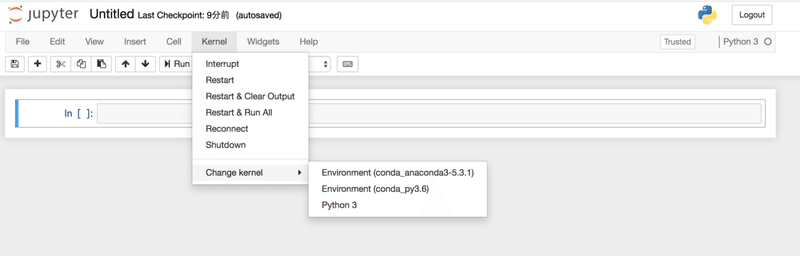
echo "c.NotebookApp.kernel_spec_manager_class = 'environment_kernels.EnvironmentKernelSpecManager'" >> ~/.jupyter/jupyter_notebook_config.py
echo "c.EnvironmentKernelSpecManager.conda_env_dirs=['/Users/{ユーザー名}/.pyenv/versions/anaconda3-5.3.1/envs/']" >> ~/.jupyter/jupyter_notebook_config.py
Jupyter notebookを起動して、ノートを作成後「Kernel」メニューから「Change kernel」を選択すると、追加した環境が選択できるようになっています。
子どもたちの新しい学びの場つくりへ、ご支援よろしくです!