楽しいよ! Processing でイメージプロセッシング

Adobe Photoshop や Gimp で、画像を油絵風にするフィルターとかありますよね?
「画像処理」「写真加工」「イメージプロセッシング」、呼び名はいろいろありますが、ああいうことを Processing を使ってやってみましょう。
この記事は全文無料でお読みいただけます。もしお気に召しましたら投げ銭お願いしますね。😉✨
![]()
画像の読み込みと情報の取得
まずは、画像を読みこんで書き出す一連の処理を行うコードを見ちゃいましょう。
話はそれから。
// Processing で画像処理
// @author @deconbatch
// @version 01 画像を読み込んでキャンバスサイズに合わせてリサイズ
// Processing 3.2.1
// 2018.09.09

void setup() {
  size(480, 480);
  colorMode(HSB, 360, 100, 100, 100);
  noStroke();
  smooth();
  noLoop();
}

void draw() {
  background(0.0, 0.0, 90.0, 100.0);

  // 読み込み画像を指定
  PImage img = loadImage("../Photo/01.jpg");

  // キャンバスに合わせてリサイズ
  float rateSize = min(width, height) * 1.0 / max(img.width, img.height);
  int   canvasW  = floor(img.width * rateSize);
  int   canvasH  = floor(img.height * rateSize);
  img.resize(canvasW, canvasH);

  // 画像データを img に保持
  img.loadPixels();

  // キャンバスの中心に来るように調整
  translate((width - canvasW) / 2, (height - canvasH) / 2);

  // 画像データを 1ピクセル毎読みながら描画
  for (int x = 0; x < canvasW; x++) {
    for (int y = 0; y < canvasH; y++) {
      color pix = img.pixels[y * canvasW + x];
      fill(
           hue(pix),
           saturation(pix),
           brightness(pix),
           100.0
           );
      rect(x, y , 1.0, 1.0);
    }
  }

  saveFrame("frames/####.png");
  exit();

}

/*
Copyright (C) 2018- deconbatch

This program is free software: you can redistribute it and/or modify
it under the terms of the GNU General Public License as published by
the Free Software Foundation; either version 3 of the License, or
(at your option) any later version.

This program is distributed in the hope that it will be useful,
but WITHOUT ANY WARRANTY; without even the implied warranty of
MERCHANTABILITY or FITNESS FOR A PARTICULAR PURPOSE.  See the
GNU General Public License for more details.

You should have received a copy of the GNU General Public License
along with this program.  If not, see <http://www.gnu.org/licenses/>
*/
画像の読み込みはこの部分です。
  // 読み込み画像を指定
  PImage img = loadImage("../Photo/01.jpg");
例では相対パスで書いていますが、絶対パスでも、URL 指定でも OK です。
ソースのあるパスに data というディレクトリを作ってそこにある画像ファイルを使うならファイル名だけで OK。
  // ./data/photo.jpg を読み込む場合
  PImage img = loadImage("photo.jpg");
もちろん、args[] で外部からファイル名をパラメータとして与えることもできます。
次に、Processing のキャンバスサイズに合わせて読み込んだ画像をリサイズしています。
  // キャンバスに合わせてリサイズ
  float rateSize = min(width, height) * 1.0 / max(img.width, img.height);
  int   canvasW  = floor(img.width * rateSize);
  int   canvasH  = floor(img.height * rateSize);
  img.resize(canvasW, canvasH);
Processing では最初に描画キャンバスのサイズを指定しますよね。
void setup() {
  size(480, 480);
読み込む画像はこのサイズより大きいかもしれないし、小さいかもしれません。縦長かもしれないし、横長かもしれない。
どんな画像でも処理できるように、描画キャンバスにフィットするようにリサイズするわけです。
読み込んだ画像の処理の仕方はいろいろありますが、今回は画像のピクセルを一個ずつ処理する方式をとります。
そのために、
  // 画像データを img に保持
  img.loadPixels();
をすることによって、画像の全ピクセルの情報を img.pixels[] という一次元配列で取り出すことができるようになります。
ピクセルごとの色相、彩度、明度はそれぞれ
 hue(img.pixels[n]);
 saturation(img.pixels[n]);
 brightness(img.pixels[n]);
で取り出すことができます。
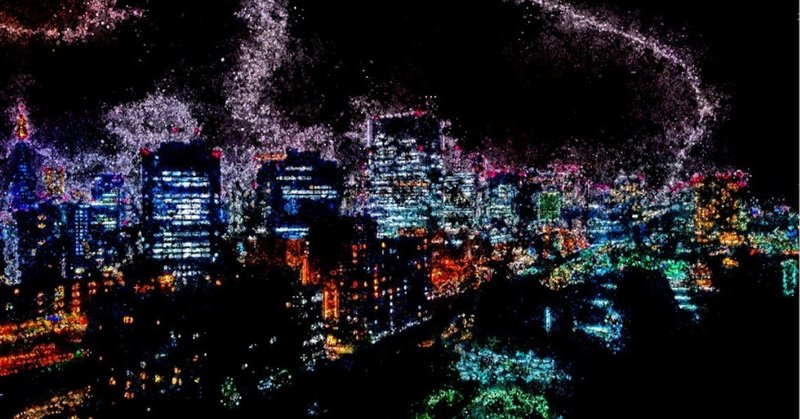
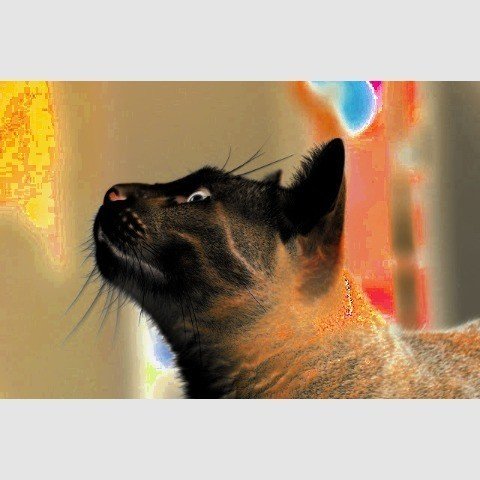
今回はこの一次元配列を順に読みながら、加工なしでそのまま点描しています。
結果として画像のリサイズだけがされることになります。
![]()
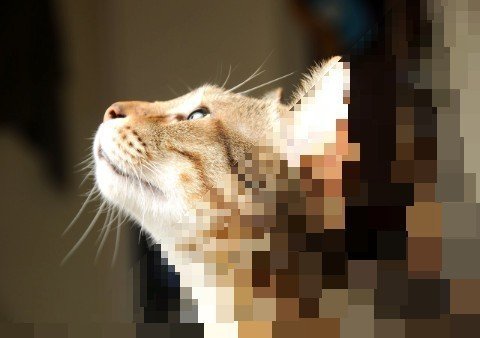
変化をつけてみよう
画像のリサイズだけって面白くないですよね?
今までの説明は基礎部分だけなのでこれだけじゃつまんないと思いますが、ここにいろいろ付け加えていくと楽しくなってくるんですよ。
元画像はこれを例にして、先のコード中の fill() を変えるだけでも…
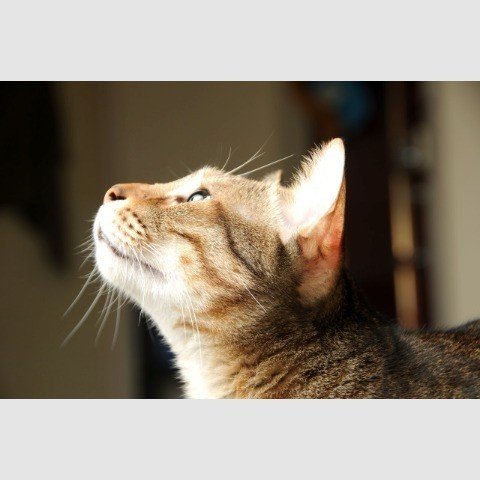
https://www.pexels.com/photo/adorable-animal-cat-cat-face-372651/
彩度をゼロにして白黒に
      fill(
           hue(pix),
           0.0,
           brightness(pix),
           100.0
           );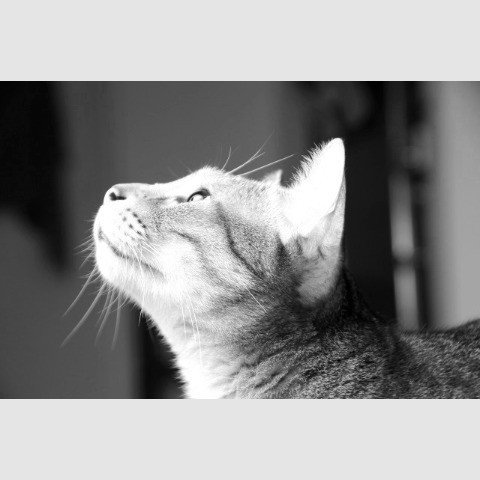
色相を反転させるなら
      fill(
           (hue(pix) + 180.0) % 360.0,
           saturation(pix),
           brightness(pix),
           100.0
           );
明るさの反転ならこのとおり
      fill(
           hue(pix),
           saturation(pix),
           100.0 - brightness(pix),
           100.0
           );
処理するピクセルを飛ばし飛ばしにすればモザイク処理もできますね。
  for (int x = 0; x < canvasW; x +=20) {
    for (int y = 0; y < canvasH; y +=20) {
      color pix = img.pixels[y * canvasW + x];
      fill(
           hue(pix),
           saturation(pix),
           brightness(pix),
           100.0
           );
      rect(x, y , 20.0, 20.0);
    }
  }
![]()
加工の一例
このように画像のピクセル情報が使いやすい配列に入っているので、 1ピクセル毎でも数ピクセルまとめてでも自在に処理することができます。後はアイディア次第で様々な加工が可能です。
ここでは一例として、先程のモザイク処理にひと工夫加えて、左上から徐々にモザイクをかけるような処理を行ってみましょう。
// Processing で画像処理
// @author @deconbatch
// @version 02 徐々にモザイク
// Processing 3.2.1
// 2018.09.09

void setup() {
  size(480, 480);
  colorMode(HSB, 360, 100, 100, 100);
  noStroke();
  smooth();
  noLoop();
}

void draw() {
  background(0.0, 0.0, 90.0, 100.0);

  // 読み込み画像を指定
  PImage img = loadImage("../Photo/01.jpg");

  // キャンバスに合わせてリサイズ
  float rateSize = min(width, height) * 1.0 / max(img.width, img.height);
  int   canvasW  = floor(img.width * rateSize);
  int   canvasH  = floor(img.height * rateSize);
  img.resize(canvasW, canvasH);

  // 画像データを img に保持
  img.loadPixels();

  // キャンバスの中心に来るように調整
  translate((width - canvasW) / 2, (height - canvasH) / 2);

  // 画像データを 1ピクセル毎読みながら加工して描画
  int drawCntMax = 10;
  for (int drawCnt = 1; drawCnt <= drawCntMax; ++drawCnt) {

    int div       = ceil(map(drawCnt, 1, drawCntMax, 50, 1));
    int drawLimit = ceil(map(drawCnt, 1, drawCntMax, canvasW + canvasH, (canvasW + canvasH) / 2.0));

    for (int x = 0; x < canvasW; x += div) {
      for (int y = 0; y < canvasH; y += div) {

        if (x + y > drawLimit) {
          continue;
        }

        color pix = img.pixels[y * canvasW + x];
        fill(
             hue(pix),
             saturation(pix),
             brightness(pix),
             100.0
             );
        rect(x, y , div, div);

      }
    }
  }

  saveFrame("frames/####.png");
  exit();

}

/*
Copyright (C) 2018- deconbatch

This program is free software: you can redistribute it and/or modify
it under the terms of the GNU General Public License as published by
the Free Software Foundation; either version 3 of the License, or
(at your option) any later version.

This program is distributed in the hope that it will be useful,
but WITHOUT ANY WARRANTY; without even the implied warranty of
MERCHANTABILITY or FITNESS FOR A PARTICULAR PURPOSE.  See the
GNU General Public License for more details.

You should have received a copy of the GNU General Public License
along with this program.  If not, see <http://www.gnu.org/licenses/>
*/
良い感じですね!
でもこれ、猫ちゃんの顔が左上にあったから良かったのですが、もし右下側にあったら…
はい、こんな感じです。
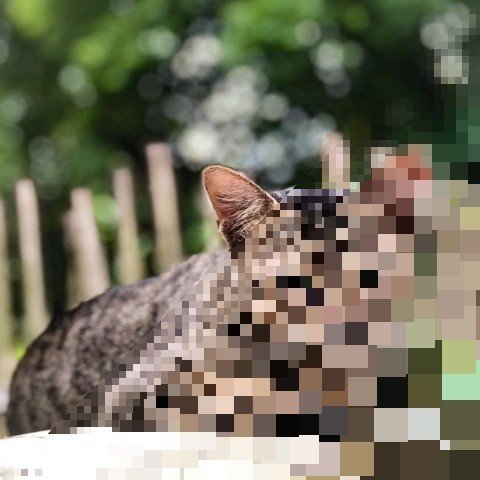
https://www.pexels.com/photo/close-up-photography-of-tabby-cat-1034828/
これは残念!
結構こういうパターン多くて…。どんな写真でもよい結果を出す加工のアイディアを出すのはなかなか難しいです。
![]()
楽しいよ!
私はこういう画像処理が結構好きで、いろんな加工パターンのプログラムを作ってきました。
↓ いろいろなパターンをまとめてみました。見てみてね!
自分で撮った風景の写真を加工してみたりして、どんな写真になるのかわくわくどきどき、とっても楽しいですよ。
あなたもやってみませんか?
![]()
参考情報
田所先生のメディアアート・プログラミング講義ノート
yoppa org - 第6回: 画像の分析・再合成 (画像データ、ピクセル、ラスタ画像)
私は田所先生の講義ノートがきっかけで画像処理を始めて、その楽しさに虜になりました。
とってもわかりやすくて素晴らしい資料に感謝です!
写真加工の作例、こちらもどうぞ。
ここでこの記事はおしまいです。もしこの記事がお気に召しましたら投げ銭お願いします。😉✨
ここから先は
¥ 100
この記事が面白かったらサポートしていただけませんか? ぜんざい好きな私に、ぜんざいをお腹いっぱい食べさせてほしい。あなたのことを想いながら食べるから、ぜんざいサポートお願いね 💕