【Android】カスタムビューで複数のビューをまとめる

こんにちは!
Androidエンジニアのたぼーんです。
前回はカスタムビューの基本的な使い方について紹介しました。
記事についてはこちらをご参照ください!
今回は、複数のビューをカスタムビューを用いてまとめる方法を紹介します。
これによってビューの再利用性が高まり、コードの可読性や保守性の向上に利用することが可能です。
今回作るもの
こちらの仕様の画面を作成します。
UserNameというラベル(TextView)と入力フォーム(EditTextView)がある
ユーザー名に何も入力せずに送信すると、エラーメッセージが表示される
何かを入力して送信すると、エラーメッセージが消える

構成
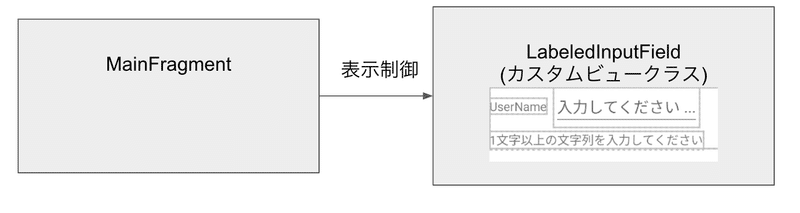
LabeledInputField(カスタムビュークラス)
カスタムビューで、ラベル、入力フォーム、エラー文字列を定義
要素の取得・挿入のための関数を持つ
MainFragment
ボタン押下時の表示制御を行う
対応するlayoutファイルからは、ラベルを指定できるようにする
全体のレイアウトを作成
まずは全体像を掴みやすいようにMainFragmentに対応するLayoutを記載します。
注目するべきは以下となります。
レイアウトにカスタムビューを指定すると、ラベル、入力フォーム、エラーメッセージの定義が作成される
ラベル名はlayoutから自由に設定できるように、「app : labelText」を独自に定義
<?xml version="1.0" encoding="utf-8"?>
<androidx.constraintlayout.widget.ConstraintLayout xmlns:android="http://schemas.android.com/apk/res/android"
    xmlns:app="http://schemas.android.com/apk/res-auto"
    xmlns:tools="http://schemas.android.com/tools"
    android:id="@+id/main"
    android:layout_width="match_parent"
    android:layout_height="match_parent"
    tools:context=".ui.main.MainFragment">

    <!--    カスタムビュークラス  -->
    <com.example.enjoy_android.CustomView.LabeledInputField
        android:id="@+id/labelField"
        android:layout_width="wrap_content"
        android:layout_height="wrap_content"
        app:labelText="UserName"  <-----  ここでLabel名を指定できる
        app:layout_constraintStart_toStartOf="parent"
        app:layout_constraintTop_toTopOf="parent"
        android:layout_marginStart="8dp"
        android:layout_marginTop="8dp"/>

    <Button
        android:id="@+id/button"
        android:layout_width="wrap_content"
        android:layout_height="wrap_content"
        android:text="送信"
        app:layout_constraintStart_toStartOf="parent"
        app:layout_constraintTop_toBottomOf="@id/labelField"
        android:layout_marginStart="12dp"/>
</androidx.constraintlayout.widget.ConstraintLayout>
Fragmentから表示制御を行う
Fragmentで送信ボタン押下時の表示制御を行います。
カスタムビュークラスに定義したgetterとsetterを利用できます。
override fun onViewCreated(view: View, savedInstanceState: Bundle?) {
    super.onViewCreated(view, savedInstanceState)
    val userNameField = view.findViewById<LabeledInputField>(R.id.labelField)
    val button = view.findViewById<Button>(R.id.button)
    button.setOnClickListener {
        val userName = userNameField.getTextInput()
        if(userName.isEmpty()){
            userNameField.setInputError("1文字以上の文字列を入力してください")
        }else{
            userNameField.clearInputError()
        }
    }
}
カスタムビュークラスの作成
ラベル、入力フォーム、エラーメッセージの要素を持ったカスタムビュークラスを作成します。
ラベルの文字列は、layoutから「app:labelText」で指定した値をattrs.xmlの定義を元にして取得します。
class LabeledInputField (context : Context, attrs : AttributeSet) : ConstraintLayout(context , attrs){
    private var label : TextView
    private var errorMessage : TextView
    private var inputField : EditText
    init{
        val view = LayoutInflater.from(context).inflate(R.layout.labeled_input_field , this , true)
        label = view.findViewById(R.id.label)
        errorMessage = view.findViewById(R.id.error_message)
        inputField = view.findViewById(R.id.input_field)
        val typedArray = context.obtainStyledAttributes(attrs , R.styleable.LabeledInputField)
        label.text = typedArray.getString(R.styleable.LabeledInputField_labelText)
        typedArray.recycle()
    }

    fun getTextInput() : String{
        return inputField.text.toString()
    }

    fun setInputError(message : String){
        errorMessage.text = message
        errorMessage.visibility = View.VISIBLE
    }

    fun clearInputError(){
        errorMessage.text = ""
        errorMessage.visibility = View.GONE
    }
}
attrs.xmlでは以下のようにapp:labelTextを定義しています。
<?xml version="1.0" encoding="utf-8"?>
<resources>
    <declare-styleable name="LabeledInputField">
        <attr name="labelText" format="string" />
    </declare-styleable>
</resources>
また、カスタムビューのlayoutは以下の通りです
<merge xmlns:android="http://schemas.android.com/apk/res/android"
    xmlns:app="http://schemas.android.com/apk/res-auto"
    xmlns:tools="http://schemas.android.com/tools">

    <androidx.constraintlayout.widget.ConstraintLayout
        android:layout_width="match_parent"
        android:layout_height="wrap_content">

        <TextView
            android:id="@+id/label"
            android:layout_width="wrap_content"
            android:layout_height="wrap_content"
            app:layout_constraintTop_toTopOf="parent"
            app:layout_constraintStart_toStartOf="parent"
            android:layout_marginTop="12dp"
            tools:text = "UserName"/>

        <EditText
            android:id="@+id/input_field"
            android:layout_width="wrap_content"
            android:layout_height="wrap_content"
            android:hint="入力してください ..."
            app:layout_constraintStart_toEndOf="@id/label"
            app:layout_constraintTop_toTopOf="@id/label"
            app:layout_constraintBottom_toBottomOf="@id/label"
            android:layout_marginStart="8dp"/>
        <TextView
            android:id="@+id/error_message"
            android:layout_width="wrap_content"
            android:layout_height="wrap_content"
            android:visibility="gone"
            app:layout_constraintTop_toBottomOf="@id/input_field"
            app:layout_constraintStart_toStartOf="parent"
            android:layout_marginTop="4dp"
            tools:text="1文字以上の文字列を入力してください"
            tools:visibility="visible"
            />

    </androidx.constraintlayout.widget.ConstraintLayout>
</merge>
まとめ
いかがでしたでしょうか。
カスタムビューを用いて複数のビューをまとめて一つのビューとして扱う方法を紹介いたしました。
これによって、コードの再利用性が高まるので、同じようなビューをあらゆる画面で簡単に作成できるようになります。
また、今回のように特定の属性だけはユーザーから定義できるように(今回はラベルをlayoutから設定できるようにした)、カスタマイズすることもできます。
ぜひ、試してみてください!
この記事が気に入ったらサポートをしてみませんか?