【Unity】ボタンの派生クラス作ってインスペクタで設定する

たくさんあるボタンの中で「キャラクターを変える」や「色を変える」など処理自体は共通で、どのボタンが押されたかでデータを変えたい場合があります。
それぞれのボタンに専用のメソッドを追加することで対応は可能ですが、ボタンの数が多くなるとそれも大変です。そこでインスペクタからボタン自体にパラメーターを設定できるようにして、クリック処理を共通の関数に引数付きで渡せるようにボタンを拡張してみたいと思います。
1. スクリプト (パターン1)
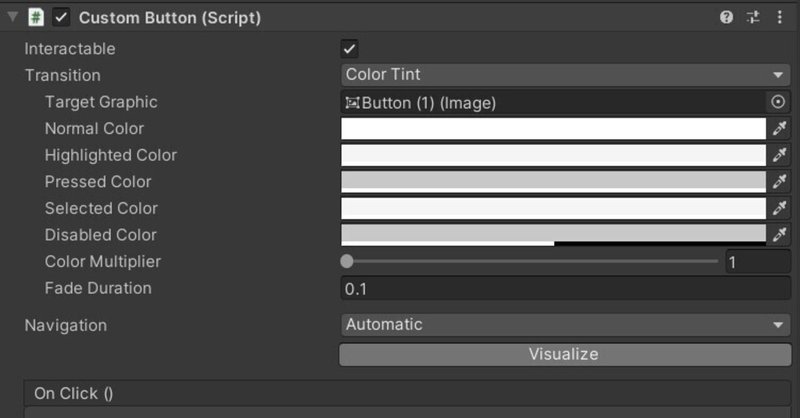
方法としては標準のボタンクラスを継承したクラスを作成し、そこにプロパティを追加します。追加したプロパティはインスペクタから編集できるようにエディタを拡張します。CustomButton.csとして以下のスクリプトを作成します。
using System;
using System.Collections.Generic;
using System.Linq;
using UnityEngine;
using UnityEngine.UI;
#if UNITY_EDITOR
using System.Text.RegularExpressions;
using UnityEditor;
#endif


public enum WEEK {
   SUN,
   MON,
   TUE,
   WED,
   THU,
   FRI,
   SAT
}

[Serializable]
public class SampleClass {
   public string Hoge;
   public int Fuga;
}

public class CustomButton : Button {
   [SerializeField] public int MyInt;
   [SerializeField] public string MyString;
   [SerializeField] public Sprite MySprite;
   [SerializeField] public Color MyColor;
   [SerializeField] public WEEK MyWeek;
   [SerializeField] public SampleClass MyClass;
   [SerializeField] public List<int> MyList;
}

#if UNITY_EDITOR
[CustomEditor(typeof(CustomButton))]
public class CustomButtonEditor : UnityEditor.UI.ButtonEditor {

   public override void OnInspectorGUI() {
       base.OnInspectorGUI();
       var component = (CustomButton) target;

       component.MyInt = EditorGUILayout.IntField("My Int", component.MyInt);
       component.MyString = EditorGUILayout.TextField("My String", component.MyString);
       component.MySprite = (Sprite) EditorGUILayout.ObjectField("My Sprite", component.MySprite, typeof(Sprite), true);
       component.MyColor = EditorGUILayout.ColorField("My Color", component.MyColor);
       component.MyWeek = (WEEK) EditorGUILayout.EnumPopup("My Week", component.MyWeek);

       EditorGUILayout.PropertyField(serializedObject.FindProperty(nameof(component.MyClass)), new GUIContent("My Class"));
       EditorGUILayout.PropertyField(serializedObject.FindProperty(nameof(component.MyList)), new GUIContent("My List"));

       serializedObject.ApplyModifiedProperties();

   }
}
#endif
例では数値以外にさまざまな型のプロパティを追加しているので複雑に見えますが、構造としてはシンプルですので必要とする型だけを参考にしてください。
2. 結果と補足
作成したら標準のボタンコンポーネントと入れ替えてアタッチすると以下のようになります。
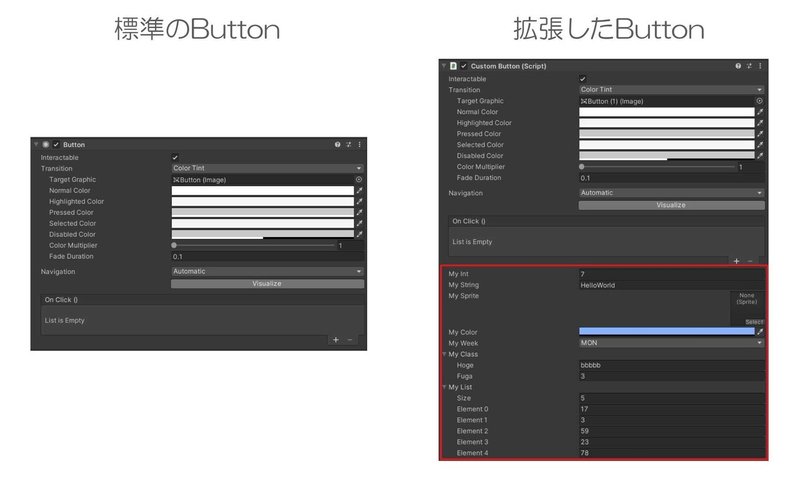
インスペクタからボタンごとに値が変えられることを確認してみてください。
スクリプトの中身に関して補足すると、#if UNITY_EDITOR~#endifの範囲はエディタ専用の処理で、ビルドして実行するときはエラーとなるためプリプロセッサで囲っています。
CustomButtonEditorはUnityEditor.UI.ButtonEditorクラスを継承していますが、Editorクラスを継承してしまうとレイアウトが崩れるので注意してください。
ボタンクリック時の処理は処理したいスクリプトから配列でボタンの参照を保持させ、Start処理で一括でonClick.AddListenerを登録します。
特定の関数を指定すればクリック処理を共通化させることができます。
using UnityEngine;
using UnityEngine.UI;

public class Controller : MonoBehaviour {

   [SerializeField] private CustomButton[] m_CustomButtons;

   private void Start() {
       foreach (var button in m_CustomButtons) {
           button.onClick.AddListener(() => Debug.Log(button.MyInt.ToString()));
       }
   }
}
Unityエディタ上で実行し、ボタンをクリックするとコンソールログにそれぞれ設定したMyIntの値が表示されます。
3. スクリプト (パターン2)
OnInspectorGUIでパラメーターの型に応じたメソッドを使って値を設定していますが、Listや独自のクラスでPropertyFieldを使っているように他の型もPropertyFieldを使って値を設定することができます。
型を気にする必要がなくなるため、パターン1よりも統一的にスッキリと記述することができます。
using System;
using System.Collections.Generic;
using UnityEngine;
using UnityEngine.UI;
#if UNITY_EDITOR
using UnityEditor;
#endif


public enum WEEK {
   SUN,
   MON,
   TUE,
   WED,
   THU,
   FRI,
   SAT
}

[Serializable]
public class SampleClass {
   public string Hoge;
   public int Fuga;
}

public class CustomButton : Button {
   [SerializeField] public int MyInt;
   [SerializeField] public string MyString;
   [SerializeField] public Sprite MySprite;
   [SerializeField] public Color MyColor;
   [SerializeField] public WEEK MyWeek;
   [SerializeField] public SampleClass MyClass;
   [SerializeField] public List<int> MyList;
}

#if UNITY_EDITOR
[CustomEditor(typeof(CustomButton))]
public class CustomButtonEditor : UnityEditor.UI.ButtonEditor {

   public override void OnInspectorGUI() {
       base.OnInspectorGUI();
       var component = (CustomButton) target;

       PropertyField(nameof(component.MyInt), "My Int");
       PropertyField(nameof(component.MyString), "My String");
       PropertyField(nameof(component.MySprite), "My Sprite");
       PropertyField(nameof(component.MyColor), "My Color");
       PropertyField(nameof(component.MyWeek), "My Week");
       PropertyField(nameof(component.MyClass), "My Class");
       PropertyField(nameof(component.MyList), "My List");

       serializedObject.ApplyModifiedProperties();
   }

   private void PropertyField(string property, string label) {
       EditorGUILayout.PropertyField(serializedObject.FindProperty(property), new GUIContent(label));
   }
}
#endif
上記の共通化させた部分では、ラベル名がプロパティ名と同じでも良ければGUIContentにプロパティ名を指定することで、ラベルの指定も省略することができます。ラベルに日本語を使いたい場合は指定できた方が便利かもしれません。
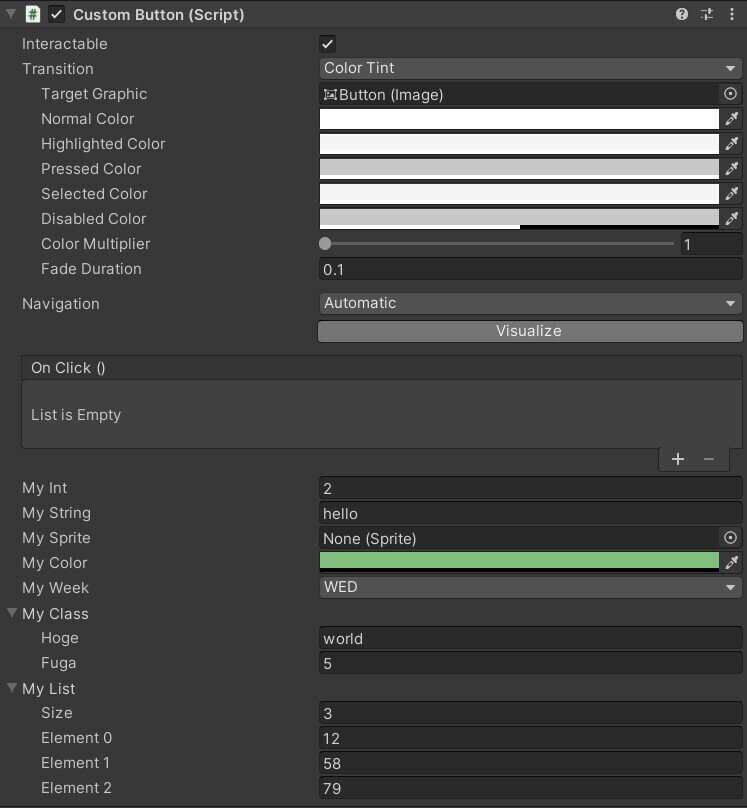
パターン1と比較するとObjectFieldを使ったSpriteだけ見た目が少し変わっていますね。設定自体は可能なので使用感はさほど変わらないかと思います。
EditorGUILayoutの拡張は他にもたくさんありますので、以下のサイトやUnityのドキュメントが参考になります。
4. おわりに
独自のクラスを作って一からインスペクタの拡張を行うのではなく、既存のクラスを派生させてかつ、インスペクタから値を設定できる方法を解説しました。
ボタン以外にもトグルや他のUIの派生クラスも作成できると思いますので、参考になれば幸いです。それでは良いUnityエディタ拡張ライフを!🌱
5. 参考
この記事が気に入ったらサポートをしてみませんか?