
PDFデータでRAGを構築する手法

ステップ 1: データ準備
PDF文書の収集: 抽出したい情報を含むPDF文書を集めます。
PDFからテキストを抽出: PDF抽出ツールやライブラリを使用して、PDF文書からテキスト内容を抽出します。
クリーンアップと前処理: ページ番号、ヘッダー、フッターなどのノイズを除去するために、抽出したテキストをクリーンアップして前処理します。
ステップ 2: 埋め込みの作成
埋め込みモデルの選択: テキストを数値表現に変換するために、OpenAIの埋め込みやHuggingFaceのSentenceTransformersなど、適切な埋め込みモデルを選択します。
文書埋め込みの作成: 選択した埋め込みモデルを使用して、前処理済みテキストを数値ベクトルに埋め込みます。このプロセスは、モデルが文書の意味内容を理解するのに役立ちます。
ベクトルデータベースに埋め込みを保存: 文書の埋め込みをFaissやChromaDBなどのベクトルデータベースに保存し、検索フェーズでの効率的な検索を可能にします。
ステップ 3: リトリバーの構築
検索方法の選択: 与えられたクエリに最も関連する文書を見つけるために、最近傍探索やベクトル検索などの検索方法を選択します。
リトリバーの実装: LangChainやHuggingFaceなどのライブラリやフレームワークを使用して、選択した検索方法を実装します。
文書埋め込みの索引作成: 検索方法を使用してベクトルデータベースに文書の埋め込みを索引付けします。
ステップ 4: 言語モデルとの統合
言語モデルの選択: ChatGPT-4やGPT-NeoXなどの言語モデルを選択します。
RAGパイプラインの作成: リトリバーと言語モデルを組み合わせたRAGパイプラインを作成します。
パイプラインの実装: LangChainやHuggingFaceなどのライブラリやフレームワークを使用してRAGパイプラインを実装します。
ステップ 5: 評価とファインチューニング
RAGモデルの評価: テストセットでRAGモデルのパフォーマンスを評価します。
モデルのファインチューニング: ターゲットタスクのパフォーマンスを向上させるために、特定のデータセットでRAGモデルをファインチューニングします。
コード例
以下のコード例は、HuggingFaceとLangChainを使用して基本的なRAGモデルを作成する方法を示しています:
import langchain

# データの準備
pdf_path = "your_pdf.pdf"
text_splitter = langchain.CharacterTextSplitter(chunk_size=500, chunk_overlap=100)
docs

 = text_splitter.split_documents(pdf_path)
embeddings = langchain.HuggingFaceEmbeddings("sentence-transformers/all-MiniLM-L6-v2")
docs = [Document(page_content=doc, embedding=embedding) for doc, embedding in zip(docs, embeddings)]

# リトリバーの作成
retriever = langchain.VectorRetriever(lambda x: x.embedding, docs)

# 言語モデルの作成
language_model = langchain.GPT2LanguageModel("gpt2")

# RAGパイプラインの作成
rag_pipeline = langchain.RAGPipeline(retriever, language_model)

# RAGパイプラインを使用してテキストを生成
query = "この文書の主なアイデアは何ですか?"
answer = rag_pipeline(query)
print(answer)
PDF RAG processing with LlamaIndex
次の記事は、Tesla社が2023年9月末にSECに報告したQ10フォーム(4半期の財務報告書)をベースにRAGを構築した例を紹介してます。LlamaIndexが使用され、内容に関する様々なクエリーを自然言語で対応できるシステムを作り上げています。
Clip source: PDF RAG processing with LlamaIndex | by Thomas Reid | Mar, 2024 | Level Up Coding
Can we use this technique to query an SEC Q10 form?
Published in: Level Up Coding
For those of you who don’t know, an SEC Q10 form is a comprehensive report of a company’s performance that must be submitted quarterly by all public companies in the U.S. to the Securities and Exchange Commission (SEC). The 10-Q is a more detailed version of the quarterly earnings reports that companies often release, providing a more complete view of the company’s financial results, including income, financial condition, and cash flow.
Typically a Q10 form will include things like,
Financial Statements
Unaudited financial statements, including balance sheets, income statements, and statements of cash flows, providing insight into the company’s financial status and operations during the quarter.
Management Discussion and Analysis (MD&A)
This section offers management’s perspective on the financial and operational results, including explanations of the revenues, expenses, and other significant factors that have influenced the company’s financial performance during the period.
Quantitative and Qualitative Disclosures About Market Risk
Information on the company’s exposure to market risk, such as interest rate risk, foreign exchange risk, commodity price risk, and other relevant risks.
Controls and Procedures
Disclosure of any changes in the company’s internal control over financial reporting and information on the effectiveness of these controls and procedures.
So, it’s quite a long document, detailed and contains a complicated structure and I’ve been on a quest to use LLMs and RAG to see if I can answer a simple question from the Tesla September 2023 Q10 form. You can download the full PDF at:-
https://ir.tesla.com/_flysystem/s3/sec/000162828023034847/tsla-20230930-gen.pdf
I have been a bit obsessed with trying to get RAG to answer the following simple question about the PDF. My question is this:
“What are the Total liabilities and Total assets for 2022 and 2023”
To a human, the answer is easy. Just go to page 4 of the Q10 PDF and you’ll see this,
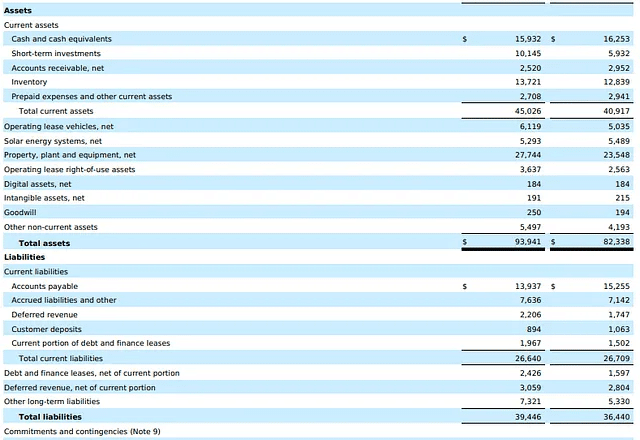
Image by Author
As you can see, the Total assets for 2022/2023 were (in Millions) $93,941 and $82,338. And the Total liabilities were (in Millions) $39,446 and $36,440.
Getting an LLM to answer this question isn’t that easy. My latest attempt at doing this is to use LlamaIndex.
What is LlamaIndex?
LlamaIndex is a data framework designed specifically for applications powered by large language models (LLMs). It provides the tools and functionalities needed to manage the end-to-end lifecycle of building LLM-based applications, with a particular focus on data ingestion, structuring, and access.
Here’s a breakdown of what LlamaIndex does:
1. Data Ingestion
Connects to various data sources, including structured (databases, spreadsheets), unstructured (text documents, PDFs), and semi-structured (APIs) data.
Supports diverse data formats, allowing you to work with your existing information easily.
2. Data Indexing
Stores and indexes your data efficiently for different use cases.
Integrates with downstream vector store and database providers for flexible data management.
3. Query Interface
Provides a query interface that accepts any input prompt related to your data.
Retrieves relevant information from your indexed data and presents it in a knowledge-augmented response.
Essentially, LlamaIndex acts as a bridge between your data and LLMs, enabling them to access and leverage your specific information to generate more accurate, relevant, and personalized outputs.
The code
We’re now ready to write some code to try and answer our question, but before that, we should set up a separate Python environment to do all our work. To create separate Python environments, I use conda but use whatever method suits.
If you want to go down the conda route and don’t already have it, you must install Miniconda (recommended) or Anaconda first.
#create our test environment
conda create -n llamaindex_test python=3.11 -y
Once the environment is created, switch to it using the activatecommand, then we can install all the libraries we need
# Now activate it
conda activate llamaindex_test
# Install required libraries
pip install llama-index
# Install jupyter
conda install jupyter -yNow type in jupyter notebook into your command prompt. You should see a jupyter notebook open in your browser. If that doesn’t happen automatically what you’ll likely see is a screenful of information after the jupyter notebook command and, near the bottom of that, there will be a URL that you should copy and paste into your browser to initiate the Jupyter Notebook.
Your URL will be different to mine but it should look something like this:-
http://127.0.0.1:8888/tree?token=3b9f7bd07b6966b41b68e2350721b2d0b6f388d248cc69daOk, let’s get started with the code. I’ll break it down into sections and put comments in each to explain what’s going on.
# This prevents issues running async operations in Notebooks
# since they are already running in an event loop
import nest_asyncio
nest_asyncio.apply()
# All the imports we need
# Various required imports
#
from llama_index.core import SimpleDirectoryReader, ServiceContext, VectorStoreIndex
from llama_index.llms.openai import OpenAI
from llama_parse import LlamaParse
from llama_index.core.tools import QueryEngineTool,ToolMetadata
from llama_index.core.query_engine import SubQuestionQueryEngine# Ensures we can use OPENAI for our LLM
import os
os.environ["OPENAI_API_KEY"] = "YOUR OPEN AI KEY HERE"# specify our LLM model
# temp set to zero as we want the LLM
# to be as factual as possible
llm = OpenAI(temperature=0, model="gpt-4", max_tokens=1000)
service_context = ServiceContext.from_defaults(llm=llm)# I'm assuming you have downloaded the PDF
# into a suitable location on your system
# Extract the contents of the PDF
data = SimpleDirectoryReader(
input_files=["tsla-20230930-gen.pdf"]
).load_data()# creates an instance of the VectorStoreIndex class,
# which is a specific indexing strategy within LlamaIndex.
# It's designed for efficient retrieval of information
# from text-based documents.
data_index = VectorStoreIndex.from_documents(data)# This method essentially converts the static index
# into an engine that can handle user queries and retrieve
# relevant information.
# The "similarity_top_k=10" means the engine will search for
# and provide the 10 nodes from the indexed documents that
# have the most similar meaning to the query prompt.
#
data_engine = data_index.as_query_engine(similarity_top_k=10)# Registers a specialized tool with the query engine,
# allowing users to easily access information about
# Tesla's September 2023 quarterly financials from indexed documents.
#
query_engine_tools = [
QueryEngineTool(
query_engine=data_engine,
metadata=ToolMetadata(
name="tesla_data",
description=(
"Provides information about Tesla quarterly financials"
" September 2023"
),
),
),
]# Sets up a query engine that can handle sub-questions related
# to information stored in the index, leveraging the specialized
# "tesla_data" tool for focused answers
#
s_engine = SubQuestionQueryEngine.from_defaults(
query_engine_tools=query_engine_tools
)Finally, we get to the point where we can ask thee question.
response = s_engine.query(
"What are the Total assets and Total liabilities for 2022 and 2023"
)
Drum roll please ….
Generated 4 sub questions.
[data] Q: What are the Total assets for 2022?
[data] Q: What are the Total liabilities for 2022?
[data] Q: What are the Total assets for 2023?
[data] Q: What are the Total liabilities for 2023?
[data] A: The Total assets for 2022 were $82,338 million.
[data] A: The total liabilities for 2023 are $3,874 million.
[data] A: The Total assets for 2023 are $93,941 million.
[data] A: The total liabilities for 2022 are $36,440 million.
Well, 3 out of 4 ain’t bad. I have now run this code a few times and on one of those occasions it actually provided the four correct figures I was looking for, but more often than not it gave the same answers as above.
I should mention that, initially, when I ran the code, in the part where I define the similarity_top_k, the value was set to 3 i.e.
data_engine = data_index.as_query_engine(similarity_top_k=3)This didn’t work well for me so I increased it to 10 and started to get much better results.
この記事が気に入ったらサポートをしてみませんか?