The Complete OP04 Rebecca Guide

Hi again,
This is going to be my 2nd full length guide on a specific deck, and my 4th guide/ article in total. I plan to make more guides on other aspects of the game, but my popular demand, this is article is on Rebecca.
Big shout-out to @Cross_Aii (Cross) for being a big Rebecca believer. For the really spicy Rebecca lists, follow him. This guide will be focusing on a Standard Rebecca list that will not fail you, and can be built upon.
You can find my other articles on my profile on note.com, and follow me at @ikailakai on Twitter for new ones.
Sorry
I would like to say one thing before we get into this article that I say with a heavy heart. I spend a lot of time on these articles, and while I want to keep putting them out for free, it's not very smart for me to make these for free considering the amount of time that I put into them. As such, this will be my last full-length article that is entirely free. I am making this one free so that you can see the sort of content that exists before you decide if it's worth a few dollars later on Patreon (most likely).
Some articles I'm considering making, though not entirely sure yet what will end up being interesting or worth writing about are:
How to correctly split your Don to attack (short article)
What goes into deck building and how to become a better deck builder (very long)
How to choose the right deck for a tournament on why it's different from 3v3 tournaments (medium length)
Nami Guide (long)
How to beat Nami (short)
Uta Guide (long(it's much more complicated than film Kid))
etc.
I know that asking for a few dollars is a lot more than people are willing to pay, but if you are interested in this kind of content, I will write them at a faster rate (probably 2-3 per month) if people are on that platform waiting for them. That way I hope to benefit everyone involved.
Additionally, I will soon start putting out gameplay videos with explanations on OP05, and maybe some OP04. The videos will act as an introduction to decks, and the articles on Patreon will be for people who want to go to the next level. I hope that by doing it like this, those who want to stay free to learn, can do so, and those who want to support me, get a benefit too.
Thank you for your understanding, into Rebecca.
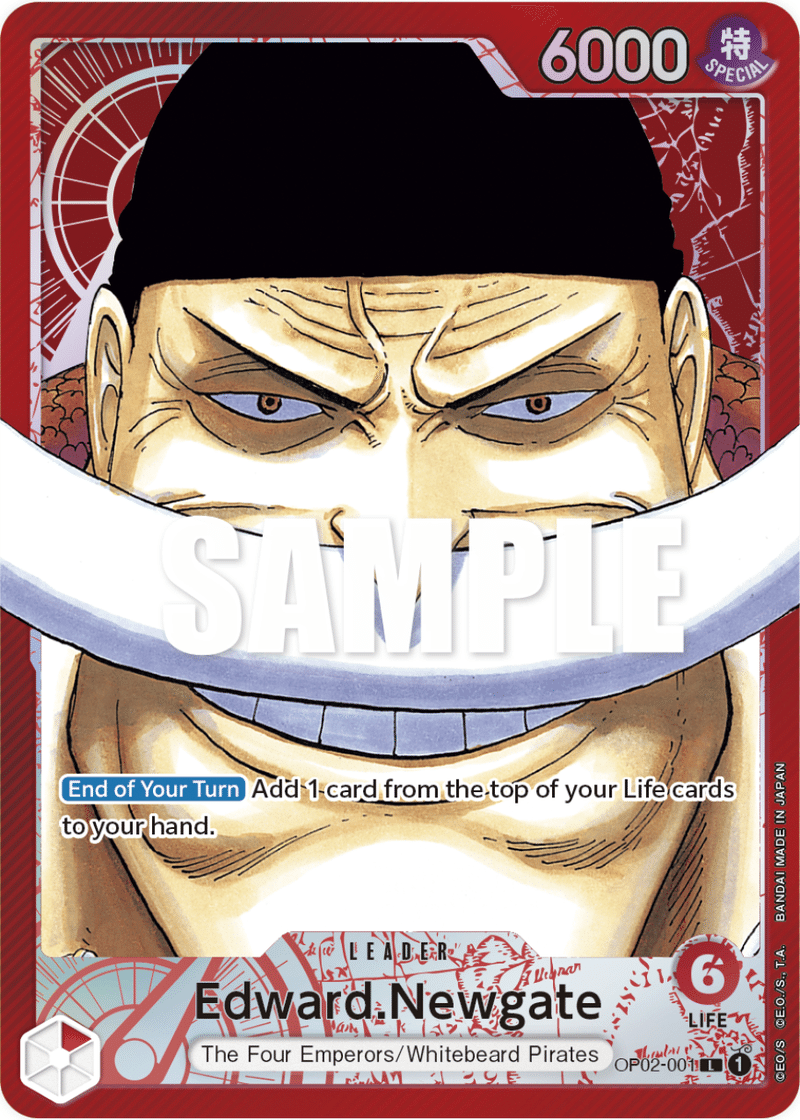
Rebecca is an interesting deck in standings if you look at its history in Japan in OP04 (via my other article). It never had a high pick-rate, but always had a high win-rate. This can be attributed to many reasons, and this guide will go over everything I can think of in regard to Rebecca as well as how to beat Rebecca. So let's first take a look at the Leader's strengths and weaknesses.
What makes Rebecca strong?
There are 2 somewhat unique traits about this leader.
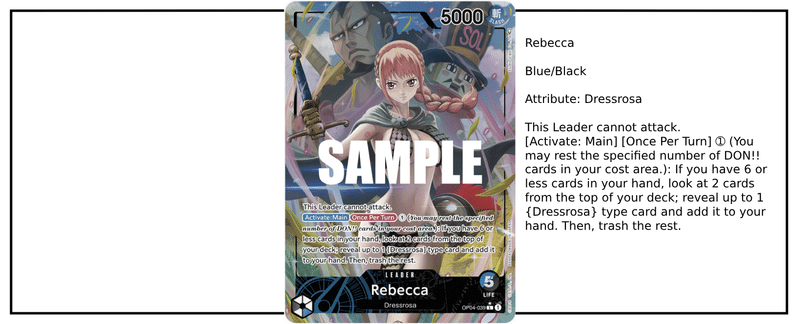
1. This Leader cannot attack.
2. Rebecca has 5 life as a 2 color leader.
Currently, there are 3 leaders that cannot attack:
Iceburg, Vivi, and Rebecca
Currently, there are 3, 2 color leaders with 5 life:
Vivi, Rebecca, and Red/Purple Kid
Each of these leader have powerful cards and leader effects that support and help outweigh these demerits, but it is safe to say that Rebecca has the strongest of these effects. Iceburg's effect is arguably actually one of the strongest effects in the game, being the only leader who could play a 5 cost on turn 1. However, purple being weak in OP04 + the fact that the leader can't attack was too much of a demerit. I've heard people say that Iceburg is decent in OP05 with the new 5cost Kid, but I cannot verify this. If Iceburg had an extra life like the other leader's who couldn't attack, then maybe his fate could have been very different.
Vivi has the opposite issue. She has a few strong cards such as Igram, and Chaka that create problems for the enemy, but her leader effect is not quite strong enough. Getting rush and a card is great, but 2 cost is much too heavy of a cost for this merit. The largest benefit of Vivi's effect is that she has no hand limit, so she can be at 14 cards and still draw another. However, this is not actually a massive advantage, and I'll get into this when explaining how to play Rebecca.
Rebecca on the other hand has an excellent leader ability that only costs 1, letting you effectively draw 2 cards per turn for the entire game. The restriction is that it must be a card with the type: [Dressrosa] and you cannot have more than 6 cards. Luckily, Dressrosa cards are very strong.

Not only this, but Rebecca's main demerit, not being able to attack, is not as big of a demerit as it is for a deck like Iceburg or Vivi. I believe that Iceburg and Vivi should play like midrange decks. Making a powerful board and pushing forward on the life while dealing with the early game board efficiently. For Iceburg, cards like Paulie help, and for Vivi, 7 cost Doflamingo helps. But the issue with this plan, no matter how strong the cards are, is that you're a midrange leader that can't attack with your leader. This inevitably results in a big resource disadvantage from not being able to hit the enemy leader for 5000 power and not being able to close the game out in time.
Rebecca on the other hand, does not need to hit with her leader, and does not want to hit the enemy's life until the late game. This is because in many matchups she wants to choke the enemy out of the game before going aggressive, making it a horrible deck to play against as a leader like Zoro or Law, as the game will be set in 10 minutes, but it will take another 15 to close out.
Rebecca's leader ability counterbalances the demerit of not being able to hit, and has many strong cards that support her goal as a pure control deck.
Rebecca has many strengths so let's see her weaknesses.
If she has 7 cards in hand, she cannot use her leader ability.
If Rebecca is at 7 cards at the start of the turn, it's largely not a problem as she can play a card and go down to 6. However, if she's at 8 or 9, it starts to get hard to use her leader ability. A way that Rebecca can struggle is if the enemy only puts don on your leader and hits for 8000, 10000, 12000 etc and make situations that are very hard for Rebecca to counter and are forced to take her life.Rebecca needs to set up the board
If you play Rebecca you'll know that you want Kyros, Corrida Coliseum, and Orlumbus on the board to start controlling the game. As you need to draw all or most of these pieces, and keep them on the board, some matchups are hard without much saving. These matchups are Blue Crocodile and Yellow Katakuri.Rebecca is hard
As Rebecca needs lots of pieces, that need to be used correctly, it ends up being a very hard deck. That being said, the stability of the deck is insanely high, so if you can master Rebecca, you can win a lot, given you don't hit some unfortunate matchups
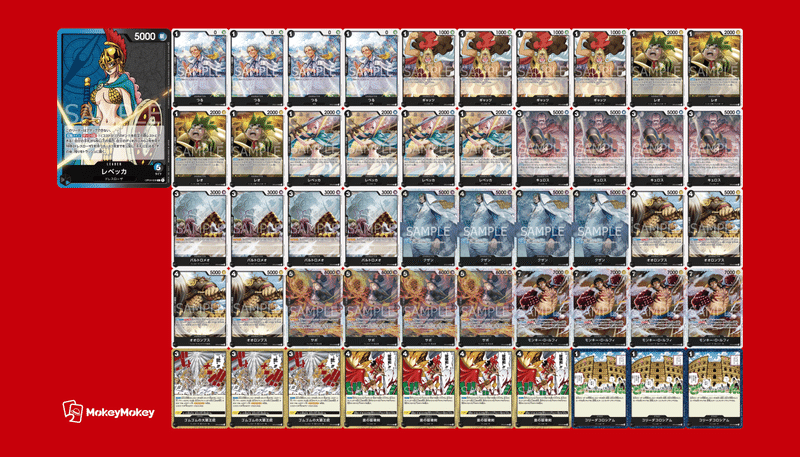
The Standard Rebecca List
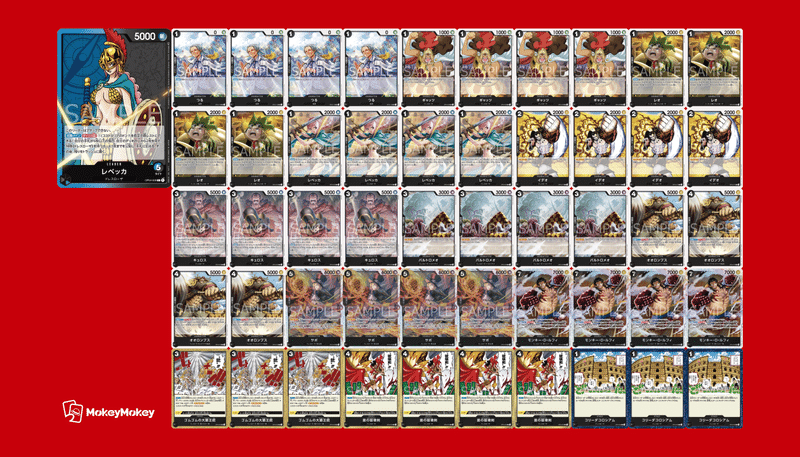
This is my recommendation for starting to play OP04 Rebecca. I will go through every card, the reason for their usage compared to other similar cards first. Then I will go through each matchup, other cards that could help for those specific matchups, and then some other stuff like my OP05 Rebecca.
Even if you are only interested in the specific matchups, or the deck, I recommend reading the philosophy behind why I choose these cards specifically, as it will help you make decisions on where and when you would want to change some for your own local environment.
I always put a ton of emphasis on card choices as I need people to understand that there is always reasoning behind why you would or wouldn't use a card.
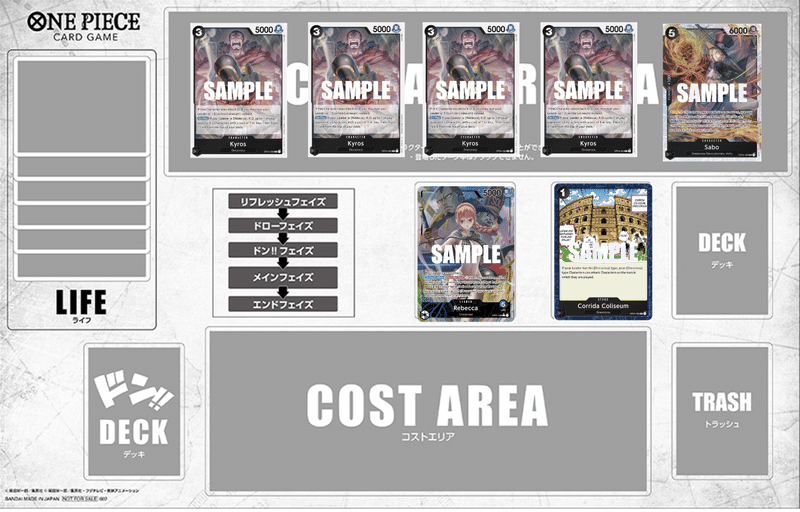
Kyros
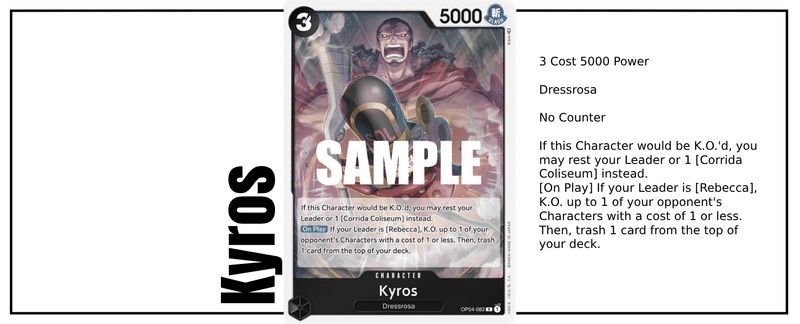
Let's start with a few core pieces that I will refer back to often in the other cards. Many of Rebecca's cards combo together, and these pieces are required or help a lot to start the combo. Kyros turns your leader into a leader that can attack at the cost of letting you only have 4 characters on the board. Kyros is very hard to kill, and can KO a 1 cost, as well as fill your trash. As Kyros is hard to kill and can KO, he is core to many combos with Orlumbus and makes the mid-game much more stable. Having 5000 power, he can also attack on the turn he is played thanks to Corrida Coliseum. Against matchups like Law and Zoro, Kyros is King. Kyros is the reason that Rebecca is playable, so you will put in the max amount of 4 copies if you are of sound heart and mind. Just remember that Kyros has [Slash] and can't kill Buggy.
Orlumbus
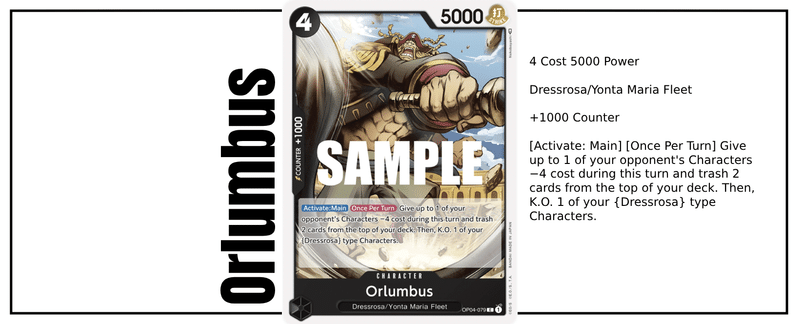
Orlumbus is the best cost reducing card in black, but is only usable in Rebecca. Orlumbus needs to KO a Dressrosa type character, and other decks that legally cannot use. Without Kyros or Leo other decks will struggle very hard to use Orlumbus. Orlumbus doesn't need to be rested for his effect, so if you have a Kyros and Orlumbus on the board vs a deck that cannot clear the board, then this is a free -4 cost every turn. Orlumbus burns through your deck incredibly fast, but in the early game this is an advantage. If you deem it safe to, I recommend using Orlumbus on the turn he's played to fill up your trash and get closer to the coveted 15 trash goal as soon as possible. If you only have a single Leo, or Rebecca on the board, or a Kyros with no stage, then do not activate Orlumbus, but if you have multiple targets for days, or a Kyros with stage, then use this card on the turn it's played solely to drop more cards into your trash.
Should you play Kyros or Orlumbus on turn 2 going second?
There are a few factors that go into this so these are some questions you can ask yourself.
1. Did you play a character turn 1? This character can become fuel for Orlumbus not requiring you to play Kyros first.
2. Can the enemy KO Orlumbus? Generally the answer to this is no. It's hard to KO Orlumbus on 5 don in OP04 (not OP05 though haha help me). But just because it's possible to KO it, you will need to weigh if it's their best interest to. You can play it vs Zoro and give them the choice between JetPistol or FireFisting it, playing 5 Marco, or hitting for 10000. Them choosing to Jet Pistol it is actually the worst decision, so Orlumbus can create problems that the enemy might trip over. But just because Orlumbus is playable, doesn't always mean it's the right choice of course.
3. Can you use your leader ability? If the enemy hits you very hard the turn before and forces you to take your life and you have 7-8 cards, you cannot use your leader ability. If they do not hit you and you are able to play Kyros + Leader Ability, then I almost always take this choice.
In general, the safer choice is to play Kyros over Orlumbus, but knowing the situations where you can play Orlumbus can create a playstyle that can take more risks and pull more wins out of bad situations. Conversely, knowing when you should not play these cards is important. Kyros can almost always be played, but that doesn't mean you should, as he also has an on play effect that KOs. Playing him later on can help you clear 2 things at once. Once you get one Kyros on the board, you can take your time to play your second one unless the matchup requires you to play multiple fast like Yellow.
Tsuru

Starting the 2000 counters immediately with a very complicated card.
There are 2 different Dressrosa type 2000 counters meaning you can use up to 8. But as the norm is 10-12 2000 counters we need at least 1 more type of 2000 counter to round out the 2000 counters. The 3 choices are the following:
The best unsearchable 2000 counter
There is no wrong answer if you choose 1 of these 3 as your 3rd 2000 counter type, so let's go into the difference between them and you can choose whichever suits you personally.
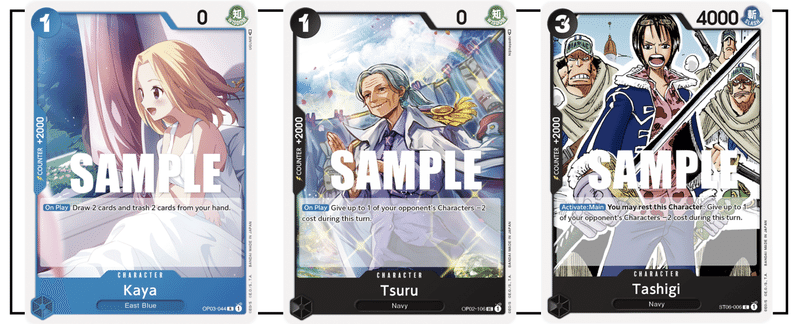
Kaya
1 Cost 0 Power
[On Play] Draw 2 cards and trash 2 cards from your hand.
Kaya is used to increase the consistency of the deck. In matchups where you want to play multiple of the same card such as Orlumbus or Kyros, Kaya can help you get that extra bit of consistency in those matchups.
Tsuru
1 Cost 0 Power
[On Play] Give up to 1 of your opponent's Characters −2 cost during this turn.
Tsuru is the card I use for my Rebecca decks as it helps Rebecca's playstyle the most. Rebecca generally needs to set up Orlumbus on the board early and then can permanently reduce the enemy's cost by 4 whenever they feel like it given that there's a Kyros on the board as well. This lets you very easily take out cards that cost 5 or less with Kyros and Leo, but you can struggle with some things with an awkward cost like 7. Tsuru is good emergency cost reduction that I've found that I use a lot more often than the other 2, even if its' job is done as soon as it's played. 1 cost -2 cost is a very good emergency tool that is at the very least easier to use in my opinion.
Tashigi
3 Cost 4000 Power
[Activate: Main] You may rest this Character: Give up to 1 of your opponent's Characters −2 cost during this turn.
Tashigi does what Tsuru does, but better. She reduces the cost of an enemy character by 2, but is an [Activate: Main] effect. Meaning if it's not dealt with, can be used again. In this way, Tashigi acts as a pseudo-blocker for the enemy. If you prefer Tashigi, I have nothing against that. The main drawback of Tashigi is that she costs 3. In a deck where you need to constantly be comboing cards together like Orlumbus Kyros as well as your leader ability, an extra 2 cost above Tsuru was a bit too heavy for me personally to use.
As you are playing a control deck with many opportunities to play your 2000 counters on the board, Tsuru, as well as all other 2000 counters are at their max count of 4, meaning there are 12 total in this deck. I would go to 14 before I would go to 10.
Gyats
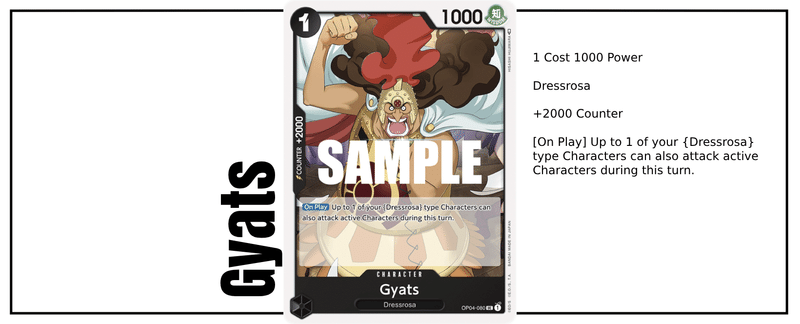
An excellent card.
There will be timings when you play this card to enable you to clear 2 things on the board at once. Generally Rebecca can only clear 1 thing each turn without hitting with a card like Luffy, but Gyats is another option in some early game situations, and not later game situations where you absolutely do not want the enemy to have a board. I would not through this at any time, but consider this an option if the enemy plays something like 2cost Sanji, or multiple low cost cards that come out together vs Zoro. When you have 7 cards in your hand or just need another target to Orlumbus, throwing this out to get some value before using your leader ability or Orlumbus can also be good options. It's important to recognize 2000 counters as more than just 2000 counters in this deck to reach its full potential. Always consider every tool available, and find ways to push your advantage even by a little bit each turn.
As it's a Dressrosa 2000 counter, we use the maximum of 4. The effect is a bonus, but is still very very good.
Bartolomeo

Second time I've talked about Bartolomeo in my guides but thankfully this one doesn't cost $50.
Somehow, there's a card better than Gyats.
I don't think there is much to say about Bartolomeo. He's a blocker, he's a 2000 counter. That enough. This is probably going to be the 2000 counter you play the most as you need to access the situation for whether you need 2000 counter guaranteed out of hand, or a blocker than can be theoretically infinite counter. Against yellow and decks like Whitebeard that generally struggle to deal with active don, you can play this card when you have extra don left up and nothing to do, but do not play this against decks that like to control the board and can KO it easily such as 5 cost Marco in Zoro, or Izou in Law, or the Black Mirror. Against matchups that can KO it easily, remember to play it together with Sabo. (And remember to play it before you play Sabo)
Bartolomeo is one of the best 2000 counters in the game and therefore we will use the maximum of 4 in any control oriented black deck.
This completes all of the 2000 counters in the deck, and we will now move on to the 1 cost characters and up. Thankfully they balanced Dressrosa to only have 2 types of 2000 counters, and didn't give them another one with an even crazier effect...
I love this card. Moving on.
Rebecca

Searchers are always great, but there is an argument to not use Rebecca as your leader ability is a search. However, this card is used for 3 reasons.
1. Consistency. 1 cost Rebecca can be used even if you have more than 6 cards and can thus help you move out from difficult situations. This is the same for any searcher.
2. Filling trash. There are a few cards that benefit from you having a large trash. Those being Destructive Sword, and Barrier. As this deck uses Destructive sword, you will want to rush to 15 cards in your trash. Rebecca will drop 2 immediately and is great in this regard.
3. Orlumbus Fuel. If you don't have Kyros on the board, Orlumbus will need to KO something else on your board to get his benefit. Rebecca, Leo, Gyats etc are all great targets for this in the early game, and even in the last game where you don't want to create a situation where Kyros might die.
For these reasons there's no reason not to add Rebecca, and while I sometimes wonder if 4 is required, if you have the extra space, the of course 4 is better than 3.
Leo
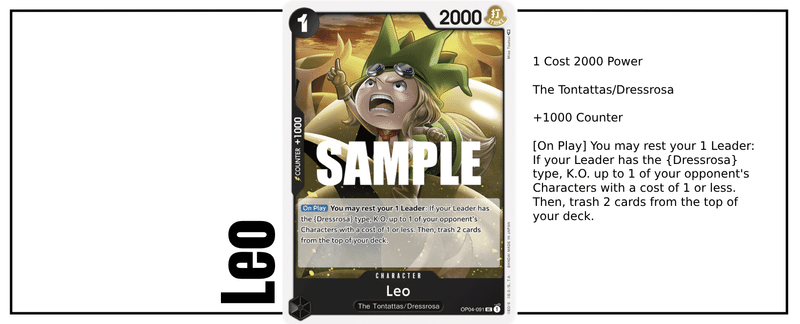
If you've ever played black, you understand how nice it is to have a card that KOs without costing your hand. On top of this, Leo has counter, which is quite rare for board control cards in Black. While Leo only KOs a 1 cost, combined with Orlumbus it can reach up to 5cost for 1 Don, as well as be Fuel for Orlumbus himself. Vs Zoro you can play it immediately when they play a 1 cost to let them know they are not allowed to play the game. In other matchups where the enemy doesn't play lots of low or mid cost characters, feel free to use it for its counter.
As Leo can fill your trash, help deal with Aggro and Midrange cards, has counter and can be used for Olumbus' effect, it's safe to put in 4.
Ideo

Ideo is a searchable low cost blockers. There are other options for blockers such as 1 cost Law, and 3 cost Doflamingo, which I do think have their place, so I will write a little about them and why Ideo is beneficial above being a 2 cost searchable blocker
The best low cost blocker
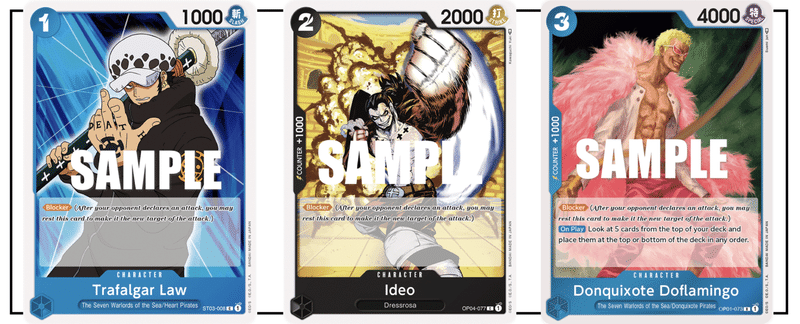
Trafalgar Law
1 Cost 1000 Power No Counter
[Blocker] (After your opponent declares an attack, you may rest this card to make it the new target of the attack.)
Law is not used too often, but is still a 1 cost blocker. Rebecca has difficulty managing her Don, so the difference in cost between Ideo and Law can sometimes be sizable. That being said, Law also does not have counter, and in these situations where you're tight on Don, Ideo tends to be easier to use, even if Law sometimes has more instantaneous power. If you play a build that uses cards like Garp or 4cost Kuzan, Law can be very good to protect them on the side.
Ideo
2 Cost 2000 Power +1000 Counter
[Blocker] (After your opponent declares an attack, you may rest this card to make it the new target of the attack.)
Ideo is searchable, has 1000 counter, and only costs 2, so it's the default choice for this deck. On top of this, Ideo being 2 cost means you can play 7cost Luffy, 2cost Ideo, and Leader ability for 10 Don cleanly. This is the only pattern Rebecca can take to defend Luffy on the turn he's played. No one will complain about this cards inclusion if you want to put in a low cost blocker, but right below this I'll explain why I want a low cost blocker at all.
Donquixote Doflamingo
3 Cost 4000 Power +1000 Counter
[Blocker] (After your opponent declares an attack, you may rest this card to make it the new target of the attack.) [On Play] Look at 5 cards from the top of your deck and place them at the top or bottom of the deck in any order.
Doflamingo at the start of OP04 was actually the default pick in Japan because people ran 10 cost Kuzan. The benefit of Doflamingo is that it is essentially a universal search. If you rely heavily on 10 cost Kuzan for your deck concept, consider this card to increase the stability, and also choose what you search next with your leader ability.
The best way to set Doflamingo's order up is (assuming you haven't used your leader ability yet)
1. The card you want from leader ability now 2. A card you don't want at all (to throw away from your leader ability search) 3. The card you want to draw next turn 4. The card you want from leader ability next turn 5. A card you don't want at all, or another option that you're not sure about yet between card 4&5
All of these can have their place, but Ideo is a safe pick for a standard Rebecca build.
Why do you need a low cost blocker?
I don't know if people ask this question, but if you don't, you should. Question every card's role so you can know where to adjust.
Originally Rebecca didn't use a low cost blocker. Rebecca as a concept heavily controls the board, so having blockers might not feel necessary if the enemy board is 0. However, this card is important against leaders that hit infrequently, but hard. This would include Katakuri/GP Doflamingo, but not Law or Zoro. for example. In these matchups where they hit you low at 5000 over and over, feel free to use Ideo for counter. It's the same if he dies blocking a 5000 attack anyways. Against Law you could play it before the final turn if you're afraid of Restand Law, but generally just use it as counter or as a blocker depending on the matchup, the same way that Bartolomeo is used. The flexibility of a low cost blocker is hard to dispute, and it is very important to stopping Katakuri from kicking your teeth in.
Sabo
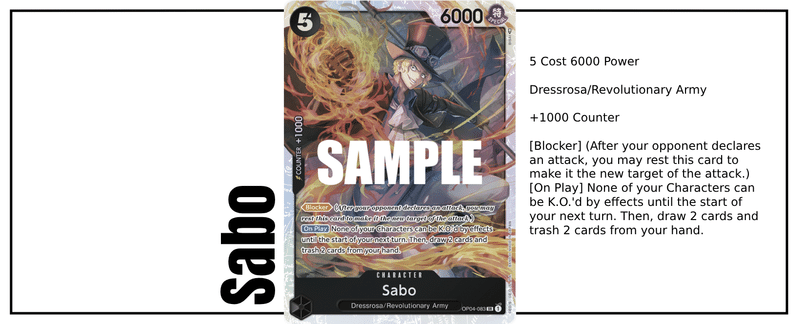
Sabo is the glue that holds together this and many black decks together. Although his effect only lasts for 1 turn, the timing in which you play Sabo will massively change the course of the game. By playing Sabo you can care for Jet Pistol / Jet Pistol trigger, Thunderbolt / Thunderbolt trigger, 9Whitebeard On Attack effect, etc.
On top of this effect, Sabo refreshes your hand and lets you get rid of card that have expired such as Corrida Coliseum, or Leo, or other cards that you do not need later in the game.
On top of all of this, Sabo has counter and will never get stuck in your hand. With all of this combined, Sabo is a card you will never have any problems putting in 4 of.
Do I play Sabo in the early game or late game?
Sabo has a very strong effect that feels like it gets more value the bigger that your board is, and is therefore, a lategame card. However, this is only partly true. Sabo is a better in the late game, but not because of the anti-KO effect. Sabo is better in the late game, because search effects are strong in the late game.
This is important so I will go on a tangent.
Have you ever seen a Whitebeard player have 'Whitebeard Pirates or Izou' but not use it on turn 1? Have you ever wondered why? The reason is simple if you think about it. The longer you wait, the more cards you see before you use your searcher, meaning that you will draw the card that you want more often. If you have what you currently need, there's no need to search for more. Let's say Whitebeard has a no good turn 3 play in their starting hand going first. If you search and pick up a 5 Marco you feel good in the moment, although you bottomed your 7Ace in the process. Next turn you draw a random card from your life from Leader Ability, and a 4/6000 Atmos from the draw. While of course if you didn't search, you wouldn't draw this Atmos yet, because you used your Izou early, either this Atmos or Marco will become 1000 counter. If the choice last turn was 1000 counter or 7Ace, you would choose 7Ace in many circumstances (also remember Izou has 1000 counter, so effectively nothing happened). By waiting as long as you can on searches, you will have more hand information on yourself that can aid you in making the correct decision.
Now in the same scenario, if Whitebeard passes turn 1, and draws the 5Marco naturally, he is allowed to take 7 Ace from the search. In the case that he doesn't draw a card that aids him, he can search and pick up the card normally, being able to technically search 6 instead of 5 including the draw at the start of the turn.
Sabo works the same way although it's not a 'searcher.' You can draw 2 cards, and throw away 2 cards. Searchers generally draw 1 card at the cost of the searcher. By waiting for not just 1 turn in the Izou example, but 10 for Sabo, you will accumulate more cards you know you don't need anymore, and know what cards you are looking for better.
However, this doesn't mean you should wait on playing Sabo to get full value from the hand refresh or the protection. Because Sabo is effectively a searcher, you can use him in the early game to look for the parts you want. Whether it's a second Kyros, or a Luffy you really want to play next turn, Sabo can help increase the stability of the deck. Against matchups like Zoro where the enemy is trying to rush you down, playing Sabo on curve can be a death sentence for them.
Other things to remember about Sabo:
He has 6000 power. Don't be afraid to hit with him with Corrida Colisseum on the turn he's played. Rebecca players, and people who fight Rebecca often forget that this is possible.
He has counter. Just because he's a powerful card, that doesn't mean you always need to play him. It's safer to keep at least 1 in your hand, but as you can't play him and Luffy on the same turn, you'll want to look ahead at what you need to do, and what you won't need immediately. It's a good idea to keep track of how many you've seen this game so far.
He can protect Ideo to make a mini Fukuro
Monkey D. Luffy
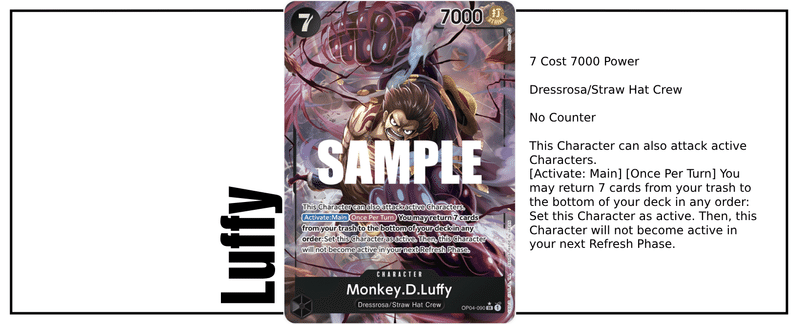
I know that I saw "This card is important to Rebecca," for every card, but it's because every card is important. One weakness Rebecca suffers from is he disability to easily KO more than one thing at a time. Luffy paired with Corrida Coliseum allowed Rebecca to take, or at least attack twice on the turn he is played. Not only does it essentially have rush and 2 attacks, it can also hit active characters, meaning that no characters are safe. Luffy is very well the reason to use Rebecca, as only with her does Luffy get rush (from the stage). As Luffy is 7 cost, it's hard to find a timing to play him and get value out of it. A good philosophy to have about high cost no counter cards is to think to yourself, "When will I be able to play this card next?" For a card like Luffy, you might only have 1-3 windows to play it, so even if it's not the strongest move that turn, you will thank yourself later on if you identify and play Luffy in these windows. Find a timing to play Luffy where he won't be immediately taken by something like 8Katakuri, and then speed up the resource game with extra 7000+ hits each turn.
Luffy's cost is treated like a drawback, where you can only use his effect if you have 7 cards in your trash. However, for Rebecca this is a benefit, as without it, you will run out of cards in your deck and lose. As you want to use your Luffy ability at least once, it's recommended to use Luffy's ability on the turn he's played, regardless of the targets on the board. Even if the enemy Zoro only has Izou and Dadan on the board, just clear it with 7000-7000. This shuts down their aggression, and let's you refuel your deck.
Remember: Luffy does not need to be rested to use his ability. You may use it without attacking (in the case that you don't have stage for example) to just give yourself more fuel in your deck.
Luffy Ability: Cards to Return to Deck
What I mean by this is: What are the cards and in what order should you put them back into your deck in?
Here is my personal ranking of the priority of each card. While your 2nd and third Luffy ability won't matter as much, there is a good chance that your first 7 cards you return will come back to your hand later in the game. As such, while this can be an annoying an tedious part of Rebecca, it is important.
Explanation:
Monkey D. Luffy: While Luffy is the highest priority on the list, that doesn't mean you want to put back every Luffy you have. If you do not have a Luffy in your deck, the enemy has a new win condition by waiting for you to run out of cards. It's important to always have 1 Luffy in your deck, so that the enemy never has the opportunity to kill you this way.
Sabo: Being an excellent late game blocker, once your deck starts to loop, being able to play this every single turn can be GG for your opponent.
Bartolomeo: 2000 counter and blocker, the ability to choose which side of the effect is more important in the current situations is very useful. On top of this, returning 2000 counters to your deck hides information from your opponent and makes it harder for the opponent to know how many 2000 counters could be in your hand.
Trueno Bastardo: We have yet to go over this card yet, but it's the only KO event that we utilize in this deck. As such, being able to use this to KO something of the enemy's while playing Sabo, or pushing damage with Luffy, creates lots of pressure.
Gyats: Gyats is again a searchable 2000 counter. This late in the game you will not need to play him generally, but being 2000 counter is very good.
King Kong Gun: You only need to return 1 if at all to act as a finisher when you pick it back up in your loop. It's a good option in some situations, so I don't mind putting it back into my deck thanks to being able to choose if I need it from my leader ability.
Ideo: Ideo is a worse version of Bartolomeo in the late game, but is not a bad choice if you don't have better options.
Rebecca: Rebecca can be good at the end of your 7 cards if you intend to loop again and don't have the cards you are looking for quite yet in your trash.
Tsuru: Tsuru isn't searchable, but is still a 2000 counter, so has some merit. But as she isn't searchable, the order in which you put her back can become redundant.
Orlumbus: You don't need Orlumbus this late in the, as he's a combo starter. If you have him in your hand at this stage, feel free to use him for counter as well if you've passed the baton off to Luffy to end the game.
Leo: You don't need to KO a 1 cost at this point in the game, but it has counter I guess.
Kyros: You don't need to KO a 1 cost at this point in the game, and it doesn't even have counter.
Corrida Colisseum: What are you doing
Here is an example of a set of 7 cards you might put back. What you want to do is set up choices for your leader ability so that you can change your plan in the moment.
By putting 2000 counters inbetween power cards like King Kong Gun, or Trueno Bastardo, you can choose if you want the power of King Kong Gun, or the extra defense from Bartolomeo, etc.
If you intend for the game to go passed your first 7 cards, you could choose a defensive 7 cards as well. It's important to remember that not only will you be able to look at 2 cards with your leader ability each turn (meaning it's suboptimal to put 2 2000 counters in a row), but also that Sabo will draw 2 cards when played. You want to mix in lots of choices to keep your flexibility strong so that once your deck loops, every single card you draw is a banger.
Gum-Gum King Kong Gun
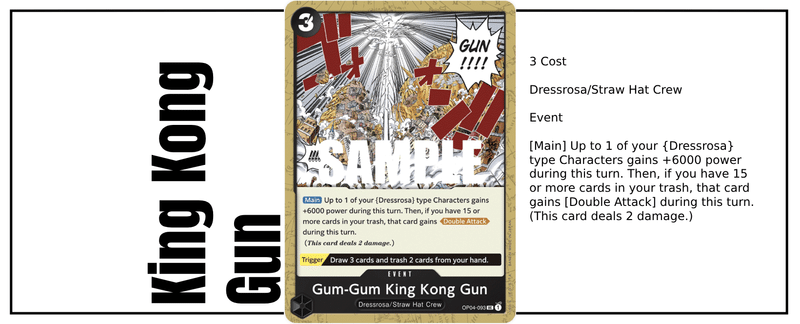
If Luffy is active, with just 1 of these and the remaining don on your board, you can hit for 20000, Double Attack, Twice, out of nowhere. This is an incredibly strong finisher, and you can look for opportunities to pressure with this in the midgame if the enemy does not have blockers set up. It is important to remember though, that this card is not just a finisher. With 10 don, you can play Luffy + King Kong Gun to hit 2 things on the board for 13000.
The trigger is also occasionally useful, as it's the same as Shirahoshi. But as the card alone is very strong, do consider when you shouldn't use the trigger. This is generally a lategame card, so feel free to get rid of it early with Sabo or from trigger, and put it back into your deck later if you want it to finish the game.
As there are cases where we want this in the mid to late game a few times, but not every single time we draw it, 3 copies feels like enough to me, though there are people who use 2, and 4.
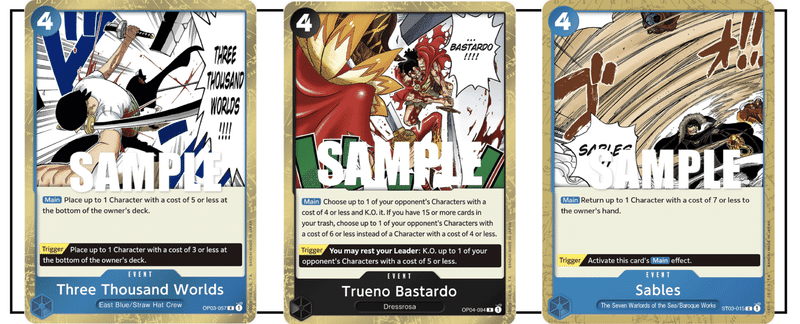
Trueno Bastardo

Trueno Bastardo is the only searchable KO event in Dressrosa. It is also the only card that can KO a 6 cost with no other set up. Additionally, the trigger is incredibly strong, and can KO things like Borsalino (as it's on the enemy turn).
There are a few choices for removal events so let's go through the other choices briefly.
The Best Removal Event
I think all of these events have their place, but maybe not in the current meta. So let's go over each one and what sort of meta you would use it in.
Three Thousand Worlds
This card deletes any other card that is a cost 5 or lower. While the trigger is weak, the effect is guaranteed with the current card pool, and can immediately get rid of things such as Borsalino, 5 cost Marco, or Sabo.
If you're in a meta where cards such as these are popular, then I would recommend using this over Trueno Bastardo. One downside is that it is blue, and not Dressrosa, so you will need to draw it naturally. If you put in this card, I would prefer to put in 4, so that it's easier to draw.
Trueno Bastardo
The difference between this card and Three Thousand Worlds, is that 1, this card is searchable, which is a big merit, and 2, this card can reach 6 cost. 5 and 6 don't seem like a large difference, but considering that this deck uses Orlumbus as it's core cost reducing card -- Trueno Bastardo can reach up to 10 cost with Orlumbus. The sole reason I chose Trueno Bastardo over Three Thousand Worlds is that with Orlumbus, this card can KO 10cost Mom. Without Trueno Bastardo, I think Katakuri is sickeningly difficult.
Sables
Sables has the strongest trigger in the game, only comparable to DEATH WINK. While I doubt people have this card on their radar, and it isn't a terrifying card to play against, Sables is good against ramp decks. If Kaido, or next set, Purple Luffy, is popular, consider this as an option.
Corrida Coliseum
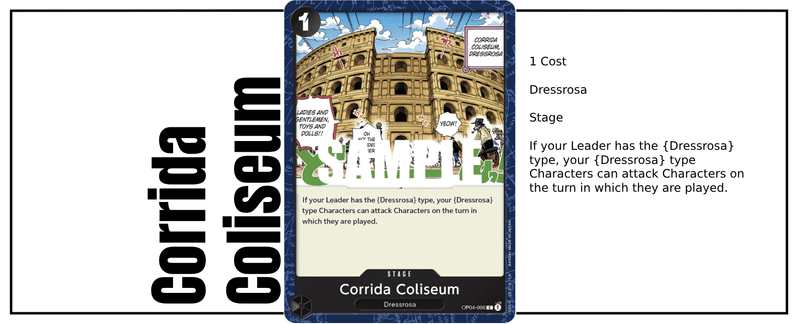
Finally, the last card to discuss. One of the most annoying cards in the game to me as a Rebecca player. This card is so strong as it enables Luffy, and protects Kyros, but getting value out of it is not easy. Because Rebecca KOs a lot, there aren't many targets to hit that are rested. You end up only using this effect maybe 1-2 times per game, and feel like you don't want this card in your deck. However, if you take it out, you feel so much weaker and feel forced to put it in. Consider this card the cost of being able to use such a broken card such as 7 cost Luffy. You will want this card in the early game, and playing this on turn 1 going second with your leader ability is a very strong move.
While playing this on turn 1 is optimal (if you're going second, turn 2 if you're going first), it's not required. As this card can get stuck in your hand, and can be played in the early to mid game at any time, 3 feels like the correct amount. 4 felt unnecessary, and 2 felt like 1 with how rare it was for me to draw it on time.
Finally, we're done with the card explanations.
As it's already ridiculously long, let's first go into what an optimal flow of play might look like and how the matchups go, before going through some other cards that could potentially fit it. I feel if I talk about card choices too long you'll fall asleep.
Flow of Play
The mulligan will change based on the matchup, but it's always safe if you have 2 of Orlumbus, Kyros, 1 cost Rebecca, Corrida Coliseum, or a 2000 counter. 7 Luffy doesn't hurt to have either, but as this deck can search so much, you can reasonable draw 7 Luffy in time and should not become the top priority in your mulligan.
Going First:
You will always want to use your leader ability on turn 1. If you can 1 cost Rebecca or Corrida Coliseum, that's ok, don't play.
1: Leader Ability
3: Corrida Coliseum + Leader Ability, or Kyros
5: Orlumbus + Leader Ability, or Sabo, or Kyros
7: An arrangement of the moves above, or Luffy
9: An arrangement of the moves above, or Luffy
etc. etc. The important thing is to remember the question, "When will I be able to play this card safely?"
Unlike Whitebeard or Film Kid, there isn't a set course of moves that will lead you to victory, which makes using, and getting used to Rebecca very difficult. Concepts that will make this easier are,
1. If you can use your leader ability, do so.
2. If you can defend an enemy attack with 1 card, do so.
When you're at 4 card in hand and 4 life, you might feel tempted to just take a 5000 attack as it doesn't affect your leader ability, but if you have a +1000 (or even a +2000) card that you do not need, just counter it. You will eventually take that life from an attack you cannot defend.
The benefit of going first lies in the fact that you can fairly reliably use your leader ability twice (turn 1 and turn 2) in the early game, and play 7 cost Luffy on curve. While I generally prefer going second in most matchups with the standard Rebecca list, but these merits help balance it out, enabling Rebecca to be strong going first and second.
Going Second:
You'll notice that the writing on how to play the deck is shockingly short. This isn't because I'm lazy, a l t h o u g h I a m. It's because Rebecca's moves are so situational, that there isn't a one size fits all movement. The best I can do is point out some useful situations to know and be ready for, and strive for.
2: Leader ability + Corrida or Rebecca
4: Orlumbus or Kyros (Refer to "Should you play Kyros of Orlumbus on turn 2 going second?" earlier in the article.
6: Orlumbus, Kyros, or Sabo
8: An arrangement of the moves above, or Luffy
10: An arrangement of the moves above, or Luffy / Luffy King Kong Gun
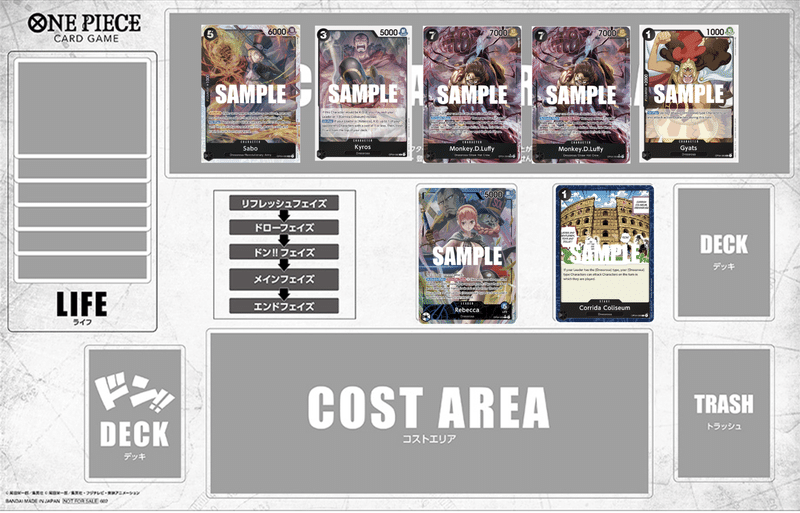
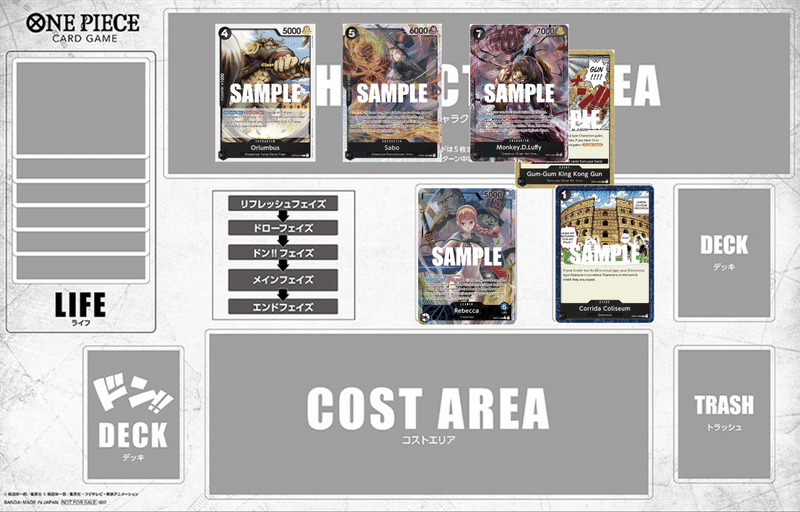
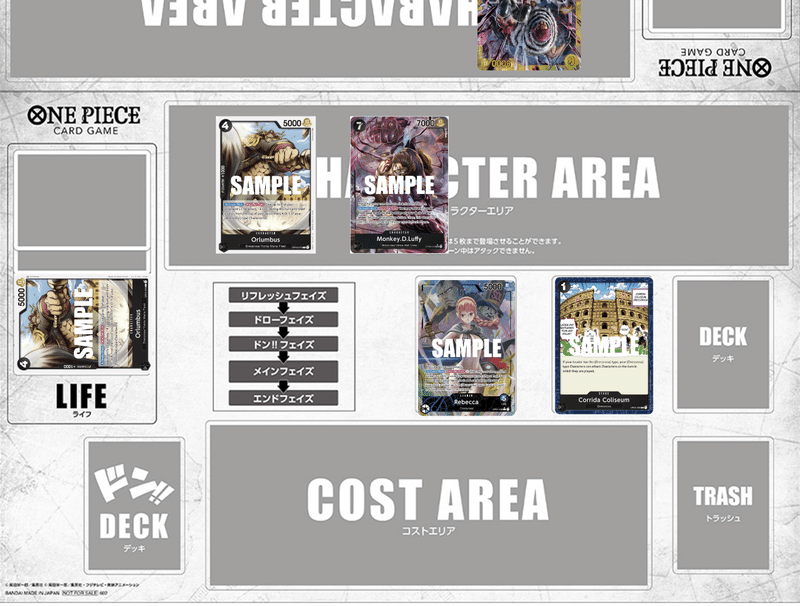
This feels very loose, so here's the board state you want to achieve eventually.
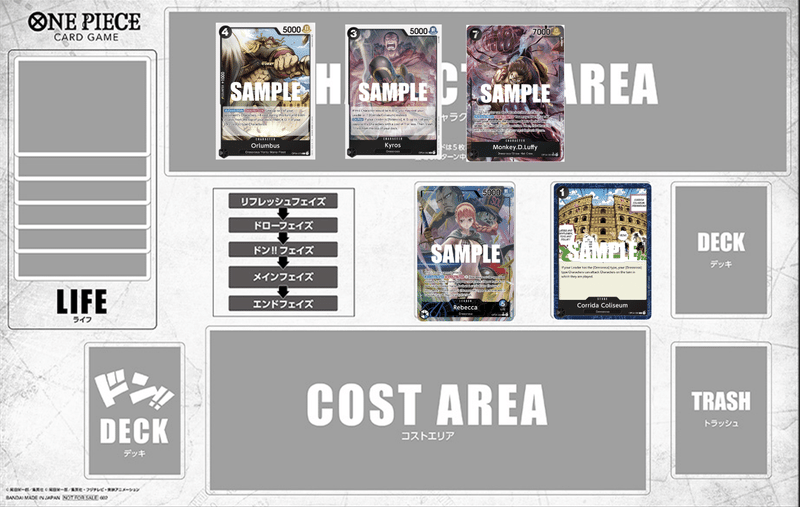
Your goal is to achieve this board state with ample health. If you do this, the game is probably over.
In some matchups you will hit with Kyros from the early game, but some matchups you want to starve the enemy's resources for as long as possible, and push back once you've created your perfect board, example above.
This is an important concept to any deck. Don't play a game of inches where you do the best thing you can each turn. Play a marathon, and visualize the board state in a winning position. Now your goal is not to win the game, as that can be done in thousands of ways. Your goal is to reach a position where you know you'll win. See what you want the board to be on the turn that you win, and try to make that board state. This is true for every deck.
Matchups
Roronoa Zoro

80+% winning
Select: First
The goal in this matchup is to completely clear their board and their hand. As such, you do not want to hit their leader until they are at 0 cards on board and effectively 0 cards in hand.
To achieve this, we want to permanently be punching their active board and not give them a chance to hit leader. Playing Luffy on curve, as well as abusing Gyats will be beneficial to this matchup. As you will focus on Luffy, Orlumbus' value will be lower, but not 0. Orlumbus can still help you reduce 5 cost Marco, and KO it with Kyros or Leo for example.
So how do you deal with 5 cost Marco if you don't run Three Thousand Worlds?
I actually feel like not having Three Thousand Worlds makes this matchup easier to play out, because the enemy's hand will be burned faster protecting Marco. If you bottom-deck Marco, he's simply gone, and the enemy hand isn't razed. Compared to Ace, Zoro does not have enough events to permanently keep Marco alive for free, and will eventually run out of hand.
You can watch a high level Zoro vs a high level Rebecca here from 20:17
Nekomaru (Championship top16 Zoro) vs Saide (2 time JP championship TopCut and 1 time Champion)
Playing as Zoro vs Rebecca
As Zoro you will firstly want to take first, as first and second don't make a large difference for Rebecca, but lets you start hitting first as Zoro.
1: Pass even if you have a character
3: 8000 Leader. Rebecca wants to use her leader ability every turn, so making her hand 7 will prevent this. If you are Rebecca and can defend his 8000 with 2000+2000, please do so, and the game is set as you cannot be stopped from using your leader ability for the rest of the game.
5: 5 Marco and no hit to leader, or 10000 leader. If you can only hit for 5000, there's no point in hitting Rebecca as she will treat it as a hand refresh with leader ability.
7: 12000 leader, or 5 Marco+7000, or fill the board with small cost characters. By putting out all of your characters at once, there's a chance some of them survive and become attackers the next turn.
You want to try to kill Rebecca as fast as possible while making it hard for her to do what she wants. As such every turn will be some combination of hitting high enough that she can't defend it, playing multiple small things, or playing 5Marco hoping she can't clear it.
Even knowing how to fight Rebecca, this matchup will be hard.
Whitebeard
50% winning
Select: First
You would imagine taking second is better against Whitebeard and both decks generally prefer second. However, I've found that taking first is better. The big reason why taking first could be better is that as we don't run Three Thousand Worlds, getting rid of 5Marco is quite difficult, given that the enemy will play 7 Ace on the next turn. As we can't keep up with this tempo, I would rather take first and get ahead on making board to try to deal with at least everything except 5Marco as soon as it comes out. I could be wrong on this point though, as I have not fought restricted Whitebeard irl.
Newgate with the restrictions is a buff. This sounds weird, but it's true. Whitebeard's most oppressive card to other decks is not 9cost Whitebeard, but rather, 7cost Ace. However, Ace is extraordinarily weak in the unrestricted Whitebeard Mirror. However, as that unrestricted Whitebeard Mirror doesn't exist, Whitebeard is free to use 7cost Ace. Ace is the most problematic card for Rebecca, and as such you will want to keep your characters aside from Kyros active on their 7-8don turn.
A few key cards to this matchup as well as 2 different ways to win.
Orlumbus: Unless Orlumbus is rested, he cannot be killed by Whitebeard. Playing this with priority over Kyros is important, as he will make killing Atmos, Thatch, and Ace easier.
Sabo early can also help stop the pressure that Whitebeard exerts by letting you defend a 6000 attack as if it's 5000, once per turn.
The early game from Rebecca will become 2 different outcomes. You want to clear the early game board as efficiently as possible, then choose between the next 2 plans.
Permaclear and hit with 6000 slowly
If it seems possible to keep the board completely under your control, I would do so, as it is safer. If this plan seems possible, and you are able to completely shut Whitebeard out of the game, it doesn't matter if he is going to hate you for the rest of the week, you will never see him again. Take 20 turns and make sure he loses.
However, this plan does not always work, and you will sometimes (honestly most of the time) have to take the riskier planKill him immediately
Rebecca is a control deck so many people will adjust their hand and don to push as much damage out as possible, and disregard the fact that Luffy with King Kong Gun can hit for minimum 20000 Double Attack twice out of nowhere. If the situation presents itself, go for lethal on turn 5-6. As such, you will want to play Luffy on curve, or as soon as you have the oppurtunity to, as if he's active, he cannot be killed, and will permanently be a threat.
27:41, Kanagawa Championship, Tsuki Usagi (Multi-time topcut appearance) Whitebeard vs Chami (Multi-time topcut appearance) Rebecca
Playing as Whitebeard vs Rebecca
As Whitebeard, you want to keep the pressure up, and not play 9cost Whitebeard. As Rebecca doesn't need to hit your leader anyways, the +2000 does not hurt as much as just spreading your don out and hitting would. If you play 9 cost Whitebeard, you will lose tempo, and probably your Whitebeard. Additonally, be careful when playing 4 cost Marco, and it can be hit active, and then abused when rested after the on KO effect.
As Whitebeard, I would take first, and put immense pressure on Rebecca
1: Izou (unlike Zoro, she is not an attacker)
3: 9000 leader
5: Marco
7: Ace
9: Ace/big hit
etc. There's no need to take the board that's above 5000 power, until it is rested and you play Ace. It is easier for Whitebeard to play vs Rebecca, but I think that this matchup is very 50-50.
Red/Green Law
80+% winning
Select: Second
In this matchup, if you play normally you should win. It's much harder for Law to play this matchup than for Rebecca, which is very rare. As such, I'll keep it short for what Rebecca should do, as seeing the game through Law's perspective, will help Rebecca understand what she needs to do.

Again, you will want to permanently clear the board and not hit the enemy life until they have no chance of being your friend. Use cards like Kyros and Gyats to your advantage, and hold on to Leo and extra Kyros' for when they try to spread out their board.
Playing as Law vs Rebecca
PRAY YOU WIN ROCK PAPER SCISSORS AND TAKE SECOND AND PRAY THE ENEMY BRICK
next matchup.
Just kidding. The first and most important card to this matchup is 2cost Sanji. Without 2 cost Sanji, this matchup is actually impossible. Not only is Sanji 2 cost and is therefore not killable by Kyros or Leo alone, he can draw your life which Rebecca is trying to prevent. Play Sanji on turn 1 and use his effect immediately. If you're on 2 life, it's the same as if you're on 1 as King Kong Gun doesn't care about even numbers. Use Sanji to fuel your hand, and only play 2 cost cards before the turn where you will Shambles (leader ability)
When you play your 5 cost Law for example, and then enemy doesn't have an Orlumbus on the board, be sure to pair him with low cost blockers. You will want to keep your hand and your board healthy and try and rush down Rebecca with 5cost restand Law. While this is a simplified version of it, it's generally just a very tough matchup. I do not think I lost with Rebecca vs Law except for a few times vs @peth_card, one of the best Law's in Tokyo (at least).
If you're first vs Rebecca, it's a big rough, but keep a similar gameplan in mind. Remember that if you can only hit for 5000, do not hit at all. Hitting with 6000 is barely passable as they will probably only trade their 2000 counter for a 1000 counter from leader ability. However, I still would not recommend hitting at 6000 at all if it can be helped. I would hit with 7000 or more the same way Zoro does, and try to spread out my board all in one turn and Shambles it all together.
If Law gets to go second, draws Sanji, draws Law as well as seachers, then he has a fighting chance. As this is not realistic every game, it is fairly losing, but not unwinnable, for Law.
Winning game for Law vs Rebecca between 2 high level players, starting from 2:32:17.
Rebecca
50% Winning
Select: First
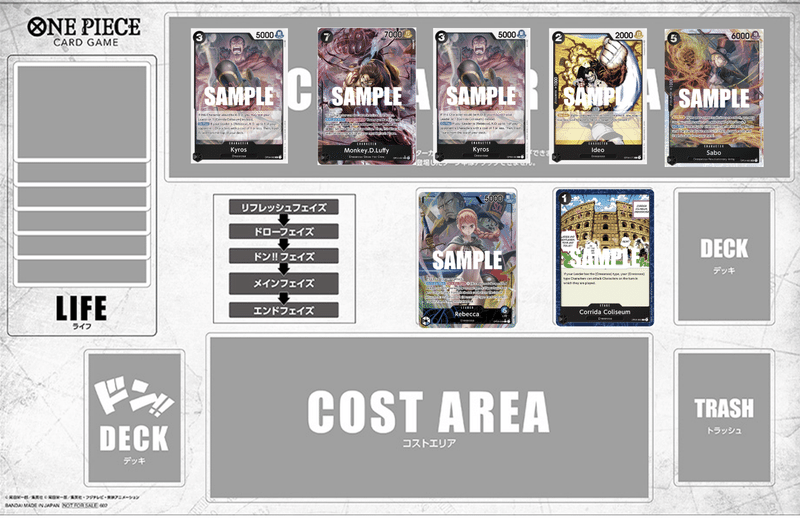
Rebecca mirror seems like it would be a pain, but it's actually not very interactive unfortunately. The side that picks up more Kyros wins. As you want to play Kyros first, you will take first. As Kyros cannot be KO's the enemy either just deals with it, or uses Three Thousand Worlds on it. As this is a trade of a 3 cost for a 4 cost, it's better to be in the aggressive position. It's also important to play Sabo at good timings. Playing Sabo right before their 10Don to possibly prevent a 10Kuzan from dropping, can keep the momentum in your favor. This matchup surprisingly only takes about 10-15 minutes, and this is what you want your board to look like.
Another way that you can win, is by hold on to the game long enough to play Luffy and finishing the game in 1 turn like you would against a deck like Zoro or Law. This is risky as you can't clear the board, but is an option if you're on the backfoot of the situation. The attached video is an excellent example of both strategies as work.
Kaku vs Kaa, Fukuoka Championship Finals, 2:33:12
https://www.youtube.com/live/-ej5quV2RTE?si=vguLbvaENh17Yp2O&t=9193
Katakuri
80% Losing
Select: Second
8 cost Katakuri will get rid of Luffy or Orlumbus, denying you from being completely ready for when they inevitably from 10 cost Linlin on the board in a row. As such there are 2 ways to clear 10Linlin and make the matchup semi-difficult for Katakuri.
Play 2 Orlumbus
Play Luffy on 9/10 Don and have King Kong Gun ready for next turn.
By playing 2 Orlumbus at some point in the first 4 turns, Katakuri will only be able to clear 1, and the other one will be free to minus, and set up for Trueno Bastardo. Another plan you can take is to play 7cost Luffy not on 7-8 don, but 9-10 don. By delaying Luffy by 1 turn, the opponent cannot play 8Katakuri on turn to clear Luffy. By playing it on 9-10 Don active, you give them the choice between playing 10Linlin, or another 8Katakuri, stalling their 10Linlin turn. If your Luffy does survive, slap a bunch of don on it, or King Kong Gun, and clear 2 things at once and delay the game long enough to be able to win.
Plan B:
Against Katakuri, if you cannot clear the whole board, there is another way.
If you have 2 Kyros in the early game, these are effectively 2 5000 attacks that cannot be dealt with every turn. By playing 2+ Kyros and hitting every turn, now all you need to do is stall long enough for them to finish the game before the enemy Katakuri can. I find that this Kyros hit plan has a higher winrate for me, but it comes down to your draws if you're allowed to take this plan.
If you are worried the Katakuri matchup, and being able to draw the pieces you need, I would consider using Kaya over Tsuru to cycle my deck faster.
Playing as Katakuri vs Rebecca
2: Pudding
4: 10000 Leader
6: 12000 Leader
8: 14000 Leader or 8Katakuri
10: 10Linlin or 8Katakuri+8000 Leader
If the enemy takes the plan to delay their 7Luffy, it does them more harm than it does you to just play 8Katakuri and get rid of it immediately. As such, if they have a board that does not require you to play 8Katakuri, hold on to it for 7Luffy, even if it delays your 10Linlin. Hitting with massive numbers every turn, trashing their life and playing massive bodies that also protect your life, is pretty fucking cringe.
Fairly winning for Katakuri, but with tech cards like 4Kuzan, 5Garp, 10Kuzan, etc can help.
Ideo will help stall the game as well, so consider maybe even adding some more small blockers if you want to go for a more aggressive plan. Just be careful of Thunderbolt.
Crocodile
This matchup was thankfully very rare in Japan, but is extremely hard for Rebecca. Anything you play will be bounced to your hand or your deck, not letting you set up your ideal board. As such, try your best to play cards that can immediately effect the board. KO characters out of hand and eventually Luffy King Kong Gun on 10 Don to clean up the boards. This is a very hard matchup.
Playing as Crocodile vs Rebecca
Playing normally
Queen
I thought I should write something here as this matchup seems to be a bit more common overseas. However, Queen is completely MIA in Japan, and as such I have never fought a Queen as Rebecca in tournament. I have absolutely no idea how the matchup goes honestly, and I always pray I never hit it as all I know if that you will run out of time because the game takes too long between 2 hyper-control deck. If you play vs a Queen, or vs a Rebecca as Queen, agree to play as fast a humanly possible so you can actually finish in 30 minutes. I played this matchup maybe twice in practice early on in the meta and games took about 45 minutes.
Other Card Possibilities
All of the other cards I mentioned before
Kaya, Tashigi, Sables, Three Thousand Worlds, Trafalgar Law, 3 cost Doflamingo are all viable substitutes and I've talked about them above.
Garp
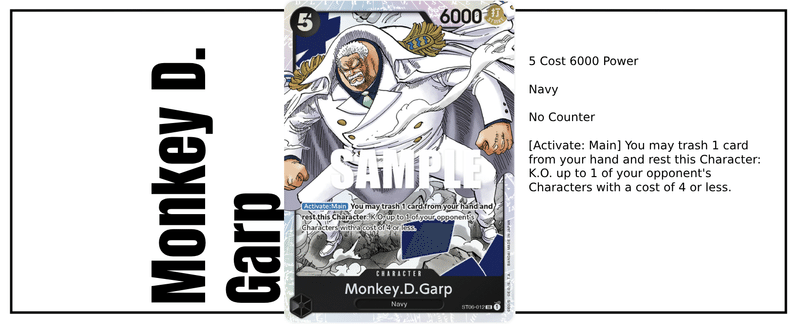
I love this card. A way that many decks play vs Rebecca is to hit high so that Rebecca can't reach 6 cards for her leader ability. Garp not only KOs a 4 cost or less, it trashes a card for you so you can use your leader ability again. Now only this, but Garp is such a big problem that he makes your leader 6000 in every matchup except Law, who will just Otama you. Garp is very good vs Whitebeard and Katakuri, but is a bit mid vs Zoro, Law, and Ace.
Using this card together with 10Kuzan is terrifyingly strong in some instances.
Sogeking
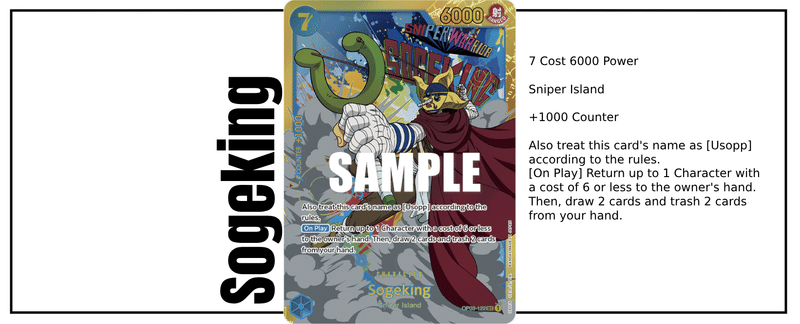
Being able to refresh your hand is nice, and Sogeking can do this while stalling the game for a turn. If Yellow plays cards like 6 cost Perospero, or Whitebeard plays 6 cost Thatch, this card can get massive value. If these 6 cost Vanillas are popular, this can be a good choice to fill your trash, increase your consistency, and stall a turn.
Hajrudin
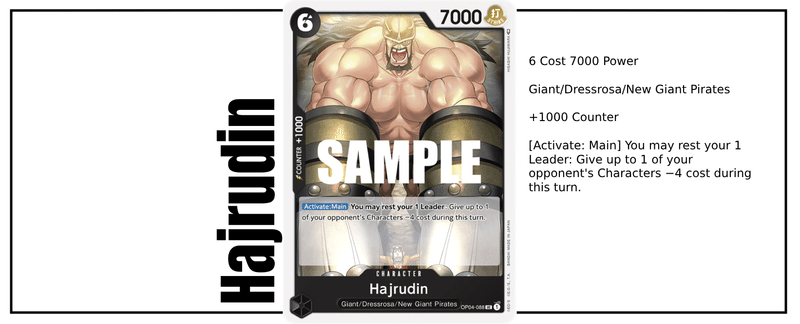
Hajrudin can act as a 5th or 6th Orlumbus for matchups like Yellow where you will want to play mulitple cost reducing cards. The benefit of this card compared to 4 cost Kuzan, is that this card is searchable and has +1000 counter. However, it does cost 6 which is quite heavy, so keep this in mind if you want to adjust some things for certain matchups.
4 cost Kuzan

This card is good vs Yellow and Whitebeard. As you want to play 2 Orlumbus vs Yellow in plan A, having essentially 8 Orlumbus helps the consistency of this game plan. The highest placing Japanese player at the Championship Finals in OP04 used this Kuzan and no stage
エリア予選決勝大会
— かぁ〜。 (@Ka_pkkmy) August 20, 2023
予選
レベッカ 先攻 負
赤ゾロ 後攻 勝(海賊王)
白ひげ 先攻 勝
白ひげ 先攻 勝
青ナミ 後攻 勝(福岡リベンジ)
トナメ
赤緑ロー 先攻 勝
赤緑ロー 後攻 勝
赤エース 後攻 負
福岡から構築から1枚しか変わってませんw
2冠が生まれないジンクス粉砕できずっ pic.twitter.com/gIqDLpAbbM
10 cost Kuzan
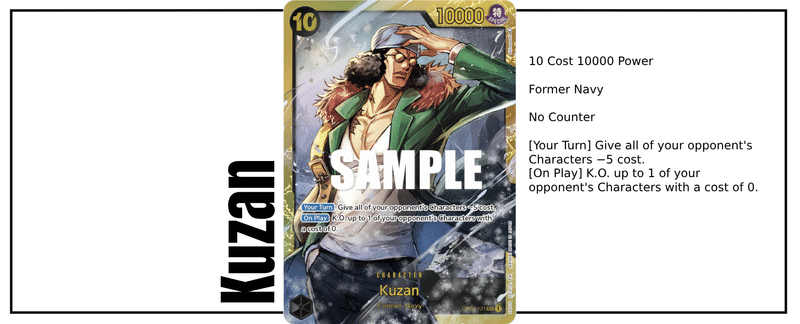
If you are not worried about the Zoro or Law matchup, and want to play a bit riskier with a stronger late game, Kuzan is a good pick. It has good synergy with 4 Kuzan and Orlumbus as it enables Kuzan to KO a 9cost on play. This card is not removable by Katakuri, so it can make a new wincondition in permanently clearing the board. I love how this card looks and would use this card if the meta allows for it.
Barrier!!
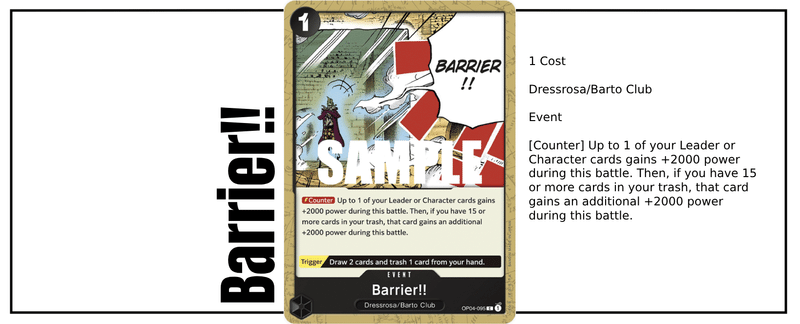
Barrier is black radical beam. You fill up your trash very fast so it does not have as big of a drawback as something like Blast Breathe. If you want to play slower games, consider this card, even as a 1 of. You will not need this in the early game, but in the late game, it can be insane. The reason this card works as a 1 of is because it has high priority in putting back into your deck with Luffy, enabling you to use it multiple time. It's a fun tech card that the enemy won't expect. Most of the time you won't use this trigger though.
Cavendish

Cavendish is a very good card. It was actually my favorite Dressrosa Card going into OP04. However, It's job is taken and split up by 2 other cards. Leo, and Luffy. I think that this card can be good in the right spot, but should not replace any slot over Luffy or Leo. As the timing on this card is niche, 1 feels like the right amount, and can surprise the enemy. But, I do not think this card has more value than some other cards in the deck to the point of cutting them down to 3 copies to fit in Cavendish. If you have a floating spot in your deck that you don't mind not having counter, consider Cavendish.
【UPDATE】: October 28
Hi again!
Putting an update here as I realized I talked a lot about every card, and a standard Rebecca List, but I didn't talk about combinations of the cards that could be good in certain situations. I have gotten some questions on "What about X card," so I'll briefly run through them.
Six King Pistol
I really don't like this card. I understand the deck runs many counterless cards, but the general mantra for any deck is, if you can defend something with 1 card, defend it, if it'll cost 2, let it though. There are case by case instances, but Six King Pistol is inherently opting into a +2000 +1000 on an enemy attack without the benefit of having an extra effect or flexibility like other +2000 counters. If you feel like you need this card, I think it's because you are prioritizing the wrong cards in your search, not using Sabo at the right time, or your list simply needs a bit of a rethink. No shade, it's important to face your worries and figure out why than to ignore it.
10 cost Kaido
This Kaido bounces an 8 cost and 3 cost. It's a very strong effect, and very very good in the mirror. Outside of the mirror, it's very mediocre in my opinion. While in the mirror you can bounce away Kyros and Orlumbus and cut their damage and threat in half, in other matchups in OP04, bouncing is super useless.
7Ace -> Has Rush it'll come back
7Linlin -> Insane onplay effect, but not the worst target to bounce
8Katakuri -> Insane onplay effect
10Linlin -> Doesn't hurt them if you bounce it because it's banishing your life
Any Law Card -> It'll cost them 2 to bring it back.
And Zoro Card -> The game is already decided by 10Don
Mirror -> Bounce Kyros, Bounce Orlumbus, gg
I would much prefer 10cost Kuzan as if helps you KO the cards instead of stall for a turn.
Rebecca Lists to Ponder
4cost Kuzan is very strong in the current meta as it's very hard to remove before at least getting 1 hit off. The importance between Kuzan and Orlumbus comes from knowing when to attack, as once Kuzan is rested he will immediately become the target. For example, against Yellow you would not rest Kuzan until 10Mom drops as you want to achieve the goal of having 2 Orlumbus or Kuzan on the board as illustrated above. By having both Kuzan and Orlumbus, the yellow matchup will become more consistent in this gameplan. As this is focusing on being able to kill 10Mom without sacrificing power in other matchups, I am using Trueno Bastardo, but if you are worried about 5Marco from Whitebeard, consider using Three Thousand World and Tashigi to be able to still reach 10 cost.
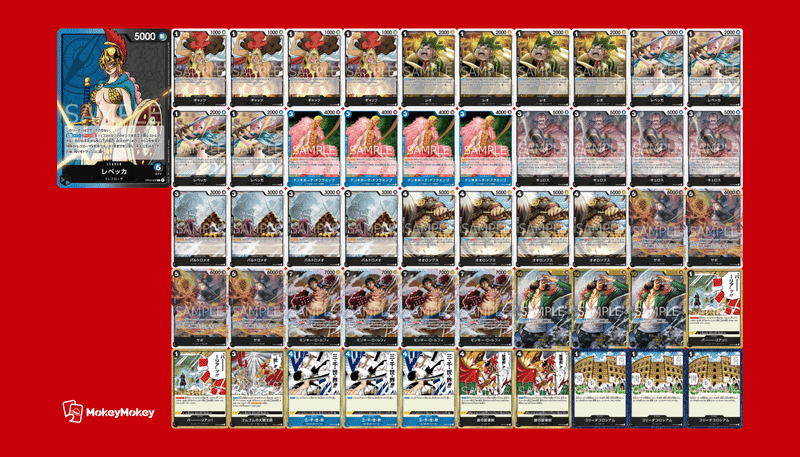
While I would not run something exactly like this, as I MUCH prefer having 12 2000 counters, I want to showcase this idea to show that there are other ways around this problem. In OP05, I run only 10 searchable 2000counters (as seen below,) and have no issues, as they are all searchable. Although Barrier costs 1 don, it is also a searchable 2000counter that can also become a 4000 counter. Though that's not the most exciting part of the list.
10Kuzan if it lands on the board is the strongest late game card in black bar none. As Kuzan has a permanent -5 cost, I am using Three Thousand Worlds to reach 10cost. I am still running a few Trueno Bastardo as it's just a solid card in general, and Orlumbus Trueno is still possible. As 10Kuzan is not searchable, 3 cost Dofla is used to help secure your next draw and look for 10Kuzan aswell as what you want from your leader ability. However, this card can be Ideo as well. If your local environment is Yellow heavy, I would prefer a build like this. If you environment is Whitebeard heavy, I would recommend something like the following

If you are worried about Whitebeard, the first important thing is to make sure you can counter his 6000 attacks. This build aims to clear Whitebeard low cost rush cards as they come out and finish the game with a simple 1-2,King Kong Gun Punch. As Whitebeard will aim to hit often and low, prioritizing 2000 counters over blockers is good in this matchup.
As you want blockers in the Yellow matchup, and counter in the Whitebeard matchup, you will want to put in about 58 cards. However as you can't I think it's best to make a meta read on what you think you will see the most, and hope that you're lucky or that you're right. All-in-all, I would prefer something like the first list in this section, but I have played variations of all of these lists and I won't post a list I hate.
I tried some really bad lists in the past, so this is the result of my hundred hours so you don't have to go through the pain of "What if I put in Ulti??"
My OP05 Rebecca

This is a slightly old list, but this is the idea. 4 cost Rebecca opens up so many new avenues for innovation.
I would talk a bit about this, but I'm a bit tired. Maybe next time^^
Closing
We've reached the end again. I hope reading up to here was worth it. I will remind you again that I plan on moving to Patreon, but will make free video of gameplay on the side. It would be absolutely amazing if you could support me here, but I have no hard feelings towards you if you can't. Thank you for reading up to here, and I hope to see you in the YouTube comments, or on Patreon soon.
My dms are always open @ikailakai on twitter, so please feel free to ask me questions, just don't send me hate for this decision if you would. I need to eat too.
Thank you very much for all of the support as always.
Stay safe,
Kai
この記事が気に入ったらサポートをしてみませんか?