JetBot OSイメージ書き込み失敗(回避編)

最大転送速度: 読み出し100MB/sにつられて買った64GB microSDXCカードにJetBotのOSイメージを書き込めない問題にハマったので、回避方法を残しておこうと思います。
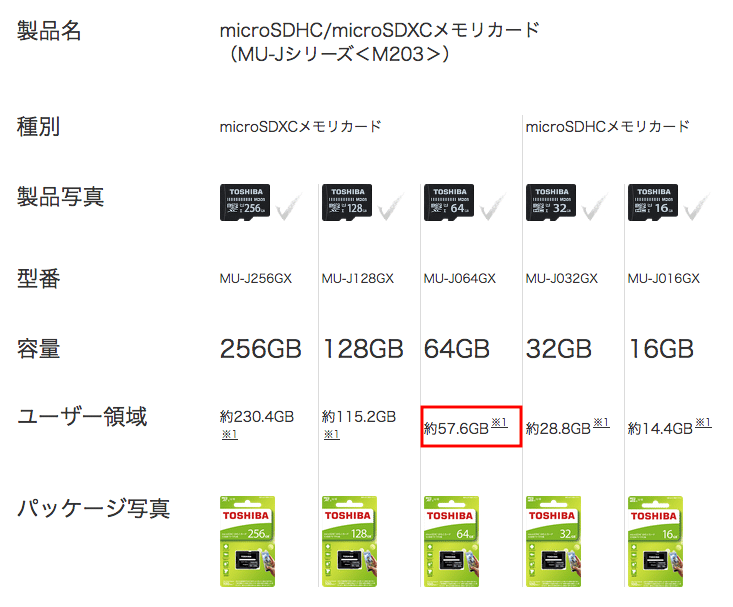
容量64GBと謳われていますが、実際に使用可能な領域はそれよりも少ない(今回のケースは約57.6GB)ことが知られています。
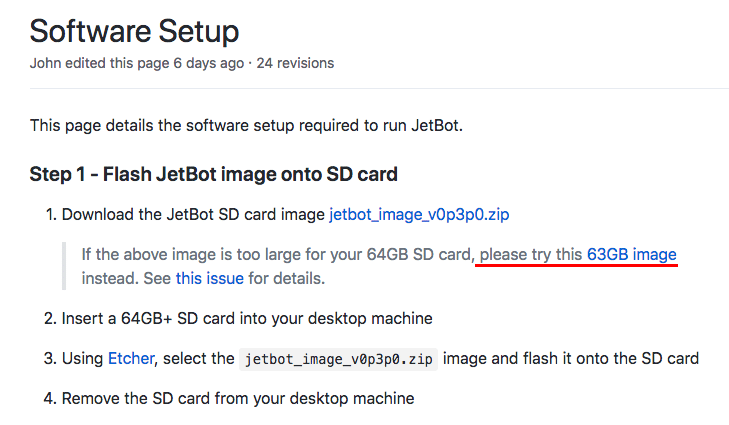
JetBot wikiページにOSイメージを64GBのSDカードへ書き込めない問題が記載されていることは事前に把握しており、問題を回避するために63GBのOSイメージファイルが用意されていることも把握していたので安易に考えていましたが、実際にEtcherで書き込もうとした段階で容量不足のエラーが表示されたため、今回の記事を書くことに至りました。

手順1. GPartedのインストール
JetPack4.2のOSイメージを書き込んだSDカード(16GB)で起動し、JetBotのOSイメージを書き込んだSDカード(128GB)をUSB接続します。(microSD USBアダプラを使用)
ターミナルを起動し、GPartedのインストールと起動をします。
kitazaki@kitazaki:~$ sudo apt install gparted
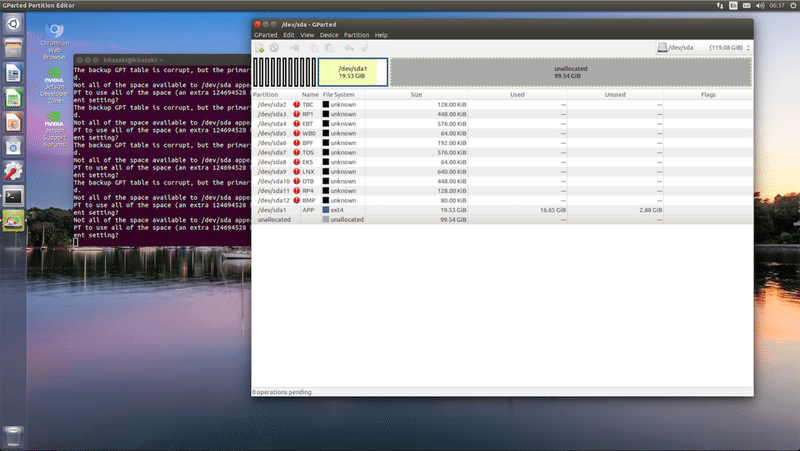
kitazaki@kitazaki:~$ sudo gparted手順2. ファイルシステムとパーティションのサイズ縮小
サイズを縮小する前に注意が3点あります。
1. GParted起動時にエラーが表示されるが、OKを選択する。
The backup GPT table is corrupt, but the primary appears OK, so that will be used. →OKを選択
また、全ての領域が使用可能になっていない警告が表示されるが、Ignoreを選択する。
Not all of the space available to /dev/sda appears to be used, you can fix the GPT to use all of the space (an extra 124694528 blocks) or continue with the current setting? →Ignoreを選択
2. 縮小の対象デバイスは/dev/sdaです。GPartedを起動した直後は起動デバイス(/dev/mmcblk0)が表示されているので、対象デバイスを変更する必要があります。
(右上のデバイス選択プルダウンメニュー)
3. サイズを変更する前に対象デバイス(対象パーティションは/dev/sda1)をumountする必要があります。
(/dev/sda1を選択して右クリック→umountを選択)
対象パーティション(/dev/sda1)を選択して右クリック→Resize/Moveを選択する。
・Free space preceding (MiB): →0を入力
・New size (MiB): →20000を入力(20GB)
・Free space following (MiB): →自動で計算されるので変更しない
Applyボタン(左上の緑色のチェックマーク)を押すと処理が始まります。
処理が完了した後、Save Detailsボタンを押して結果ファイル(gparted_details.htm)を保存します。
gparted_details.htmの内容(例)はこちらです。
GParted 0.30.0 --enable-libparted-dmraid --enable-online-resize

Libparted 3.2

Shrink /dev/sda1 from 58.66 GiB to 19.53 GiB  00:02:01    ( SUCCESS )

calibrate /dev/sda1  00:00:05    ( SUCCESS )

path: /dev/sda1 (partition)
start: 24576
end: 123041791
size: 123017216 (58.66 GiB)
check file system on /dev/sda1 for errors and (if possible) fix them  00:00:16    ( SUCCESS )

e2fsck -f -y -v -C 0 '/dev/sda1'  00:00:16    ( SUCCESS )

Pass 1: Checking inodes, blocks, and sizes
Pass 2: Checking directory structure
Pass 3: Checking directory connectivity
Pass 4: Checking reference counts
Pass 5: Checking group summary information

243598 inodes used (6.33%, out of 3850240)
170 non-contiguous files (0.1%)
150 non-contiguous directories (0.1%)
# of inodes with ind/dind/tind blocks: 0/0/0
Extent depth histogram: 214047/47
4527451 blocks used (29.44%, out of 15377152)
0 bad blocks
2 large files

181675 regular files
29821 directories
0 character device files
0 block device files
0 fifos
132 links
32088 symbolic links (29491 fast symbolic links)
5 sockets
------------
243721 files
e2fsck 1.44.1 (24-Mar-2018)
shrink file system  00:01:34    ( SUCCESS )

resize2fs -p '/dev/sda1' 20480000K  00:01:34    ( SUCCESS )

Resizing the filesystem on /dev/sda1 to 5120000 (4k) blocks.
Begin pass 2 (max = 122209)
Relocating blocks XXXXXXXXXXXXXXXXXXXXXXXXXXXXXXXXXXXXXXXX
Begin pass 3 (max = 470)
Scanning inode table XXXXXXXXXXXXXXXXXXXXXXXXXXXXXXXXXXXXXXXX
Begin pass 4 (max = 30815)
Updating inode references XXXXXXXXXXXXXXXXXXXXXXXXXXXXXXXXXXXXXXXX
The filesystem on /dev/sda1 is now 5120000 (4k) blocks long.

resize2fs 1.44.1 (24-Mar-2018)
shrink partition from 58.66 GiB to 19.53 GiB  00:00:06    ( SUCCESS )

old start: 24576
old end: 123041791
old size: 123017216 (58.66 GiB)
new start: 24576
new end: 40984575
new size: 40960000 (19.53 GiB)
libparted messages    ( INFO )

The backup GPT table is corrupt, but the primary appears OK, so that will be used.
Not all of the space available to /dev/sda appears to be used, you can fix the GPT to use all of the space (an extra 124694528 blocks) or continue with the current setting?
The backup GPT table is corrupt, but the primary appears OK, so that will be used.
Not all of the space available to /dev/sda appears to be used, you can fix the GPT to use all of the space (an extra 124694528 blocks) or continue with the current setting?
========================================リサイズ(Resize/Move)を実行して変更が完了すると20GB (17GB Used+ 3GB Unused)に縮小されていることを確認できます。32GBのMicroSDカードでも十分ですね。

手順3. ブロック数を指定したイメージのバックアップ
ここからはMacで作業を行います。SDカードからイメージを作成するのにddコマンドを使用しますが、ブロック数を指定して実行します。
書き込みスピードを上げるためにブロック数を1Mバイトとすることにして、リサイズ後の結果を確認すると、セクタ(単位は512バイト)の最後(new end)が40984575なので、40984575 / 2048 = 20011.99なので20012ブロックまで書き出します。
JetBot_20GB.imgがバックアップファイルです。
$ sudo dd bs=1m if=/dev/rdisk2 of=./JetBot_20GB.img count=20012
20012+0 records in
20012+0 records out
20984102912 bytes transferred in 253.542948 secs (82763504 bytes/sec)
手順4. イメージのリストア
バックアップで使用したddコマンドを使用してバックアップファイルをSDカードへ書き込む方法と、最初にJetBotのOSイメージをSDカードへ書き込む際に使用したEtcherツールを使用することができます。
バックアップファイルのサイズが小さいので書き込み時間が短いです。
$ sudo dd bs=1m if=./JetBot_20GB.img of=/dev/rdisk2
手順5. GPTテーブルの修正
ここからはまたJetson Nanoで作業を行います。リストアしたSDカードのディスク領域の末尾に第2GPTテーブルを作成する必要があります。
kitazaki@kitazaki:~$ gdisk /dev/sda
Command (? for help): x
Expert command (? for help):  e
Expert command (? for help):  w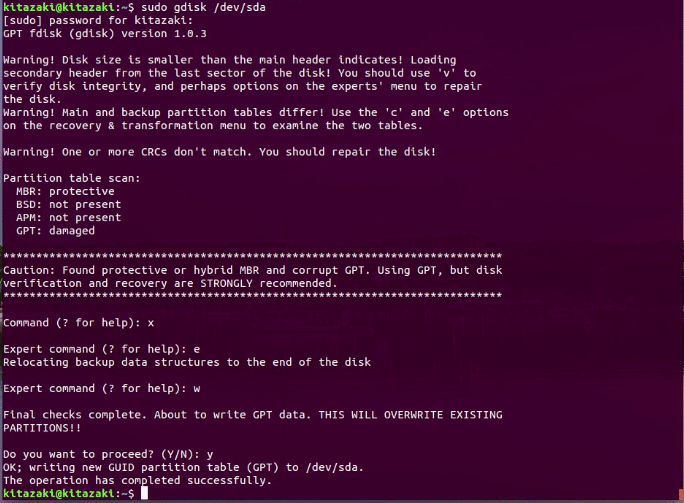
手順6. パーティション、ファイルシステムのサイズ拡張
手順2. と同じ操作でパーティション、ファイルシステムのサイズを拡張することができます。
この記事が気に入ったらサポートをしてみませんか?