Open Interpreter:ローカルPCでChatGPT×PC操作

1.概要
過去の記事で大規模自然言語モデル(LLM)の記事を作成し、その中でChatGPTを紹介しました。2023年4月10日はOpen AIのCEOが岸田文雄首相と意見交換を交わすほど、ChatGPTは社会に浸透していってます。
本記事では、2023年9月6日に公開されたOpen Iterpreterを紹介します。
Today I’m launching Open Interpreter, an open-source Code Interpreter that runs locally.
— killian (@hellokillian) September 5, 2023
Summarize PDFs, visualize datasets, and control your browser — all from a ChatGPT-like interface in your terminal.
● https://t.co/UuqbbqUhPk
$ pip install open-interpreter
$ interpreter pic.twitter.com/2daKWUH48v
1-1.Open interpreterとは
Open Interpreterはざっくりでいうと「ローカルPCで使用できるChatGPT」です。よって単純なチャットだけでなく、ローカルPCで操作できる処理をOpen Interpreterが理解して自動で実行することも可能となります。
ChatGPT Code Interpter(ChatGPTの機能でファイルを添付するとその中身を理解してくれる機能)との比較は下記の通りです(参照は公式Docs)。
インターネットへのアクセスが不要
最大Upload容量:100MB、ランタイム:120sの制限
環境が壊れた時の状態が明確
Open Interpretetでできることの概略は下記記事参照のこと。
1-2.Open interpreterの注意点
特徴で説明した通り、ローカル環境で実行されるためファイルの破損などには注意が必要となります。
【対策1:Google Colabの使用】
”ローカルPC/ネット環境無し”で使用できるという一番大事な特徴がなくなりますが、対策としてGoogle Colabでの使用があります。
公式がデモ用としてGoole Colabにファイルを公開しているため練習用として使用可能です。
【対策2:Docker環境での使用】
対策としてはDockerを用いて仮想環境で実行する方法があります。Dockerの環境構築/要領は記事発行しており、Dockerfile+ビルド手順はからあげさんが既に公開しているため簡単に利用できます。
Open Interpreter、ようやく触れましたが一瞬で動きました。これはやばすぎですね…これはやばいですよ。
— からあげ (@karaage0703) September 9, 2023
とりあえずDocker環境で動かせるようにしました。これはやばいhttps://t.co/WadmIDNq3I pic.twitter.com/VExuqRV6wn
[Dockerfile]
FROM ubuntu:22.04

RUN apt-get update && apt-get upgrade -y
RUN apt-get install -y git python3 python3-pip

RUN pip install open-interpreter==0.1.1
RUN pip install numpy matplotlib pandas

WORKDIR /root
1-3.PC環境
私のPC環境はWindowsとなります。
2.環境構築
2-1.ライブラリのインストール
ライブラリ対応は"pip install open-interpreter"のみとなります。3章 Quick Startの通り、私は事前に仮想環境を作成して実行しました。
[Terminal]
pip install open-interpreter
2-2.OpenAI APIキーの発行(任意)
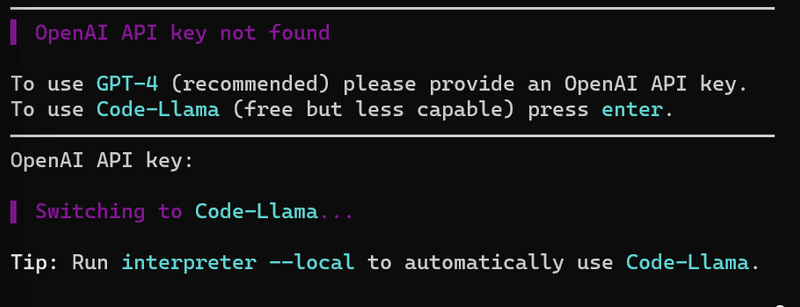
open interpreterを使用する時にAPI_KEYの入力を要求されるため必要に応じてAPI_KEYの入力が必要になります。
API_KEYを入力しない場合はGPT-4ではなくLlama2(Metaが公開したオープンソースLLM)を使用できるため本作業は任意になります。
【エラー対応:API KEYが使用できない※修正中】
下記にAPI_KEY発行方法を記載しましたが、私の現状では下記のようなエラーが発生しました。推定原因としてOpenAIのAPIに支払い方法を登録していないことが原因と思います(追って調査)。
注意点として本支払い条件はChatGPTへの課金とは別物となります。
[Error]
You exceeded your current quota, please check your plan and billing details
The model `gpt-4` does not exist or you do not have access to it. Learn more: https://help.openai.com/en/articles/7102672-how-can-i-access-gpt-4.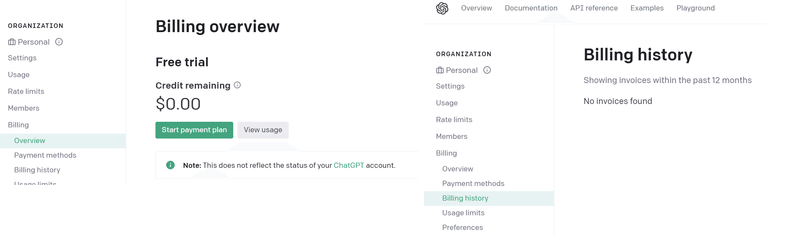
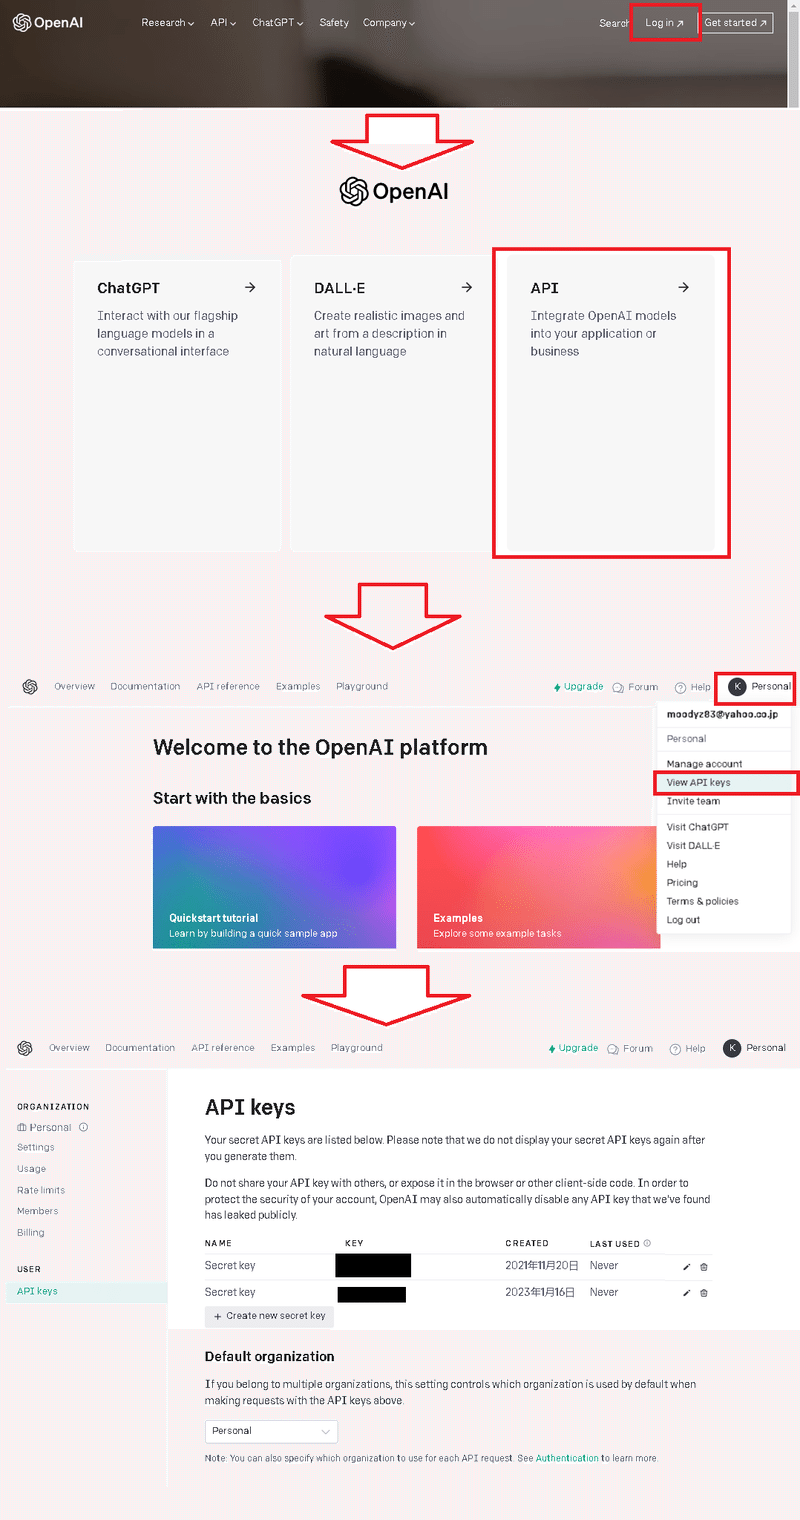
【API KEYの発行方法】
API_KEYの発行方法は下記の通りです。なおAPI_KEYを使用して実行すると課金が発生すると思います。
OpenAIのサイトに入りログインする
3つのブロックからAPIを選択
右上のアカウントから「View API Keys」を選択
API Keysを発行
2-3.Llama向け(Windows用)
2-3-1.発生エラーの内容
GPT-4(OpenAIのAPI KEY)を使わない場合、Llamaモデルを選択できます
(後述しますが)Llamaモデル選択後に流れで環境選択があり”llama-cpp-python”のインストールを要求されます。

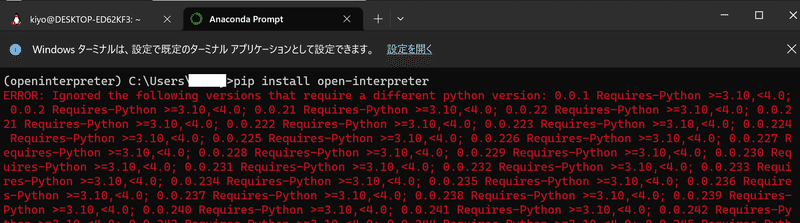
これを実行していくと下記のようなエラーが確認されます。大きく分けると「CUDA環境ができてない」と「llama-cpp-pythonがビルドされてない/入ってない」となります。
※下記エラーは”pip install llama-cpp-python”では解決しませんでした。
[Error]
      *** CMake configuration failed
      [end of output]

  note: This error originates from a subprocess, and is likely not a problem with pip.
  ERROR: Failed building wheel for llama-cpp-python
Failed to build llama-cpp-python
ERROR: Could not build wheels for llama-cpp-python, which is required to install pyproject.toml-based projects
Error during installation with cuBLAS: Command[Error]
-- Looking for pthread.h
-- Looking for pthread.h - not found
-- Found Threads: TRUE
-- Found CUDAToolkit: C:/Program Files/NVIDIA GPU Computing Toolkit/CUDA/v11.1/include (found version "11.1.105")
-- cuBLAS found
CMake Error at C:/Program Files/CMake/share/cmake-3.21/Modules/CMakeDetermineCompilerId.cmake:497 (message):
No CUDA toolset found.
Call Stack (most recent call first):
C:/Program Files/CMake/share/cmake-3.21/Modules/CMakeDetermineCompilerId.cmake:6 (CMAKE_DETERMINE_COMPILER_ID_BUILD)
C:/Program Files/CMake/share/cmake-3.21/Modules/CMakeDetermineCompilerId.cmake:59 (__determine_compiler_id_test)
C:/Program Files/CMake/share/cmake-3.21/Modules/CMakeDetermineCUDACompiler.cmake:283 (CMAKE_DETERMINE_COMPILER_ID)
vendor/llama.cpp/CMakeLists.txt:286 (enable_language)[Error]
ModuleNotFoundError: No module named 'llama_cpp'
▌ Failed to install TheBloke/CodeLlama-34B-Instruct-GGUF.
Common Fixes: You can follow our simple setup docs at the link below to resolve
common errors.
https://github.com/KillianLucas/open-interpreter/tree/main/docs
If you've tried that and you're still getting an error, we have likely not built
the proper TheBloke/CodeLlama-34B-Instruct-GGUF support for your system.
( Running language models locally is a difficult task! If you have insight into
the best way to implement this across platforms/architectures, please join the
Open Interpreter community Discord and consider contributing the project's
development. )
Press enter to switch to GPT-4 (recommended).”llama-cpp-python”がビルドできない問題に関してはVisual Studioで解決できました。
2-3-2.ビルドツールの追加:Visual Studio
llama-cpp-pythonをビルド(使えるようにする)ために自分のPC環境にツールが必要になります。Windowsでこれを行うために、Visual StudioでC++ Build Toolsを追加します。
まずは下記サイトからインストーラーをダウンロードします。
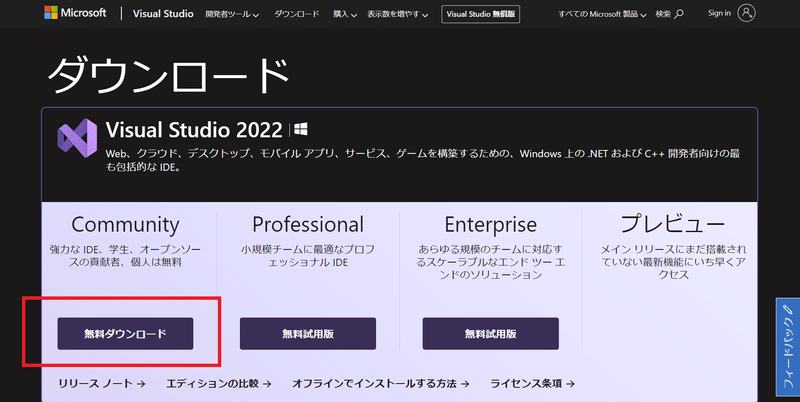
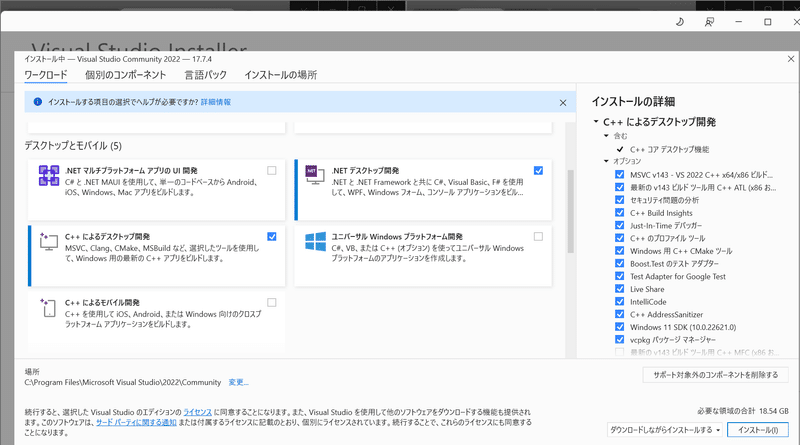
インストーラーを開いて進めていき、下記画面においてその他はデフォルトのまま「C++によるデスクトップ開発」にチェックを入れます。これで「No module named 'llama_cpp'」の部分は開発されると思います。
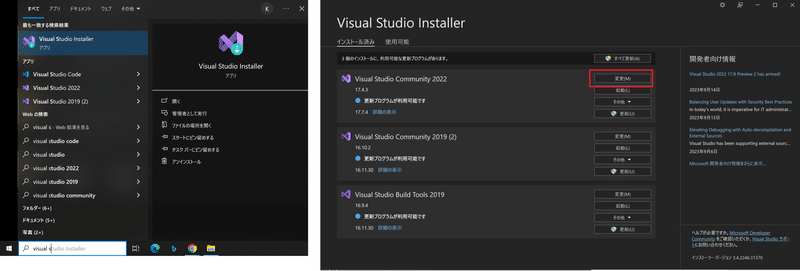
【参考:既にVisual Studioをインストール済みの場合】
既にインストール済みのかたは「Visual Studio Installer」を開き、変更ボタンから設定を変えることができます。
【参考記事】
上記と同じ内容ですがより丁寧に書いてあったのでご参考までに。
3.Quickstart
まずは練習用として実験的に簡易操作してみたいと思います。念のため作業場所は適当にDesktopに作業フォルダをつくりそこで実行します。

3-1.仮想環境作成:conda create
まずは今の環境が壊れないようにAnacondaで仮想環境を作りました。詳細な操作は下記記事をご確認ください。
後述の通りエラー防止でPythonのVersionは10.0以上を指定しました。
[Anaconda Prompt]
conda create -n openinterpreter python=3.11
activate openinterpreter
conda info -e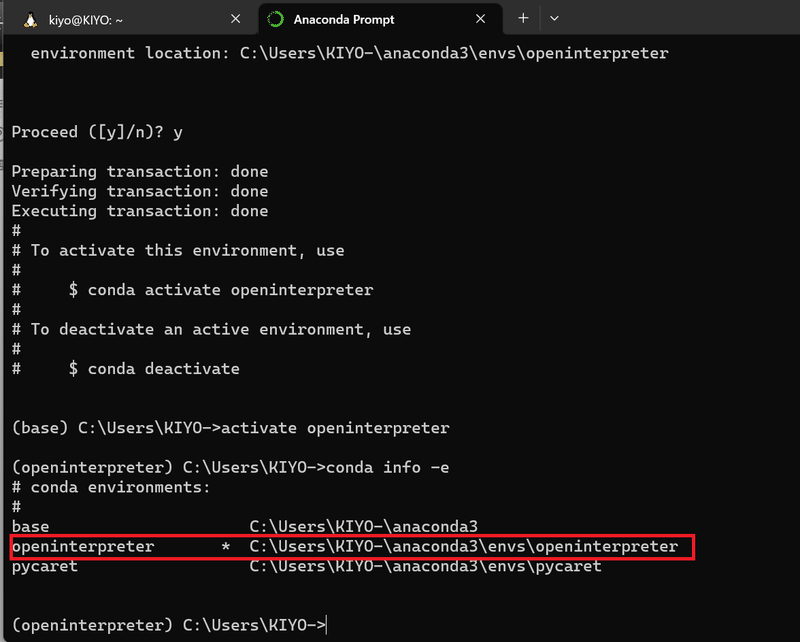

【参考:PythonのVersion】
ある方のツイートより、Python3.9でないとエラーが出ると思ったため”conda create -n openinterpreter python=3.9”で環境構築したところエラーが発生しました。
PythonのVersionは3.10以上の必要があると思います。
Open Interpreter:Python3.10だと動かないようですね
— Naoto Nakai (@NuCode) September 10, 2023
3.9の環境をつくります(conda createで作り始める)
僕:ちょ、ちょっと待ってやめてやめて… pic.twitter.com/aK376kDhpc
3-2.ライブラリ追加
前述の通り”pip install open-interpreter”のみで準備完了です。
今回はLlamaモデルを使用するためWindowsの方は事前にビルドツールの追加が必要(2-3節参照)になります。
[Terminal]
pip install open-interpreter
3-3.interpreter起動
interpreterを起動します。確認省略のためオプション"-y"を追加しました。
[Terminal]
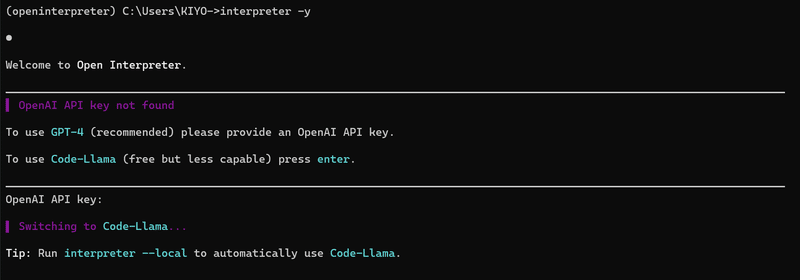
interpreter -y 実行後の流れは以下の通りであり、選択肢は矢印キーとEnterで条件を選択できます。
※
1.LLMモデルの選択
GPT-4とLlamaを選択します。APIには未課金でありAPI KEY発行してもエラーとなるため、Enterキーを押してLlamaを選択します。
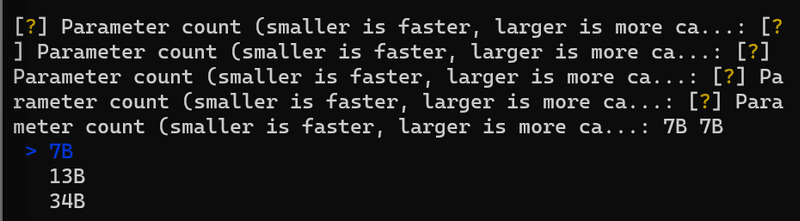
2.Parameter Countの選択
モデルの性能/速度に関係する部分だと思います。今回はGPU使わないため一番軽い”7B”を選択してEnterを押します。
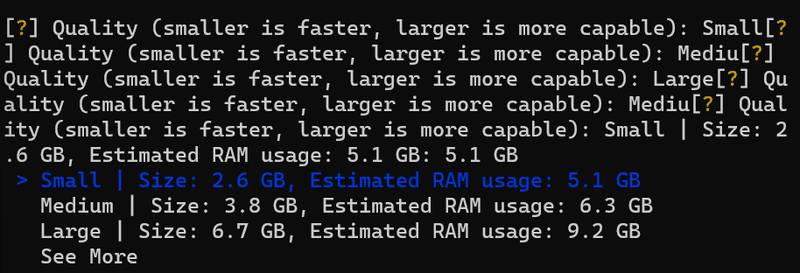
3.Qualityの選択
モデルの結果/速度に関係する部分だと思います。今回はGPU使わないため一番軽い”Small”を選択してEnterを押します。
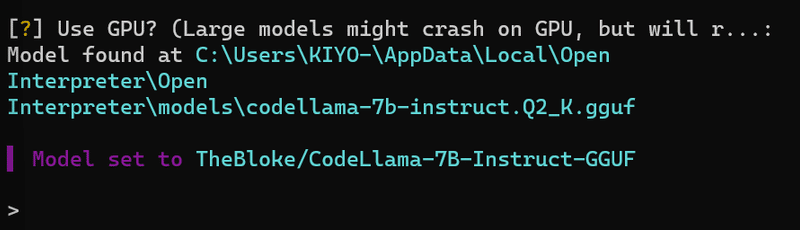
4.GPUの有無
GPUを使うか選択します。今回はGPU無しのPCで作業しているためそのままEnterを押しました。
初めて実行する場合は”This language model was not found on your system”となりダウンロードを要求されるため"Y"で実行します(※ビルドツールが無いとダウンロード後の処理でエラーとなります)。
うまくいけば”Model set to XX”と表示され、Promptが入力できる画面となります。
3-4.Prompt入力
Promptはターミナルに直接入力してEnterを押すと実行できます。
※Gifは加工しており実際はPrompt実行から出力まで数十秒かかります。
【Prompt1:フォルダ作成】
まずは「make inter dir here(ここにinterフォルダ作って)」と入力しました。結果として「本当にローカルPCを操作して希望通りフォルダを作成」しました。またこちらを要求したこと以外に下記を実行しています。
※おそらく-yオプションを外せば実行選択を選べると思います
mkdir inter:interフォルダを作成
cd inter/ls:作業ディレクトリをinterフォルダに変更しlsコマンド実行
dir:(Windowsではlsコマンドを使えないため)dirコマンドを実行
フォルダの中身が空であることを確認したことを出力
[Prompt]
make inter dir here
[OUT]
Let's create a new directory called "inter" here.
mkdir inter
Microsoft Windows [Version 10.0.22000.1455]
(c) Microsoft Corporation. All rights reserved.
(openinterpreter) C:\Users\KIYO-\Desktop\temp>mkdir inter
(openinterpreter) C:\Users\KIYO-\Desktop\temp>
it appears that the "inter" directory was created
successfully.
Now, let's move into this new directory and list its
contents using the ls command.
cd inter
ls
(openinterpreter) C:\Users\KIYO-\Desktop\temp>cd inter
'ls' は、内部コマンドまたは外部コマンド、
(openinterpreter) C:\Users\KIYO-\Desktop\temp\inter>ls
ファイルとして認識されていません。
(openinterpreter) C:\Users\KIYO-\Desktop\temp\inter>
it appears that the ls command was not recognized as an
internal or external command. This is likely because the
ls command is a Unix-specific command and may not be
available on Windows systems.
To list the contents of the "inter" directory, we can use
the dir command instead. Here's what that looks like:
dir
【Prompt2:質問】
次はシンプルな質問を投げてみました。ちゃんと回答を返しておりチャットとしても使えそうです。ちなみに2023年(R5)8月の東京都の人口は約1,400万人のため、回答は間違ってないですが値の信頼性はまだまだと思います。
[Prompt]
where is the main town in Japan?[OUT]
The main town in Japan is Tokyo. It is the capital of
Honshu, the largest island of Japan, and is located in the
Kanto region. The city has a population of over 7 million
people and is known for its vibrant culture, rich history,
and modern infrastructure. Some popular attractions in
Tokyo include the Tokyo Tower, the Meiji Shrine, and the
Tsukiji Fish Market.
Now, let's move on to your next task. What would you like
to do next?
4.コマンドライン:interpreter
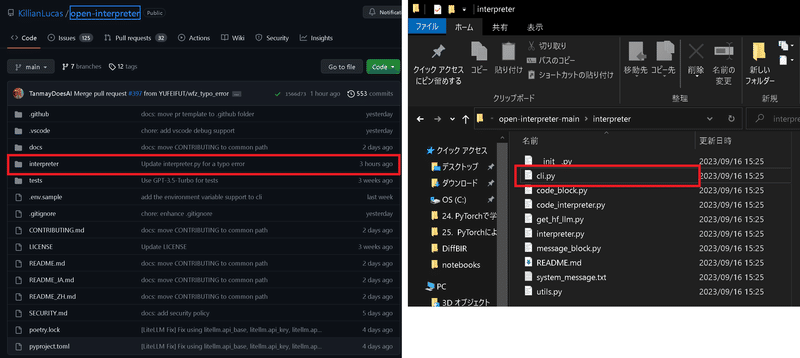
interpreterをターミナルで使用する際のコマンドラインのオプションを確認します。オプションは全文のみ記載しました(省略形は未記載)。
なおコマンドラインオプションについてはargparseでご確認ください。
詳細は"open-interpreter-main\interpreter\cli.py"から確認できます。
[cli.pyの一部]
  # Setup CLI
  parser = argparse.ArgumentParser(description='Chat with Open Interpreter.')

  parser.add_argument('-y',
                      '--yes',
                      action='store_true',
                      default=AUTO_RUN,
                      help='execute code without user confirmation')
  parser.add_argument('-f',
                      '--fast',
                      action='store_true',
                      default=FAST_MODE,
                      help='use gpt-3.5-turbo instead of gpt-4')
  parser.add_argument('-l',
                      '--local',
                      action='store_true',
                      default=LOCAL_RUN,
                      help='run fully local with code-llama')
  parser.add_argument(
                      '--falcon',
                      action='store_true',
                      default=False,
                      help='run fully local with falcon-40b')
  parser.add_argument('-d',
                      '--debug',
                      action='store_true',
                      default=DEBUG,
                      help='prints extra information')

  parser.add_argument('--model',
                      type=str,
                      help='model name (for OpenAI compatible APIs) or HuggingFace repo',
                      default="",
                      required=False)

  parser.add_argument('--max_tokens',
                      type=int,
                      help='max tokens generated (for locally run models)')
  parser.add_argument('--context_window',
                      type=int,
                      help='context window in tokens (for locally run models)')

  parser.add_argument('--api_base',
                      type=str,
                      help='change your api_base to any OpenAI compatible api',
                      default="",
                      required=False)

  parser.add_argument('--use-azure',
                      action='store_true',
                      default=USE_AZURE,
                      help='use Azure OpenAI Services')

  parser.add_argument('--version',
                      action='store_true',
                      help='display current Open Interpreter version')

  args = parser.parse_args()
4-1.確認の省略:-y/--yes
処理実行時に毎回の確認を省略できます。
[Terminal]
interpreter --yes
4-2.Llamaをローカルで使用:-l/--local
完全にローカルでLlamaを使用します。
[Terminal]
interpreter --local
4-3.Version確認:--version
OpenInterpreterのVersionを確認します。
[Terminal]
interpreter --version
4-4.モデルの選択
使用するLLMモデルを選択することが出来ます。
【GPT-3.5】
"--fast"オプションでGPT-3.5を選択できます。
[Terminal]
interpreter --fast
【Llama】
"--local"オプションでLlamaを選択できます。
[Terminal]
interpreter --local
【Hugging Face model】
Hugging Faceのモデルをローカルで使用する場合はrepo ID (e.g. "tiiuae/falcon-180B")を使用します。
[Terminal]
interpreter --model tiiuae/falcon-180B4-5.Debugモード:--debug
Debug ModeにするとLLMに送るメッセージを全てチェックが可能になります。設定は”--debug”オプションを追加するか、Chatの途中でコマンドを追加します。
[Terminal]
interpreter --debug[Chatの途中で設定変更]
> %debug true <- Turns on debug mode
> %debug false <- Turns off debug mode4-6.Azureサポート:--use-azure
Azure開発に接続する場合は”--use-azure”フラグを設定します。
[Terminal]
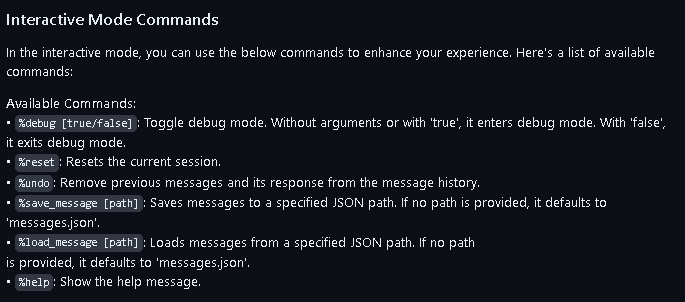
interpreter --use-azure4-7.Interactive Modeコマンド
ターミナルでのチャットの途中で設定変更できるコマンドです。詳細は下図原文を参照ください。
5.Jupyter NoteBookで実行
本章ではターミナルではなくJupyter Notebookを使用します。コードは公式DocsのGoogle Colab公開のものを参照しました。
JupyterはVS Codeを使用して実行します。VS Codeの環境構築は下記の通りです。
5-1.GPT-4:APY KEY使用
OpenAIのAPI KEYを使用してGPT-4を使用するパターンを記載します。使用する際は”interpreter.api_key”変数を自分のAPI KEYに変更したらおそらく使えるはずです。
※QuickStartの環境を使うなら!pip install open-interpreterは不要
[IN]
!pip install open-interpreter
# Google Colab users: restart your runtime here.

import interpreter

# Paste your OpenAI API key below.
interpreter.api_key = "your_openai_api_key"

interpreter.auto_run = True

interpreter.chat("Please print hello world.")
[OUT]
-5-2.Llama
OpenAIのAPIを使用せずLlamaで実行するためのコードを記載します。
環境はQuickStartで作成したものを使用するため”!pip install open-interpreter”などは省略します。
※VS Codeでの対話形式のところで躓いたのでできたら追記
6.API:interpreter
6-1.属性の設定
モデルの設定ができる属性(変数)は下記の通りです。
interpreter.model:LLMモデルをGPT-4/GPT-3.5/Llamaから選択
interpreter.auto_run:毎回の確認を省略
[IN]
interpreter.model = "gpt-3.5-turbo" #GPT -3.5を選択
【参考:モジュールの中身】
その他詳細は"interpreter.py"モジュールで確認できます。
[interpreter/interpreter.py]
class Interpreter:

  def __init__(self):
    self.messages = []
    self.temperature = 0.001
    self.api_key = None
    self.auto_run = False
    self.local = False
    self.model = "gpt-4"
    self.debug_mode = False
    self.api_base = None # Will set it to whatever OpenAI wants
    self.context_window = 2000 # For local models only
    self.max_tokens = 750 # For local models only
    # Azure OpenAI
    self.use_azure = False
    self.azure_api_base = None
    self.azure_api_version = None
    self.azure_deployment_name = None
    self.azure_api_type = "azure"

    # Get default system message
    here = os.path.abspath(os.path.dirname(__file__))
    with open(os.path.join(here, 'system_message.txt'), 'r') as f:
      self.system_message = f.read().strip()

    # Store Code Interpreter instances for each language
    self.code_interpreters = {}

    # No active block to start
    # (blocks are visual representation of messages on the terminal)
    self.active_block = None

    # Note: While Open Interpreter can use Llama, we will prioritize gpt-4.
    # gpt-4 is faster, smarter, can call functions, and is all-around easier to use.
    # This makes gpt-4 better aligned with Open Interpreters priority to be easy to use.
    self.llama_instance = None
6-2.Promptによる対話:chat()
Promptによる対話/依頼はinterpreter.chat()を使用します。
[IN]
interpreter.chat(<聞きたいこと/やってほしいことのPrompt>)”return_messages=True”引数を渡すとメッセージのリストを出力します。
6-3.新規チャットの作成:reset()
Open Interpreterは前の会話を覚えているため、初期化したい場合はreset()メソッドを使用します。
[IN]
interpreter.reset()
6-4.チャットの保存/復元:load()
chat(return_messages=True)で得られた出力をload()に渡すと会話を復元することが出来ます。
[IN]
messages = interpreter.chat("My name is Killian.", return_messages=True) # Save messages to 'messages'
interpreter.reset() # Reset interpreter ("Killian" will be forgotten)

interpreter.load(messages) # Resume chat from 'messages' ("Killian" will be remembered)
6-5.LLMモデルの選択:model
LLMモデルの選択はmodel属性で実施できます。
[IN]
interpreter.model = "gpt-3.5-turbo"
7.所感
これがうまくいけばAIが自分のPCを操作してデータ調査、報告書作成、データ分析・解析、メール送付などもすべて自動でできそうです。
ただ現状では意図したことを実行してもらうためのPrompt入力がかなり難しい+結局API KEY使わないといけないので今後に期待したいと思います。
参考資料
Open Interpreter が送ってる Prompt を見てみました。Debug Mode にしたらLLMに送ってるメッセージ全部見れます。(右図参照)
— ML_Bear (@MLBear2) September 10, 2023
System Promptは左図のような感じでした、長いw
計画をちゃんと書くことを推奨したり、細かくステップごとにコードを実行させたりして他のが印象に残りました。また、(続 pic.twitter.com/5ALjH2iG4I
あとがき
インプレッション稼ぎかわからないけど、自称AI専門家が同じレベルの記事が乱立してて情報が恐ろしく取りにくいし公式DocsがSEOの下に来るのは勘弁してほしい。
こういう時にガチ勢を知っておくと非常に助かる。
この記事が気に入ったらサポートをしてみませんか?