Pythonライブラリ(Rasberry Piカメラ操作): Picamera2

1.概要
前回記事でRasberry Pi4でカメラ環境を構築しました。
次にPythonのライブラリ:PiCamera2を使用してカメラモジュールを操作していきたいと思います。なお環境は下記の通りです。
本体:Rasberry Pi 4
Rasberry Pi OS:Debian Bullseys 64bit(Release:2023/5/3)
カメラモジュール:Raspberry Pi カメラモジュール V3
ラズパイシステムのPython Version:3.9.2
その他:Conda環境のためMiniforge追加
1-1.PiCameraとPiCamera2
結論として「Rasberry Pi OS32bitだとPiCameraの環境構築はきついためPiCamera2を使用」していきます。
Rasberry Piのカメラモジュールを扱うライブラリにpicameraがあります。しかし本ライブラリは既に開発が終わっており更新もされておりません。
64bitのOSで環境構築を進めていくと”libmmal.soが無い”というエラーにあたります。調べてるとlibmmal.soは32bit用しかないとのことであり、picameraを64bitで使用するのはかなり難しそうです。
そこでpicameraはあきらめてpicamera2を使用しています。
[Error]
  File "<string>", line 1, in <module>
  File "/home/kiyo/miniforge3/lib/python3.10/site-packages/picamera/__init__.py", line 72, in <module>
    from picamera.exc import (
  File "/home/kiyo/miniforge3/lib/python3.10/site-packages/picamera/exc.py", line 41, in <module>
    import picamera.mmal as mmal
  File "/home/kiyo/miniforge3/lib/python3.10/site-packages/picamera/mmal.py", line 49, in <module>
    _lib = ct.CDLL('libmmal.so')
  File "/home/kiyo/miniforge3/lib/python3.10/ctypes/__init__.py", line 374, in __init__
    self._handle = _dlopen(self._name, mode)
OSError: libmmal.so: cannot open shared object file: No such file or directory
1-2.Picamera2とは
Rasberry Pi OS-bullseyeバージョンアップに伴い「Picamera」はサポート対象外となるため、後継ライブラリーとしてPiカメラ用Pythonライブラリー「Picamera2」の開発が進められており2022年2月にプレビュー版がリリースされました。
picamera2は32/64bit共に使用できますが制限もあります。詳細は公式Docsをご確認ください。
GitHubではβ版のためエラー/変更の可能性あり(pip(Pypi)はα版)
OSはRaspberry Pi OS Bullseye (or later) imagesのみサポート
https://datasheets.raspberrypi.com/camera/picamera2-manual.pdf
1-3.参考:相性の良いパッケージ
公式マニュアル2.6節ではPicamera2と相性の良いパッケージ/インストール方法を紹介しています。今回は実装はせず紹介のみとなります。
OpenCV:画像処理に特化したPythonライブラリ。Picamera2に必須ではないが多くの事例で使用されている。
TensorFlow Lite:深層学習などでよく使用されるPythonライブラリ
FFmpeg:動画と音声を記録・変換・再生するためのフリーソフトウェア
2.環境構築
2-1.Rasberry Piの準備
PiCamera2ライブラリをインストールする前のRasberry Piの環境構築として下記を実施しております。詳細は各記事参照のこと
Raspberry Pi OS(64-bit) :BullseyeをRasberry Pi Imagerで書き込み
ラズパイ初期起動時の設定、インターフェースの有効化
システム更新”sudo apt-get update && sudo apt-get upgrade”を実施
任意:リモートアクセスの準備
ファイルのやり取りができるためVNC Viewerを使用
任意:VS Code、Miniforgeをインストール
任意:ソフトウェア(vim, git)を追加
任意:Linuxコマンドパッケージ(Zip, aptitude)を追加
カメラモジュールの環境構築
今回はRasberry Pi4×カメラモジュールV3の環境で作成
動作確認は事前に実施すること
【参考:Pythonライブラリのインストールをターミナルから確認】
現在の環境に指定したライブラリがインストールされているかをターミナル上から確認できます。
方法はPythonを用いてNumpyをimportできるか実行します。Miniforgeの初期環境ではNumpyはありませんでした(システム環境はデフォルトでNumpyがインストールされています)。
[Terminal]
python3 -c "import numpy"

[OUT]
Traceback (most recent call last):
  File "<string>", line 1, in <module>
ModuleNotFoundError: No module named 'numpy'
【参考 whichコマンド:使用しているPythonコマンドの環境を確認】
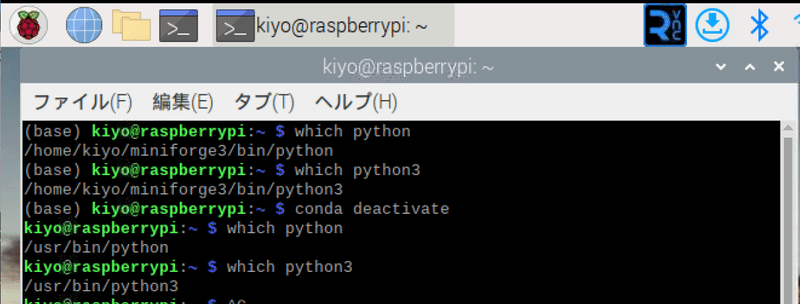
LinuxコマンドのWhichは指定した実行可能ファイルのPATHを検索します。"which python"で検索すると下記結果となり使用しているPythonの場所が異なることが確認できます。
Conda環境(仮想環境):/home/kiyo/miniforge3/bin/python
システム環境:/usr/bin/python
2-2.ライブラリインストール
2-2-1.環境構築の方法確認
Rasberry Piの環境においてMiniforgeを追加している場合は下記の環境構築方法が考えられます。
Conda:”conda install”でインストール
Pip:"pip install"でインストール
Conda環境内ではpipとcondaの依存関係の競合が発生するため併用禁止
システムのPython:Raspberry Pi OSにプリインストールされているPythonを使用して、Linuxコマンド(apt-get)でインストール
仮想環境上からPicamera2を使用しようとするとRasberry Piシステム内のlibcameraのようなパッケージとの連携が非常に難しいため、システムのPythonで実行したいと思います。
2-2-2.インストール
今回はシステムのPythonを使用したいためMiniforgeの仮想環境から"conda deactivate"で抜けます(baseが消えたことを確認)。
【Terminal】
conda deactivate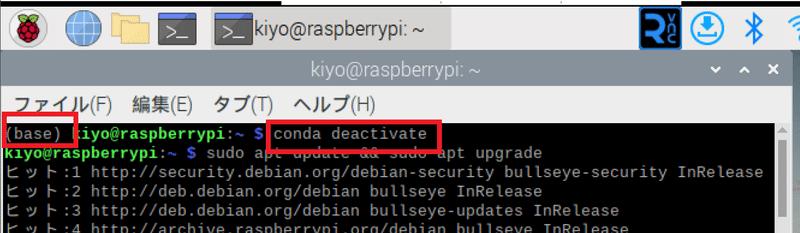
公式Docsでは下記のみでよいとのことですので実行します。うまくいかなかった場合は下記をご参照ください。
【Terminal】
sudo apt-get update && sudo apt-get upgrade
sudo apt install -y python3-picamera2
【エラー対応:ImportError】
私の環境では上記後にpythonスクリプトを実行したときは「ImportError: cannot import name 'PiCamera' from 'picamera2'」エラーが発生しました。
下記を色々やったらいつの間にかエラーが消えましたが、どれが効果があったのかがよくわからないため備忘録として実行したものを全て記載します。
事前検討で"pip install picamera[array]"を実行しpicameraに合わせてNumpyをインストールし、その後"pip3 install numpy --upgrade"を実施
環境変数PYTHONPATHを設定:
export:シェルコマンドであり、指定された環境変数を現在のシェルセッションから子プロセスに渡す
PYTHONPATH:Pythonがモジュールを検索する際に参照するディレクトリのリストを保持する環境変数
”/usr/lib/python3/dist-packages”を新しいパスに追加
picamera2のアップグレード
[Terminal]
export PYTHONPATH=$PYTHONPATH:/usr/lib/python3/dist-packages
pip3 install picamera2 --upgrade
2-3.コラム:仮想環境下でのトラブル
結論として「私の力では現状仮想環境下でPiCamera2をうまく使えない」状態です。
【Case1:システム環境と同様に実施】
前述ではシステム環境にPiCamera2をインストールしましたが、今回は仮想環境下に追加したいと思います。前述の”sudo apt install -y python3-picamera2”を実行するとエラーは発生しませんが、環境内では認識されません。おそらくパッケージが仮想環境とは別のところにインストールされていると思います。

【Case2:pipでインストール】
次にpipでインストール(通常/[gui]付きの2パターン)を試すと、PyQt5の依存関係の部分で永久に動かなくなります。
[Terminal]
pip3 install picamera2
pip3 install picamera2[gui]
まずPyQt5をpipでインストールするのが難しく"pip install PyQt5"でも下記で止まりました。

【Case3:オプションで対応】
同様のエラー報告があり、別の方は”--no-deps”フラグを付けることで解消されたとあります。同様に実行するとimport時のエラーは発生しないのですが、何故かモジュールがまともに使えない状態です。
[Terminal]
pip install PiDNG piexif pillow simplejpeg v4l2-python3 python-prctl
pip install --no-deps picamera2
3.基礎編1:簡単なスクリプト
3-1.低レベルAPI版
まずは動作させたいため簡単なスクリプトを作成して実行します。スクリプトの内容は下記の通りです。
カメラシステム(カメラオブジェクト)の起動
プレビュー用のカメラConfig(設定)を生成
プレビューConfigのカメラシステムを設定
プレビューウィンドウの起動
カメラの起動
ウィンドウ表示を待機
画像の撮影
[cam1.py]
from picamera2 import Picamera2, Preview
import time

#カメラの設定
picam2 = Picamera2() #カメラオブジェクト作成
camera_config = picam2.create_preview_configuration() #プレビュー設定オブジェクト作成
picam2.configure(camera_config) #プレビュー設定オブジェクトをカメラに設定
#プレビュー開始
picam2.start_preview(Preview.QTGL) #プレビュー開始(表示方法:QTGL)
picam2.start() #カメラ起動
time.sleep(2)
#画像撮影
picam2.capture_file("test.jpg")
[Terminal]
python3 cam1.py

プレビューウィンドウの立ち上げと画像撮影が確認できました。
3-2.高レベルAPI版
3-2-1.静止画撮影:start_and_capture_file
短い行で上記と同様の処理を実行したい場合はPicamera2の高レベルAPIを使用します。"Picamera2()"でオブジェクト作成までは同じですが、残りは"start_and_capture_file"メソッドで代用できます。
[cam2.py]
from picamera2 import Picamera2

picam2 = Picamera2()
picam2.start_and_capture_file("test2.jpg")
[Terminal]
python3 cam2.py

3-2-2.動画撮影:start_and_record_video
高レベルAPIで簡単に動画撮影したい場合は”start_and_record_video”を使用します。duration引数は撮影時間です。スクリプト完了後に作業ディレクトリ内にmp4ファイルが作成されます。
[cam3.py]
from picamera2 import Picamera2

picam2 = Picamera2()
picam2.start_and_record_video("test.mp4", duration=5)
[Terminal]
python3 cam3.py
4.基礎編2:高レベルAPI
細かい制御はできないが簡単に使用できる高レベルAPIを紹介します。
4-1.静止画の高レベルAPI
静止画の高レベルAPIは大きく分けて2つあります。
Picamera2.start_and_capture_file:静止画撮影
Picamera2.start_and_capture_files:時間遅れごとの複数画像撮影可
4-1-1.start_and_capture_file
”Picamera2.start_and_capture_file”のパラメータは下記の通りです。
name (default "image.jpg"):キャプチャー画像のファイル名
delay (default 1):画像キャプチャー前の待機時間を指定する。値は0(遅れなし)も選択可能
preview_mode (default "preview") :プレビューウィンドウを使用するかのカメラConfig(設定)
The default value indicates to use the configuration in the Picamera2 object’s preview_configuration field, though any other configuration can be supplied. The capture operation only has a preview phase if the delay is greater than zero.
capture_mode (default "still"):画像をキャプチャするために使用するカメラの構成
The default value indicates to use the configuration in the Picamera2 object’s still_configuration field, though any other configuration can be supplied.
show_preview (default True):プレビューウィンドウを表示するか
By default preview images are only displayed for the preview phase of the operation, unless this behaviour is overridden by the supplied camera configurations using the display parameter. If subsequent calls are made which change the value of this parameter, we note that the application should call the Picamera2.stop_preview method in between.
4-1-2.start_and_capture_files
”Picamera2.start_and_capture_files”のパラメータは下記の通りです。
name (default "image{:03d}.jpg"):
キャプチャー画像のファイル名
ファイル名には”format directive ”(連番用) を含むこと
上記が無い場合は単純に作成されたファイルが上書きされていく
initial_delay (default 1):最初の画像キャプチャ前の時間遅れ。値は0(遅れなし)も選択可能
preview_mode (default "preview"):the camera configuration to use for the preview phases of the operation. The default value indicates to use the configuration in the Picamera2 object’s preview_configuration field, though any other configuration can be supplied. The capture operation only has a preview phase when the corresponding delay parameter (delay or initial_delay) is greater than zero.
capture_mode (default "still"):the camera configuration to use for capturing the images. The default value indicates to use the configuration in the Picamera2 object’s still_configuration field, though any other configuration can be supplied.
num_files (default 1):the number of images to capture.
delay (default 1):the number of second between captures for all images except the very first (which is governed by initial_delay). If this has the value zero, then there is no preview phase between the captures at all.
show_preview (default True):whether to show a preview window. By default, preview images are only displayed for the preview phases of the operation, unless this behaviour is overridden by the supplied camera configurations using the display parameter. If subsequent calls are made which change the value of this parameter, we note that the application should call the Picamera2.stop_preview method in between.
サンプルスクリプトを実行してみます。本スクリプトでは下記のような動作が実行されます。
スクリプト起動するとプレビューウィンドウが立ち上がる
5秒ごとに画像キャプチャを実施し、”test”に連番(0開始)でファイル名を作成する
10枚(0~9)の画像を撮影したら自動でプレビューウィンドウが立ち下がる
[cam4.py]
from picamera2 import Picamera2
picam2 = Picamera2()

picam2.start_and_capture_files("test{:d}.jpg",  #ファイル名※{:d}は連番
                               initial_delay=5, #撮影開始までの待機時間
                               delay=5,         #撮影間隔
                               num_files=10)    #撮影枚数
[Terminal]
python3 cam4.py
4-2.動画の高レベルAPI:start_and_record_video
動画撮影の高レベルAPIとして”start_and_record_video”があります。引数は下記の通りです。出力結果は3-2節をご確認ください。
output (required):the name of the file to record to, or an output object of one of the types described above. When a string ending in .mp4 is supplied, an FfmpegOutput rather than a FileOutput is created, so that a valid MP4 file is made.
encoder (default None):the encoder to use. If left unspecified, the function will make a best effort to choose (MJPEG if the file name ends in mjpg or mjpeg, otherwise H.264).
config (default None):the camera configuration to use if not None. If the camera is unconfigured but none was given, the camera will be configured according to the "video" (Picamera2.video_configuration) configuration.
quality (default Quality.MEDIUM):the video quality to generate, unless overriden in the encoder object.
show_preview (default False):whether to show a preview window. If this value is changed, it will have no effect unless stop_preview is called beforehand.
duration (default 0):the recording duration. The function will block for this long before stopping the recording. When the value is zero, the function returns immediately and the application will have to call stop_recording later.
audio (default False):whether to record an audio stream. This only works when recording to an MP4 file, and when a microphone is attached as the default PulseAudio input
5.API:カメラの設定
カメラの設定に関する内容です。公式Docs4章から一部抜粋予定です。

6.API:カメラの制御/プロパティ
カメラの制御/プロパティに関する内容です。公式Docs5章から一部抜粋予定です。

7.API:画像キャプチャ
画像キャプチャに関する内容です。公式Docs6章から一部抜粋しました。
7-1.Numpy配列型:capture_array("main")
取得した画像を線形代数ライブラリのNumpy配列として取得します(参照:公式6.1.1. Capturing arrays)。APIは”picam2.capture_array("main")”です
[cam.py]
from picamera2 import Picamera2, Preview

import time


camera = Picamera2() #インスタンス

camera.start() #カメラの起動

time.sleep(1) #待機時間


array = camera.capture_array("main") #Numpy配列の取得

print(type(array)) #データ型の表示

print(array.shape) #画像サイズの表示

print(array) #データ型の表示
[Terminal]
python3 cam.py
[OUT]
<class 'numpy.ndarray'>
(480, 640, 4)
[[[120 125 130 255]
[120 126 129 255]
[121 126 128 255]
...
[115 120 125 255]
[117 123 127 255]
[116 123 126 255]]
[[120 126 130 255]
[120 126 128 255]
[120 125 127 255]
...
省略Numpy配列形状が4次元になっておりますがこれは「RGBにalpha channeを加えたもの」になります。
7-2.PIL型:capture_image("main")
画像データのPillowライブラリの形で出力が可能です(参照:公式6.1.2. Capturing PIL images)。APIは”picam2.capture_image("main")”です。
[cam.py]
from picamera2 import Picamera2, Preview

import time

from PIL import Image


camera = Picamera2() #インスタンス

camera.start() #カメラの起動

time.sleep(1) #待機時間


img = camera.capture_image("main") #Numpy配列の取得

print(type(img)) #データ型の表示

print(img.size) #画像サイズの表示

print(img) #データ型の表示
[Terminal]
python3 cam.py
[OUT]
<class 'PIL.Image.Image'>
(640, 480)
<PIL.Image.Image image mode=RGBA size=640x480 at 0x7F9A9B19A0>7-3.メタデータ:capture_metadata()
取得したカメラ画像のメタデータ(詳細な情報)を取得します(参照:公式6.2. Capturing metadata)。APIは”picam2.capture_metadata()”です。
Picamera2.start()でカメラを起動させることで、そのインスタンス内の情報を辞書型で抽出することができます。
[cam.py]
from picamera2 import Picamera2, Preview

import time


camera = Picamera2() #インスタンス

camera.start() #カメラの起動


 #メタデータ

metadata = camera.capture_metadata() #メタデータ情報の取得

print(type(metadata))

for key, value in metadata.items():

    print(key, value)
[Terminal]
python3 cam.py
[OUT]
<class 'dict'>
SensorTimestamp 3274815368000
ScalerCrop (1152, 432, 2304, 1728)
ColourCorrectionMatrix (1.5713839530944824, -0.27812644839286804, -0.293257474899292, -0.3936810791492462, 1.7934833765029907, -0.39981234073638916, -0.07019292563199997, -0.5152039527893066, 1.5853999853134155)
FocusFoM 316
ExposureTime 29745
SensorTemperature 28.0
AfPauseState 0
LensPosition 1.0
FrameDuration 30196
AeLocked False
AfState 0
DigitalGain 1.0
AnalogueGain 1.9033457040786743
ColourGains (2.097649097442627, 1.9859553575515747)
ColourTemperature 4970
Lux 317.4974365234375
SensorBlackLevels (4096, 4096, 4096, 4096)メタデータを辞書型ではなくクラスとして取得して属性の形で情報を取得したい場合はMetadataクラスを使用します。
[cam.py]
from picamera2 import Picamera2, Metadata


camera = Picamera2() #インスタンス

camera.start() #カメラの起動

metadata = Metadata(camera.capture_metadata())

print(type(metadata))

print(metadata.ExposureTime, metadata.AnalogueGain)
[Terminal]
python3 cam.py
[OUT]
<class 'picamera2.metadata.Metadata'>
29745 1.90334570407867438.API:動画キャプチャ
動画に関する内容です。公式Docs7章から一部抜粋予定です。

参考資料
別添1.公式ドキュメント
より詳細な実装をしたい方は公式マニュアルを見るのが最適だと思います。

別添2.技術ブログ(Rasberry Pi関係)
別添3.Python参考
あとがき
色々できそうだけどとりあえず先出。
それにしてもGhatGPTを全力で使っても環境構築辛い。
この記事が気に入ったらサポートをしてみませんか?