ShopifyのDawnで商品個別のお問い合わせフォームを設置する方法

現役Shopifyエンジニアのこだわりです。
今回は、ShopifyでもベーシックなDawnテーマを使い、「商品ページに商品個別のお問い合わせフォームを設置する方法」について解説します。
最終的な成果物はこのようなイメージです。
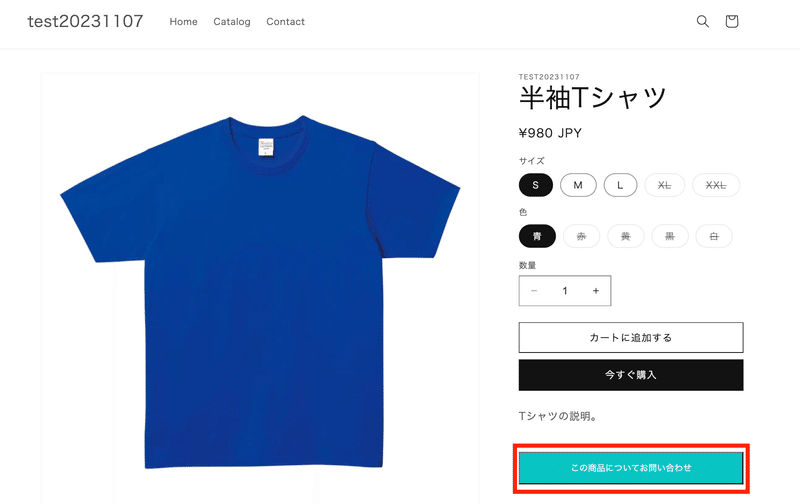
商品ページに、[この商品についてお問い合わせ]というボタンを設置。

「この商品についてお問い合わせ」のボタンをクリックすると、現在表示している商品ページの商品タイトルが自動で挿入された(赤枠の部分)、ポップアップ式のコンタクトフォームが表示されます。
お問い合わせフォームとしてはよくあるパターンかと思いますので、同じような動きを実装したい・・という方には参考になると思います。
Dawnテーマ以外をお使いの方も、モーダルのフォームやJavascriptの動きの実装はほぼそのまま使って頂けると思います。
※もし実装したいのにここが上手くいかない・・・といった問題にぶち当たったときには、ぜひ個別でご相談ください。このくらいの実装であれば、Dawnテーマの場合3,000円〜5,000円程、それ以外のテーマの場合5,000円〜8,000円程でご対応させて頂きます。
>> 個別でのご相談・お見積りはこちら
では早速、実装方法について解説していきます。
(※こちらの内容は、ある程度Shopifyのテーマ開発がわかることを前提として説明しております)
商品個別のお問い合わせフォーム設置方法
まず、Dawnテーマのどこに問い合わせ機能があるかというと、sections/contact-form.liquid に書かれています。
このファイルを編集してももちろん実装可能ですが、いざという時に下に戻せるように、今回はこの内容を複製する形で進めていきます。
お問い合わせ機能のベースとなるLiquidファイル作成
まず、sectionsディレクトリにcustom-contact-form-modal.liquid という名前でファイルを作成します。(任意のファイル名で大丈夫です)
そして、下記コードをこのファイルにコピペして貼り付けます。
{{ 'section-contact-form.css' | asset_url | stylesheet_tag }}

<div id="custom-contact__modal" class="custom-contact__modal">
  <div class='custom-contact__modal-content'>
    <div id='custom-contact__modal-body' class='custom-contact__modal-body'>
      <span id='custom-contact__modal-close' class='custom-contact__modal-close'>×</span>

      {%- form 'contact'
        , id: 'ContactForm'
        , class: contact_form_class -%}

        <div class="field">
          <input
            class="field__input"
            autocomplete="name"
            type="text"
            id="ContactForm-productTitle"
            name="contact[productTitle]"
            value="{{ product.title }}"
            required
            placeholder="商品名">
          <label class="field__label" for="ContactForm-productTitle">
            この商品についてお問い合わせ
            <span aria-hidden="true">*</span>
          </label>
        </div>

        <div class="field">
          <input
            class="field__input"
            autocomplete="name"
            type="text"
            id="ContactForm-name"
            name="contact[{{ 'templates.contact.form.name' | t }}]"
            value="{% if form.name %}{{ form.name }}{% elsif customer %}{{ customer.name }}{% endif %}"
            {% if form.errors contains 'name' %}
            aria-invalid="true"
            aria-describedby="ContactForm-name-error"
            {% endif %}
            required
            placeholder="{{ 'templates.contact.form.name' | t }}">
          <label class="field__label" for="ContactForm-name">
            {{ 'templates.contact.form.name' | t }}
            <span aria-hidden="true">*</span>
          </label>
        </div>

        <div class="field field--with-error">
          <input
            autocomplete="email"
            type="email"
            id="ContactForm-email"
            class="field__input"
            name="contact[email]"
            spellcheck="false"
            autocapitalize="off"
            value="{% if form.email %}{{ form.email }}{% elsif customer %}{{ customer.email }}{% endif %}"
            aria-required="true"
            {% if form.errors contains 'email' %}
            aria-invalid="true"
            aria-describedby="ContactForm-email-error"
            {% endif %}
            placeholder="{{ 'templates.contact.form.email' | t }}">
          <label class="field__label" for="ContactForm-email">
            {{- 'templates.contact.form.email' | t }}
            <span aria-hidden="true">*</span>
          </label>
          {%- if form.errors contains 'email' -%}
            <small class="contact__field-error" id="ContactForm-email-error">
              <span class="visually-hidden">{{ 'accessibility.error' | t }}</span>
              <span class="form__message">
                {%- render 'icon-error' -%}
                {{- form.errors.translated_fields.email | capitalize }}
                {{ form.errors.messages.email -}}
              </span>
            </small>
          {%- endif -%}
        </div>

        <div class="field">
          <textarea
            rows="10"
            id="ContactForm-body"
            class="text-area field__input"
            name="contact[{{ 'templates.contact.form.comment' | t }}]"
            placeholder="{{ 'templates.contact.form.comment' | t }}">
            {{- form.body -}}
          </textarea>
          <label class="form__label field__label" for="ContactForm-body">
            {{- 'templates.contact.form.comment' | t -}}
          </label>
        </div>
        <div class="contact__button">
          <button type="submit" class="button">
            {{ 'templates.contact.form.send' | t }}
          </button>
        </div>
      {%- endform -%}

    </div>
  </div>
</div>
このコードでは、お問い合わせフォームの本体となるコードを記述しています。特に[value="{{ product.title }}"]の部分で、商品タイトルがデフォルトでフォームに入るように設定しています。
作成したお問い合わせLiquidファイルを商品ページで読み込む
次に、先程作成したLiquidファイルを商品ページで読み込む設定をしていきます。変更する対象となるファイルは、sectionsディレクトリにあるmain-product.liquidファイルです。

埋め込む場所は、550行目あたりの赤枠のあたりです。下記コードを追記してください。
{%- render 'custom-contact-form-modal', product: product -%}モーダルの動きをつけるJavascriptファイルの作成
次に、お問い合わせボタンをクリックしたときのモーダルの動きを実装していきます。これはJSでの実装になります。
assetsディレクトリに、custom.jsというファイルを作成します。(任意のファイル名で大丈夫です)
そして、このファイルに下記コードをコピペして貼り付けます。
/* カスタマイズ用JS */

document.addEventListener(
  "DOMContentLoaded",
  function () {

    // 説明部分のモーダル化機能追記
    const openCustomContactFormModal = () => {

      // 「詳しく見る」ボタンのすべての要素を取得
      const open_btn = document.getElementById("custom-contact__modal-open-button");
      const modal = document.getElementById("custom-contact__modal");

      if (open_btn.length === 0 || modal.length === 0) return;

      // 各要素にイベントリスナーを追加
      open_btn.addEventListener("click", function () {
        // モーダル表示
        modal.style.display = "block";
      });

      // 閉じるボタンクリック時にモーダル閉じる
      document.getElementById("custom-contact__modal-close").onclick = (e) => {
        modal.style.display = "none";
      };

      // モーダルコンテンツ外がクリックされたとき、モーダル閉じる
      modal.addEventListener("click", (e) => {
        if (!e.target.closest(".custom-contact__modal-body")) {
          modal.style.display = "none";
        }
      });
    };

    // 実行
    openCustomContactFormModal();
  },
  false
);
作成したJavascriptファイルを読み込む
次に、今作成したJSファイルをテーマ側で読み込むコードを追記します。
対象となるファイルは、layoutディレクトリにあるtheme.liquidファイルです。
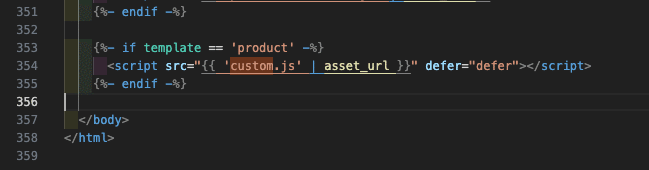
コードを挿入する箇所は、body閉じタグの直前。
下記コードを追記してください。このコードはLiquid条件分岐により商品ページだけに読み込まれるようにしています。
{%- if template == 'product' -%}
  <script src="{{ 'custom.js' | asset_url }}" defer="defer"></script>
{%- endif -%}
商品ページにお問い合わせボタンの設置
最後に、テーマエディタ側の設定をして商品ページにお問い合わせボタンを設置していきます。

まず、[オンラインストア] > [ カスタマイズ ] からテーマエディタを開きます。

次に、ページ選択タブの[ホームページ]を選択、[商品] > [デフォルトの商品]を選びます。

[テンプレート] > [商品情報] > [ブロックを追加]をクリック。[カスタマイズされたLiquid]を選択します。

このカスタムLiquidに、下記コードを追記してください。
<button id="custom-contact__modal-open-button" class="custom-contact__modal-open-button">
    この商品についてお問い合わせ
</button>
以上で設定は完了です。
商品ページを開き、お問い合わせフォームがちきんと動作していることを確認してください。
如何だったでしょうか?
説明どおりやろうとしても、コードを把握できていないとなかなかうまく設定できない場合も多いと思います。
そのようなときはぜひShopifyエンジニアの方に依頼してみてください。僕もこちらからDMでお問い合わせ頂ければ、個別の対応を受け付けております。
この記事が気に入ったらサポートをしてみませんか?