
【音MADを作ろう#1】テンポに合わせて映像を変化させるプログラム【Davinci Resolveで動画編集】

はじめに
今回解説するのは、タイトルの通り、テンポに合わせて映像を変化させるプログラムについてです。内容は、私のブログの方でもまとめております。
宜しければ、こちらもご参照ください。
ブログの方では、HTMLやCSSを使用している関係上、可読性に優れているうえ、noteでは公開していない様々な記事にアクセスできますので、おすすめです。是非、ご覧ください。
宣伝はこれくらいにして、本題に入っていきましょう。
まずは下の映像をご覧ください。

方法をご存じの方がいらっしゃいましたら、ご教授願います。
ブログの方では再生可能です。
正方形・円がリズムに合わせて変化しているのが分かるかと思います。
今回、曲のテンポが154なので、60/154秒を一周期として振動させています。
では、一体どうやってこのような映像を作るのか?以下では、編集ソフト「Davinci Resolve」を用いた方法について解説します。
本題
先ほどの映像、手作業で作ってもいいのですが、人間の手でやると、多少の誤差が出てしまうもの。
テンポが分かっているのなら、それを用いてプログラムしたほうが正確ですよね。
そこでカギになるのが、「エクスプレッション」。
簡単に言うと、プログラミング(Lua言語)を用いてやってほしい内容を指示すること。
まずは、「エクスプレッション」の使い方を見ていきましょう。
ちなみに、「エクスプレッション」については、過去に作りかけの動画をYoutubeにアップしています。
まずは、「Fusion」を選択した後、「Transform」などのツールを配置して選択します。
その後、インスペクタの項目を右クリックすると「エクスプレッション」という文字が現れます。
これを選択すればOK。

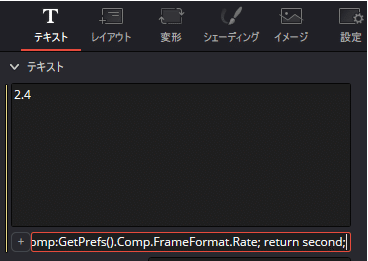
エクスプレッションを選択して表示された枠内にプログラムを記述していきます。
プログラムの書き方

また、以下の変数もよく使われるので、覚えておきましょう。

(コピペ用)
time
comp:GetPrefs().Comp.FrameFormat.Rate
さて、これらは具体的にどのように使われるのか?
具体例を見ていきましょう。
【例1】
:return 0
常に0を返します。これに関しては、プログラムを書くまでもないですね。

御覧の通り、「サイズ」が0.0となっていますね。
変数を使わない場合、あまり大きな意味を持たないです。
【例2】
:second=time/comp:GetPrefs().Comp.FrameFormat.Rate;
return second;
「second」という変数を宣言し、その値を出力しています。
ご覧の通り、time[フレーム]をcomp:GetPrefs().Comp.FrameFormat.Rate[フレーム/秒]で割ることで、そのクリップにおける時間[秒]を定義しています。
例えば3秒経過していたら3が出力されるし、10秒経過していたら10が出力されます。しかし、小数での表示です。
整数で表示したいときもありますよね・・・。そんなときは・・・、
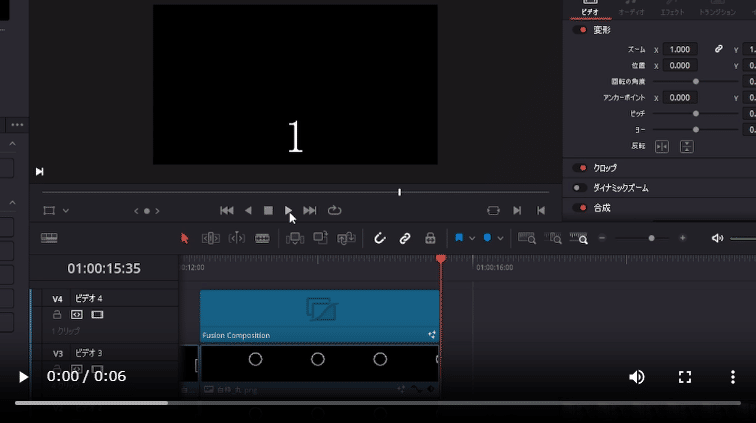
【例3】
:max_time=10;
second=time/comp:GetPrefs().Comp.FrameFormat.Rate;
return max_time-floor(second);
のように、floor(小数点以下切り捨て)を用いて書けばよいですね。
これは、先ほどの応用で、カウントダウンを行います。
「テキスト」に「エクスプレッション」を適用して上のように記述すると、下のようになります。

実践
さて、以上のプログラムを用いて、テンポに合わせて映像を変化させる方法を考えてみましょう。
想定される状況は以下の2種類あるかと思います。

それぞれについて考えていきます。
まず、前者ですが、例えばif文を用いて次のように表せます。
:tempo=154;
second=time/comp:GetPrefs().Comp.FrameFormat.Rate;
if second%(120/tempo)<=60/tempo then;
return 1;
else return 0 end;
余談ですが、私自身、エクスプレッションで初めてLua言語を扱うので、thenやendに違和感がある・・・
映像にするとこんな感じですね。
音MADでよく見る、一定時間周期で左右反転するプログラムです。
ちなみに、一定時間周期で左右反転させるには、「Transform」の「反転」についてエクスプレッションを適用し、上のプログラムを書けばOK。

後者の「テンポに合わせてなめらかに振動する」ですが、具体的にどのように動かしたいのかによって用いる関数が異なります。例えば、曲線的に動かしたいならサインやコサイン(三角関数)を使えばよいですし、直線的に動かしたいならそのような数式を使えばよいですね。必要に応じて絶対値も使いましょう。
下にサンプルを置いておきます。
:tempo=154;
difference=0.2;
second=time/comp:GetPrefs().Comp.FrameFormat.Rate;
return 1+difference*abs(sin(second*tempo*pi/60+pi/2));ちなみに、円周率はpiと書けばOK。え、知ってた?
御覧の通り、絶対値を用いたsinの関数です。これを「Trasition」の「Size」について適用すると、次のようになります。

直線的に変化するのならまだしも、曲線的に変化する映像を手作業で作るのは骨が折れるので、「エクスプレッション」を積極的に活用しましょう!
皆さんも、オリジナルの数式を作ってMAD職人になりましょう!
もう一度、ブログへのリンクを貼っておきます。
こちらではちゃんと映像の再生が可能です。
おまけ
こういう万国共通の情報は英語で書くと良いことがありそうなので、AIで記事を翻訳してもらいました。
The contents below are generated by AI, but some parts of it might be wrong or inaccurate.
In this guide, we will explore the process of adjusting videos using expressions. A hands-on approach can introduce slight errors, making a programmed solution more accurate and reliable.
The key tool in this process is “Davinci Resolve,” a powerful editing software that I personally recommend. Despite being free, it offers top-notch performance. So, why not give it a try?
To begin, let’s understand the concept of expressions. Simply put, expressions involve instructing the software through programming (using the Lua language) to achieve the desired effects.
To demonstrate the process, we will use the example of a video with square and circular elements that change rhythmically. We will control these changes based on the tempo of the accompanying music.
The first step is to select “Fusion” and place tools such as “Transform” where needed. By right-clicking on the inspector panel, you will find the option to use expressions. This selection will allow you to write the programming code in the designated box.
Expressions in DaVinci Resolve adhere to specific rules. Programs should start with a “:” and use “;” for line breaks. The “return” keyword is used to obtain output values.
For ease of use, familiarize yourself with commonly used variables like time and comp:GetPrefs().Comp.FrameFormat.Rate, representing the current time in frames and the frames per second, respectively.
Let’s overview a few examples:
The following expression always returns 0:
:return 0Though not very practical, it demonstrates the use of expressions.
This expression defines the variable “second” as the time in seconds:
:second = time / comp:GetPrefs().Comp.FrameFormat.Rate
return secondHere, the time in seconds is displayed. If 3 seconds have elapsed, the output will be 3; for 10 seconds, the output will be 10.
The following expression counts down from a specified maximum time:
:max_time = 10
second = time / comp:GetPrefs().Comp.FrameFormat.Rate
return max_time - floor(second)This expression produces a visual countdown, with the “max_time” variable allowing for customization.
Based on these examples, you can adjust videos with expressions in various ways. By using conditional logic like if statements or mathematical functions like sin and cos, you can create seamless and dynamic transformations.
For instance, if you want to alternate between two states based on the tempo, you can use the following expression:
:tempo = 154
second = time / comp:GetPrefs().Comp.FrameFormat.Rate
if second % (120 / tempo) <= 60 / tempo then
return 1
else
return 0
end
This expression simulates the left-right flipping effect seen in many audio MAD videos.
Alternatively, you can create smooth oscillating movements using expressions like:
:tempo = 154
difference = 0.2
second = time / comp:GetPrefs().Comp.FrameFormat.Rate
return 1 + difference * abs(sin(second * tempo * pi / 60 + pi / 2))
The resulting video will exhibit smooth, curved movements that can enhance the visual experience.
By mastering expressions and their application to video adjustments, you can elevate your editing skills to new heights. Remember to experiment and create your own unique formulas to become a masterful audio MAD creator.
Feel free to ask for further guidance or clarification, and enjoy the process of exploring the limitless possibilities of expressions in video editing!
一気に文字数が倍になりましたぁ!
この記事が気に入ったらサポートをしてみませんか?