【Unity】ASIO入力からSMPTEタイムコードをデコードしてTimeLine制御する

こんにちは、Unityエンジニアのならです。
今回はASIOドライバを使って音をUnityに取り込みます。
ついでにSMPTE(LTC)タイムコードをデコードしてTimeLineを制御してみましょう。
NAudioの準備
まずはASIO入力をUnityで実装します。
UnityでASIO実装する方法は色々ありますが、今回はNAudioライブラリを使用して実装していきます。
NAudioのReleaseページにビルド済みのzipがあるので、それをダウンロードします。
現在最新はver2.1.0のようです。
今回はビルド済みでサクッと使いたいので、v1.8.4を使用します。
https://github.com/naudio/NAudio/releases
ダウンロードしたNAudio.dllをAssets\Plugins\かどこかに入れておけばNAudioの準備は完了です。
ASIO入力の実装
NAudioのライブラリを入れれば後の実装は割りと簡単です。
using NAudio.Wave;
using UnityEngine;
using System;

public class ASIOInput : MonoBehaviour
{
    public string[] microphoneDeviceNames;
    [SerializeField] private string deviceName;//デバイス名
    [SerializeField] private int ch = 1;//録音チャンネル数
    [SerializeField] private int SampleRate = 48000;//サンプリングレート
    private AsioOut _asioOut;
    private ConcurrentQueue<float> _inputSamples = new ConcurrentQueue<float>();

    private void Start()
    {
        microphoneDeviceNames = AsioOut.GetDriverNames();
        _asioOut = new AsioOut(deviceName);
        _asioOut.InitRecordAndPlayback(null, ch, SampleRate);
        _asioOut.InputChannelOffset = 0;//開始チャンネル
        _asioOut.AudioAvailable += OnAsioOutAudioAvailable;
        _asioOut.Play();
    }
    private void OnDisable()
    {
        _asioOut.Stop();
    }

    // サンプルデータ取得
    void OnAsioOutAudioAvailable(object sender, AsioAudioAvailableEventArgs e)
    {
        var newSample = new float[e.SamplesPerBuffer * ch];
        e.GetAsInterleavedSamples(newSample);

        foreach (var sample in newSample)
        {
            _inputSamples.Enqueue(sample);
        }
    }
}
スタート時にmicrophoneDeviceNamesの中に現在使用可能なASIOデバイスの一覧が表示されるので、使いたいデバイス名をコピペしてdeviceNameに入れてプレイし直せばASIOドライバを通してデバイスに繋がります。
_asioOut.InitRecordAndPlayback(null, ch, SampleRate);
_asioOut.InputChannelOffset = 0;//開始チャンネル
この部分は使用環境によりますので適宜変更してください。
chは適当なDAWやTouchDesignerなんかで確認できます。
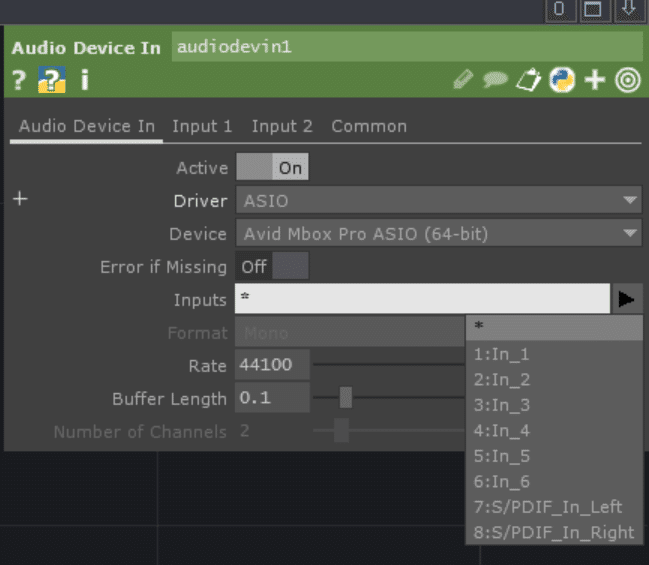
自分の手元環境にあるAvid Mbox Proの場合、8chの入力ソースがあります。
例えば、in_2からin_6までの5chを入力に入れたいとなった場合、
ch = 5;
_asioOut.InitRecordAndPlayback(null, ch, SampleRate);
_asioOut.InputChannelOffset = 1;//開始チャンネル
となります。
SteinbergのUR22mk2の場合は2chです。

Playで開始すると、ASIOBufferが読み取り可能になるたびに、OnAsioOutAudioAvailable()が呼び出されます。
 // サンプルデータ取得
    void OnAsioOutAudioAvailable(object sender, AsioAudioAvailableEventArgs e)
    {
        var newSample = new float[e.SamplesPerBuffer * ch];
        e.GetAsInterleavedSamples(newSample);

        foreach (var sample in newSample)
        {
            _inputSamples.Enqueue(sample);
        }
    }
e.GetAsInterleavedSamples()に引数で渡した配列内にデータが格納されるようになっています。
ここでは毎回新しく配列を作っていますが、事前に定義しておいて使い回す方がパフォーマンスは良いでしょう。
引数で渡す配列の大きさは、ASIOBufferのサイズ * ch数です。
ASIOBufferのサイズはそれぞれASIOデバイスのソフトから設定したものになります。
例えば、Steinbergのインタフェイスなら
Yamaha Steinberg USB Control Panel
から設定したサイズです。
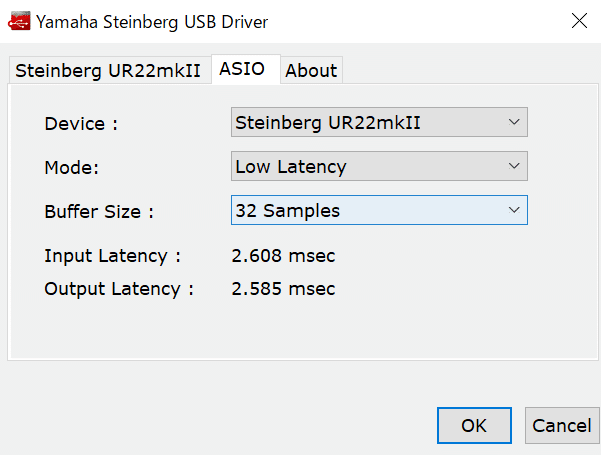
この場合は32がASIOBufferのサイズになります。
あとは配列内に音データが格納されてくるので、好きに使いましょう。
今回は使いやすいように事前に定義したQueueに格納しています。
LTCデコード
ASIO経由で入力音をデータ化出来たので、早速デコードしていきます。
LTCのデコードに関しては、以下2記事を大いに参考にさせて貰いました。大感謝です。
デコード部分に関しては2記事のコードをベースに多少変えた程度です。
クラスを分けれそうな所を分けて、非同期で動かしているのみ。
下はASIO入力からtimecodeをデコードするスクリプトの全体です。
//タイムコード読み取り部分
//http://blog.mobilehackerz.jp/2017/12/ltclinear-timecodeunity_2.html
//https://note.com/hikohiro/n/n4c6a248f0910#7fc5a9ee-e21e-47cb-aab8-d44d7153886d

using System.Collections;
using System.Collections.Generic;
using NAudio.Wave;
using UnityEngine;
using System;
using System.Linq;
using System.Threading;
using System.Threading.Tasks;
using System.Collections.Concurrent;


// ASIO入力とLTC読み取りクラス
public class ASIOInputLTCread : MonoBehaviour
{
    public string[] microphoneDeviceNames;
    [SerializeField] private string deviceName;
    [SerializeField] private int ch = 1;
    [SerializeField] private int SampleRate = 48000;
    [HideInInspector] public string m_TimeCode = "00:00:00:00";
    [SerializeField] float gain;
    private AsioOut _asioOut;
    private ConcurrentQueue<float> _inputSamples = new ConcurrentQueue<float>();
    private GUIStyle m_TimeCodeStyle;
    private int m_SameAudioLevelCount;
    private int m_LastAudioLevel;
    private int m_LastBitCount;
    private string m_BITPattern = "";
    [SerializeField, Range(0.0f, 1.0f)] private float m_AudioThreshold;
    Thread thread;
    bool isThread = true;
    private TimeCodeDecoder timeCodeDecoder;

    // 非同期でスタート
    private async void Start()
    {
        timeCodeDecoder = new TimeCodeDecoder();
        m_TimeCodeStyle = new GUIStyle
        {
            fontSize = 64 * 2,
            normal = { textColor = Color.black }
        };
        microphoneDeviceNames = AsioOut.GetDriverNames();
        _asioOut = new AsioOut(deviceName);
        _asioOut.InitRecordAndPlayback(null, ch, SampleRate);
        _asioOut.InputChannelOffset = 0;
        _asioOut.AudioAvailable += OnAsioOutAudioAvailable;
        _asioOut.Play();

        await Task.Run(() => UpdateThread());
    }
    // 終了時にスレッド停止
    private void OnDisable()
    {
        _asioOut.Stop();
        isThread = false;
    }
    // タイムコード表示
    private void OnGUI()
    {
        GUI.Label(new Rect(0, 0, 200 * 2, 100 * 2), m_TimeCode, m_TimeCodeStyle);
    }
    // 非同期でデコード処理を実行するスレッド
    private async Task UpdateThread()
    {
        while (isThread)
        {
            if (_inputSamples.IsEmpty)
            {
                await Task.Delay(1); // スレッドを適切に休止させるために追加
                continue;
            }
            DecodeAudioToTcFrames();
        }
        return;
    }
    // サンプルデータ取得
    void OnAsioOutAudioAvailable(object sender, AsioAudioAvailableEventArgs e)
    {
        var newSample = new float[e.SamplesPerBuffer];
        e.GetAsInterleavedSamples(newSample);

        foreach (var sample in newSample)
        {
            _inputSamples.Enqueue(sample);
        }
    }
    // オーディオデータをタイムコードフレームにデコード
    private void DecodeAudioToTcFrames()
    {
        if (_inputSamples.IsEmpty)
        {
            return;
        }
        gain = _inputSamples.Sum(Mathf.Abs) / _inputSamples.Count;
        if (gain < m_AudioThreshold) return;

        int pos = 0;
        int bitThreshold = 48000 / 3100;//だいたいcountの数値は15ぐらいが中心だからいい感じになるように

        while (pos < _inputSamples.Count)
        {
            int count = CheckAudioLevelChanged(ref pos, ch);
            if (count <= 0) continue;
            if (count < bitThreshold)
            {
                if (m_LastBitCount < bitThreshold)
                {
                    m_BITPattern += "1";
                    m_LastBitCount = bitThreshold;
                }
                else
                {
                    m_LastBitCount = count;
                }
            }
            else
            {
                m_BITPattern += "0";
                m_LastBitCount = count;
            }
        }

        if (m_BITPattern.Length >= 80)
        {
            int bpos = m_BITPattern.IndexOf("0011111111111101");
            if (bpos > 0)
            {
                string timeCodeBits = m_BITPattern.Substring(0, bpos + 16);
                m_BITPattern = m_BITPattern.Substring(bpos + 16);
                if (timeCodeBits.Length >= 80)
                {
                    timeCodeBits = timeCodeBits.Substring(timeCodeBits.Length - 80);
                    m_TimeCode = timeCodeDecoder.DecodeBitsToFrame(timeCodeBits);
                }
            }
        }

        if (m_BITPattern.Length > 160)
        {
            m_BITPattern = m_BITPattern.Substring(80);
        }
    }

    // オーディオレベルが変化したか確認
    private int CheckAudioLevelChanged(ref int pos, int channels)
    {
        while (pos < _inputSamples.Count)
        {
            float data;
            if (!_inputSamples.TryDequeue(out data)) return -1;

            int nowLevel = Mathf.RoundToInt(Mathf.Sign(data));

            if (m_LastAudioLevel != nowLevel)
            {
                int count = m_SameAudioLevelCount;
                m_SameAudioLevelCount = 0;
                m_LastAudioLevel = nowLevel;
                return count;
            }

            m_SameAudioLevelCount++;
            pos += channels;
        }

        return -1;
    }
}

// タイムコードデコーダクラス
public class TimeCodeDecoder
{
    // ビットからフレームデータへのデコード
    private int Decode1Bit(string b, int pos)
    {
        return int.Parse(b.Substring(pos, 1));
    }

    private int Decode2Bits(string b, int pos)
    {
        int r = 0;
        r += Decode1Bit(b, pos);
        r += Decode1Bit(b, pos + 1) * 2;
        return r;
    }

    private int Decode3Bits(string b, int pos)
    {
        int r = 0;
        r += Decode1Bit(b, pos);
        r += Decode1Bit(b, pos + 1) * 2;
        r += Decode1Bit(b, pos + 2) * 4;
        return r;
    }

    private int Decode4Bits(string b, int pos)
    {
        int r = 0;
        r += Decode1Bit(b, pos);
        r += Decode1Bit(b, pos + 1) * 2;
        r += Decode1Bit(b, pos + 2) * 4;
        r += Decode1Bit(b, pos + 3) * 8;
        return r;
    }

    // ビットデータからフレームにデコード
    public string DecodeBitsToFrame(string bits)
    {
        int frames = Decode4Bits(bits, 0) + Decode2Bits(bits, 8) * 10;
        int secs = Decode4Bits(bits, 16) + Decode3Bits(bits, 24) * 10;
        int mins = Decode4Bits(bits, 32) + Decode3Bits(bits, 40) * 10;
        int hours = Decode4Bits(bits, 48) + Decode2Bits(bits, 56) * 10;
        return $"{hours:D2}:{mins:D2}:{secs:D2}:{frames:D2}";
    }
}
タイムコードでタイムライン制御
タイムコードがデコードできれば後は簡単。
タイムコードを元にTimeLineを更新していくだけですね。
まずは、TimeLineをいつも通り作成。
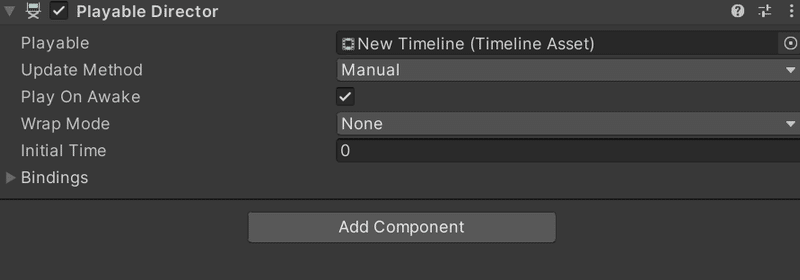
そして、Update MethodをManualに設定します。
これで、スクリプトからTimeLineの更新をかけることができます。
後は下のコードで更新部分を実装していきます。
using UnityEngine;
using UnityEngine.Playables;

public class LTCControlTimeLine : MonoBehaviour
{
    //デコーダー
    //$"{hours:D2}:{mins:D2}:{secs:D2}:{frames:D2}"
    [SerializeField] ASIOInputLTCread LTCread;
    public PlayableDirector timeline; // Timelineを格納する変数
    double NowSec;
    [SerializeField] float TimeCodeFPS = 30;
    [SerializeField] int RefreshFreme = 60;
    int Refresh = 0;
    void Start()
    {

        var v = GetNowSec();
        timeline.time = v; // 再生開始するフレームを指定
        timeline.Evaluate();
        Refresh = 0;
        NowSec = v;
    }
    void Update()
    {
        Refresh++;
        NowSec += Time.deltaTime;
        if (Refresh >= RefreshFreme)
        {
            NowSec = GetNowSec();
            Refresh = 0;
        }
        timeline.time = NowSec;
        timeline.Evaluate();
    }
    //タイムコードから今のフレームを取得
    double GetNowSec()
    {
        string[] arr = LTCread.m_TimeCode.Split(':');
        var now = int.Parse(arr[0]) * 3600d + int.Parse(arr[1]) * 60d + int.Parse(arr[2]) + int.Parse(arr[3]) / TimeCodeFPS;
        return now;
    }
}
GetNowSec()で、現フレーム時点のタイムコードから秒数換算したものを取ってきます。今回はStringのm_TimeCodeから無理やり持ってきてますが、int配列かなんかで持ってきたほうが良いと思います。
毎フレーム持ってきても問題は無いですが、RefreshFremeの間隔で取得して同期とる方が安定します。1sec間隔で取ってきても問題はなさそうでした。
注意する点は、timeline.timeとTimeLineの時間を指定する変数は、秒数ということです。最初あまり調べずフレームっぽい気がしてフレーム数指定して少し沼りました。
後は、timeline.timeで指定後にtimeline.Evaluate();で更新をかけてあげれば、スクリプトからの更新は問題ありません。
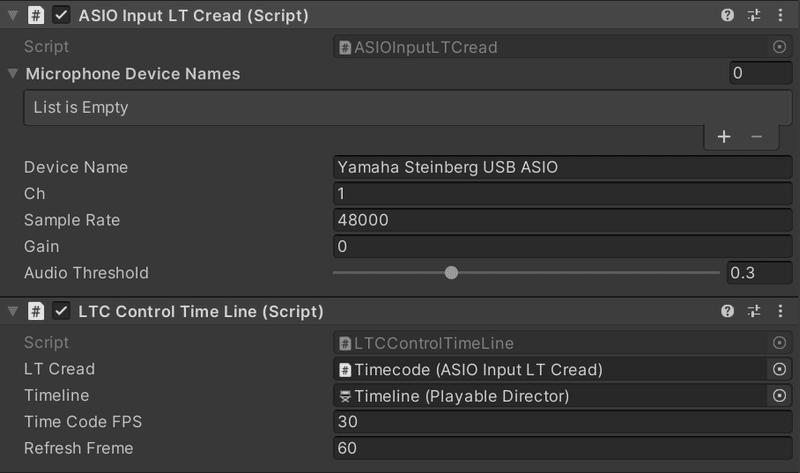
後は空のGameObjectにこのようにアタッチしてあげれば完成です。
ASIOデバイス周りは適宜
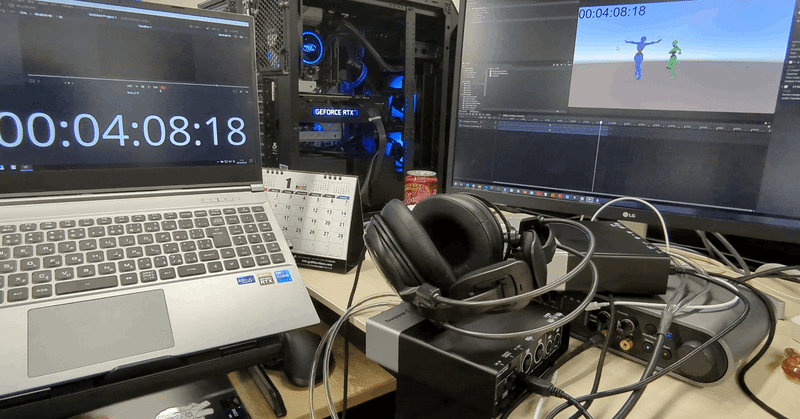
実際に動かして見たのが↓
レイテンシは大体1/30フレームですかね。
とはいえこのレイテンシは可変気味で、自分の環境では1~5フレームを可変します。
一定であればもっと使いやすいのですが、まぁまぁ上等ではないでしょうか?
タイムコード自体は、下のLTCTwoというサイトでwavを作成し、Davinci Resolveのタイムラインに貼って、タイムコードウインドウを表示させています。
わざわざASIOで入れ込む必要性もあまりなさそうな気もしますが、レイテンシは無いに越したことはありません。
思いつく対策としての、ASIO入力でした。
余談:ASIO入力して録音
せっかくASIO入力したので、録音もついでにしてみましょう。
ASIOから受け取ったデータを使ってwavファイルの生成してあげれば良いだけです。
using NAudio.Wave;
using UnityEngine;
using System.Collections.Concurrent;
using System.IO;

public class AudioRecorder : MonoBehaviour
{
    public string[] microphoneDeviceNames;
    [SerializeField] private string deviceName;
    [SerializeField] private int ch = 1;
    [SerializeField] private int SampleRate = 48000;
    private AsioOut _asioOut;
    private ConcurrentQueue<float> _inputSamples = new ConcurrentQueue<float>();
    private bool isRecording = false;
    private MemoryStream recordedStream;
    private WaveFileWriter waveFileWriter;
    private string outputFilename = "~\\output.wav";

    // Start is called before the first frame update
    void Start()
    {
        microphoneDeviceNames = AsioOut.GetDriverNames();
        _asioOut = new AsioOut(deviceName);
        _asioOut.InitRecordAndPlayback(null, ch, SampleRate);
        _asioOut.InputChannelOffset = 0;
        _asioOut.AudioAvailable += OnAsioOutAudioAvailable;
        _asioOut.Play();
    }

    void Update()
    {
        if (Input.GetKeyDown(KeyCode.Q) && !isRecording)
        {
            StartRecording();
        }
        else if (Input.GetKeyDown(KeyCode.W) && isRecording)
        {
            StopRecording();
        }

        if (isRecording)
        {
            var flag = true;
            while (flag)
            {
                float data;
                if (!_inputSamples.TryDequeue(out data)) flag = false;
                waveFileWriter.WriteSample(data);
            }
        }
    }

    private void StartRecording()
    {
        isRecording = true;
        recordedStream = new MemoryStream();
        waveFileWriter = new WaveFileWriter(new IgnoreDisposeStream(recordedStream), new WaveFormat(SampleRate, ch));
    }

    private void StopRecording()
    {
        isRecording = false;
        _asioOut.Stop();

        if (waveFileWriter != null)
        {
            waveFileWriter.Dispose();
            waveFileWriter = null;
        }

        using (var fileStream = new FileStream(outputFilename, FileMode.Create, FileAccess.Write))
        {
            recordedStream.WriteTo(fileStream);
        }

        recordedStream.Dispose();
        recordedStream = null;

        _asioOut.Play();
    }

    private void OnDisable()
    {
        _asioOut.Stop();
    }

    // サンプルデータ取得
    void OnAsioOutAudioAvailable(object sender, AsioAudioAvailableEventArgs e)
    {
        var newSample = new float[e.SamplesPerBuffer];
        e.GetAsInterleavedSamples(newSample);

        foreach (var sample in newSample)
        {
            _inputSamples.Enqueue(sample);
        }
    }
}

public class IgnoreDisposeStream : Stream
{
    private readonly Stream _innerStream;

    public IgnoreDisposeStream(Stream innerStream)
    {
        _innerStream = innerStream;
    }

    public override void Flush() => _innerStream.Flush();
    public override long Seek(long offset, SeekOrigin origin) => _innerStream.Seek(offset, origin);
    public override void SetLength(long value) => _innerStream.SetLength(value);
    public override int Read(byte[] buffer, int offset, int count) => _innerStream.Read(buffer, offset, count);
    public override void Write(byte[] buffer, int offset, int count) => _innerStream.Write(buffer, offset, count);
    public override bool CanRead => _innerStream.CanRead;
    public override bool CanSeek => _innerStream.CanSeek;
    public override bool CanWrite => _innerStream.CanWrite;
    public override long Length => _innerStream.Length;
    public override long Position
    {
        get => _innerStream.Position;
        set => _innerStream.Position = value;
    }

    // ここで本来のDispose()が呼び出されず、リソースが解放されないようにします。
    protected override void Dispose(bool disposing)
    {
    }

    // 必要に応じて、Close()もオーバーライドして無効化できます。
    public override void Close()
    {
    }
}
こんなコードで録音は可能
余談用の思いつきなのでGPTにベースを書いてもらいました。
_inputSamplesを共通にしておいて、タイムコードで制御しながら、wavでタイムコード録音しておりゃおりゃと。
色々できるそうなことが増えて面白いですね。
キャラクターを実写合成したい時に、リアルタイムで合成しつつ、後合成用のモーションとタイムコード音を収録なんかがぱっと思いつく活用法でしょうか。近々試してみたいと思います。
この記事のベースはGPTにコード食べさせて書いてもらったものです。
別作業中に書いてくれるので気軽に記事かけて良いですね。
好みの人格シミュさせたSlackBotは作ってみましたが結局一番使うのはweb版という
この記事が気に入ったらサポートをしてみませんか?