
Qt 6 QML 和訳文書 P20 ~ P48

Qt 6 Introduction
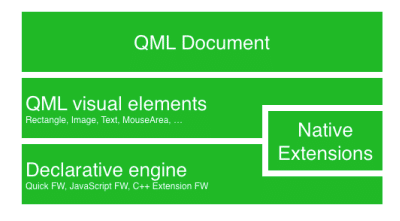
Qt Quick
Qt Quick is the umbrella term for the user interface technology used in Qt 6. It was introduced in Qt 4 and now expanded for Qt 6. Qt Quick itself is a collection of several technologies:
QML - Markup language for user interfaces
JavaScript - The dynamic scripting language
Qt C++ - The highly portable enhanced c++ library
Similar to HTML, QML is a markup language. It is composed of tags, called types in Qt Quick, that are enclosed in curly brackets: Item {} . It was designed from the ground up for the creation of user interfaces, speed and easier reading for developers. The user interface can be enhanced further using JavaScript code. Qt Quick is easily extendable with your own native functionality using Qt C++. In short, the declarative UI is called the front-end and the native parts are called the back-end. This allows you to separate the computing intensive and native operation of your application from the user interface part. In a typical project, the front-end is developed in QML/JavaScript. The back-end code, which interfaces with the system and does the heavy lifting, is developed using Qt C++. This allows a natural split between the more design-oriented developers and the functional developers. Typically, the back-end is tested using Qt Test, the Qt unit testing framework, and exported for the front-end developers to use.
Qt QuickというのはQt6内で利用されるユーザーインターフェーステクノロジーのための包括的な専門用語です。Qt4で紹介されて、今はQt6で拡張されています。Qt Quick自体はいくつかのテクノロジーの集合です。
QML: ユーザーインターフェースのためのマークアップ言語です。
JavaScript: 動的なスクリプト言語です。
Qt C++-高度に他のシステムに移植可能、画質の高められたC++ライブラリです。
HTMLと同様に、QMLはマークアップ言語です。Qt Quickでは型(タイプス)と呼ばれるタグで構成されます。タグは中括弧{}で囲まれているものです。:Item{}.
開発者にとって迅速に、より可読性のあるユーザーインターフェースの作成のために0からデザインされました。
ユーザーインターフェースはJavaScriptによってさらに質が向上します。Qt QuickはQt C++を使って独自のネイティブ機能で簡単に拡張することができます。
要するに、宣言型言語のUIはいわゆるフロントエンドと呼ばれ、ネイティブの部分がバックエンドと呼ばれます。これにより、アプリケーションのコンピューティング集約型およびネイティブ操作をユーザーインターフェイス部分から分離できます。
典型的なプロジェクトでは、フロントエンドはQML/JavaScriptで開発されます。
システムとの仲介を行い、そしてヘビーリフティングをする、バックエンドコードはQt C++を使って開発されます。これはよりデザインに方針を決め、開発者と、関数手続き型指向の開発者の間では自然な分担です。通常、バックエンドはQt単体テストフレームワークであるQt Testを使用してテストされ、フロントエンド開発者が使用できるようにエクスポートされます。
Digesting a User Interface
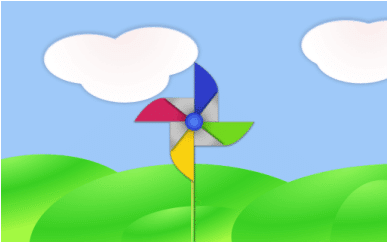
Let’s create a simple user interface using Qt Quick, which showcases some aspects of the QML language. In the end, we will have a paper windmill with rotating blades.
Qt Quickを使って簡単なユーザーインターフェースを作りましょう。QML言語のいくつかの側面のショーケースです。最後に、回転する刃のついた紙風車になります。
We start with an empty document called main.qml . All our QML files will have the suffix .qml . As a markup language (like HTML), a QML document needs to have one and only one root type. In our case, this is the Image type with a width and height based on the background image geometry: As QML doesn’t restrict the choice of type for the root type, we use an Image type with the source property set to our background image as the root.
「main.qmlという名前の空のドキュメントで始めます。全てのQMLファイルは.qmlという接尾辞がつきます。HTMLのようなマークアップランゲージのように、QMLドキュメントは一つあるいは、唯一のルート型を持つ必要があります。このサンプルのためには、これはImage型で、イメージの幾何領域(ジオメトリ)の背景に基づき、widthとheightを持ちます。QMLはルート型のための型の選択を制限していませんので、私たちはルートとして背景のイメージへソースプロパティをセットするImage型をつかいます。」
import QtQuick
Image {
id: root
source: "images/background.png"
}

TIP
Each type has properties. For example, an image has the properties width and height , each holding a count of pixels. It also has other properties, such as source . Since the size of the image type is automatically derived from the image size, we don’t need to set the width and height properties ourselves.
ヒント:
それぞれの型はプロパティを持ちます。例えば、イメージ型がwidthとheightのプロパティを持ちます。それぞれはピクセルのカウント数を持ちます。他のプロパティもあります。例えばsourceというプロパティです。イメージ型のサイズは自動的にimageのサイズによりますので、widthとheightをセットする必要はありません。
The most standard types are located in the QtQuick module, which is made available by the import statement at the start of the .qml file. The id is a special and optional property that contains an identifier that can be used to reference its associated type elsewhere in the document.
Important: An id property cannot be changed after it has been set, and it cannot be set during runtime. Using root as the id for the root-type is a convention used in this book to make referencing the top-most type predictable in larger QML documents. The foreground elements, representing the pole and the pinwheel in the user interface, are included as separate images
最も標準的な型はQtQuickモジュール内に置かれており、.qmlファイルの最初でimportステートメントにより利用可能になります。idは特別であり、かつ、任意のプロパティです。idはドキュメント内のどこでも、関連した型を参照するために使うことができる識別子を持ちます。
重要:IDプロパティは実行中は設定することができませんし、一旦セットすると変更することはできません。ルート型のIDとしてrootを使用することは、より大きなQMLドキュメントで最上位の型を参照することを予測可能にするためにこの本で使用されている規則です。foreground要素は、ユーザーインターフェース内ではポールとピンホイールを表現しており、別々のイメージとして含まれます。


We want to place the pole horizontally in the center of the background, but offset vertically towards the bottom. And we want to place the pinwheel in the middle of the background. Although this beginners example only uses image types, as we progress you will create more sophisticated user interfaces that are composed of many different types.
私たちは、背景の中央に水平にポールを置きたいのですが、下部に向かって垂直にオフセットします。背景の真ん中にpinwheelを置きます。この初心者用エグザンプルはimage型だけを使いますが、進むにつれて、多くの型で構成される、より洗練されたユーザーインターフェースを作ることになります。
Image {
id: root
...
Image {
id: pole
anchors.horizontalCenter: parent.horizontalCenter
anchors.bottom: parent.bottom
source: "images/pole.png"
}
Image {
id: wheel
anchors.centerIn: parent
source: "images/pinwheel.png"
}
...
}
To place the pinwheel in the middle, we use a complex property called anchor . Anchoring allows you to specify geometric relations between parent and sibling objects. For example, place me in the center of another type ( anchors.centerIn: parent ). There are left, right, top, bottom, centerIn, fill, verticalCenter and horizontalCenter relations on both ends. Naturally, when two or more anchors are used together, they should complement each other: it wouldn’t make sense, for instance, to anchor a type’s left side to the top of another type. For the pinwheel, the anchoring only requires one simple anchor.
中央にピンホイールを置くために、anchorと呼ばれる複雑なプロパティを使います。アンカーを使うことはparentと兄弟間オブジェクトの間で幾何領域的な関係を指定するようになります。例えば、私を他の型の中央におきます。(anchors.centerIn: parent)左、右、上、下、中央、塗りつぶし、垂直に中央、水平に中央の関係が両端にあります。当然、anchorの二つか、それよりも多くのアンカーが共に使われる時、それぞれを補間するべきです。例えば、ある型の左側を他の型の上へ結びつけることは意味がありません。pinwheelのためには、アンカーを行うことは一つの単純なアンカーを必要とするだけです。
TIP
Sometimes you will want to make small adjustments, for example, to nudge a type slightly off-center. This can be done with anchors.horizontalCenterOffset or with anchors.verticalCenterOffset . Similar adjustment properties are also available for all the other anchors. Refer to the documentation for a full list of anchors properties.
例えば、中心の外へ少しだけ型を押しのけるような、ちょっとした修正をしたいかもしれません。これはanchors.horizontalCenterOffset、あるいはanchors.verticalCenterOffsetでできます。同様の修正プロパティは他のアンカー全てに対してできます。アンカープロパティのための完全なリストには、ドキュメンテーションを参照してください。
TIP
Placing an image as a child type of our root type (the Image ) illustrates an important concept of a declarative language. You describe the visual appearance of the user interface in the order of layers and grouping, where the topmost layer (our background image) is drawn first and the child layers are drawn on top of it in the local coordinate system of the containing type.
ルート型の子の型としてイメージを置くことは宣言型言語の重要なコンセプトを例証します。レイヤーとグルーピングの順番でユーザーインターフェースの可視的な外観を記述します。最上部の層(背景画像)が最初に描かれて、子の層は含んでいる型のローカル座標システムで、その上に描かれます。
To make the showcase a bit more interesting, let’s make the scene interactive. The idea is to rotate the wheel when the user presses the mouse somewhere in the scene. We use the MouseArea type and make it cover the entire area of our root type
展示品となるサンプルコードをちょっとだけ面白くするために、インタラクティブにしてみましょう。ユーザーがシーンのどこかでマウスを押すときに、ホイールを回転させることです。MouseArea型を使い、ルート型の全体の領域でそれをカバーします。
Image {
id: root
...
MouseArea {
anchors.fill: parent
onClicked: wheel.rotation += 90
}
...
}
The mouse area emits signals when the user clicks inside the area it covers. You can connect to this signal by overriding the onClicked function. When a signal is connected, it means that the function (or functions) it corresponds to are called whenever the signal is emitted. In this case, we say that when there’s a mouse click in the mouse area, the type whose id is wheel (i.e., the pinwheel image) should rotate by +90 degrees.
マウスエリアはユーザーがカバーしている領域内でクリックを行うときシグナルを発生させます。あなたはonClicked関数をオーバーライドすることでこのシグナルに接続することができます。シグナルがつながると、シグナルが発行されるときはいつでも対応している関数がよばれるということです。この場合、マウスエリア内でクリックがあると、idがwheelである型(例えば、pinwheelイメージ)は、90度ごとに回転します。
TIP
This technique works for every signal, with the naming convention being on + SignalName in title case. Also, all properties emit a signal when their value changes. For these signals, the naming convention is
このテクニックはタイトルケースのon+シグナル名である命名規則で全てのシグナルで働きます。また、全てのプロパティはそれらの値が変化するときシグナルを発行します。これらのシグナルは、名前付けの規則が
`on${property}Changed`
For example, if a width property is changed, you can observe it with onWidthChanged: print(width) .
例えば、もしwidthプロパティが変化するのであれば、onWidthChanged: print(width)でそれを観察することができます。
【翻訳者の補足:Title caseは、文章やフレーズ内の単語の最初の文字を大文字にするテキストの書式設定方法です。タイトルケースは、書類、見出し、本のタイトル、論文のタイトルなど、特定の文章の一部を強調するために使用されることがあります。
Title caseの基本的なルールは以下の通りです。
最初の単語は常に大文字にする。
名詞、代名詞、動詞、形容詞、副詞などの主要な語はすべて大文字にする。
記号や前置詞("and"、"the"、"in"など)は通常、小文字にする。
一部の特定の単語("a"、"an"、"the"、"and"など)は、文の最初や重要な位置に現れる場合でも、小文字にすることがあります。
以下は、タイトルケースの例です。
"The Quick Brown Fox Jumps Over the Lazy Dog"
"Harry Potter and the Chamber of Secrets"
"A Brief History of Time"
タイトルケースの使用方法は、スタイルガイドや個々の出版物によって異なる場合があります。特定の文書やプロジェクトでタイトルケースが要求されている場合は、そのガイドラインに従う必要があります。】
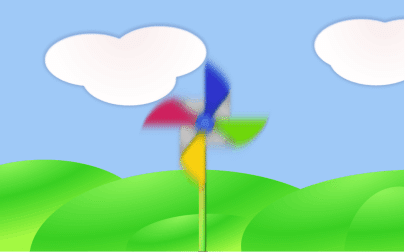
The wheel will now rotate whenever the user clicks, but the rotation takes place in one jump, rather than a fluid movement over time. We can achieve smooth movement using animation. An animation defines how a property change occurs over a period of time. To enable this, we use the Animation type’s property called Behavior . The Behavior specifies an animation for a defined property for every change applied to that property. In other words, whenever the property changes, the animation is run. This is only one of many ways of doing animation in QML.
ホイールは今ユーザーがクリックすときはいつでも回転しますが、回転は一定時間中流れるような動きよりはむしろ、一回のジャンプで起きるものです。アニメーションを使って滑らかな動きを実現できます。アニメーションは一定期間を越えてどれだけプロパティの変化が発生するかを定義します。これを有効にするには、Behaviorと呼ばれるアニメーション型のプロパティを使います。Behaviorはそのプロパティに適用される全ての変化のために定義されたプロパティのためのアニメーションを指定します。言い換えれば、プロパティが変わるごとに、アニメーションが走ります。これはQMLでアニメーションを行う数ある方法のうちの一つにしかすぎません。
Image {
     id: root
      Image {
             id: wheel
             Behavior on rotation {
             NumberAnimation {
             duration: 250
                        }
             }
       }
}
Now, whenever the wheel’s rotation property changes, it will be animated using a NumberAnimation with a duration of 250 ms. So each 90-degree turn will take 250 ms, producing a nice smooth turn.
今、ホイールの回転プロパティが変化するごとに、NumberAnimationを使って250ミリセカンドの存続時間でアニメ―とします。だからそれぞれの90度には250ミリセカンドかかり、ほどよいスムーズな回転を生み出します。
TIP
You will not actually see the wheel blurred. This is just to indicate the rotation. (A blurred wheel is in the assets folder, in case you’d like to experiment with it.) Now the wheel looks much better and behaves nicely, as well as providing a very brief insight into the basics of how Qt Quick programming works.
実際には風車はぼやけてみえることはありません。これは回転を示しているだけです。(あなたがそれで実験したい場合には、ぼやけた回転は、assetsフォルダ内にあります。Qt Quickプログラミングがどう動くのかという基本への手短な洞察を提供するだけではなく、風車の見栄えは前よりいいですし、本当にそれらしく振舞います。
Quick Start
This chapter will introduce you to developing with Qt 6. We will show you how to install the Qt SDK and how you can create as well as run a simple hello world application using the Qt Creator IDE
この章はQt6での開発をご紹介します。Qt SDKをインストールする方法、そしてQt Creator IDEを利用してhello worldアプリケーションを実行するだけではなく、どのように作るのか、ということについてお伝えします。
Installing Qt 6 SDK
The Qt SDK includes the tools you need to build desktop or embedded applications. You can grab the latest version from the Qt Company (https://qt.io) ’s homepage. There is an offline and online installer. The author personally prefers the online installer package as it allows you to install and update multiple Qt releases. This is the recommended way to start. The SDK itself has a maintenance tool, which allows you to update the SDK to the latest version. The Qt SDK is easy to install and comes with its own IDE for rapid development called Qt Creator. The IDE is a highly productive environment for Qt coding and recommended to all readers. Many developers use Qt from the command line, however, and you are free to use the code editor of your choice. When installing the SDK, you should select the default option and ensure that at least Qt 6.2 is enabled. Then you’re ready to go.
Qt SDKはデスクトップあるいは、組み込み型アプリケーションを組み立てる必要があるツールを含んでいます。Qtカンパニーのホームページから最新版を手に入れることができます。オフラインとオンラインインストーラーがあります。著者は個人的にオンライン版を好みます。インストールと、多数のQtのリリースを更新してくれるからです。始めるにはお勧めの方法です。SDK自体、SDKを最新版へ更新するようにできるメンテナンスツールを持っています。Qt SDKはイントールが簡単でQt Creatorという迅速な開発のための、IDEをもちます。IDEは全ての読み手にとってお勧めであり、Qtコーディングのための高度に生産性の高い環境です。多くの開発者はコマンドラインからQtを使いますが、あなたの選択次第でコードエディタを使うのも自由です。SDKをインストールすると、初期オプションを選択し、少なくともQt6.2が利用可能であることを確認するべきです。これで準備は完了です。
Update Qt
The Qt SDK comes with an own maintenance tool located under the ${install_dir} . It allows to add and/or update Qt SDK components.
Qt SDKは${install_dir}の元に置かれた自身のメンテナンスツールも一緒に持っています。これはQt SDKのコンポーネントを更新するものです。
Build from Source
To build Qt from source you can follow the guide from the Qt Wiki (https://wiki.qt.io/Building_Qt_6_from_Git)
ソースからQtをビルドするには、Qt Wiki(https://wiki.qt.io/Building_Qt_6_from_Git)のガイド通りにできます。
Hello World
To test your installation, we will create a small hello world application. Please, open Qt Creator and create a Qt Quick UI Project ( File ‣ New File or Project ‣ Other Project ‣ Qt Quick UI Prototype ) and name the project HelloWorld .
インストールをテストするために、小さいhello worldアプリケーションを作りましょう。どうか、Qt Creatorを開き、Qt Quick UI Projectを作ってください。(File ‣ New File or Project ‣ Other Project ‣ Qt Quick UI Prototype)そして、プロジェクト名をHelloWorldにします。
TIP
The Qt Creator IDE allows you to create various types of applications. If not otherwise stated, we always use a Qt Quick UI prototype project. For a production application you would often prefer a CMake based project, but for fast prototyping this type is better suited.
「QtCreator IDEでは様々な型のアプリケーションを作ることができます。他に何も言われなければ、私たちは常にQt Quick UI prototypeプロジェクトを使います。運用アプリケーションでは、CMake ベースのプロジェクトを好むことがよくありますが、高速プロトタイプ作成にはこの型の方が適しています。」
TIP
A typical Qt Quick application is made out of a runtime called the QmlEngine which loads the initial QML code. The developer can register C++ types with the runtime to interface with the native code. These C++ types can also be bundled into a plugin and then dynamically loaded using an import statement. The qml tool is a pre-made runtime which is used directly. For the beginning, we will not cover the native side of development and focus only on the QML aspects of Qt 6. This is why we start from a prototype project. Qt Creator creates several files for you. The HelloWorld.qmlproject file is the project file, where the relevant project configuration is stored. This file is managed by Qt Creator, so don’t edit it yourself. Another file, HelloWorld.qml , is our application code. Open it and try to understand what the application does before you read on.
「典型的なQt Quickアプリケーションは初期のQMLコードをロードするQmlEngineと呼ばれるランタイムから作成されます。開発者はネイティブコードを仲介するためにランタイムでC++の型を登録できます。これらのC++の型はプラグインとバンドルすることもできますし、importステートメントを使って動的にロードすることもできます。
qmlツールは直接使用される事前に作られたランタイムツールです。初心者のために、私たちはQt6のQML側のみに焦点を絞ってネイティブサイドの開発をカバーしません。こういうわけで私たちはprototypeプロジェクトから始めます。Qt Creatorはあなたに対していくつかのファイルを作ります。HelloWorld.qmlprojectファイルはプロジェクトファイルで、関連するプロジェクトの構成が格納されているものです。このファイルはQt Creatorによって管理されています、だからあなた自身でそれを編集しないでください。別のファイルには、HelloWorld.qmlがあり、これが私たちのアプリケーションのコードです。それを開いて、あなたが読む前にアプリケーションが何をするのか理解してみましょう。」
// HelloWorld.qml
import QtQuick
import QtQuick.Window
Window {
       width: 640
       height: 480
       visible: true
       title: qsTr("Hello World")
}
The HelloWorld.qml program is written in the QML language. We’ll discuss the QML language more in-depth in the next chapter. QML describes the user interface as a tree of hierarchical elements. In this case, a window of 640 x 480 pixels, with a window title “Hello World”. To run the application on your own, press the Run tool on the left side, or select Build > Run from the menu. In the background, Qt Creator runs qml and passes your QML document as the first argument. The qml application parses the document, and launches the user interface. You should see something like this:
HelloWorld.qmlプログラムはQML言語で書かれています。私たちはQML言語を次の章でより深く討論します。QMLはユーザーインターフェースを階層要素のツリーとして記述します。この場合、640×480ピクセルのウィンドウ、windowタイトルは"Hello World"です。アプリケーションを自分自身で走らせるために、左側にあるRunツールを押して、メニューからBuild>Runを選択してください。バックグラウンドでは、QtCreatorがqmlを走らせ、あなたのQMLドキュメントを最初の引数として渡します。qmlアプリケーションはドキュメントを解析し、そしてユーザーインターフェースを発射します。次のようなものが表示されます。
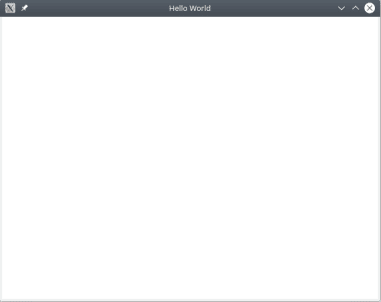
Qt 6 works![
Qt6は動いています。
That means we’re ready to continue.
私たちは続行する準備が整っているということです。
TIP
If you are a system integrator, you’ll want to have Qt SDK installed to get the latest stable Qt release, as well as a Qt version compiled from source for your specific device target.
TIP
Build from Scratch
If you’d like to build Qt 6 from the command line, you’ll first need to grab a copy of the code repository and build it. Visit Qt’s wiki for an up-to-date explanation of how to build Qt from git. After a successful compilation (and 2 cups of coffee), Qt 6 will be available in the qtbase folder. Any beverage will suffice, however, we suggest coffee for best results. If you want to test your compilation, you can now run the example with the default runtime that comes with Qt 6: $ qtbase/bin/qml
システムインテグレーターの場合は、Qt SDKをインストールして、最新の安定したQtリリースと、特定のデバイスターゲットのソースからコンパイルされたQtバージョンを入手する必要があります。
もしコマンドラインからQt6をビルドしたいのならば、最初にコードレポジトリのコピーを手に入れて、それをビルドする必要があります。gitからQtをビルドする方法の最新の説明のためにはQtのウィキを訪問してください。(コーヒー2杯を飲んだあたりで)コンパイルがうまくいくと、Qt6はqtbaseフォルダ内で利用可能です。飲み物はなんでもいいけれども、最高の結果のためにはコーヒーをおすすめします。もしあなたがコンパイルをテストしたいのであれば、今Qt6についてくるデフォルトランタイムのエグザンプルを、実行することができます。
$qtbase/bin/qml
Application Types
This section is a run through of different application types one can write with Qt 6. It’s not limited to the selection presented here, but it will give you a better idea of what you can achieve with Qt 6 in general.
Console Application
A console application does not provide a graphical user interface, and is usually called as part of a system service or from the command line. Qt 6 comes with a series of ready-made components which help you create cross-platform console applications very efficiently. For example, the networking file APIs, string handling, and an efficient command line parser. As Qt is a high-level API on top of C++, you get programming speed paired with execution speed. Don’t think of Qt as being just a UI toolkit - it has so much more to offer!
コンソールアプリケーションはグラフィカルユーザーインターフェースを提供しません。そして大抵はシステムサービスの一部として呼ばれるか、あるはコマンドラインから呼ばれます。Qt6はとても効率的にクロスプラットフォームのコンソールアプリケーションを作る手助けをする一連の準備で作成されたコンポーネントと共にあります。
例えば、ネットワーキングファイルのAPI, ストリングハンドリング、そして効率的なコマンドラインパーサーです。QtはC ++の上位にある高レベルのAPIであるため、プログラミング速度と実行速度の組み合わせが得られます。Qtを単なるUIツールキットであると考えないでください。提供できるものはまだまだたくさんあります!
String Handling
This first example demonstrates how you could add 2 constant strings. Admittedly, this is not a very useful application, but it gives you an idea of what a native C++ application without an event loop may look like.
ストリング処理
最初の例はあなたが2つの定数ストリングをどのように加えるのかを実証します。明らかに、これはあまり役に立つアプリケーションではないが、ネイティブのC++アプリケーションが、イベントループなしでどのようであるかという考えを与えます。
// module or class includes
#include <QtCore>
// text stream is text-codec aware
QTextStream cout(stdout, QIODevice::WriteOnly);

int main(int argc, char** argv)
{
// avoid compiler warnings
Q_UNUSED(argc)
Q_UNUSED(argv)
QString s1("Paris");
QString s2("London");
// string concatenation
QString s = s1 + " " + s2 + "!";
cout << s << Qt::endl;
}
Container Classes
This example adds a list, and list iteration, to the application. Qt comes with a large collection of container classes that are easy to use, and has the same API paradigms as other Qt classes.
コンテナクラス
この例はリスト、そしてリストイテレーションをアプリケーションに加えます。Qtは使いやすい大量のコンテナクラスがあり、他のQtのクラスと同じAPIパラダイムを持ちます。
QString s1("Hello");
QString s2("Qt");
QList<QString> list;
// stream into containers
list << s1 << s2;
// Java and STL like iterators
QListIterator<QString> iter(list);
while(iter.hasNext()) {
cout << iter.next();
if(iter.hasNext()) {
cout << " ";
}
}
cout << "!" << Qt::endl;
Here is a more advanced list function, that allows you to join a list of strings into one string. This is very handy when you need to proceed line based text input. The inverse (string to string-list) is also possible using the QString::split() function.
より進んだリスト関数があります。リスト内のストリングを一つのストリングに連結できます。これは行を基本としたテキスト入力を手続きするようなときにはとてもお手軽です。split()関数を使えば逆もまた可能になります。
QString s1("Hello");
QString s2("Qt");
// convenient container classes
QStringList list;
list << s1 << s2;
// join strings
QString s = list.join(" ") + "!";
cout << s << Qt::endl;
File IO
In the next snippet, we read a CSV file from the local directory and loop over the rows to extract the cells from each row. Doing this, we get the table data from the CSV file in ca. 20 lines of code. File reading gives us a byte stream, to be able to convert this into valid Unicode text, we need to use the text stream and pass in the file as a lower-level stream. For writing CSV files, you would just need to open the file in write mode, and pipe the lines into the text stream.
次のスニペットでは、私たちはローカルディレクトリからCSVファイルを読込み、それぞれの行からセルを抜き出すために行をループします。これを行うことで、CSVファイルからコードのca.20行内のテーブルデータを取得します。ファイルの読込はバイトストリームを私たちに与え、これを有効なユニコードテキストに変換することができ、私たちはテキストストリームを使って、より低いレベルのストリームとしてファイル内に渡す必要があります。CSVファイルを書くために、write modeでファイルを開く必要があり、そしてテキストストリームに行をパイプします。
QList<QStringList> data;
// file operations
QFile file("sample.csv");
if(file.open(QIODevice::ReadOnly)) {
QTextStream stream(&file);
// loop forever macro
forever {
QString line = stream.readLine();
// test for null string 'String()'
if(line.isNull()) {
break;
}// test for empty string 'QString("")'

if(line.isEmpty()) {
continue;
}
QStringList row;
// for each loop to iterate over containers
foreach(const QString& cell, line.split(",")) {
row.append(cell.trimmed());
}
data.append(row);
}
}
// No cleanup necessary.
C++ Widget Application
Console based applications are very handy, but sometimes you need to have a graphical user interface (GUI). In addition, GUI-based applications will likely need a back-end to read/write files, communicate over the network, or keep data in a container. In this first snippet for widget-based applications, we do as little as needed to create a window and show it. In Qt, a widget without a parent is a window. We use a scoped pointer to ensure that the widget is deleted when the pointer goes out of scope. The application object encapsulates the Qt runtime, and we start the event loop with the exec() call. From there on, the application reacts only to events triggered by user input (such as mouse or keyboard), or other event providers, such as networking or file IO. The application only exits when the event loop is exited. This is done by calling quit() on the application or by closing the window. When you run the code, you will see a window with the size of 240 x 120 pixels. That’s all.
コンソールベースのアプリケーションはとてもお手頃ですが、あなたはGUIを持つ必要があるときもあります。加えて、GUIを基本としたアプリケーションはバックエンドでファイルを読込、書き込みする必要がありますし、ネットワーク上でコミュニケーションを取り、あるいはコンテナ内のデータを保存する必要があります。ウィジェットベースのアプリケーション用のこの最初のスニペットでは、ウィンドウを作成して表示するために必要なことをほとんど行いません。Qtでは、親なしのウィジェットはウィンドウです。私たちはそのウィジェットがポインタがスコープの外に出る時に消去することを確かにするためスコープドポインタを使います。アプリケーションオブジェクトはQtのランタイムをカプセル化し、exec()をコールすることでイベントループをスタートさせます。そこから、アプリケーションはユーザー入力(マウスやキーボードのような)によって引き起こされたイベントにのみ、あるいはネットワーキングやfile IOのような他のイベント提供者によって引きおこされるイベントにのみ反応します。アプリケーションはイベントループが脱出するときにのみ脱出します。これはアプリケーション上でquit()がコールされることにより、あるいはウィンドウをクローズすることによって行われます。あなたがコードを走らせるとき、240×120ピクセルのサイズでウィンドウを見るでしょう。それだけです。
include <QtGui>
int main(int argc, char** argv)
{
    QApplication app(argc, argv);
    QScopedPointer<QWidget> widget(new CustomWidget());
    widget->resize(240, 120);
    widget->show();
    return app.exec();
}
Custom Widgets
When you work on user interfaces, you may need to create custom-made widgets. Typically, a widget is a window area filled with painting calls. Additionally, the widget has internal knowledge of how to handle keyboard and mouse input, as well as how to react to external triggers. To do this in Qt, we need to derive from QWidget and overwrite several functions for painting and event handling.
あなたがユーザーインターフェース上で活動するとき、カスタムメイドのウィジェットを作る必要があるかもしれません。典型的には、ウィジェットはペインティングを呼ぶことで塗りつぶされるウィンドウの領域です。加えて、ウィジェットはキーボード入力とマウス入力の動かし方の内部の知識を持っており、そして外部のトリガーへの反応の仕方の知識も持っています。Qt内でこれを行うには、QWidgetを継承して、イベントハンドリングとペイントのためのいくつかの関数を上書きする必要があります。
#pragma once
include <QtWidgets>
class CustomWidget : public QWidget
{
    Q_OBJECT
public:
    explicit CustomWidget(QWidget *parent = 0);
    void paintEvent(QPaintEvent *event);
    void mousePressEvent(QMouseEvent *event);
    void mouseMoveEvent(QMouseEvent *event);
private:
    QPoint m_lastPos;
};
In the implementation, we draw a small border on our widget and a small rectangle on the last mouse position. This is very typical for a low-level custom widget. Mouse and keyboard events change the internal state of the widget and trigger a painting update. We won’t go into too much detail about this code, but it is good to know that you have the possibility. Qt comes with a large set of ready-made desktop widgets, so it’s likely that you don’t have to do this.
実装では、ウィジェット上に小さな境界線を描き、最後のマウスポジション上に小さな矩形を描きます。これは低レベルのカスタムウィジェットに対してとても典型的です。マウスとキーボードイベントはウィジェットの内部の状態を変化させ、ペインティングの更新を引き起こします。私たちはこのコードについてあまりにも多くの詳細に立ち入りませんが、可能性があることを知るのはいいことです。Qtは既に整えられたデスクトップウィジェットの大きなセットを持っています。だからあなたはこれを行わなくてもよい可能性があります。
include "customwidget.h"
CustomWidget::CustomWidget(QWidget *parent) :
    QWidget(parent)
{
}
void CustomWidget::paintEvent(QPaintEvent *)
{
    QPainter painter(this);
    QRect r1 = rect().adjusted(10,10,-10,-10);
    painter.setPen(QColor("#33B5E5"));
    painter.drawRect(r1);
    QRect r2(QPoint(0,0),QSize(40,40));
if(m_lastPos.isNull()) {
    r2.moveCenter(r1.center());
} else {
    r2.moveCenter(m_lastPos);
}
    painter.fillRect(r2, QColor("#FFBB33"));
}
void CustomWidget::mousePressEvent(QMouseEvent *event)
{
    m_lastPos = event->pos();
    update();
}

void CustomWidget::mouseMoveEvent(QMouseEvent *event)
{
m_lastPos = event->pos();
update();
}
Desktop Widgets
The Qt developers have done all of this for you already and provide a set of desktop widgets, with a native look on different operating systems. Your job, then, is to arrange these different widgets in a widget container into larger panels. A widget in Qt can also be a container for other widgets. This is accomplished through the parent-child relationship. This means we need to make our ready-made widgets, such as buttons, checkboxes, radio buttons, lists, and grids, children of other widgets. One way to accomplish this is displayed below. Here is the header file for a so-called widget container.
Qtの開発者は異なるオペレーティングシステム内のネイティブの外観で、デスクトップウィジェットの設定を提供し、既にあなたのためにこれの全てを行いました。その時、あなたの仕事は、あるウィジェットコンテナ内の異なるこれらのウィジェットをより大きなパネルへ整理することです。Qt内のウィジェットは他のウィジェットのためのコンテナにもなります。これは親子関係を通して達成されます。これは私たちが作り、例えば、ボタン、チェックボックス、ラジオボタン、リスト、そしてグリッド、他のウィジェットの子のような既存のウィジェットを作る必要があるという意味です。これを達成する方法は下記に表示されます。こちらはいわゆるウィジェットコンテナのヘッダファイルです。
CustomWidget::CustomWidget(QWidget *parent) :
QWidget(parent)
{
    QVBoxLayout *layout = new QVBoxLayout(this);
    m_widget = new QListWidget(this);
    layout->addWidget(m_widget);
    m_edit = new QLineEdit(this);
    layout->addWidget(m_edit);
    m_button = new QPushButton("Quit", this);
    layout->addWidget(m_button);
    setLayout(layout);
    QStringList cities;
    cities << "Paris" << "London" << "Munich";
    foreach(const QString& city, cities) {
        m_widget->addItem(city);
    }
    connect(m_widget, SIGNAL(itemClicked(QListWidgetItem*)), th
    connect(m_edit, SIGNAL(editingFinished()), this, SLOT(updat
    connect(m_button, SIGNAL(clicked()), qApp, SLOT(quit()));
}
void CustomWidget::itemClicked(QListWidgetItem *item)
{
    Q_ASSERT(item);
    m_edit->setText(item->text());
}
    void CustomWidget::updateItem()
{
    QListWidgetItem* item = m_widget->currentItem();
    if(item) {
    item->setText(m_edit->text());
    }
}
Drawing Shapes
Some problems are better visualized. If the problem at hand looks remotely like geometrical objects, Qt graphics view is a good candidate. A graphics view arranges simple geometrical shapes in a scene. The user can interact with these shapes, or they are positioned using an algorithm. To populate a graphics view, you need a graphics view and a graphics scene. The scene is attached to the view and is populated with graphics items. Here is a short example. First the header file with the declaration of the view and scene.
いくつかの問題がより浮き彫りになってきます。もし問題がじおめてぃかるな部ジェクトのように遠くに見えるのだれば、Qtのグラフィックスビューが良い候補です。グラフィックビューは単純な幾何図形をシーン内に整理します。ユーザーはこれらのシェイプと相互にかかわることができ、あるいはアルゴリズムを使って位置づけられます。グラフィックスビューを一般化するためには、あなたはグラフィックスビューとグラフィックスシーンを必要とします。シーンはビューに取り付けられ、グラフィックスアイテムで一般化されます。こちらは小さいエグザンプルです。ビューとシーンの宣言の最初のヘッダファイルです。
class CustomWidgetV2 : public QWidget
{
    Q_OBJECT
public:
    explicit CustomWidgetV2(QWidget *parent = 0);
private:
    QGraphicsView *m_view;
    QGraphicsScene *m_scene;
};
In the implementation, the scene gets attached to the view first. The view is a widget and gets arranged in our container widget. In the end, we add a small rectangle to the scene, which is then rendered on the view.
「実装では、シーンは最初にビューに取り付けられます。ビューはウィジェットであり、コンテナウィジェット内でアレンジされます。最後には、シーンに小さな矩形範囲を加え、そしてそれからビューへ表示されます。」
include "customwidgetv2.h"
CustomWidget::CustomWidget(QWidget *parent) :
QWidget(parent)
{
    m_view = new QGraphicsView(this);
    m_scene = new QGraphicsScene(this);
    m_view->setScene(m_scene);
    QVBoxLayout *layout = new QVBoxLayout(this);
    layout->setMargin(0);
    layout->addWidget(m_view);
    setLayout(layout);
    QGraphicsItem* rect1 = m_scene->addRect(0,0, 40, 40, Qt::No
    rect1->setFlags(QGraphicsItem::ItemIsFocusable|QGraphicsIte
}
Adapting Data
Up to now, we have mostly covered basic data types and how to use widgets and graphics views. In your applications, you will often need a larger amount of structured data, which may also need to be stored persistently. Finally, the data also needs to be displayed. For this, Qt uses models. A simple model is the string list model, which gets filled with strings and then attached to a list view.
「今までで私たちはほとんどの基本のデータ型をカバーしましたし、ウィジェットとグラフィックスビューの使い方をカバーしました。あなたのアプリケーションでは、より多くの構造化されたデータを必要とすることがよくあるでしょうし、そのデータはいつまでも格納し続ける必要があるでしょう。最後に、そのデータは表示される必要もあります。このため、Qtはモデルを使います。単純なモデルはストリングリストモデルで、ストリング型で満たされ、リストビューに取り付けられます。」
m_view = new QListView(this);
m_model = new QStringListModel(this);
view->setModel(m_model);
QList<QString> cities;
cities << "Munich" << "Paris" << "London";
m_model->setStringList(cities);
Another popular way to store and retrieve data is SQL. Qt comes with SQLite embedded, and also has support for other database engines (e.g. MySQL and PostgreSQL). First, you need to create your database using a schema, like this:
「データを格納し、取り出すための、他の人気な方法はSQLです。Qtは組み込まれたSQLiteを持っていて、他のデータベースエンジンのためのサポートも持っています。(例えばMySQLとPostgreSQLです。)最初、あなたはスキーマを使ってデータベースを作る必要があります。このように。」
CREATE TABLE city (name TEXT, country TEXT);
INSERT INTO city VALUES ("Munich", "Germany");
INSERT INTO city VALUES ("Paris", "France");
INSERT INTO city VALUES ("London", "United Kingdom");
To use SQL, we need to add the SQL module to our .pro file
「SQLを使うため、私たちは.proファイルにSQLモジュールを加える必要があります。」
QT += sqlAnd then we can open our database using C++. First, we need to retrieve a new database object for the specified database engine. With this database object, we open the database. For SQLite, it’s enough to specify the path to the database file. Qt provides some high-level database models, one of which is the table model. The table model uses a table identifier and an optional where clause to select the data. The resulting model can be attached to a list view as with the other model before.
「そしてそれからC++を使ってデータベースをオープンできます。最初に、私たちは新しいデータベースオブジェクトを、指定したデータベースエンジンのために取得する必要があります。このデータベースオブジェクトで、データベースを開きます。SQLiteに対しては、データベースファイルのパスを指定するだけで十分です。Qtはいくつかの高レベルのデータベースモデルを提供し、そのうちの一つがテーブルモデルです。テーブルモデルはテーブルの識別子と、データを選択するための選択的なwhere句を利用します。結果としてのモデルは以前の他のモデルとしてリストビューへ取り付けられます。」
QSqlDatabase db = QSqlDatabase::addDatabase("QSQLITE");
db.setDatabaseName("cities.db");
if(!db.open()) {
    qFatal("unable to open database");
}
m_model = QSqlTableModel(this);
m_model->setTable("city");
m_model->setHeaderData(0, Qt::Horizontal, "City");
m_model->setHeaderData(1, Qt::Horizontal, "Country");
view->setModel(m_model);
m_model->select();
For a higher level model operations, Qt provides a sorting file proxy model that allows you sort, filter, and transform models.
「より高度な段階の命令のために、Qtはソート、フィルター、モデルの変換ができるプロキシもソーティングファイルプロキシモデルを提供します。」
QSortFilterProxyModel* proxy = new QSortFilterProxyModel(this);
proxy->setSourceModel(m_model);
view->setModel(proxy);
view->setSortingEnabled(true);
Filtering is done based on the column that is to be filters, and a string as filter argument.
「フィルタリングはフィルターであるカラムを基本として行われ、フィルター引数としてストリング型を基本とします。」
proxy->setFilterKeyColumn(0);
proxy->setFilterCaseSensitivity(Qt::CaseInsensitive);
proxy->setFilterFixedString(QString)
The filter proxy model is much more powerful than demonstrated here. For now, it is enough to remember it exists.
「フィルタープロキシモデルはここで証明するよりもずっとパワフルです。これからのためにも、それが存在するということを覚えるだけで十分です。」
!!! note
This has been an overview of the different kind of classic appl
これは古典的なアプリの異なる種類の概観でした。
Coming next: Qt Quick to the rescue.
次は、緊急救援のQt Quickです。
Qt Quick Application
There is an inherent conflict in modern software development. The user interface is moving much faster than our back-end services. In a traditional technology, you develop the so-called front-end at the same pace as the back-end. This results in conflicts when customers want to change the user interface during a project, or develop the idea of a user interface during the project. Agile projects, require agile methods. Qt Quick provides a declarative environment where your user interface (the front-end) is declared like HTML and your back-end is in native C++ code. This allows you to get the best of both worlds.
現代のソフトウェア開発には固着した競合があります。ユーザーインターフェースはバックエンドサービスよりもずっと速く動いています。伝統的な技術では、バックエンドと同じペースでいわゆるフロントエンドを開発します。顧客はプロジェクトの間にユーザーインターフェースを変化させたい時、あるいは、プロジェクトの間にユーザーインターフェースのアイデアを発展させたい時、これが競合する結果になります。アジャイルプロジェクトは、アジャイルメソッドを必要とします。Qt Quickは、ユーザーインターフェイス(フロントエンド)がHTMLのように宣言され、バックエンドがネイティブC ++コードである宣言型環境を提供します。これにより、両方の長所を活かすことができます。
This is a simple Qt Quick UI below
import QtQuick
Rectangle {
    width: 240; height: 240
    Rectangle {
        width: 40; height: 40
        anchors.centerIn: parent
        color: '#FFBB33'
    }
}
The declaration language is called QML and it needs a runtime to execute it. Qt provides a standard runtime called qml . You can also write a custom runtime. For this, we need a quick view and set the main QML document as a source from C++. Then you can show the user interface.
「QMLという宣言型言語、①そしてそれは実行するランタイムを必要とします。Qtはqmlと呼ばれる標準のランタイムを提供します。カスタムランタイムも書くことができます。このため、私たちはクイックビューを必要とし、主なQMLドキュメントをC++からのソースとして設定します。それからユーザーインターフェースを表示します。」
①ランタイムとは何か?
chat GPT
ランタイム(Runtime)とは、プログラムが実行される環境や実行時における動作のことを指します。具体的には、プログラムが実行される際に必要なランタイム環境やランタイムエンジンが提供する機能やサービスを指すことがあります。
一般的に、プログラミング言語にはそれぞれ対応するランタイムが存在します。例えば、JavaプログラムはJavaランタイム環境(JRE)またはJava仮想マシン(JVM)上で実行されますし、JavaScriptプログラムはウェブブラウザのJavaScriptランタイムで実行されます。
ランタイムには、メモリ管理、変数のライフサイクル管理、例外処理、スレッド管理、ファイル入出力などの機能が含まれる場合があります。また、実行時に動的なコード生成や実行が可能な場合もあります。
一般に、開発者がプログラムを作成する際には、プログラミング言語と対応するランタイム環境が必要となります。このランタイム環境が提供する機能や制約によって、プログラムの挙動やパフォーマンスが左右されることになります。
したがって、「ランタイム」という用語は、プログラムが実際に動作するための環境や実行時の動作に焦点を当てた概念を表す言葉として使用されます。
import QtQuick
Rectangle {
     width: 240; height: 120
ListView {
     width: 180; height: 120
     anchors.centerIn: parent
     model: cityModel
     delegate: Text { text: model.city }
     }
}
To enable the cityModel , we can mostly re-use our previous model, and add a context property to our root context. The root context is the other root-element in the main document.
cityModelを有効にするため、私たちはほとんど私たちの以前のモデルを再利用することができ、ルートコンテキストにコンテキストプロパティを加えることができます。ルートコンテキストはメインドキュメント内の他のルート要素です。
m_model = QSqlTableModel(this);
... // some magic code
QHash<int, QByteArray> roles;
roles[Qt::UserRole+1] = "city";
roles[Qt::UserRole+2] = "country";
m_model->setRoleNames(roles);
engine.rootContext()->setContextProperty("cityModel", m_model);
Summary
We have seen how to install the Qt SDK and how to create our first application. Then we walked you through the different application types to give you an overview of Qt, showing off some features Qt offers for application development. I hope you got a good impression that Qt is a very rich user interface toolkit and offers everything an application developer can hope for and more. Still, Qt does not lock you into specific libraries, as you can always use other libraries, or even extend Qt yourself. It is also rich when it comes to supporting different application models: console, classic desktop user interface, and touch user interface.
まとめ
私たちはQt SDKのインストール方法と、最初のアプリケーションの作り方を見てきました。それからQtの概観をあなたに示すために異なるアプリケーションタイプを通して道案内をし、アプリケーション開発のためにQtが提供する機能をお見せしました。私はQtがとてもリッチなユーザーインターフェースツールキットであるという良い印象を得ることを望みますし、アプリケーション開発者が望むものすべて、そしてそれ以上のものを提供するものであることを望んでいます。なお、Qtは指定したライブラリへあなたを拘束しません、あなたは常に他のライブラリを使うことができ、あるいはQtをあなた自身が拡張することさえできます。異なるアプリケーションモデル:コンソール、古典的なデスクトップユーザーインターフェース、そしてタッチ型ユーザーインターフェースのようなものをサポートすることでもなおリッチなのです。
この記事が気に入ったらサポートをしてみませんか?