【Android】ConcatAdapterを使用して複雑なレイアウトを簡単に作成しました。

動機
複雑なレイアウトをどうやって簡単に作れるかについて悩んでいました。 以前のプロジェクトではepoxyを使用してこれを解消しましたが、今回recyclerViewの改善によってconcatAdapter(GroupedRecyclerView)を使ってみました。
ConcatAdapterは?
グループにセクションを分け、画面リストを配分してレイアウトを作ります。
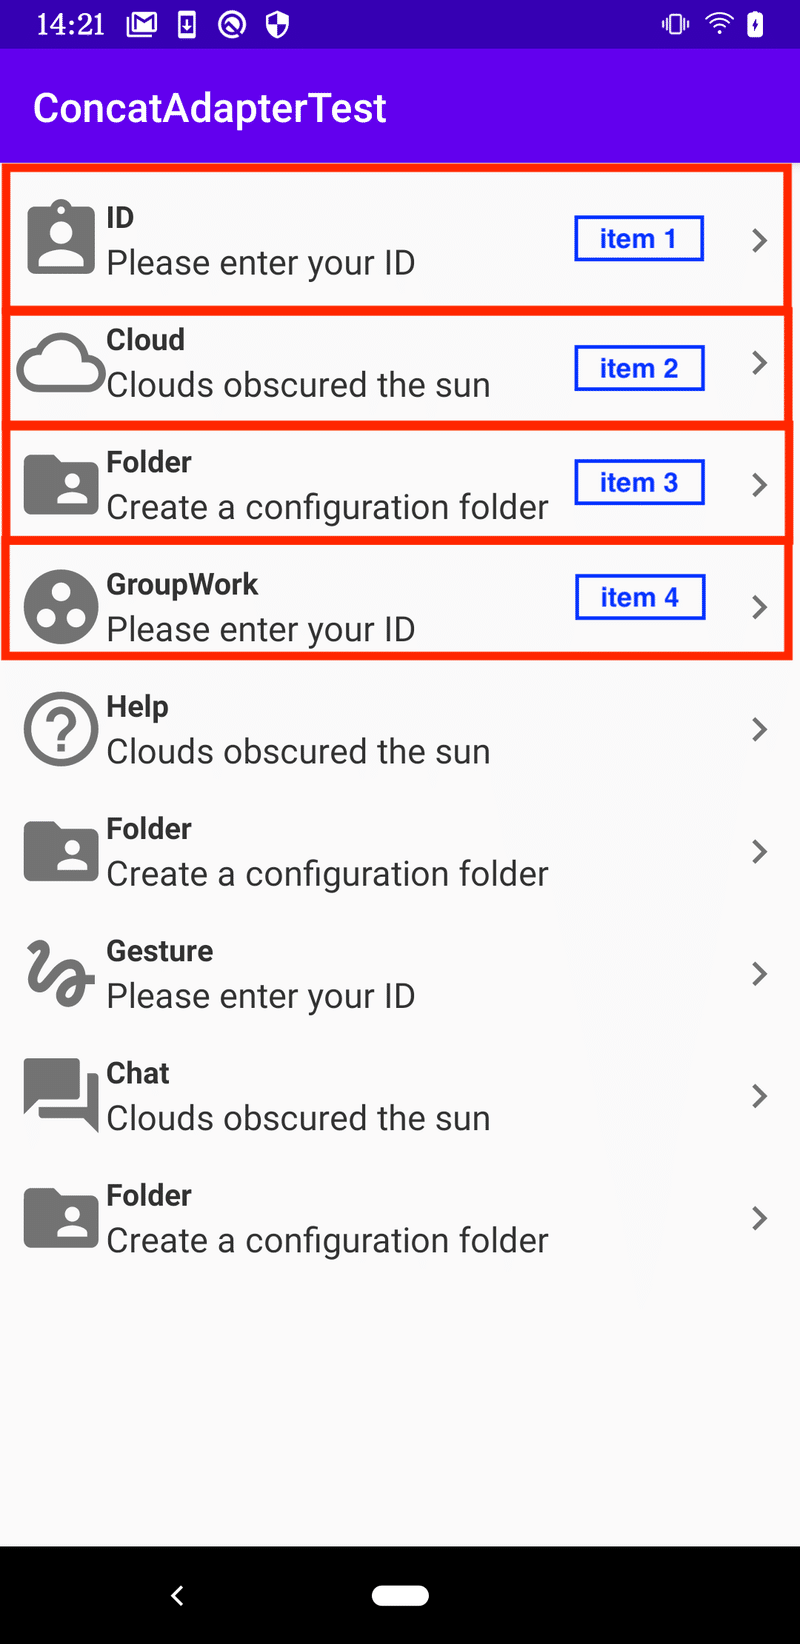
上のようにリストに連続的に(concat)アイテムを入れることです。
アイテムの形態が同じ場合、データだけ変更すればOKで、形態が違っても新しいアイテムを作って追加するだけなので、複雑なuiも簡単に作ることができます。
Q.epoxyと似ていますが、なぜepoxyを使わずにconcatAdapterを使うのでしょうか?
実はこれについて私も正確な答えが分からず、会社の先輩に聞きました。
Epoxy を使わない理由についてですが、以下の理由が挙げられます。デメリットはもともとあったもので変わらないですが、Android SDKの進化によりメリットが減ったため、メリットよりデメリットが上回るようになってきたという感覚です。
Epoxyの機能の主要な部分がAndroidの標準機能だけで実現できてしまうので魅力が薄れている
Epoxy独自の書き方がAndroid公式の方法と違いすぎて相互に書き換えるハードルが高い
Paging3ライブラリによるページング機能などEpoxyでは実現できない機能が出てきた
Concat Adapter には、例えば
val news: List<Article>
というリストがあったとして、 今まではヘッダーやフッターを考慮する必要があり fun getItemCount() = news.size と書くことができませんでした。
ConcatAdapter を使えばヘッダーやフッターは別のアダプタに分離できるため、目的となる機能に特化したAdapterを作ることができます。
始めましょう
0. Base
基本fragment-view Modelの(MVVM)であり、bindingを使ってxmlと繋げています。
   buildFeatures {
       dataBinding = true
   }
1. build.gradle(Module)
   implementation 'androidx.recyclerview:recyclerview:1.2.0-alpha05'
   implementation 'androidx.lifecycle:lifecycle-extensions:2.2.0'
   implementation 'androidx.lifecycle:lifecycle-viewmodel-ktx:2.2.0'
   implementation("androidx.lifecycle:lifecycle-livedata-ktx:2.3.0-alpha07")
2. SimpleViewHolder
class SimpleViewHolder(itemView: View) : RecyclerView.ViewHolder(itemView)Simple UiModel Adapterに使用するView Holderを簡単に作ります。
3. SimpleUiModelAdapter
/**
* シンプルなユースケースを想定したUiModelからViewへのアダプタ
*/
const val uiModelConst = 1
const val viewModelConst = 2

abstract class SimpleUiModelAdapter<UiModelType>(
   private val lifecycleOwner: LifecycleOwner,
   private val viewModel: ViewModel? = null
) : RecyclerView.Adapter<SimpleViewHolder>() {

   private val uiModels = mutableListOf<UiModelType>()

   override fun getItemCount(): Int = uiModels.size

   override fun getItemViewType(position: Int): Int = getLayoutId(uiModels[position])

   override fun onCreateViewHolder(parent: ViewGroup, viewType: Int): SimpleViewHolder {
       val layoutInflater = LayoutInflater.from(parent.context)
       return SimpleViewHolder(layoutInflater.inflate(viewType, parent, false))
   }

   override fun onBindViewHolder(holder: SimpleViewHolder, position: Int) {
       DataBindingUtil.bind<ViewDataBinding>(
           holder.itemView
       )?.apply {
           // XML側に定義がない場合は場合はエラーにならずfalseが返ってきます。
           setVariable(uiModelConst, uiModels[position])
           setVariable(viewModelConst, viewModel)
       }?.also {
           it.lifecycleOwner = lifecycleOwner
       }?.run {
           executePendingBindings()
       }
   }

   fun refresh(newUiModels: List<UiModelType>) {
       val oldUiModels = uiModels.toList()
       uiModels.apply {
           clear()
           addAll(newUiModels)
       }

       DiffUtil.calculateDiff(SimpleDiffCallback(oldUiModels, newUiModels)).dispatchUpdatesTo(this)
   }

   @LayoutRes
   abstract fun getLayoutId(uiModel: UiModelType): Int

   private class SimpleDiffCallback<T>(
       private val oldUiModels: List<T>,
       private val newUiModels: List<T>
   ) : DiffUtil.Callback() {
       override fun getOldListSize(): Int = oldUiModels.size

       override fun getNewListSize(): Int = newUiModels.size

       override fun areItemsTheSame(oldItemPosition: Int, newItemPosition: Int): Boolean {
           return oldUiModels[oldItemPosition] === newUiModels[newItemPosition]
       }

       override fun areContentsTheSame(oldItemPosition: Int, newItemPosition: Int): Boolean {
           return oldUiModels[oldItemPosition] == newUiModels[newItemPosition]
       }
   }
}
recyclerView作成と同じです。 overideをしてlistの値を埋めます。
ただし、アイテムを下のSectionAdapterで各itemLayoutを受け取り、そのlayoutのbindingした値をsetVariableします。
+)SimpleDiffCallback / refresh
リロードした時のアイテム更新のためのコードです。
4. SectionAdapter
class SectionAdapter(
   lifecycleOwner: LifecycleOwner,
   viewModel: MainViewModel
) : SimpleUiModelAdapter<MainViewModel.Section>(lifecycleOwner, viewModel) {

   override fun getLayoutId(uiModel: MainViewModel.Section): Int = when (uiModel) {
        is MainViewModel.Section.MainList -> R.layout.main_section_item
   }
}
必要なアイテムレイアウトを設定します。これをvmとつなげます。
5. main_section_item.xml
<?xml version="1.0" encoding="utf-8"?>
<layout
   xmlns:android="http://schemas.android.com/apk/res/android"
   xmlns:app="http://schemas.android.com/apk/res-auto"
   xmlns:tools="http://schemas.android.com/tools"
   >
   <data>
       <import type="android.view.View" />
       <variable
           name="uiModel"
           type="com.yumekim.concatadaptertest.ui.main.MainViewModel.Section.MainList"
           />
       <variable
           name="viewModel"
           type="com.yumekim.concatadaptertest.ui.main.MainViewModel"
           />
   </data>
   <androidx.constraintlayout.widget.ConstraintLayout
       android:layout_width="match_parent"
       android:layout_height="wrap_content"
       android:layout_marginEnd="8dp"
       android:layout_marginStart="8dp"
       android:layout_marginTop="16dp"
       >
       <ImageView
           android:id="@+id/img"
           android:layout_width="44dp"
           android:layout_height="44dp"
           android:src="@{uiModel.img}"
           app:layout_constraintBottom_toBottomOf="parent"
           app:layout_constraintStart_toStartOf="parent"
           app:layout_constraintTop_toTopOf="parent"
           tools:src="@drawable/ic_baseline_assignment_ind_24"
           />
       <TextView
           android:id="@+id/title"
           android:layout_width="wrap_content"
           android:layout_height="wrap_content"
           android:text="@{uiModel.title}"
           android:textStyle="bold"
           app:layout_constraintStart_toEndOf="@+id/img"
           app:layout_constraintTop_toTopOf="@id/img"
           app:layout_constraintVertical_chainStyle="spread_inside"
           android:textSize="15sp"
           android:textColor="#323232"
           tools:text="testtest"
           />

       <TextView
           android:id="@+id/descripton"
           android:layout_width="wrap_content"
           android:layout_height="wrap_content"
           android:text="@{uiModel.description}"
           android:textColor="#323232"
           android:textSize="17sp"
           app:layout_constraintTop_toBottomOf="@id/title"
           app:layout_constraintStart_toStartOf="@id/title"
           app:layout_constraintBottom_toBottomOf="parent"
           tools:text="testtesttest"
           />
       <ImageView
           android:id="@+id/right_arrow"
           android:layout_width="wrap_content"
           android:layout_height="wrap_content"
           android:src="@drawable/ic_baseline_keyboard_arrow_right_24"
           app:layout_constraintEnd_toEndOf="parent"
           app:layout_constraintTop_toTopOf="parent"
           app:layout_constraintBottom_toBottomOf="parent"
           />
   </androidx.constraintlayout.widget.ConstraintLayout>
</layout>
簡単なアイテム layout を作成します。
6. MainFragment
class MainFragment : Fragment() {
   companion object {
       fun newInstance() = MainFragment()
   }
   private lateinit var viewModel: MainViewModel
   private val useBinding by bindings<MainFragmentBinding>()
   override fun onCreateView(
       inflater: LayoutInflater, container: ViewGroup?,
       savedInstanceState: Bundle?
   ): View {
       return inflater.inflate(R.layout.main_fragment, container, false)
   }

   @ExperimentalStdlibApi
   override fun onViewCreated(view: View, savedInstanceState: Bundle?) {
       super.onViewCreated(view, savedInstanceState)
       viewModel = ViewModelProviders.of(this).get(MainViewModel::class.java)
       viewModel.let {vm->
           val sectionAdapter = SectionAdapter(viewLifecycleOwner, vm)
           useBinding { binding->
               binding.viewModel = viewModel
               binding.userInfoEditRecyclerView.adapter = sectionAdapter
           }
           vm.sections.observeNonNull(viewLifecycleOwner) { sections ->
               sectionAdapter.refresh(sections)
           }
           vm.setMainLayout(requireContext())
       }
   }
}
onViewCreatedを見ると、Section Adapterにview Modelを入れます。bindingにも必要なvmとsectionAdapterを入れます。
vm.setMainLayout(requireContext())を呼びます
7. MainViewModel
class MainViewModel : ViewModel() {
private val _sections = MutableLiveData<List<Section>>()
val sections: LiveData<List<Section>>
get() = _sections
@ExperimentalStdlibApi
fun setMainLayout(context: Context) {
_sections.value = buildList {
add(Section.MainList("ID", "Please enter your ID", R.drawable.ic_baseline_assignment_ind_24.toDrawable(context)))
add(Section.MainList("Cloud", "Clouds obscured the sun", R.drawable.ic_baseline_cloud_queue_24.toDrawable(context)))
add(
Section.MainList(
"Folder",
"Create a configuration folder",
R.drawable.ic_baseline_folder_shared_24.toDrawable(context)
)
)
add(Section.MainList("GroupWork", "Please enter your ID", R.drawable.ic_baseline_group_work_24.toDrawable(context)))
add(Section.MainList("Help", "Clouds obscured the sun", R.drawable.ic_baseline_help_outline_24.toDrawable(context)))
add(
Section.MainList(
"Folder",
"Create a configuration folder",
R.drawable.ic_baseline_folder_shared_24.toDrawable(context)
)
)
add(Section.MainList("Gesture", "Please enter your ID", R.drawable.ic_baseline_gesture_24.toDrawable(context)))
add(Section.MainList("Chat", "Clouds obscured the sun", R.drawable.ic_baseline_forum_24.toDrawable(context)))
add(
Section.MainList(
"Folder",
"Create a configuration folder",
R.drawable.ic_baseline_folder_shared_24.toDrawable(context)
)
)
}
}
sealed class Section {
data class MainList(
val title: String,
val description: String,
val img: Drawable?
) : Section()
}
private fun Int.toDrawable(context: Context): Drawable? {
return ContextCompat.getDrawable(context, this)
}
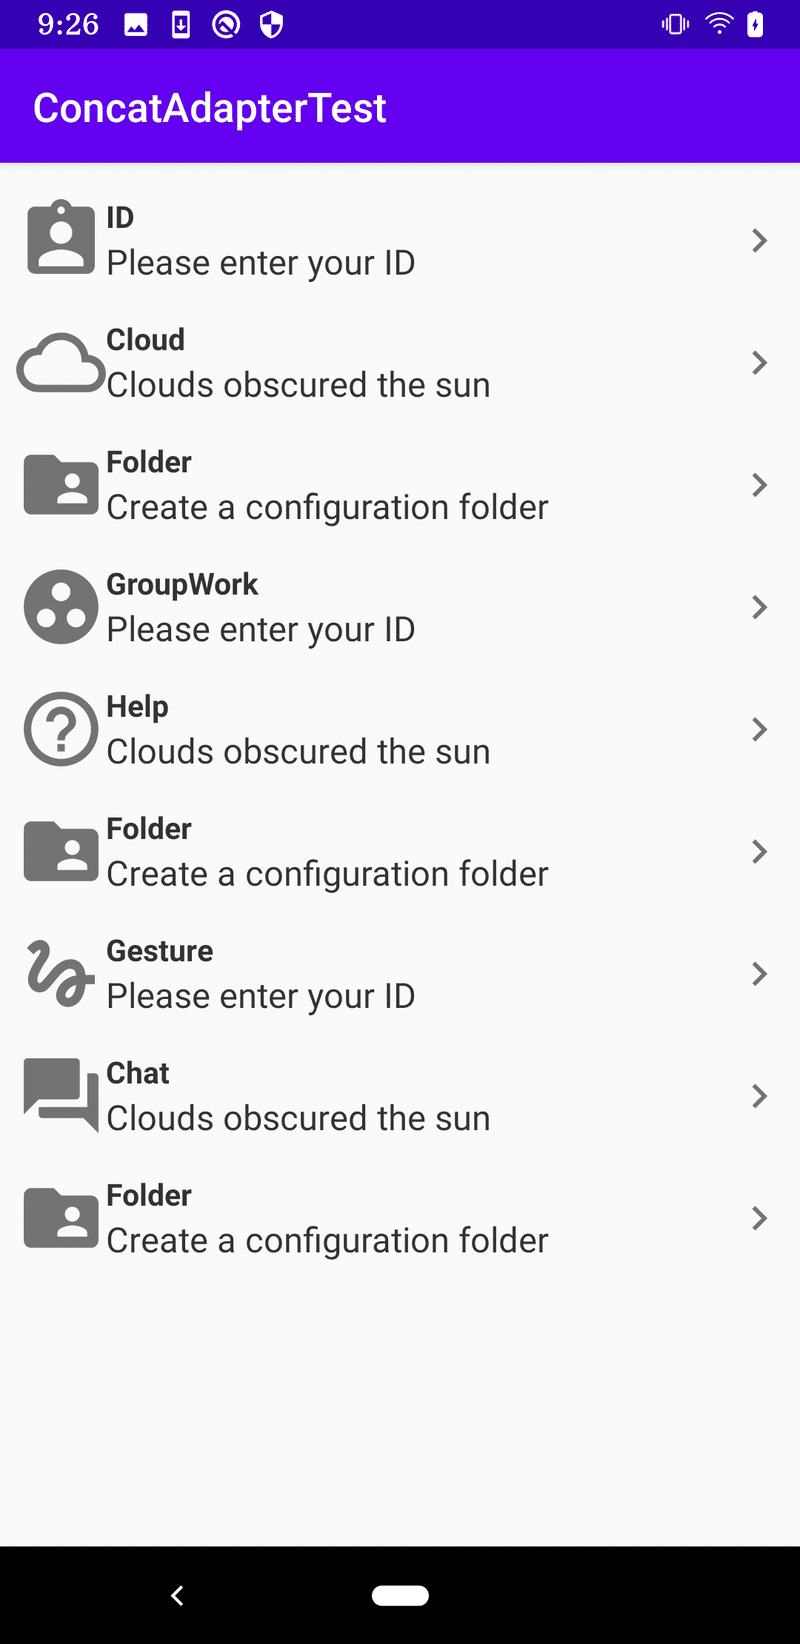
}setMainLayoutでaddを使ってレイアウトを構成します。
val sections: LiveData<List<Section>> を通じてxml、sectionAdapterを結び付け、下のsealed classを通じてsetMainLayoutでaddするときに各アイテムに必要な値を入れるようにしています。
+)Int.toDrawableは、画像を呼びやすくするための拡張関数です。
8.結果
この記事が気に入ったらサポートをしてみませんか?