LINEアカウント連携のコーディング

こんにちはKenです!
早速アカウント連携のコーディングに入っていきたいと思います。
実行環境の構築
まず初めに実行環境を構築します。過去記事に従って環境構築しましょう。新たに作業フォルダを作成いただき、そのフォルダをカレントディレクトリに指定し、以下を実行していきましょう。
・Node.jsとnpmのインストール
・HerokuアプリとLINE公式アカウントチャンネルの作成
herokuのアプリ名は世界でただ1つのものにしなければなりません。私は、
$ heroku create linebot-account-renkeiと「linebot-account-renkei」にしました。みなさんは違う名前をつけてくださいね。
・PostgreSQLのアドオン追加
ついでにPostgreSQLもインストールしてしまいましょう。
heroku上でPostgreSQLを追加し、以下でライブラリも追加です。
$ npm i pg --saveこれで環境構築は終了です。では、実際にコーディングしていきましょう。
簡単なBOT作成
まずは、フォローされたら挨拶する、メッセージに対しオウム返しする簡単なBOTを作りたいと思います。作業フォルダ直下に「index.js」ファイルを作成しましょう。
以下を参考にコーディングします。
なお、LINE Developersの中のMessaging API設定の中の「あいさつメッセージ」と「応答メッセージ」はオフにしておいてください。
ここが有効になっていると、登録されたメッセージが自動で返ってしまいます。
コードは以下のようになります。
const express = require('express');
const app = express();
const line = require('@line/bot-sdk');
const PORT = process.env.PORT || 5000
const config = {
  channelAccessToken:process.env.ACCESS_TOKEN,
  channelSecret:process.env.CHANNEL_SECRET
};
const client = new line.Client(config);
app
  .post('/hook',line.middleware(config),(req,res)=> lineBot(req,res))
  .listen(PORT,()=>console.log(`Listening on ${PORT}`));
  const lineBot = (req,res) => {
   res.status(200).end();
   const events = req.body.events;
   const promises = [];
   for(let i=0;i<events.length;i++){
       const ev = events[i];
       switch(ev.type){
           case 'follow':
               promises.push(greeting_follow(ev));
               break;

           case 'message':
               promises.push(handleMessageEvent(ev));
               break;
       }
   }
   Promise
       .all(promises)
       .then(console.log('all promises passed'))
       .catch(e=>console.error(e.stack));
}
const greeting_follow = async (ev) => {
   const profile = await client.getProfile(ev.source.userId);
   return client.replyMessage(ev.replyToken,{
       "type":"text",
       "text":`${profile.displayName}さん、フォローありがとうございます\uDBC0\uDC04`
   });
}

const handleMessageEvent = async (ev) => {
   const profile = await client.getProfile(ev.source.userId);
   const text = (ev.message.type === 'text') ? ev.message.text : '';

   return client.replyMessage(ev.replyToken,{
       "type":"text",
       "text":`${profile.displayName}さん、今${text}って言いました?`
   });
}
ここまでで、あいさつとオウム返しをしてくれるBOTができたと思います。これをベースに作っていきます。
PostgreSQLの設定およびデータテーブル作成
先ほど見た以下の記事のコーディング部分を実行していきましょう。
const { Client } = require('pg');pgライブラリを読み込みます。そして以下を追加でコーディング。
const connection = new Client({
   user:process.env.PG_USER,
   host:process.env.PG_HOST,
   database:process.env.PG_DATABASE,
   password:process.env.PG_PASSWORD,
   port:5432
 });
connection.connect();
const create_userTable = {
text:'CREATE TABLE IF NOT EXISTS users (id SERIAL NOT NULL, name VARCHAR(50), login_id VARCHAR(50), login_password VARCHAR(50), line_id VARCHAR(255));'
};

connection.query(create_userTable)
.then(()=>{
   console.log('table users created successfully!!');
})
.catch(e=>console.log(e));
usersテーブルに名前、ログインID、ログインパスワード、LINE IDを項目としてもつデータテーブルを作成します。
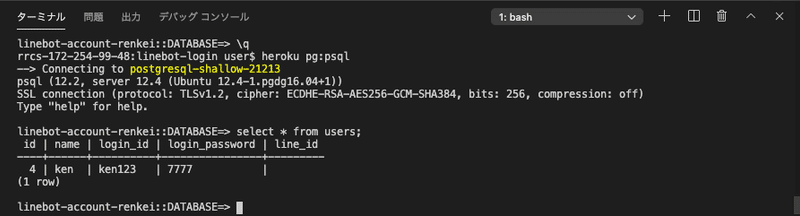
さてこれでherokuへデプロイしてみましょう。
デプロイしたらターミナルで、
$ heroku pg:psqlDATABASE=> select * from users;をコマンドしてみましょう。以下のように空っぽのデータテーブルが完成されていればOKです。
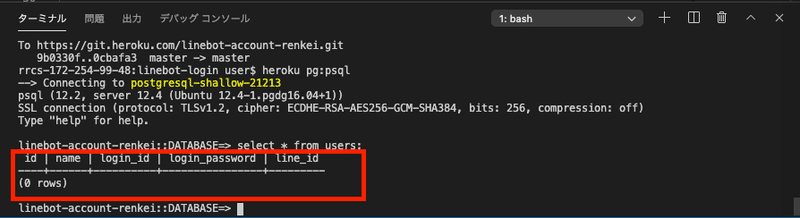
nama, login_id, login_passwordは自社ホームページで登録した名前、ID、パスワードとなります。最終的には、この名前、ID、パスワードにline_idを紐付けていくことを最終目標とします。
模擬ログイン画面の作成
それでは、次に自社ホームページの鏡である、新規会員登録およびログイン画面の作成を行っていきます。超シンプルな形で実装していきます。
まずHTMLファイル等を扱うため、作業フォルダ直下に「public」フォルダと「views」フォルダ、「routers」フォルダを作成しましょう。
そしてejsをインストールしましょう。ejsはNode.jsのパッケージの1つで、HTMLを作成することができます。
また、pathも一緒にインストールしましょう。
$ npm i --save ejs pathpathのみパッケージの読み込みを行います。
const path = require('path');routersフォルダの下にindex.jsファイルを作成します。index.jsファイルはページのルーティングを行うもので、次のようなコーディングをしましょう。
const express = require('express');
const router = express.Router();
router
   .get('/',(req,res)=>{
       res.render('pages/index');
   })
   .get('/registration',(req,res)=>{
       res.render('pages/registration');
   })
   .get('/mainpage',(req,res)=>{
       res.render('pages/mainpage');
   })

module.exports = router;
つまり、ページ構成はログイン画面、新規登録画面、メインページの3つの構成とします。expressの記述も次のように変えます。
app
  .use(express.static(path.join(__dirname, 'public')))
  .set('views', path.join(__dirname, 'views'))
  .set('view engine', 'ejs')
  .use('/',router)
  .post('/hook',line.middleware(config),(req,res)=> lineBot(req,res))
  .listen(PORT,()=>console.log(`Listening on ${PORT}`));
次にviewsフォルダの下にpagesフォルダを作成し、pagesフォルダの中に以下の3つのファイルを作成してください。
・index.ejs
・registration.ejs
・mainpage.ejs
各ファイルには次のようなコーディングを行います。
<!DOCTYPE html>
<html>
<head>
   <meta charset='utf-8'>
   <meta name="viewport" content="width=device-width, initial-scale=1, shrink-to-fit=no">
   <title>ログインページ</title>
   <link rel="stylesheet" type="text/css" href="/stylesheets/main.css" />
</head>
<body>
   <h1>ログインページ</h1>
</body>
</html>
これはindex.ejsの中身です。全く同じコードをregistration.ejs、mainpage.ejsにも貼り付けて、<title>と<h1>タグの中身だけそれぞれ、「新規登録」とか「メインページ」とかに書き換えてあげましょう。
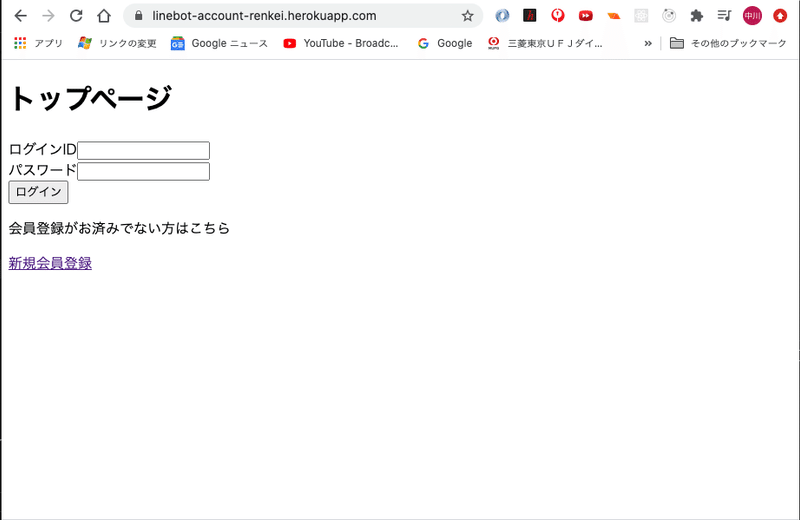
一旦ここまででherokuへデプロイしましょう。
https://linebot-account-renkei.herokuapp.com/
https://linebot-account-renkei.herokuapp.com/registration
https://linebot-account-renkei.herokuapp.com/mainpage
これらのページにアクセスしたら、ちゃんとh1の中身は表示されましたか?表示されればexpressによるルーティングはOKです。
今回はログイン画面を作成することが目的ではないため、最低限の機能を盛り込んだ画面をサクっとコーディングします。
「public」フォルダの下に「js」フォルダと「stylesheets」フォルダを作成し、jsフォルダの中に「main.js」ファイルと「registration.js」ファイル、「stylesheets」フォルダの中に「main.css」ファイルを作成します。
index.ejsの<body>中身を次のように書き換えます。
<body>
<h1>トップページ</h1>
<div id='login_area'>
</div>
<div class='registration_area'>
<p>会員登録がお済みでない方はこちら</p>
<a href='/registration'>新規会員登録</a>
</div>
<script src='js/main.js'></script>
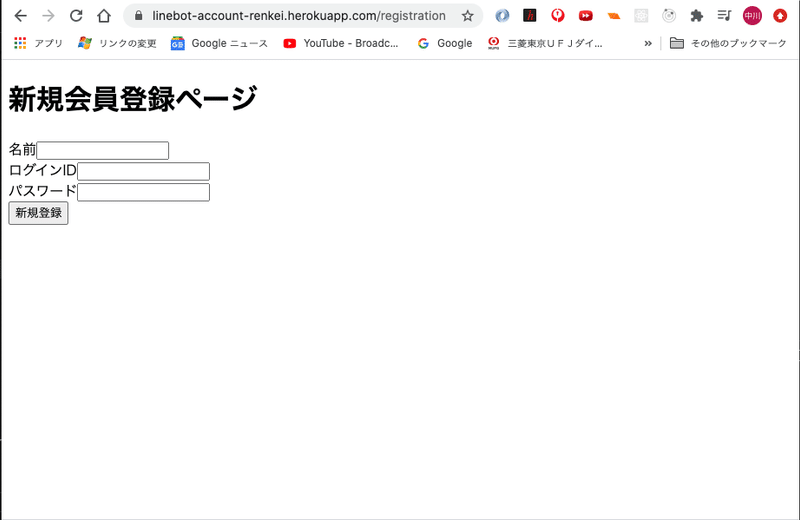
</body>registration.ejsの<body>中身は次のようにします。
<body>
   <h1>新規会員登録ページ</h1>
   <div id='registration_area'>
   </div>
   <script src='js/registration.js'></script>
</body>
私は基本的にはJavaScriptで書くことを好みますので、ejsの中身は最低限で、あとは、main.jsとregistration.jsのコーディングで様々な要素を配置していきます。
まずはmain.jsの中身です。
// 大元のdivエリア
const divLogin = document.getElementById('login_area');

// URLの?以降を取り出し、linkTokenを取得する処理
const param = new URL(location).search;
const pElement = document.createElement('p');
const splitParam = param.split('=');
const linkToken = splitParam[1];
pElement.innerHTML = linkToken;
divLogin.appendChild(pElement);

// フォームの生成。ここにlabelとinput要素を入れていく。
const formElement = document.createElement('form');
formElement.setAttribute('id','login');
formElement.setAttribute('name','login_info');
formElement.setAttribute('method','post');
formElement.setAttribute('action','/api/users/login'); //POST先のアドレス

// div_form1はログインIDに関するlabel要素とinput要素で構成
const div_form1 = document.createElement('div');

const label_form1 = document.createElement('label');
label_form1.setAttribute('class','label_id');
label_form1.textContent = 'ログインID';
div_form1.appendChild(label_form1);

const input_form1 = document.createElement('input');
input_form1.setAttribute('type','text');
input_form1.setAttribute('class','id-input');
input_form1.setAttribute('name','id');
div_form1.appendChild(input_form1);

// div_form2はパスワードに関するlabel要素とinput要素で構成
const div_form2 = document.createElement('div');

const label_form2 = document.createElement('label');
label_form2.setAttribute('class','label_password');
label_form2.textContent = 'パスワード';
div_form2.appendChild(label_form2);

const input_form2 = document.createElement('input');
input_form2.setAttribute('type','password');
input_form2.setAttribute('class','password-input');
input_form2.setAttribute('name','password');
div_form2.appendChild(input_form2);

// ログインボタン
const loginButton = document.createElement('input');
loginButton.value = 'ログイン';
loginButton.type = 'submit';
loginButton.addEventListener('click',(e)=>{
   const id = document.login_info.id.value + '&' +linkToken;
   document.login_info.id.value = id;
   formElement.submit();
});

// フォーム要素にform1,form2,loginButtonを格納
formElement.appendChild(div_form1);
formElement.appendChild(div_form2);
formElement.appendChild(loginButton);

// フォーム要素を大元のdiv要素へ格納
divLogin.appendChild(formElement);
そして、registration.jsの中身です。
// 大元のdiv要素
const divRegistration = document.getElementById('registration_area');

// フォーム要素生成。ここに各label要素とinput要素を格納していく。
const formElement = document.createElement('form');
formElement.setAttribute('id','registration');
formElement.setAttribute('name','user_info');
formElement.setAttribute('method','post');
formElement.setAttribute('action','/api/users'); //POST先のアドレス

// div_form0は名前入力に関するlabel,input要素から構成
const div_form0 = document.createElement('div');

const label_form0 = document.createElement('label');
label_form0.setAttribute('class','label_name');
label_form0.textContent = '名前';
div_form0.appendChild(label_form0);

const input_form0 = document.createElement('input');
input_form0.setAttribute('type','text');
input_form0.setAttribute('class','name-input');
input_form0.setAttribute('name','name');
div_form0.appendChild(input_form0);

// div_form1はログインID入力に関するlabel,input要素から構成
const div_form1 = document.createElement('div');

const label_form1 = document.createElement('label');
label_form1.setAttribute('class','label_id');
label_form1.textContent = 'ログインID';
div_form1.appendChild(label_form1);

const input_form1 = document.createElement('input');
input_form1.setAttribute('type','text');
input_form1.setAttribute('class','id-input');
input_form1.setAttribute('name','id');
div_form1.appendChild(input_form1);

// div_form2はログインID入力に関するlabel,input要素から構成
const div_form2 = document.createElement('div');

const label_form2 = document.createElement('label');
label_form2.setAttribute('class','label_password');
label_form2.textContent = 'パスワード';
div_form2.appendChild(label_form2);

const input_form2 = document.createElement('input');
input_form2.setAttribute('type','text');
input_form2.setAttribute('class','password-input');
input_form2.setAttribute('name','password');
div_form2.appendChild(input_form2);

// 新規登録ボタン
const registrationButton = document.createElement('input');
registrationButton.value = '新規登録';
registrationButton.type = 'submit';
registrationButton.addEventListener('click',(e)=>{
   console.log('name',document.user_info.name.value);
   formElement.submit();
})

// フォーム要素へform0〜form2と新規登録ボタンを格納
formElement.appendChild(div_form0);
formElement.appendChild(div_form1);
formElement.appendChild(div_form2);
formElement.appendChild(registrationButton);

// フォーム要素を大元のdiv要素へ格納
divRegistration.appendChild(formElement);
新規登録画面の方は名前の入力欄があるだけの違いです。
herokuへデプロイし、指定アドレスへアクセスすると次のような画面になったでしょうか。メインページは特に変更しておりません。
では次に新規会員登録ページで入力した値をデータテーブルへ挿入することを実現していきましょう。
APIサーバーの構築(新規登録編)
inputフォームに入力された値をデータテーブルへ挿入するためにAPIサーバーを構築します。
APIサーバーの概念については以下のページが参考になりますので、ぜひご覧いただければと思います。
まずルーティングの設定です。
routersフォルダに新たに「users.index」を作成しましょう。
そして、大元のindex.jsに次のコードを追加します。
const usersRouter = require('./routers/users');app
.use(express.static(path.join(__dirname, 'public')))
.use('/',router)
.post('/hook',line.middleware(config),(req,res)=> lineBot(req,res))
.use(express.json())
.use(express.urlencoded({extended:true}))
.use('/api/users',usersRouter)
.set('views', path.join(__dirname, 'views'))
.set('view engine', 'ejs')
.listen(PORT,()=>console.log(`Listening on ${PORT}`));.use('/api/users',usersRouter)が追加されています。細かな説明は割愛しますが、クライアント側からのデータをreq.bodyで取得できるexpress.json()やそれとセットで記述されるexpress.urlencodedなどもコードされています。
ではroutersフォルダの中に作成したusers.jsの中身を次のようにコーディングしましょう。
const express = require('express');
const router = express.Router();
const controller = require('../controllers/users');

router
   .route('/')
   .post(controller.postUser);

module.exports = router;
POSTメソッドがcontrollerへルーティングされています。なお、route('/')は基本のアドレス/api/usersへのルーティングを意味します。
ではcontrollerについて作成していきましょう。作業フォルダ直下に「controllers」フォルダを作成し、その中に、「users.js」ファイルを新規作成してください。
const User = require('../models/User');

module.exports = {
   postUser: (req,res) => {
       try{
           const {name,id,password} = req.body;
           console.log('name id pass',name,id,password);
           User.create({name,id,password})
               .then(message=>{
                   console.log('message:',message);
                   res.status(200).redirect('https://linebot-account-renkei.herokuapp.com/');
               })
               .catch(e=>console.log(e.stack));
        }catch(error){
            res.status(400).json({message:error.message});
        }
   }
}
3つのインプットフォーム 'name'、'id'、'password'からのPOSTデータをreq.bodyにより取得しています。さらにそれをUserモデルに渡してあげてます。後にコーディングしますが、UserはPromiseです。
では、作業フォルダ直下に「models」フォルダを作成し、その中に「User.js」を新規作成しましょう。User.jsは次のようにコーディングします。
const { Client } = require('pg');
const connection = new Client({
   user:process.env.PG_USER,
   host:process.env.PG_HOST,
   database:process.env.PG_DATABASE,
   password:process.env.PG_PASSWORD,
   port:5432
 });
connection.connect();

class Create {
   constructor({name,id,password}){
       this.name = name;
       this.id = id;
       this.password = password;
   }
   queryArray(){
       return [this.name,this.id,this.password];
   }
}

module.exports = {
   create:({name,id,password})=>{
       return new Promise((resolve,reject)=>{
           const createUser = new Create({
               name:name,
               id:id,
               password:password
           }).queryArray();
           console.log('createUser:',createUser);
           const insert_query = {
               text:'INSERT INTO users (name,login_id,login_password) VALUES($1,$2,$3);',
               values:createUser
           };
           connection.query(insert_query)
               .then(res=>{
                   console.log('新規登録成功');
                   resolve('post succeeded!');
               })
               .catch(e=>console.log(e));
       })
   }
}
要はinputフォームから渡された値をデータテーブルusersへINSERTする処理となってます。
ここまでできたらherokuへデプロイしましょう。
デプロイできたら、新規登録画面で"名前"、"ID"、"パスワード"を入力し、新規登録できるか確認いたしましょう。例として以下のように入力します。
■名前:ken
■ID:ken123
■パスワード:7777
ターミナルでheroku Postgresへ接続します。
$ heroku pg:psqlそしてデータテーブルにデータが格納されているか確認します。
DATABASE=> select * from users;以下のように登録されていればOKです。
APIサーバーの構築(ログイン編)
では、先ほど登録したID、パスワードを使ってログインするとメインページへ飛ぶようなコードを書いていきたいと思います。
routersフォルダの中のusers.jsファイルを以下のように書き換えます。
const express = require('express');
const router = express.Router();
const controller = require('../controllers/users');
router
   .route('/')
   .post(controller.postUser);
router
   .route('/login')
   .post(controller.postLogin);
module.exports = router;
そしてcontrollersフォルダの中のusers.jsを次のように書き換えます。
const User = require('../models/User');
module.exports = {
   postUser: (req,res) => {
       try{
           const {name,id,password} = req.body;
           console.log('name id pass',name,id,password);
           User.create({name,id,password})
               .then(message=>{
                   console.log('message:',message);
                   res.status(200).redirect('https://linebot-account-renkei.herokuapp.com/');
               })
               .catch(e=>console.log(e.stack));
        }catch(error){
            res.status(400).json({message:error.message});
        }
   },

   postLogin: (req,res) => {
       try{
           const {id,password} = req.body;
           console.log('id pass',id,password);
           User.check()
               .then(response=>{
                   console.log('response:',response);
                   const filtered = response.filter(object=>{
                       return object.login_id === id && object.login_password === password;
                   });
                   if(filtered.length){
                       console.log('認証成功');
                       res.status(200).redirect(`https://linebot-account-renkei.herokuapp.com/mainpage?${id}&${password}`);
                   }else{
                       console.log('ログイン失敗');
                   }
               })
               .catch(e=>console.log(e));
        }catch(error){
            res.status(400).json({message:error.message});
        }
   }
}
postLoginを追加しました。ログインデータがPOSTされてきた場合の処理です。ログインIDとパスワード両方一致したら、メインページに飛ばしてます。その際にURLに?でクエリパラメータとしてIDとパスワードをくっつけています。こうすることで、メインページ内でIDとパスワードの値を利用することができます。
そしてmodelsフォルダのUser.jsです。
module.exports = {

   create:({name,id,password})=>{
       return new Promise((resolve,reject)=>{
           const createUser = new Create({
               name:name,
               id:id,
               password:password
           }).queryArray();
           console.log('createUser:',createUser);
           const insert_query = {
               text:'INSERT INTO users (name,login_id,login_password) VALUES($1,$2,$3);',
               values:createUser
           };
           connection.query(insert_query)
               .then(res=>{
                   console.log('新規登録成功');
                   resolve('post succeeded!');
               })
               .catch(e=>console.log(e));
       })
   },

   check: ()=>{
       return new Promise((resolve,reject)=>{
           const select_query = {
               text:'SELECT * FROM users;'
           }
           connection.query(select_query)
               .then(res=>{
                   console.log('取得成功');
                   resolve(res.rows);
               })
               .catch(e=>console.log(e));
       });
   }
}
module.exports内です。check関数が追加となりました。単純にデータテーブルからデータを取得し、返してあげるだけの関数です。
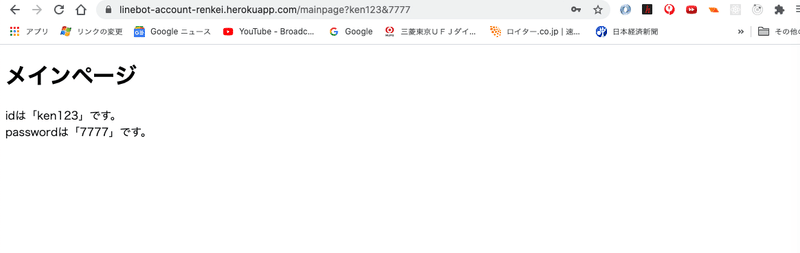
それではせっかくなので、メインページにアクセスしたらIDとパスワードが表示されるようにしましょう。
mainpage.ejsを次のように書き換えます。
<!DOCTYPE html>
<html>
<head>
   <meta charset='utf-8'>
   <meta name="viewport" content="width=device-width, initial-scale=1, shrink-to-fit=no">
   <title>メインページ</title>
   <link rel="stylesheet" type="text/css" href="/stylesheets/main.css" />
</head>
<body>
   <h1>メインページ</h1>
   <div class="text-area">idは「<span id="text_id"></span>」です。</div>
   <div class="text-area">passwordは「<span id="text_password"></span>」です。</div>
   <script src='js/mainpage.js'></script>
</body>
</html>
そして、public/jsフォルダ内にmainpage.jsファイルを新規作成しましょう。mainpage.jsファイルの中身は以下です。
const param = new URL(location).search;
const splitParam = param.split('&');
const id = splitParam[0].slice(1);
const password = splitParam[1];
document.getElementById('text_id').innerHTML = id;
document.getElementById('text_password').innerHTML = password;
さぁこれで、先ほど登録したIDとパスワードを使ってログインしてみましょう。
こんな感じですね。これで簡易的なログインページは完成です。
いよいよアカウント連携をしていく
前置きがだいぶ長くなってしまいましたが、こういったバックエンドとフロントエンドのやりとりも必要なので、あえて割愛せずに書いてきました。不明点も多いかもしれませんので、その点はMENTAなどでご質問いただければと思います。
さて、いよいよアカウント連携の本番です。以下のマニュアルに従い実装していきたいと思います。
まず、LINEサーバーへPOSTするためのパッケージrequestとrequest-promiseをインストールします。
$ npm i --save request request-promiseそして、index.js内でライブラリを読み込みます。
const request = require('request-promise');そしてアカウント連携処理の起点をユーザーからのメッセージ「アカウント連携」にしたいと思いますので、handleMessageEvent関数内を次のように書き換えます。
 const handleMessageEvent = async (ev) => {
   const profile = await client.getProfile(ev.source.userId);
   const text = (ev.message.type === 'text') ? ev.message.text : '';
   if(text === 'アカウント連携'){
       const userId = ev.source.userId;
       const options = {
           url:`https://api.line.me/v2/bot/user/${userId}/linkToken`,
           method:'POST',
           headers:{
               'Authorization':'Bearer /hwe0EhoKLsy2P1ynqJOWH3TWytYYrqlO6w9cPiDVjdJwwx2NoPosK98vovYkAH5Xu1oqYvpY8Fmr6/kE3maBr/zjr7I4MQ1az2puov0vg0CWmNgCQSulsMJd0yOqR2ruchBI0Uwntg7fE8tCgdWDQdB04t89/1O/w1cDnyilFU='
           }
       }
       request(options)
           .then(body=>{
               const parsedBody = JSON.parse(body);

               return client.replyMessage(ev.replyToken,{
                   "type":"flex",
                   "altText":"link",
                   "contents":
                   {
                     "type": "bubble",
                     "body": {
                       "type": "box",
                       "layout": "vertical",
                       "contents": [
                         {
                           "type": "button",
                           "action": {
                             "type": "uri",
                             "label": "自社HPログイン画面へ",
                             "uri": `https://linebot-account-renkei.herokuapp.com?linkToken=${parsedBody["linkToken"]}`
                           }
                         }
                       ]
                     }
                   }
                 });
           })
           .catch(e=>console.log(e));
   }else{
       return client.replyMessage(ev.replyToken,{
           "type":"text",
           "text":`${profile.displayName}さん、今${text}って言いました?`
       });
   }
}
ログインページへリダイレクトする際に、URLにlinkTokenをクエリパラメータとしてくっつけているので、それがログインページでしっかり表示されるか確認してみましょう。main.jsの一番上のdivLoginの下に次のコードを追加しましょう。
const divLogin = document.getElementById('login_area');

const param = new URL(location).search;
const pElement = document.createElement('p');
const splitParam = param.split('=');
const linkToken = splitParam[1];
pElement.innerHTML = linkToken;
divLogin.appendChild(pElement);
p要素にlinkTokenを出力するようにしました。
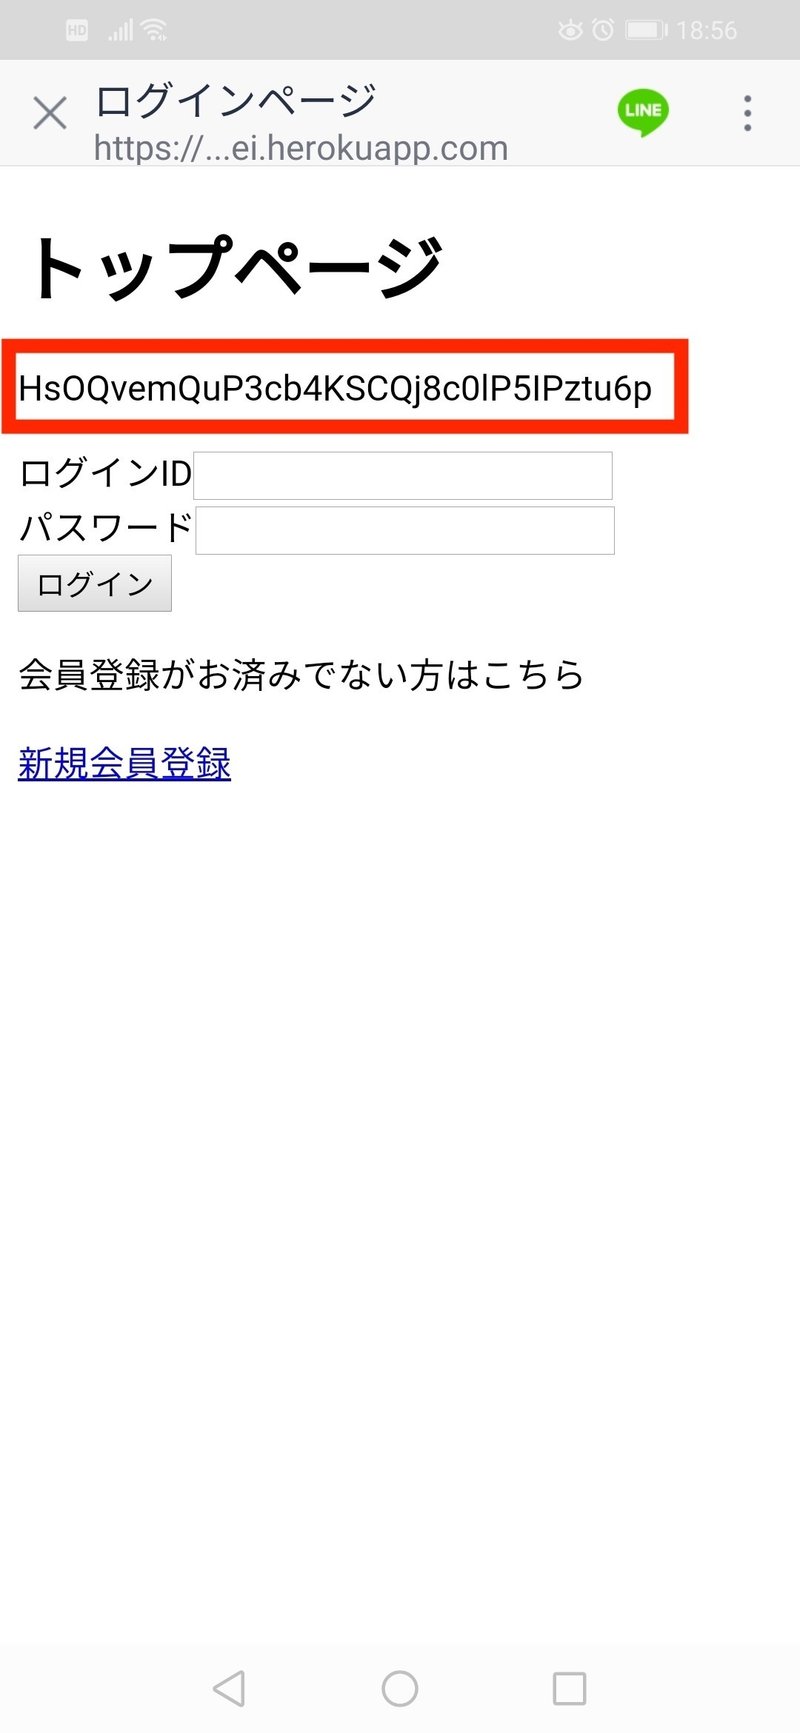
では、LINE公式アカウントにメッセージ「アカウント連携」を送って、返ってきたリプライのボタンをタップして、リンクしてみましょう。次のようなページになれば成功です。赤枠内がlinkTokenです。
nonceの生成
では、次にnonceの生成を行いましょう。どこで、nonceを生成するか。nonceはログインIDと紐付ける必要があるため、ログインIDとパスワードを入力し、POSTした先、すなわちcontrollersの中のusers.js、postLoginの中にコーディングするのが良さそうです。
またnonceはランダム文字列を作ったりしなければならないため、そのためのパッケージを読み込みましょう。
users.jsの頭の部分はこんな感じです。
const User = require('../models/User');
const {randomBytes} = require('crypto')
const { Client } = require('pg');
const connection = new Client({
   user:process.env.PG_USER,
   host:process.env.PG_HOST,
   database:process.env.PG_DATABASE,
   password:process.env.PG_PASSWORD,
   port:5432
 });
connection.connect();
randomBytesはランダムの文字列を生成するパッケージです。そして、ここでPostgresに接続してます。nonceはログインIDと紐付けて保存する必要があるため、ここでデータテーブルに格納するためにpostgresを使います。
では、ログインIDとnonce格納用のデータテーブルを作成しましょう。
いろいろ飛びますが、作業フォルダ直下のindex.jsに戻ります。ここの頭の方で、usersテーブル同様にnoncesテーブルを作成しましょう。以下がコードです。
const create_nonceTable = {
   text:'CREATE TABLE IF NOT EXISTS nonces (id SERIAL NOT NULL, login_id VARCHAR(50), nonce VARCHAR(255));'
}
connection.query(create_nonceTable)
   .then(()=>{
       console.log('table nonce created successfully');
   })
   .catch(e=>console.log(e));
項目はシンプルにlogin_idとnonceだけです。
また、ログイン画面からPOSTする際には、ログインIDとパスワードだけでなく、linkTokenも一緒にPOSTしてあげる必要があります。
ここはいろんなやり方があるかと思いますが、今回はログイン部分は模擬でしかないため、次のようにしました。
loginButton.addEventListener('click',(e)=>{
   const id = document.login_info.id.value + '&' +linkToken;
   document.login_info.id.value = id;
   formElement.submit();
});
ログインボタンをクリックしたときに、idのinputのvalueをid&linkTokenに書き換えて、id&linkTokenをPOSTしてます。本来的には、しっかりPOST用のJSONデータを作成し、fetchなどでPOSTすることが必要ですが、今回はログインボタンの属性を'submit'としてしまっているので、やむを得ずこうしております。
さぁこれでログインID,パスワード,linkTokenの3つが(idとlinkTokenは&で連結されていますが・・・)POSTされました。
では再びcontrollersのusers.jsに戻ります。postLoginの中身はこのようになります。
    postLogin: (req,res) => {
       try{
           const {id,password} = req.body;
           // ログインidとlinkTokenの分離
           const splitId = id.split('&');
           const originId = splitId[0];
           const linkToken = splitId[1];
           console.log('id linktoken pass',originId,linkToken,password);
           User.check()
               .then(response=>{
                   console.log('response:',response);
                   const filtered = response.filter(object=>{
                       return object.login_id === originId && object.login_password === password;
                   });
                   if(filtered.length){
                       console.log('認証成功');
                       // nonce生成
                       const N=16
                       const randomStrings = randomBytes(N).reduce((p,i)=> p+(i%36).toString(36),'');
                       const buf = Buffer.from(randomStrings);
                       const nonce = buf.toString('base64');
                       console.log('nonce:',nonce);
                       // nonceテーブルへの挿入
                       const insert_query = {
                           text:'INSERT INTO nonces (login_id,nonce) VALUES($1,$2);',
                           values:[`${originId}`,`${nonce}`]
                       }
                       connection.query(insert_query)
                           .then(response=>{
                               console.log('insert into nonces 成功');
                               res.status(200).redirect(`https://access.line.me/dialog/bot/accountLink?linkToken=${linkToken}&nonce=${nonce}`);
                           })
                           .catch(e=>console.log(e));
                   }else{
                       console.log('ログイン失敗');
                   }
               })
               .catch(e=>console.log(e));
        }catch(error){
            res.status(400).json({message:error.message});
        }
   }
ログインIDとlinkTokenの分離処理を行い、ログインIDとパスワードが一致した時にnonceの生成を行っています。
nonceの生成要件として以下がマニュアルに記載されています。
■予測が難しく一度しか使用できない文字列であること。セキュリティ上問題があるため、自社サービスのユーザーIDなどの予測可能な値は使わないでください。
■長さは10文字以上255文字以下であること
推奨事項であるBase64へのエンコードも実行しております。
そして、ログインIDとnonceの2つをnoncesテーブルへ格納しています。
格納に成功後、以下のURLへリダイレクトさせてます。これはマニュアル通りです。
https://access.line.me/dialog/bot/accountLink?linkToken=${linkToken}&nonce=${nonce}さて、このURLへリダイレクトすると何が起こるか?BOTサーバから以下のようなイベントが返ってきます。
{
type: 'accountLink',
replyToken: 'xxxxxxxxxxxxxxxxxxx',
source: { userId: 'yyyyyyyyyyyyyyyyyyyy', type: 'user' },
timestamp: 1603626390579,
mode: 'active',
link: { result: 'ok', nonce: 'eTdhN2l5MzAzendrMGQ2MA==' }
}
nonceは上記でランダムに生成したものです。
この中のsource.userIdが個人のLINE ID になるので、先ほど保存したnonceからログインIDを見つけ出し、ログインIDとsource.userIdを紐付ければアカウント連携完了です。
アカウント連携の仕上げ
accountLinkというイベントが返ってきたため、index.js内のlineBot関数内で、新たにaccountLinkイベントを処理する関数を実装しましょう。
linBot関数内のswitch構文に次のようにaccoutLinkを追加します。
        switch(ev.type){
           case 'follow':
               promises.push(greeting_follow(ev));
               break;

           case 'message':
               promises.push(handleMessageEvent(ev));
               break;

           case 'accountLink':
               promises.push(accountLink(ev));
               break;
       }
では、accountLink関数の実装をします。
const accountLink = (ev) => {
   const lineId = ev.source.userId;
   const nonce = ev.link.nonce;

   const select_query = {
       text:`SELECT * FROM nonces WHERE nonce='${nonce}';`
   };
   connection.query(select_query)
       .then(res1=>{
           const login_id = res1.rows[0].login_id;
           const selectUsers = {
               text:`SELECT * FROM users WHERE login_id='${login_id}';`
           }
           connection.query(selectUsers)
               .then(res2=>{
                   const name = res2.rows[0].name;
                   const password = res2.rows[0].login_password;
                   const update_query = {
                       text:`UPDATE users SET (name, login_id, login_password, line_id) = ('${name}', '${login_id}', '${password}', '${lineId}') WHERE login_id='${login_id}';`
                   }
                   connection.query(update_query)
                       .then(res3=>{
                           console.log('アカウント連携成功!!');
                       })
                       .catch(e=>console.log(e));
               })
       })
       .catch(e=>console.log(e));
}
まず最終的に連携したいLINEのIDをlineIdとして取得します。
そしてテーブルnoncesからwebhookイベントで返ってきたnonceと一致する行を抜き出し、その行のlogin_idを取得します。
そして今度はusersテーブルから、そのlogin_idと一致する行を抜き出し、name,login_passwordを変数へ格納し、usersテーブルをUPDATEにより更新します。
更新の際に、line_idへlineIDを格納すれば、login_id・login_passwordとline_idが紐付けられました。これで、ユーザーがログインすれば、そのユーザーのLINE IDがわかるため、そのIDへプッシュメッセージを送ったりすることができるようになるわけです。
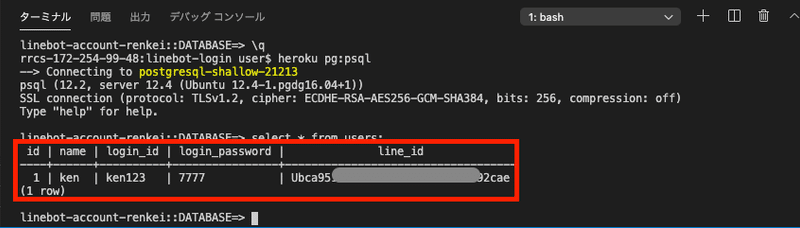
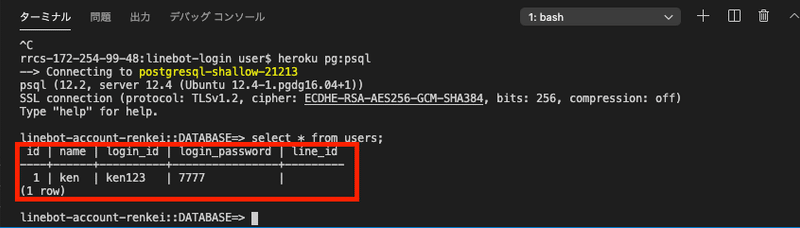
ではしっかり連携できたのか、usersテーブルを確認してみましょう。
$ heroku pg:psqlDATABASE=> select * from users;以下のようにline_idに格納されていれば成功です。
アカウント連携の解除
マニュアルにはアカウント連携を解除できるようにとの記載があります。
アカウント連携の解除は簡単です。usersテーブルから自身のline_idを削除すれば良いのです。
連携しているか、していないかはline_idに値が格納されているかどうかで判断できますね。
では、解除の起点はユーザーからの「連携解除」というメッセージにしましょう。
handleMessageEventを改造します。
    else if(text === '連携解除'){
       const line_id = ev.source.userId;
       const select_query = {
           text:`SELECT * FROM users WHERE line_id='${line_id}';`
       }
       connection.query(select_query)
           .then(res=>{
               const name = res.rows[0].name;
               const login_id = res.rows[0].login_id;
               const password = res.rows[0].login_password;
               const update_query = {
                   text:`UPDATE users SET (name, login_id, login_password, line_id) = ('${name}', '${login_id}', '${password}', '') WHERE login_id='${login_id}';`
               }
               connection.query(update_query)
                   .then(res2=>{
                       console.log('アカウント連携解除成功!');
                   })
                   .catch(e=>console.log(e));
           })
           .catch(e=>console.log(e));
   }
メッセージ「連携解除」が送られた際の処理を書きます。メッセージを送った人のLINE IDをsource.userIdにより取得します。
そしてusersテーブルからそのLINE IDに一致する行を抜き出し、その行をUPDATEにより更新します。更新する箇所はline_idで、''により空文字挿入で消去します。
では、heroku pg:psqlにより中身を見てみましょう。
しっかりline_idが消えていることがわかりますね。
LINEと自社HPのアカウント連携は以上となります。
これにより様々なサービスが可能となりますよね!
最後までお読みいただきありがとうございました。
少しでも参考になりましたら「スキ」をいただけると幸いです。
MENTAでもメンターさせていただいてますので、ご不明点等お気軽にお問い合わせください。
それではまた。
この記事が気に入ったらサポートをしてみませんか?