
Unity DOTweenの.SetLookAtで動きが完成!

こんにちは!
ぷもんです。
Unity 進行方向を軸に回転させる!というnoteで
・カメラの位置が悪い
・進行方向を軸に回す
をやりました。
今回は
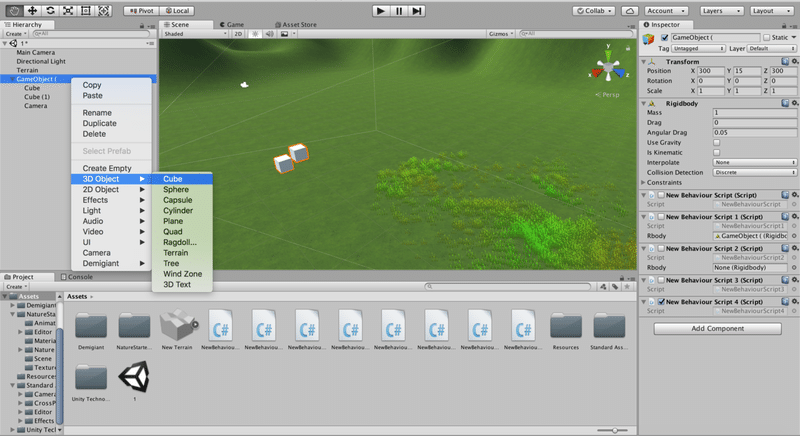
まずはCubeを増やします。
動きをわかりやすくするためです。
画面左のHierarchyの「GameObject (」を右クリックして
3D Object→Cubeをクリック
画面左のHierarchyで新しく作った「Cube(2)」をクリックしてから
画面右のInspectorのTransformの
Positionの値をX=0、Y=−1、Z=−1
にします。

もう一つCubeを作って
Positionの値をX=−1、Y=0、Z=−2にします。
Add Component→New Scriptで
新しいスクリプトを追加します。

ここに他のCubeと同じスクリプトを書きます。
using System.Collections;
using System.Collections.Generic;
using UnityEngine;

public class NewBehaviourScript9 : MonoBehaviour {

	private GameObject player;
	private Vector3 Player_pos;
	private Vector3 rotateAxis;

	// Use this for initialization
	void Start () {
		player = GameObject.Find("GameObject (");
		Player_pos = GetComponent<Transform>().position;
	}

	// Update is called once per frame
	void Update () {
		rotateAxis = transform.position - Player_pos;

		transform.RotateAround(player.transform.position,rotateAxis,1f);

		Player_pos = transform.position;
	}
}
これで動かして見たのがこちら!
— ぷもん (@pumonmon) March 27, 2019
頭の向きがうまくいかない...。
ここで僕自身もスクリプトが一杯で混乱してきたので
整理してみます。
Unity動かすのはDOTweenのSequenceができればカンペキかも!というnoteで
親オブジェクトの「GameObject (」に次のようなスクリプトを書きました。
using System.Collections;
using System.Collections.Generic;
using UnityEngine;
using DG.Tweening;

public class NewBehaviourScript10 : MonoBehaviour {

	// Use this for initialization
	void Start () {
		Vector3[] path = {
			new Vector3(300, 35, 300),
			new Vector3(400, 40, 400),
			new Vector3(400, 300, 400),
		};

		transform.DOLocalPath(path, 30.0f, PathType.CatmullRom)
			.SetOptions(true);

	}

	// Update is called once per frame
	void Update () {

	}
}
回転させるために
Sequence seq = DOTween.Sequence();
		seq.Join(
			transform.DORotate(
				new Vector3(0f, 0f,270f),
				5f
			)
		);
のようなDOTweenのSequenceの機能を使ったスクリプトも書いていたのですが
回転はCubeに書いたスクリプトでいけそうだったので
外しました。
そして、先ほども書いたように
子オブジェクトの4つのCubeには次のようなスクリプトが書かれています。
using System.Collections;
using System.Collections.Generic;
using UnityEngine;

public class NewBehaviourScript8 : MonoBehaviour {

	private GameObject player;
	private Vector3 Player_pos;
	private Vector3 rotateAxis;

	// Use this for initialization
	void Start () {
		player = GameObject.Find("GameObject (");
		Player_pos = GetComponent<Transform>().position;
	}

	// Update is called once per frame
	void Update () {
		rotateAxis = transform.position - Player_pos;

		transform.RotateAround(player.transform.position,rotateAxis,1f);

		Player_pos = transform.position;
	}
}
これはCubeを回転させるためのものです。
頭の向きは「GameObject (」の方のスクリプトを修正したほうが早そうです。
ここで次のスクリプトを加えます。
.SetLookAt(0.01f, Vector3.forward)これはどちらに顔を向けて動くかを決めることができるもので
「.SetLookAt(〇〇, Vector3.forward)」で
〇〇先の時間の動きを先取りした方向を向いてくれます。
これを加えたスクリプトがこちらで
using System.Collections;
using System.Collections.Generic;
using UnityEngine;
using DG.Tweening;

public class NewBehaviourScript10 : MonoBehaviour {

	// Use this for initialization
	void Start () {
		Vector3[] path = {
			new Vector3(300, 35, 300),
			new Vector3(400, 40, 400),
			new Vector3(400, 300, 400),
		};

		transform.DOLocalPath(path, 30.0f, PathType.CatmullRom)
			.SetOptions(true)
			.SetLookAt(0.01f, Vector3.forward);

	}

	// Update is called once per frame
	void Update () {

	}
}
動かしてみた様子がこちらです。
— ぷもん (@pumonmon) March 27, 2019
動きはうまくいっていますが
「GameObject (」の子オブジェクトのカメラにも動きの影響が出ています。
「GameObject (」を右クリックして
Copy→PasteでCamera以外のオブジェクトを消します。
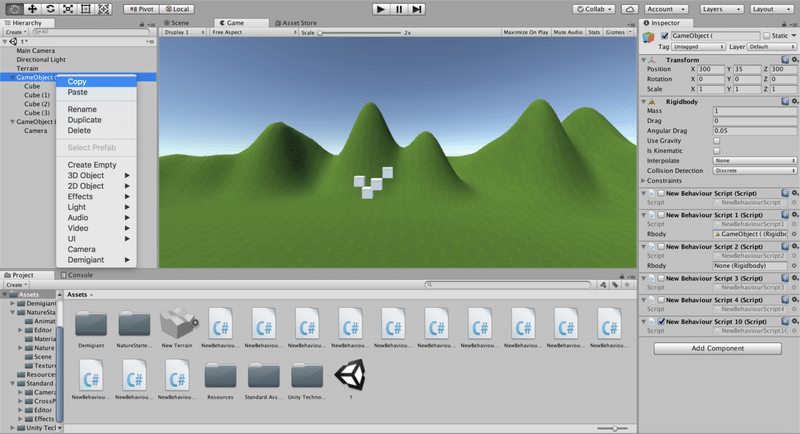
これで再生してみたのがこちらです。
— ぷもん (@pumonmon) March 27, 2019
多少のズレはあるもののやりたい動きができました!
参考にしたサイトです!
最後まで読んでいただきありがとうございました。
ぷもんでした!
noteを日々投稿してます! もしいいなと思ってもらえたら サポートしてもらえるとありがたいです。 VRやパソコンの設備投資に使わせていただきます。 ご意見、質問等ありましたらコメントください。 #ぷもん でつぶやいてもらえると励みになります。 一緒に頑張りましょう!