その3 イメージファイルを使う

今回はイメージファイルを使ってあれこれやって画面をよくしていくをやっていきます。
■ このページで達成すること
1.背景にイメージファイルを取り込む
2.BlueToothアイコンを表示する
ではやってみよう!
■ 画面のサイズを知る
ガーミンのスマートウォッチだけどまぁほんとにたくさんの種類がある。ここにデバイスの一覧があるんですが、自分のデバイス見つけました?
解像度、サポートしている機能、採用している液晶の種類、APIのどのレベルに対応しているか記載されています。これに合わせてWatchFaceを作るわけですね。
私のForerunner255sはこんな感じです。

最新のAPIには対応するも液晶は218x218ドットで64色発色の液晶です。バックライトが点灯していなくても見える液晶でそれはいいのですが、色は正直鮮やかではないので視認性のいいWatchFaceが求められるのですね。
背景のイメージを設定する。
おっさんは有史以来Photoshopなる製品を使っていまして、でも最近はお安いelementsなんていうのをPCを買うたびに買っていまして、こんな感じで218×218で作ってみます。
はい作りました。こんな感じで。

ではWatchFaceに入れましょう。
イメージファイルを配置しlayout.xmlに書く
作ったファイルを[resources]-[drawables]に入れまして・・・

layout.xmlにイメージを表示させる行を追加します。(3行目です。)
このlayout.htmlですが、書かれた順に書いていくので最後の”AmPmLabel”がいわゆる最前面に来ます。
<layout id="WatchFace">
<drawable class="Background" />
<bitmap id="myBitmap" filename="../drawables/backGround.png" />
<label id="TimeLabel" x="center" y="center" font="Graphics.FONT_LARGE" justification="Graphics.TEXT_JUSTIFY_CENTER" color="Graphics.COLOR_BLUE" />
<label id="AmPmLabel" x="50%" y="60%" font="Graphics.FONT_LARGE" justification="Graphics.TEXT_JUSTIFY_CENTER" color="Graphics.COLOR_BLUE" />
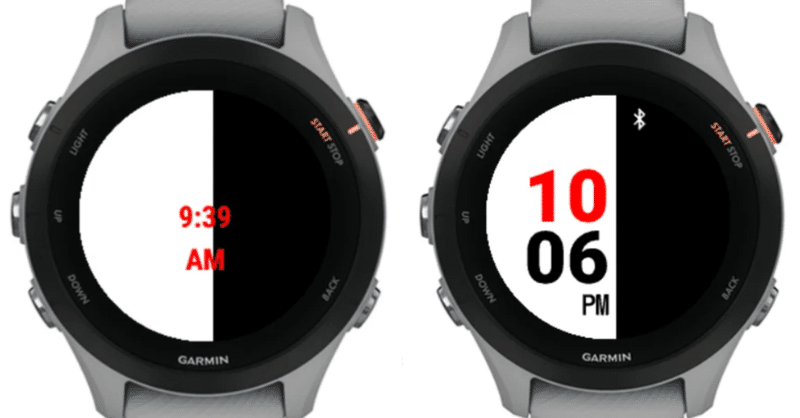
</layout>実行すると!!!
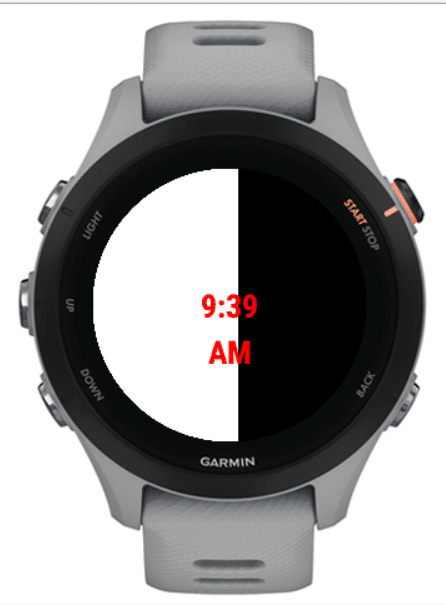
見事なユベントスです(笑)
折角なんで時間表示を直してみましょう!
■フォントの色を変えたりサイズを変える
layout.xmlの後ろにもにょもにょ書かれていたところを修正すると文字の色だのサイズだのを変更できます。
何が変更できるかはここに記載されています。
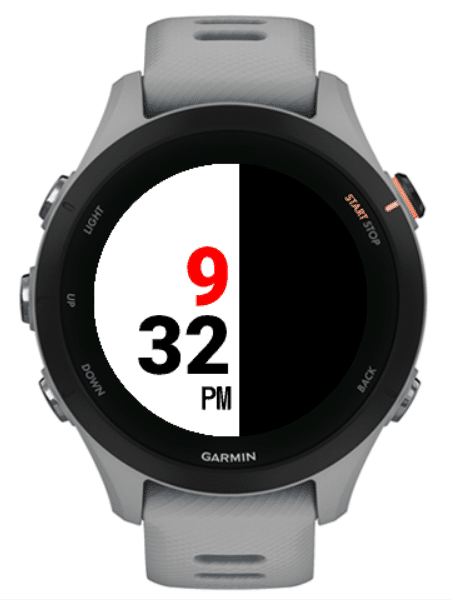
こんな感じで時と分を別々表示にして半分で別れる背景にしたので、右寄せにしてみて、やっぱり白黒でメリハリよくってしてみました。
<layout id="WatchFace">
    <drawable class="Background" />
    <bitmap id="myBitmap" filename="../drawables/backGround.png" />
    <label id="TimeHourLabel" x="50%" y="20%" font="Graphics.FONT_NUMBER_THAI_HOT" justification="Graphics.TEXT_JUSTIFY_RIGHT" color="Graphics.COLOR_BLACK" />
    <label id="TimeMinuteLabel" x="50%" y="45%" font="Graphics.FONT_NUMBER_THAI_HOT" justification="Graphics.TEXT_JUSTIFY_RIGHT" color="Graphics.COLOR_BLACK" />
    <label id="AmPmLabel" x="50%" y="80%" font="Graphics.FONT_LARGE" justification="Graphics.TEXT_JUSTIFY_RIGHT" color="Graphics.COLOR_BLACK" />
</layout>
レイアウトいじって・・・・
ソースもちょっと修正しました。
        // Update the view

        //時を表示
        var view = View.findDrawableById("TimeHourLabel") as Text;
        view.setColor(getApp().getProperty("ForegroundColor") as Number);
        view.setText(hours.toString());

        //分を表示
        var view3 = View.findDrawableById("TimeMinuteLabel") as Text;
        view3.setText(clockTime.min.format("%02d"));

        // AMPM表示
//        System.println(amPm); //Debug Print
        var view2 = View.findDrawableById("AmPmLabel") as Text;
        view2.setText(amPm);
いい感じになりましたね!
という具合にラベルをセットして、プログラムから設定してやるとうのがガーミンのWatchFaceの標準技法のようです。
画面にイベントに応じてイメージファイルを表示させる。
次なる野望は、イベントに応じてイメージファイルを表示させるです。なんのこっちゃって?えっとBluetoothでスマホと接続されたらBTマークを出そうってものです。
というわけでまずはBluetoothアイコンを作っておきます。
こんな奴で高さ22横15で作ってみました。
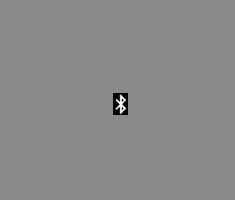
これを・・・。\resources\drawablesに起きます。
で、layout.xmlに書きたいところですがここがまだまだGariminSDKって事でここには書きません。ダイナミックに表示させたり消したりしたいので、ソース上に表現します。
その前にdrawables.xmlにこういう要素があるよという事でxmlに書きます。3行目ですね。
<drawables>
    <bitmap id="LauncherIcon" filename="launcher_icon.png" />
    <bitmap id="bmBluetoothIcon" filename="bluetooth_icon.png" />
</drawables>
次にソースです。
・値の宣言の所にvarでイメージを入れるオブジェクトと、配列でBTアイコンを表示する場所XYを保管する配列を作る宣言をします。
・function initialize()にこの画面が初期化したと時に動作するものとして、先ほどのオブジェクトにdrawablesで定義したアイコンをロードします。
・function onLayout(dc as Dc) as VoidにアイコンのXY座標を配列で入れます。
・関数を書く場所に関数を作って書きました。
// Bluetooth接続ステータスを取得し表示する。
function drawBT(dc) {
var info = System.getDeviceSettings();
if (info.phoneConnected)
{
dc.drawBitmap( bmBtPosion[0] ,bmBtPosion[1] , bmBluetooth);
}
}
BTのステータスはSystem.getDeviceSettings();で取得したオブジェクトのinfo.phoneConnectedでわかるようでtrueだったらビットマップを書きなさいと書きます。
・// Call the parent onUpdate function to redraw the layout
に
drawBT(dc);
とさっきの関数を呼ぶようにします。
import Toybox.Application;
import Toybox.Graphics;
import Toybox.Lang;
import Toybox.System;
import Toybox.WatchUi;

class wFace01View extends WatchUi.WatchFace {

// bluetooth関連アイコンと位置情報
    var bmBluetooth;
    var bmBtPosion;

    function initialize() {
        WatchFace.initialize();
        bmBluetooth = WatchUi.loadResource(Rez.Drawables.bmBluetoothIcon); //BTアイコンをロード
    }

    // Load your resources here
    function onLayout(dc as Dc) as Void {
        setLayout(Rez.Layouts.WatchFace(dc));
        bmBtPosion = [dc.getWidth()/2 + 20, 10];     //BTアイコンを位置決め
    }

    // Bluetooth接続ステータスを取得し表示する。
    function drawBT(dc) {
    	var info = System.getDeviceSettings();
    	if (info.phoneConnected) {
    		dc.drawBitmap( bmBtPosion[0] ,bmBtPosion[1]  , bmBluetooth);
        }
    }

    // Called when this View is brought to the foreground. Restore
    // the state of this View and prepare it to be shown. This includes
    // loading resources into memory.
    function onShow() as Void {
    }

    // Update the view
    function onUpdate(dc as Dc) as Void {

        // Get the current time and format it correctly
        var clockTime = System.getClockTime();
        var hours = clockTime.hour;
        var amPm = "AM"; // AM,PMの文字
        if (!System.getDeviceSettings().is24Hour) {
            //PM判定
            if (hours > 11) {
                amPm = "PM";
            }else{
                amPm = "AM";
            }
            if (hours > 12) {
                hours = hours - 12;
            }
        }else{
                amPm = "";
        }

        // Update the view
        //時を表示
        var view = View.findDrawableById("TimeHourLabel") as Text;
        view.setColor(getApp().getProperty("ForegroundColor") as Number);
        view.setText(hours.toString());
        //分を表示
        var view3 = View.findDrawableById("TimeMinuteLabel") as Text;
        view3.setText(clockTime.min.format("%02d"));
        // AMPM表示
//        System.println(amPm); //Debug Print
        var view2 = View.findDrawableById("AmPmLabel") as Text;
        view2.setText(amPm);
        // Call the parent onUpdate function to redraw the layout
        View.onUpdate(dc);
        drawBT(dc);
    }

    // Called when this View is removed from the screen. Save the
    // state of this View here. This includes freeing resources from
    // memory.
    function onHide() as Void {
    }

    // The user has just looked at their watch. Timers and animations may be started here.
    function onExitSleep() as Void {
    }

    // Terminate any active timers and prepare for slow updates.
    function onEnterSleep() as Void {
    }

}
はい実行しましょう!
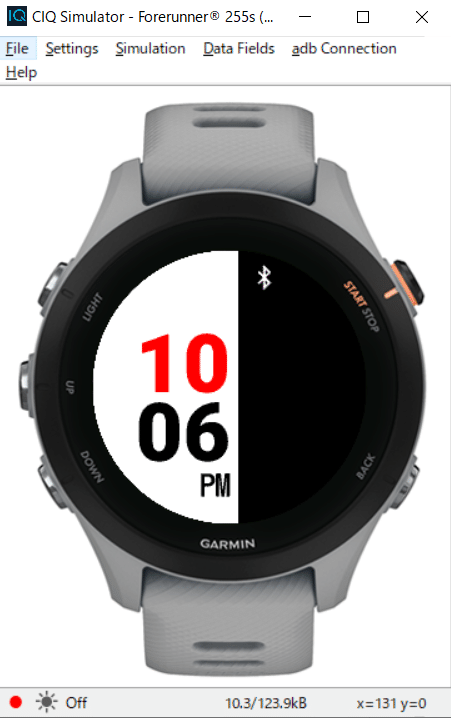
出ましたね!!という事でOFFにします。
シミュレータの
[Settings]-[Connection Type]-[BLE]-[Not Connected]を選ぶと

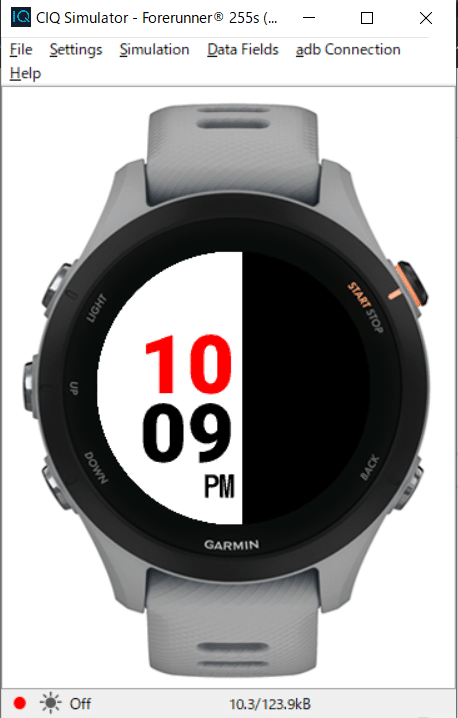
アイコンが消えればOKです。
どうです?これでイメージの表示をしたり、文字を変えたり要素を追加できるようになりました!
ではがんばっていそしみましょう・・・・
次回は秒表示とカスタムフォント、自分のガーミンにインストールするをいってみたいと思います。
ではっ!
この記事が気に入ったらサポートをしてみませんか?