
Storybookの「インタラクションテスト」でフロントエンドのテストをシンプルに管理する!

はじめに
こんにちは。
株式会社SHIFTのブラッドフォード です。
ついに Storybook の v7.0 が正式リリースされましたね!
早速利用していますが、設定や記法がシンプルになり使いやすくなりました。
Storybook といえば、コンポーネント管理を目的としたライブラリですが、最近はテストもこなせるようになりました。
公式では「インタラクションテスト」という名前で紹介されています。
今回はこの「インタラクションテスト」を使ったフロントエンドのテストを紹介します。
うまく活用できれば、単体テストや結合テストは「インタラクションテスト」に集約できるかもしれません。
執筆者プロフィール:ブラッドフォード
株式会社SHIFT DAAE部所属のフロントエンドエンジニアです。
最近は keyball を使って仕事しています。
おさらい|フロントエンドのテスト
まずはフロントエンドのテストについておさらいです。
テスト種別は以下の5種が一般的かと思います。
単体テスト(ユニットテスト)
結合テスト(インテグレーションテスト)
スナップショットテスト
ビジュアルリグレッションテスト
E2Eテスト
Storybookの「インタラクションテスト」では上記のうち、単体テストや結合テストを実施することが可能です。
フロントエンドの単体テストや結合テストでは通常 Jest や Testing Library が使われますが、Storybookの「インタラクションテスト」も内部的に、この2つが利用されています。
インタラクションテストの強み
Storybookの「インタラクションテスト」には、いくつか強みがあります。
ストーリーとテストを一元管理できる
当たり前ですが、ストーリーファイルにテストを記述する事になるため、ストーリーとテストを一元管理できます。
また、テストケースの名称を見ることで、コンポーネントがどのような機能を持つかを確認しやすくなります。
ブラウザとCLIの両方で実行できる
テストを実行する方法は主に2つで、通常はブラウザ上でStorybookを表示して実行します。
テストランナーをセットアップすることで、CLIでの実行が可能になります。
ブラウザのDOMでテストできる
ブラウザ上で実行する場合はもちろん、テストランナーで実行する場合も内部的に Playwright を利用して任意のブラウザ(Chromium, Firefox, webkit)で実行されます。
つまり jest-dom ではなく、実際のブラウザDOMでテストされるので信頼性が高いということ。
実演
それでは実際にボタンコンポーネントを作成して、その挙動をテストしてみましょう。今回は Next.js を利用して実演してみます。
まずは Next.js と Storybook を用意します。
// コマンド

$ npx create-next-app --ts storybook-interaction-test
$ cd storybook-interaction-test
$ npx storybook@latest init
$ npm install -D @storybook/jest
次にコンポーネントファイルを用意します。
// Button.tsx

import React, { useState } from "react";
import { useRouter } from "next/router";
import "./button.css";

interface ButtonProps {
  testId: string;
  label: string;
  text?: string;
  href?: string;
  primary?: boolean;
  "data-testid"?: string;
}

export const Button = ({
  testId,
  label,
  text,
  href,
  primary = false,
  ...props
}: ButtonProps) => {
  const [textToggle, setTextToggle] = useState(false);
  const router = useRouter();
  const mode = primary ? "primary" : "";

  const onClick = () => {
    if (href) {
      router.push(href);
    } else {
      setTextToggle(!textToggle);
    }
  };

  return (
    <div>
      <button
        data-test-id={testId}
        type="button"
        className={["button", mode].join(" ")}
        onClick={onClick}
        {...props}
      >
        { label }
      </button>
      {textToggle && <div>{text}</div>}
    </div>
  );
};
CSSは以下の内容で用意します
// button.css

.button {
  font-family: "Nunito Sans", "Helvetica Neue", Helvetica, Arial, sans-serif;
  font-size: 20px;
  font-weight: 700;
  border: 0;
  border-radius: 3em;
  cursor: pointer;
  display: inline-block;
  line-height: 1;
  padding: 10px 20px;
  color: #333;
  background-color: transparent;
  box-shadow: rgba(0, 0, 0, 0.15) 0px 0px 0px 1px inset;
}
.primary {
  color: white;
  background-color: #1ea7fd;
}
ストーリーファイルを用意します。
// Button.stories.ts
import type { Meta, StoryObj } from "@storybook/react";
import { within, userEvent } from "@storybook/testing-library";
import { jest, expect } from "@storybook/jest";
import { Button } from "./Button";
const fn = jest.fn();
const meta: Meta<typeof Button> = {
title: "Atoms/Button",
component: Button,
tags: ["autodocs"],
parameters: {
nextjs: {
router: {
push: fn,
},
},
},
};
export default meta;
type Story = StoryObj<typeof Button>;
export const Default: Story = {
args: {
label: "Default",
"data-testid": "button",
},
play: async ({ canvasElement, step }) => {
const canvas = within(canvasElement);
await step("ボタンにLabelの文字列が表示されている", async () => {
await expect(canvas.getByText("Default")).toBeInTheDocument();
});
},
};
export const Primary: Story = {
args: {
primary: true,
label: "Primary",
"data-testid": "button",
},
play: async ({ canvasElement, step }) => {
const canvas = within(canvasElement);
await step("ボタンのclassName属性にprimaryが適用されている", async () => {
const button = canvas.getByTestId("button");
await expect(button.classList.contains("primary")).toBe(true);
});
},
};
export const Toggle: Story = {
args: {
label: "Toggle",
text: "Success",
"data-testid": "button",
},
play: async ({ canvasElement, step }) => {
const canvas = within(canvasElement);
await step("ボタン押下でtextを表示する", async () => {
await userEvent.click(canvas.getByTestId("button"));
await expect(canvas.getByText("Success")).toBeInTheDocument();
});
await step("再度ボタン押下でtextを非表示にする", async () => {
await userEvent.click(canvas.getByTestId("button"));
await expect(canvas.queryByText("Success")).toBeNull();
});
},
};
export const Link: Story = {
args: {
label: "Link",
href: "/auth/login",
"data-testid": "button",
},
play: async ({ canvasElement, step }) => {
const canvas = within(canvasElement);
await step("ボタン押下でhrefで指定した画面に遷移する", async () => {
await userEvent.click(canvas.getByTestId("button"));
await expect(fn.mock.lastCall).toContainEqual("/auth/login");
});
},
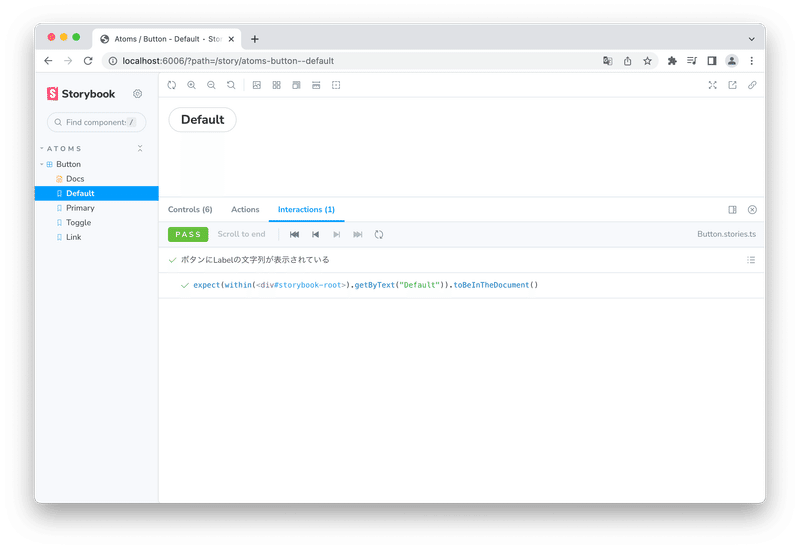
};テスト実行してみます。
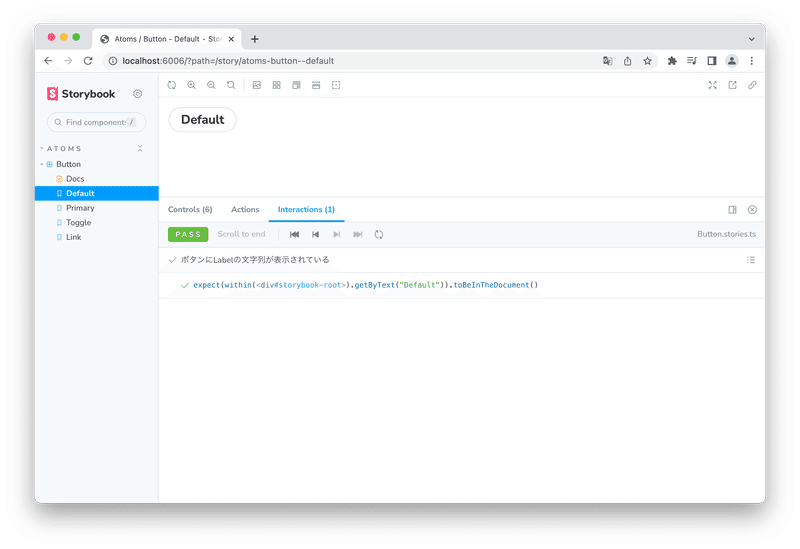
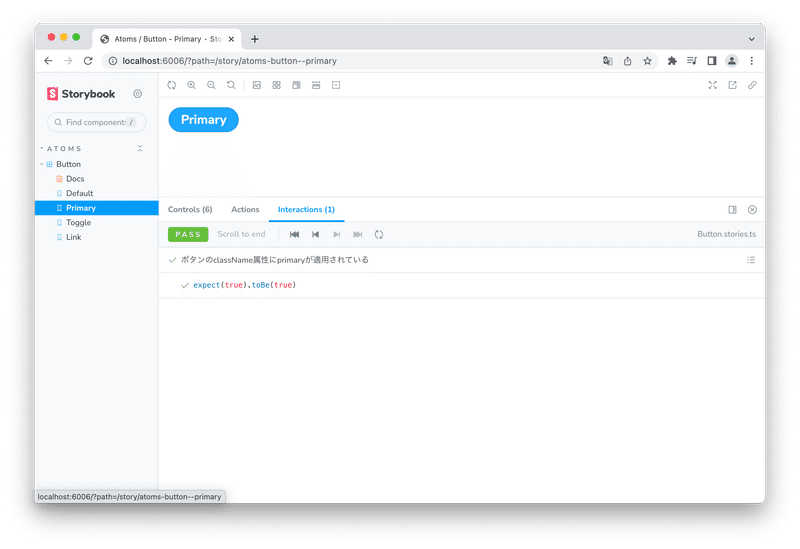
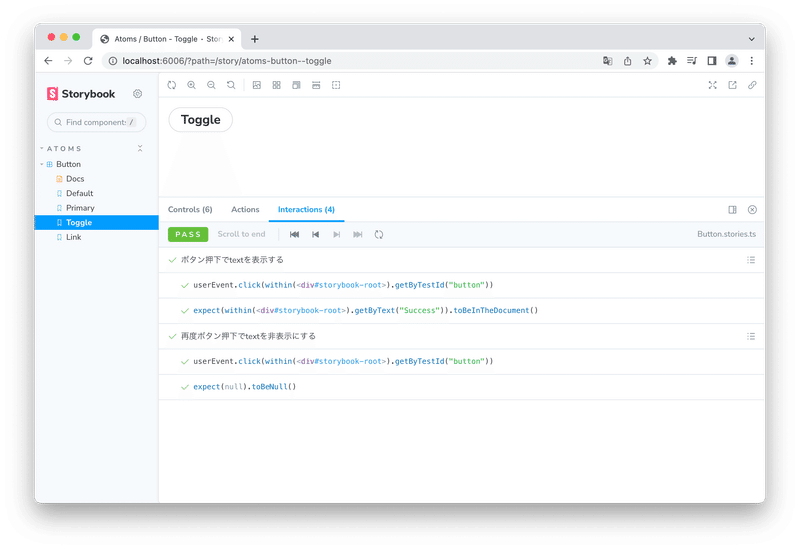
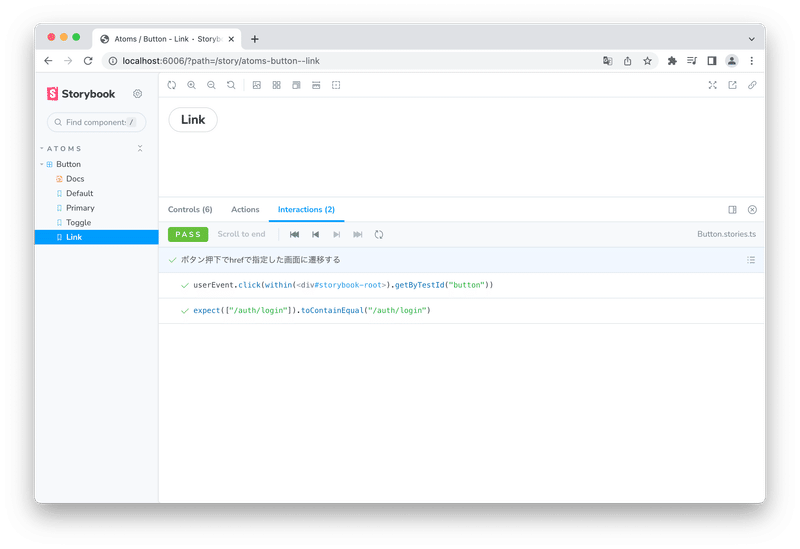
それぞれ問題なく動作していることが分かります。
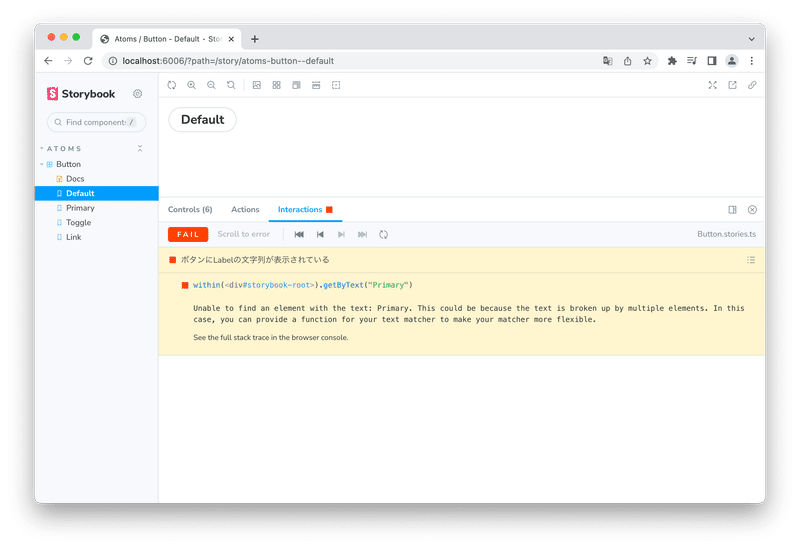
問題が発生した場合は、以下のようにエラーが表示されます。
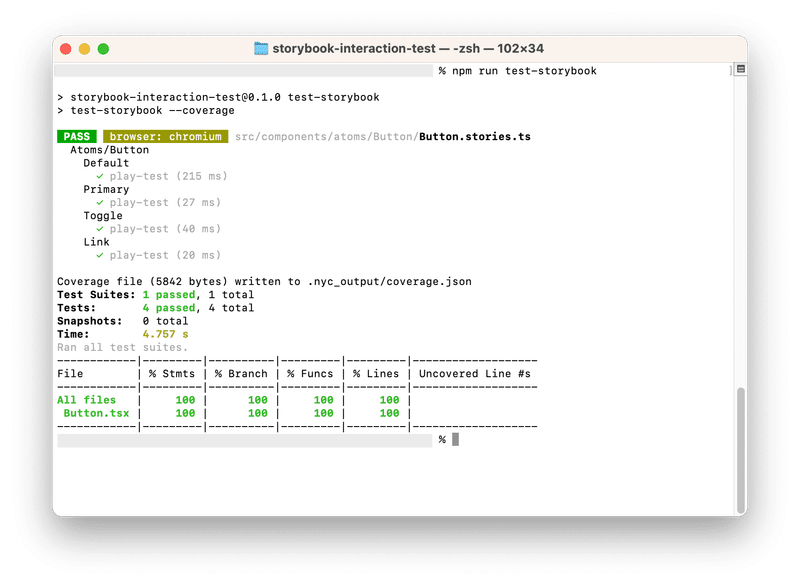
カバレッジの計測について
テストランナーを利用して、カバレッジを計測することも可能です。
先ほどのテストで処理全体のうち、どれくらいの検証ができたかを見てみましょう。
まずはテストランナーとカバレッジ計測用のアドオンを設定しましょう。
// コマンド

$ npm install -D @storybook/test-runner @storybook/addon-coverage
// package.json
{
"scripts": {
...
"test-storybook": "test-storybook --coverage" // この行を追加
}
}// .storybook/main.ts
const config: StorybookConfig = {
...
addons: [
...
'@storybook/addon-coverage', // この行を追加
],
};以下を実行するとテストランナーが走ります。
// コマンド
$ npm run storybook
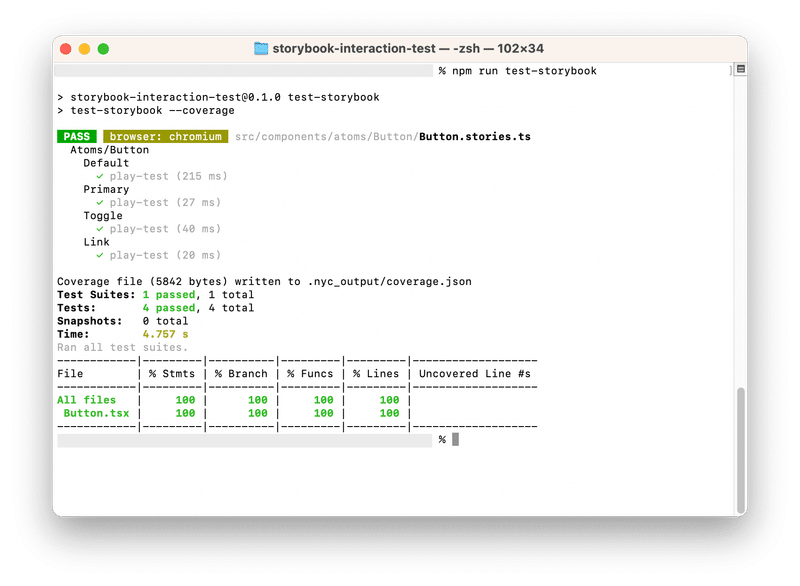
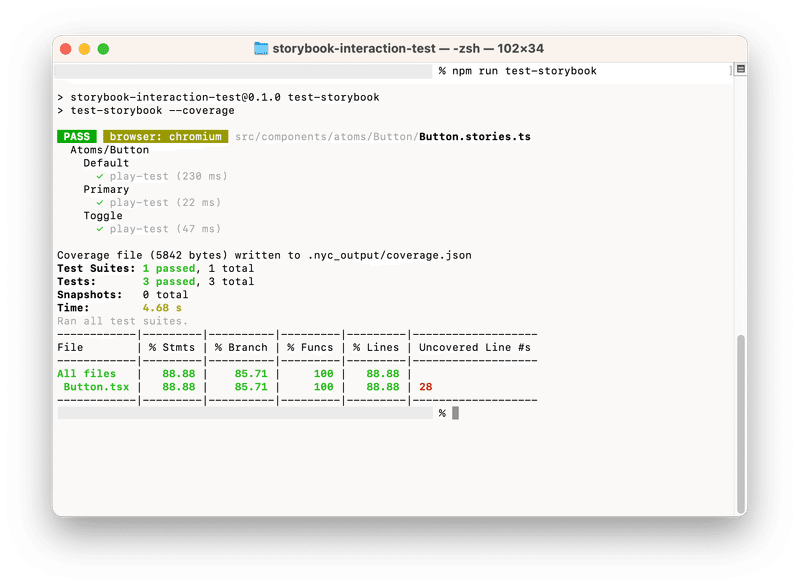
$ npm run test-storybook結果画面は以下。
全ての処理をカバーできているようです。
カバーできていない箇所があれば、以下のように表示されます。
上記は Button.stories.ts の Link: Story を削除して実行した場合の参考です。
つまり Buttonコンポーネント のリンク機能がテストされていない事を示しています。
さいごに
ストーリーとインタラクションテストを実装することで、考慮漏れ・実装漏れを防ぎやすくなります。
カバレッジを計測すると、テスト実装の考慮漏れも拾うことができます。
これらの実装・導入コストは低くありませんが、堅実性が求められるプロジェクトでは非常に有用だと思います。
また Chromatic を利用することで、インタラクションテストの自動実行が可能になったり、ビジュアルリグレッションテスト、スナップショットテストも半自動的に実施できるので、とてもおすすめです。
以上、Storybookのインタラクションテストについてのご紹介でした。
参考
Storybookの公式ドキュメント:なぜStorybookを使うのか https://storybook.js.org/docs/react/get-started/why-storybook
Storybookの公式ドキュメント:インタラクションテストについて https://storybook.js.org/docs/react/writing-tests/interaction-testing
Storybookの公式ドキュメント:テストカバレッジについて https://storybook.js.org/docs/react/writing-tests/test-coverage
\もっと身近にもっとリアルに!DAAE公式Twitter/
お問合せはお気軽に
https://service.shiftinc.jp/contact/
SHIFTについて(コーポレートサイト)
https://www.shiftinc.jp/
SHIFTのサービスについて(サービスサイト)
https://service.shiftinc.jp/
SHIFTの導入事例
https://service.shiftinc.jp/case/
お役立ち資料はこちら
https://service.shiftinc.jp/resources/
SHIFTの採用情報はこちら
https://recruit.shiftinc.jp/career/
PHOTO:UnsplashのKimon Maritz