
Node.js(ES6で実装)におけるESLint・Prettierの設定を1からやってみた

はじめに
こんにちは、SHIFT の開発部門に所属しているKatayamaです。
開発をしていく中に静的解析・構文チェックが常に走る状態になっておらず、開発後に一気に静的解析・構文チェックを実行すると、中々悲惨な事になってしまいます・・・。というわけで今回は JavaScript の開発をする上では必須とも言える静的解析・構文チェックツールである ESLint・prettier の設定を 1 からやってみたので、それについて書いていこうと思います。
合わせて、ESLint・prettier の設定に合わせた VS Code の設定も行ってみたので、それについても書いています。
※なお、今回 ESLint の設定を行うプロジェクトは、Node.js で ES Modules を利用して実装しているものにります。Node.js で ES Modules を利用するための設定についてはNode.js で import・export(ES6 の構文)を使えるように webpack × Babel の設定をやってみたを参照ください。
ESLint を設定する
JavaScript の静的解析と言えばESLintという感じなので ESLint で静的解析のルール設定をしていく。
以下での ESLint の実行対象コードは以下。
// src/index.js
import express from "express";

const app = express();

app.get("/", async (req, res) => {
  const reqTime = Date.now();
  console.log(Array.from("foo"));

  await new Promise((resolve) => {
    setTimeout(() => {
      resolve("sleep");
    }, 500);
  });

  res.status(200).send({
    msg: "hello world!",
    elaptime: Date.now() - reqTime,
  });
});

app.listen(3000, () => console.log("listening on port 3000!"));
ESLint を PJ に導入し、init で初期設定を構築
はじめの導入はGetting Started with ESLintを見れば簡単にできる。
yarn add --dev eslint
yarn run eslint --init
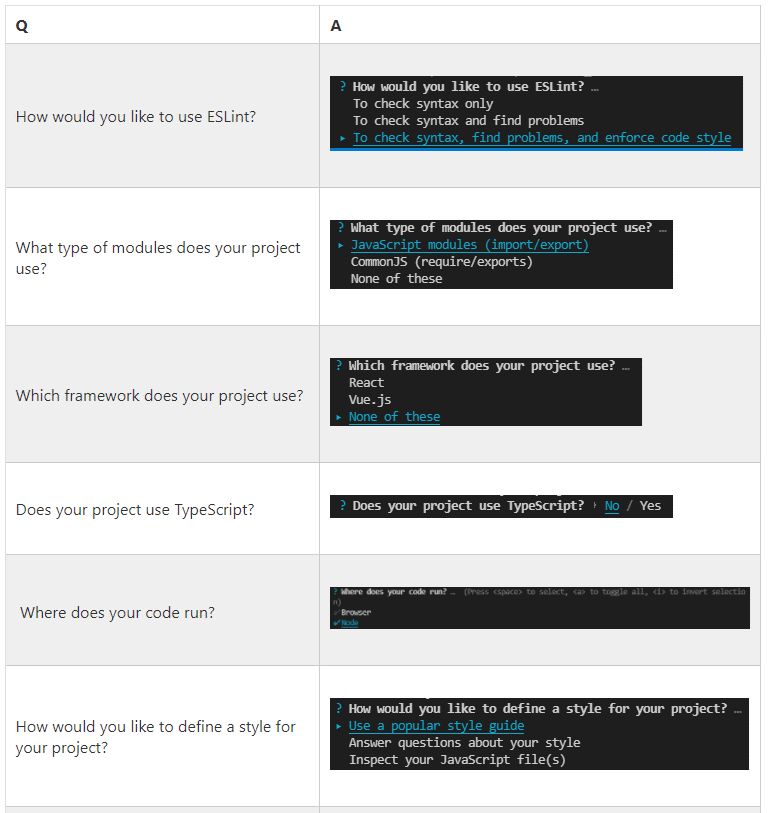
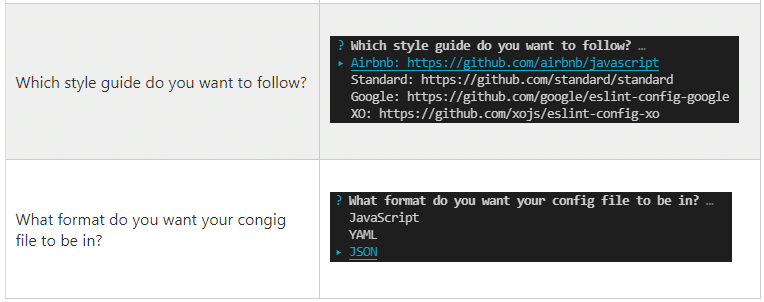
"yarn run eslint --init" を実行すると、CLI 上で質問が出てきて初期の構成を作ってくれる。今回は一旦以下のように設定した。
初期設定時の ".eslintrc.json" は以下のようになる。ここからルールを変更していく。
// .eslintrc.json
{
  "env": {
    "es2021": true,
    "node": true
  },
  "extends": ["airbnb-base"],
  "parserOptions": {
    "ecmaVersion": 13,
    "sourceType": "module"
  },
  "rules": {}
}
※ちなみに今の状態で ESLint を実行すると、
[root@localhost node-express]# yarn lint
yarn run v1.22.17
$ eslint src/*

/root/workspace/node-express/src/index.js
   7:3   warning  Unexpected console statement  no-console
  21:24  warning  Unexpected console statement  no-console

✖ 2 problems (0 errors, 2 warnings)

Done in 1.38s.
のようになる。
・参考:ESLint 最初の一歩
結論:ESLint の設定内容と prettier の設定内容
今回設定した ESLint・prettier の内容全体としては以下の通り。
// .eslintrc.json
{
  "root": true,
  "env": {
    "es2021": true
  },
  "extends": [
    "eslint:recommended",
    "airbnb-base",
    "plugin:prettier/recommended"
  ],
  "rules": {
    "no-console": "off"
  },
  "ignorePatterns": ["/node_modules/", "/dist/"]
}
// .prettierrc
{
  "singleQuote": true,
  "useTabs": true,
  "semi": true,
  "bracketSpacing": true,
  "arrowParens": "always",
  "printWidth": 80,
  "trailingComma": "none"
}
## 一部省略している
[root@localhost node-express]# tree -I 'node_modules|.git' -a
.
├── .eslintrc.json
├── .prettierrc
├── .vscode
│   └── settings.json
├── babel.config.js
├── package.json
├── src
│   └── index.js
├── webpack.config.js
└── yarn.lock
以下の項で、上記の設定の詳細についてみていく。
root: true
ESLint を特定のプロジェクトに制限するための設定。
ESLint はデフォルトでは公式に書かれている通り、ルートディレクトリまでのすべての親フォルダにある設定ファイルを探す。これはすべてのプロジェクトを特定の規則に従わせたい場合に便利だが、意図しないルール適用になったりするので、それを防止するために "root: true" として、ESLint を特定のプロジェクトに限定する(ESLint は "root": true で親フォルダまで探しに行くのを Stop させられる)。
By default, ESLint will look for configuration files in all parent folders up to the root directory. This can be useful if you want all of your projects to follow a certain convention, but can sometimes lead to unexpected results. To limit ESLint to a specific project, place "root": true inside the .eslintrc._ file or eslintConfig field of the package.json file or in the .eslintrc._ file at your project's root level. ESLint will stop looking in parent folders once it finds a configuration with "root": true.
env
静的解析の前提条件(JavaScript のコードが、ブラウザで動くコードである・ES6 である、など)を設定する事ができるオプション。 これを設定する意味としては、例えばブラウザだと
window.onload = function () {
  alert("hello world!");
};
みたいなコードを書けてしまうが、ESLint からすれば "window" や "alert" はどこにも定義されていないから no-undef(未定義だからダメだよ)に引っかかってしまう。これを回避するには、Specifying Globalsというオプションでグローバル変数に定義済みなので宣言不要で使用可能なもの一覧を設定する事ができるので、これを設定するしかない。
// .eslintrc.json
{
  "globals": {
    "window": false,
    "alert": false
  }
}
がしかし、こんな事をイチイチやっていると日が暮れるので ESLint 側でも環境ごと(ブラウザとか node, es6 など)に使われるグローバル変数のリストを既に用意しており、どのリストを適用させるのか?= env の設定という仕組みになっている。
※ESLint が持っている Global の設定一覧は、environments.jsで "import globals from "globals";" として読み込まれているものと思われ、その globalsを見てみると、globals.jsonに各環境ごとの設定が書かれている。
今回は Node.js で ES6 の構文を使う+最新の ES2021 も使うかもしれないので、"node", "es2021" と設定する(globals.jsonを見る限り、ES2021 を設定しておけば、下位の es6 等のルールも含まれているので)。
"env": {
   "es2021": true,
   "node": true
}
と言いたいところだが、この後見ていく extends の設定で『airbnb-base』について解説するが、この "airbnb-base" に "node" は組み込み済みなのでここで明示的に宣言せずで問題ない(分かりやすさを考えて宣言するのはありだが、同じ事を書いている事になるので冗長な気もしたり…)。
なので、結論としては "es2021" だけ記載するようにする。
"env": {
    "es2021": true
},
・参考:Specifying Environments
・参考:Specifying Parser Options
・参考:🌟 環境設定をする
・参考:webpack の基本的な使い方
・参考:.eslintrc の env 設定ってなんぞや?
parserOptions
今回は extends の "airbnb-base" が諸々いい感じに設定してくれるので設定不要だが、知識として以下は知っておく必要がありそうなので書いておく。
・ES Moduleの機能(簡単に言ってしまえば import/export のやつ)を静的解析でチェックするには、後に出てくる "parserOptions" の設定で "sourceType": "module" とする必要がある。
・(同じく parserOptions について)ecmaVersion という設定項目があるが、これは env で "es6: true" のように設定している場合、特に設定は不要。理由は公式に、
this automatically sets the ecmaVersion parser option to 6
と書かれているように、env に "es6: true" と設定すると、自動的に parserOptions の ecmaVersion が 6 に設定されるため(es2017, es2020, es2021 も同様)
"parserOptions": {
    // "ecmaVersion": 12, ← env の方で設定しているなら不要
    "sourceType": "module"
}
extends
eslint の設定(.eslintrc.json などに書く設定)で、他の設定内容を継承させるための設定をする部分。
普通のプログラムの継承と同じように、env とか rules とか parserOptions とか、eslint の設定項目の各項目に対する設定を、他のファイルから読み込んで継承させられる。
例えば、今回 extends にしてしようとしている "airbnb-base"(eslint-config-airbnb-base)では、index.jsの方に、rules フォルダ内のパスが書かれており、その rules フォルダ内には、es6.jsというのがあるが、この中身を継承するので、env の "es6: true", parserOptions の "ecmaVersion: 6", "sourceType: 'module'" や、rules の各項目が、自分の ESLint の設定ファイル(.eslintrc.json)に書かれているのと同じ扱いになる。
※airbnb-base の詳細については『airbnb-base の中身』の項を参照。
今回は、eslint の方の recommended になっているルール(eslint:recommended)と、airbnb-base、さらにフォーマッタは prettier を使いたいので plugin:prettier/recommended の 3 つを継承させる。
※prettier の使い方は今までの使われ方から含めて『prettier について』の項に詳細を書いている。
・eslint:recommended
eslint の推奨ルールなので設定に組み込む
・airbnb-base
JavaScript の静的解析ルールとして厳しいと言われており、これで書いておくと良さげらしいので設定に組み込む
・prettier(eslint-config-prettier)
コードのフォーマッターである prettier のルールにコードスタイルを統一するために設定に組み込む
以下でそれぞれについて少し詳細を見ていく。
・参考:Extending Configuration Files
・参考:Using a configuration from a plugin
eslint:recommended の中身
ルールの中身全体はRulesに書かれている。
ソースコードとしてはeslint-recommended.jsが "eslint:recommended" の定義をしているものと思われる。
※eslint:recommended を始めとする eslint-config-_系の比較表としてはeslint-config-_ の比較表が分かりやすいと思う。
airbnb-base の中身
ルールの中身全体はAirbnb JavaScript Style Guideに書かれている。
ソースコードとしては、eslint-config-airbnb-baseの rules フォルダ内のものと思われる(『extends』の項で説明した通り)。
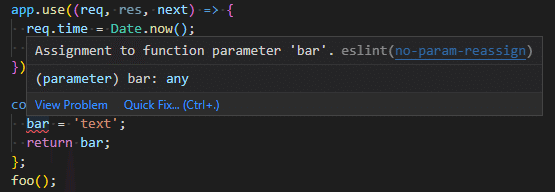
※ちなみに、より具体的にルールを見ていくと、『関数の引数にそのまま値を代入』の方はエラーになるが、Express の middleware を定義の場合はエラーにならない。これは、https://github.com/airbnb/javascript/blob/master/packages/eslint-config-airbnb-base/rules/best-practices.js#L226 の設定のおかげ。
// 関数の引数にそのまま値を代入
const foo = (bar) => {
  bar = "text";
  return bar;
};
foo();
// expressのmiddlewareの例
app.use((req, res, next) => {
  req.time = Date.now();
  next();
});
prettier について
今回はフォーマットルールに沿っているか?も静的解析でチェックをしたい(ESLintのルールとして検証する構成にしたい)ので plugin:prettier/recommended を extends に入れる(※合わせて『おまけ』の『ESLintとprettier』の項も参照ください)。
どのように設定するかだが、まず大前提として prettier のルールと衝突する ESLint やその他のルールは off にする必要がある。これはeslint-plugin-prettier の Recommended Configurationにも書かれている。
This plugin works best if you disable all other ESLint rules relating to code formatting, and only enable rules that detect potential bugs. (If another active ESLint rule disagrees with prettier about how code should be formatted, it will be impossible to avoid lint errors.) You can use eslint-config-prettier to disable all formatting-related ESLint rules.(このプラグインは、コードのフォーマットに関する他の ESLint ルールをすべて無効にし、潜在的なバグを検出するルールのみを有効にした場合に最適です。(他のアクティブな ESLint ルールがコードのフォーマットについて prettier と意見が合わない場合、lint エラーを回避することができません)。eslint-config-prettier を使って、フォーマットに関する ESLint ルールをすべて無効にすることができます。)
という事で、手順にある通りeslint-config-prettierを依存に追加する。
yarn add --dev eslint-config-prettier
ちなみに、この eslint-config-prettier の中身は、index.jsを見ると分かるが、単にいくつかのルールを off にしているだけ。
続いて、eslint-plugin-prettier を依存に追加する。
yarn add --dev eslint-plugin-prettier prettier
あとは、eslint-plugin-prettier の Recommended Configurationに書かれている通り、extends にplugin:prettier/recommendedを追記するだけ。
この plugin:prettier/recommended は、公式にも書いてあるように、単に
{
  "extends": ["prettier"],
  "plugins": ["prettier"],
  "rules": {
    "prettier/prettier": "error",
    "arrow-body-style": "off",
    "prefer-arrow-callback": "off"
  }
}
と同じ事を自分の ESLint の設定に追加してくれるだけで、ソースコードで言えばeslint-plugin-prettier.jsがそれ。
これで ESLint に prettier のフォーマッティングルールの設定を組み込んだ状態になり、以下のように eslint コマンド時に prettier のエラーも出力されるようになる。
[root@localhost node-express]# yarn lint
yarn run v1.22.17
$ eslint src/*

/root/workspace/node-express/src/index.js
   1:21  error    Replace `"express"` with `'express'`                                  prettier/prettier
   5:9   error    Replace `"/"` with `'/'`                                              prettier/prettier
   7:3   warning  Unexpected console statement                                          no-console
   7:26  error    Replace `"foo"` with `'foo'`                                          prettier/prettier
  11:15  error    Replace `"sleep"` with `'sleep'`                                      prettier/prettier
  16:10  error    Replace `"hello·world!"` with `'hello·world!'`                        prettier/prettier
  21:24  warning  Unexpected console statement                                          no-console
  21:36  error    Replace `"listening·on·port·3000!"` with `'listening·on·port·3000!'`  prettier/prettier

✖ 8 problems (6 errors, 2 warnings)
  6 errors and 0 warnings potentially fixable with the `--fix` option.
※prettier の設定や ESLint の設定全体は『結論:ESlint の設定内容と prettier の設定内容』の項を参照。
※ちなみに、eslint-plugin-prettier だと以下のように赤線が出る...。なおこれは、extends に "plugin:prettier/recommended" を記載し、.prettierrc に "{ "singleQuote": true }" を記載した時の状況。
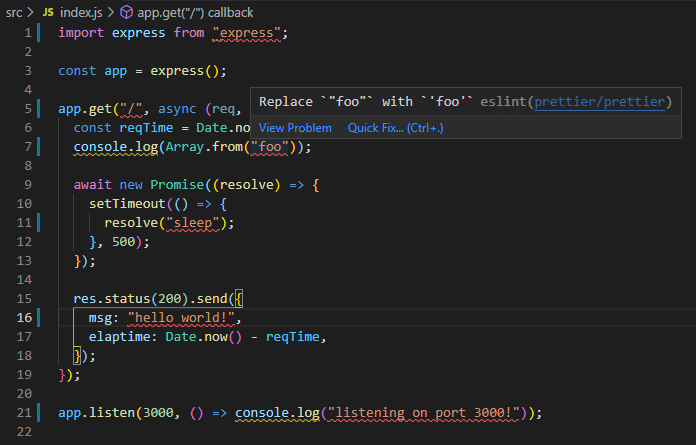
しかし、基本的に VS Code であれば、設定でソースの保存時には自動でフォーマッティングを走らせることができるので、新規で自分がコードを書いている時に赤線が出る以外は、この赤線は表示されることはないと思われ、そこまで煩わしくもないと思う。
※この ESLint・prettier を使う時の VS Code の設定については、『VS Code の設定』の項を参照。
・参考:How To Set Up ESLint & Prettier In VS Code
・参考:Prettier と ESLint の組み合わせの公式推奨が変わり plugin が不要になった
VS Code の設定
今回は ESLint の中で prettier のフォーマットルールに則っているか?のチェックもしているので、 "source.fixAll.eslint" + Extentions の ESLintの追加で最低限の設定にはなると思われる(prettier は package.json に追加してありそれが動く事が前提)。
その場合の setting.json は以下のようになる。
// ./.vscode/setting.json
{
  "editor.codeActionsOnSave": {
    "source.fixAll.eslint": true
  }
}
※ただ、この状態だと、
・ESLint が走るファイル以外(json など)で prettier のフォーマッティングができない
といった事があるので、"editor.formatOnSave"+Extentions の Prettierを入れるという事も一つの手に思える。この場合、ソースコードの保存時にどちらが先に走るのか?が分からないのと、思わぬ副作用があるかもしれないので注意は必要かもしれない。
上記の方法でやる場合、Prettier の Extentions を追加した上で、 "editor.formatOnSave": true を追記する。setting.json は以下のようになる("editor.defaultFormatter" を設定しているが、ESLint のフォーマットチェックと同じ prettier なので、この設定がフォーマッティングのルールに衝突する事はないと思っている)。
// 両方書いた場合
{
  "editor.defaultFormatter": "esbenp.prettier-vscode",
  "editor.formatOnSave": true,
  "editor.codeActionsOnSave": {
    "source.fixAll.eslint": true
  }
}
※ESLint のルール設定をしていて気づいたが、VS Code の Extentions で ESLint を入れて、コマンドではなくその Extentions を介して "source.fixAll.eslint" でフォーマッティングを走らせている場合、 ".prettierrc" の設定内容を変えてソースコードを保存しても変更後のルールでフォーマッティングされなかった...。しょうがないので ".prettierrc" を変えたら再起動するとちゃんと "source.fixAll.eslint" でフォーマッティングが自動修正されるようになった。
まとめとして
今回は ESLint と prettier の設定を 1 からやってみて、開発をする上での環境を整備してみた。少しさらに理解を深めていく必要がある部分があるが、基本的な設定はできたのではないかと思っている。
※上記内容で理解に誤りがある等ありましたらご指摘いただけると幸いです。
おまけ
ESLintとprettier
今回はeslint-plugin-prettierを使った設定を行ったが、この設定ではIntegrating with Lintersに書かれている通り、以下のようなデメリットもある。
・You end up with a lot of red squiggly lines in your editor, which gets annoying. Prettier is supposed to make you forget about formatting – and not be in your face about it!
・They are slower than running Prettier directly.
・They’re yet one layer of indirection where things may break.
この、
・フォーマッターなのに赤い線がエディタに出てしまって気になってしまう(本来フォーマットの事は忘れるべきなのに)
・prettier を直接実行するより遅い
という内容から、prettier としては、基本的には ESLint と prettier は分けて使われるべきという考え方をしているのだろうと思われる。そのため eslint-plugin-prettier ではなく、eslint-config-prettier を使って、prettier と衝突するような ESLint のルールを off にしつつ、フォーマットの事で(ESLint が prettier のフォーマットルール違反を検知して)警告がでないような形でフォーマッティングする(普通に prettier のコマンドでフォーマッティングする)という考え方をしているのだろうと思われる。
また、gitを使っていればGit hooksにあるような設定で prettier を実行することも可能だろう。
※ちなみに、ESLint と prettier を分けて考える場合の設定方法としては、公式にあるようにeslint-config-prettierを依存に追加(yarn add --dev eslint-config-prettier)し、"prettier"を extends の末尾に追記する。あとは、prettier のフォーマッティングルールを ".prettierrc" に記載し、後は以下のようなコマンドを実行するだけ(以下はprettier 本体の package.jsonを参考に書いたもの)。
// package.json
"scripts": {
    "fix": "run-s fix:eslint fix:prettier",
    "fix:eslint": "eslint --fix",
    "fix:prettier": "prettier --write",
}
_________________________________
執筆者プロフィール:Katayama Yuta
SaaS ERPパッケージベンダーにて開発を2年経験。 SHIFTでは、GUIテストの自動化やUnitテストの実装などテスト関係の案件に従事したり、DevOpsの一環でCICD導入支援をする案件にも従事。 最近開発部門へ異動し、再び開発エンジニアに。座学で読み物を読むより、色々手を動かして試したり学んだりするのが好きなタイプ。
お問合せはお気軽に
https://service.shiftinc.jp/contact/
SHIFTについて(コーポレートサイト)
https://www.shiftinc.jp/
SHIFTのサービスについて(サービスサイト)
https://service.shiftinc.jp/
SHIFTの導入事例
https://service.shiftinc.jp/case/
お役立ち資料はこちら
https://service.shiftinc.jp/resources/
SHIFTの採用情報はこちら
https://recruit.shiftinc.jp/career/