
Flaskとwebsocketを使った簡易的なチャットを開発する

WebSocket関連の勉強も兼ねて、FlaskでWebSocketを使用した簡易的なチャットの作り方を紹介していきます。ここではwebsocketとは何かという説明は致しません。
元々はfalconというフレームワークを使用して、作り方をご紹介しようと考えておりましたが、現状はWebSocket等に対応していないため、今回はFlaskを使用します。
目標としては以下のようなフロントの画面を表示して、sendボタンを押すとメッセージが送信されて、このページを開いている人全てにメッセージが届くようにするアプリケーションを作成していきます。

必要なモジュールのインストール
まずはアプリケーション開発に必要なモジュール類をインストールしていきます。requirements.txtに以下のファイルを記述していきます。
Flask==1.0.2
Flask-Sockets==0.2.1
gunicorn==19.9.0
gevent==1.4.0
gevent-websocket==0.10.1
requirements.txtが出来上がったら、pip installでモジュール類をインストールしていきましょう。
$ pip install -r requirements.txtFlask側の実装(サーバー側の実装)
それではサーバー側であるFlaskの実装を行っていきます。ファイル名をapp.pyとします。まずは必要だと思われるモジュール類をインポートしていきます。
# -*- coding: utf-8 -*-

import json
import datetime
import time

from gevent.pywsgi import WSGIServer
from geventwebsocket.handler import WebSocketHandler

from flask import Flask, request, render_template

app = Flask(__name__)
app.config.from_object(__name__)
URLエンドポイントは二つ用意します。WEBの画面部分であるhtmlのテンプレートを「/」から配信、「/pipe」でWebSocket部分を受け付けます。app.pyの続きに下記のコードを足してください。
@app.route('/')デコレーターが付いているとおり、pathが「/」のトップページの時に、indexメソッドが対応します。render_templateメソッドは、templatesディレクトリ内のファイルを指定し、そのhtmlファイルをレスポンスで返すメソッドです。
・/ - indexファイルを配信
・/pipe - websocketを受け付ける
# app.py

@app.route('/')
def index():
    return render_template('index.html')


@app.route('/pipe')
def pipe():
    if request.environ.get('wsgi.websocket'):
        ws = request.environ['wsgi.websocket']
        while True:
            time.sleep(1)
            message = ws.receive()
            if message is None:
                break
            datetime_now = datetime.datetime.now()
            data = {
                'time': str(datetime_now),
                'message': message
            }
            ws.send(json.dumps(data))
            print(message)
            print(data)
    return
単体でも動かせるように簡易的なWSGIミドルウェアを通せるようにします。これにより「python app.py」でも起動できるようになります。
以下のコードを見ればわかりますが、ホストは当然 localhostで動作するようにし、portは8080番ポートで動作させます。
app.pyファイルの一番上を見ればわかりますが、WSGIServerとWebSocketHandlerはgeventとgeventwebsocketモジュールからインポートしています。
# app.py

if __name__ == '__main__':
    app.debug = True

    host = 'localhost'
    port = 8080
    host_port = (host, port)

    server = WSGIServer(
        host_port,
        app,
        handler_class=WebSocketHandler
    )
    server.serve_forever()
app.pyの全体図は以下のようになっています。
# -*- coding: utf-8 -*-
import json
import datetime
import time

from gevent.pywsgi import WSGIServer
from geventwebsocket.handler import WebSocketHandler

from flask import Flask, request, render_template
app = Flask(__name__)
app.config.from_object(__name__)


@app.route('/')
def index():
   return render_template('index.html')


@app.route('/pipe')
def pipe():
   if request.environ.get('wsgi.websocket'):
       ws = request.environ['wsgi.websocket']
       while True:
           time.sleep(1)
           message = ws.receive()
           if message is None:
               break
           datetime_now = datetime.datetime.now()
           data = {
               'time': str(datetime_now),
               'message': message
           }
           ws.send(json.dumps(data))
           print(message)
           print(data)
   return


if __name__ == '__main__':
   app.debug = True

   host = 'localhost'
   port = 8080

   host_port = (host, port)
   server = WSGIServer(
       host_port,
       app,
       handler_class=WebSocketHandler
   )
   server.serve_forever()
HTML側の実装(フロント側の実装)
次にWEBフロント部分を作っていきます。最初はvue.jsなどを使ってリッチなフロントエンドでも作ろうと考えていましたが、苦戦したため普通のhtmlにしました。
同ディレクトリ上にtemplatesディレクトリを作り、その中にindex.htmlを作ります。treeコマンドでディレクトリ構成が以下のようになっているはずです。
$ tree
.
├── app.py
├── requirements.txt
└── templates
   └── index.html
それでは静的ファイルであるindex.htmlの中身を実装していきます。websocketは、localhost:8080/pipeで受けています。今回はCDN経由でJQueryを使用しています。
<html lang="ja">
    <head>
        <meta charset="UTF-8">
        <title>Document</title>
    </head>
    <body>
        <h1>websocket chat</h1>

        <input type="text" id="msg" value="> message"/>
        <button id="sendBtn">send</button>
        <ul id="rcv"></ul>
    </body>

    <script src="http://code.jquery.com/jquery-1.8.2.min.js"></script>
    <script type="text/javascript">
        var host = "ws://localhost:8080/pipe";
        var ws = new WebSocket(host);

        ws.onmessage = function(message){
            var message_data = JSON.parse(message.data);
            var time = message_data['time'];
            var message = message_data['message'];

            var string_txt = "[" + time + "] - " + message
            $("#rcv").append("<li>" + string_txt + "</li>")
        }

        $("#sendBtn").on("click",function(){
            message = $("#msg").val()
            ws.send(message);
        });
    </script>
</html>
buttonタグのsendボタンをクリックすると、以下のスクリプトが動作します。以下はJQueryのスクリプトで、idであるsendBtnがクリックされると、idがmsgのDOMのvalueを読み取って、ws.send()でwebsocketを受け付けるポートに送信しています。
$("#sendBtn").on("click",function(){
    message = $("#msg").val()
    ws.send(message);
});
python側のpipeメソッドが対応し、書き込んだmessageと書き込まれた時間が書き込まれたjson形式のデーターが、WEBページを開いている全体に送信されます。
その内容を読み取って、レスポンスのjsonをパースし、ulタグにliタグとして追加していきます。
ws.onmessage = function(message){
   var message_data = JSON.parse(message.data);
   var time = message_data['time'];
   var message = message_data['message'];
   var string_txt = "[" + time + "] - " + message
   $("#rcv").append("<li>" + string_txt + "</li>")
}
実際の動作
それでは実際に動作に問題がないか、動かしてみましょう。
上から順にやっていけば、以下のようなファイル構成になっているはずです。
$ tree
.
├── app.py
├── requirements.txt
└── templates
   └── index.html
以下のコマンドで実際にサーバーを動作させます。
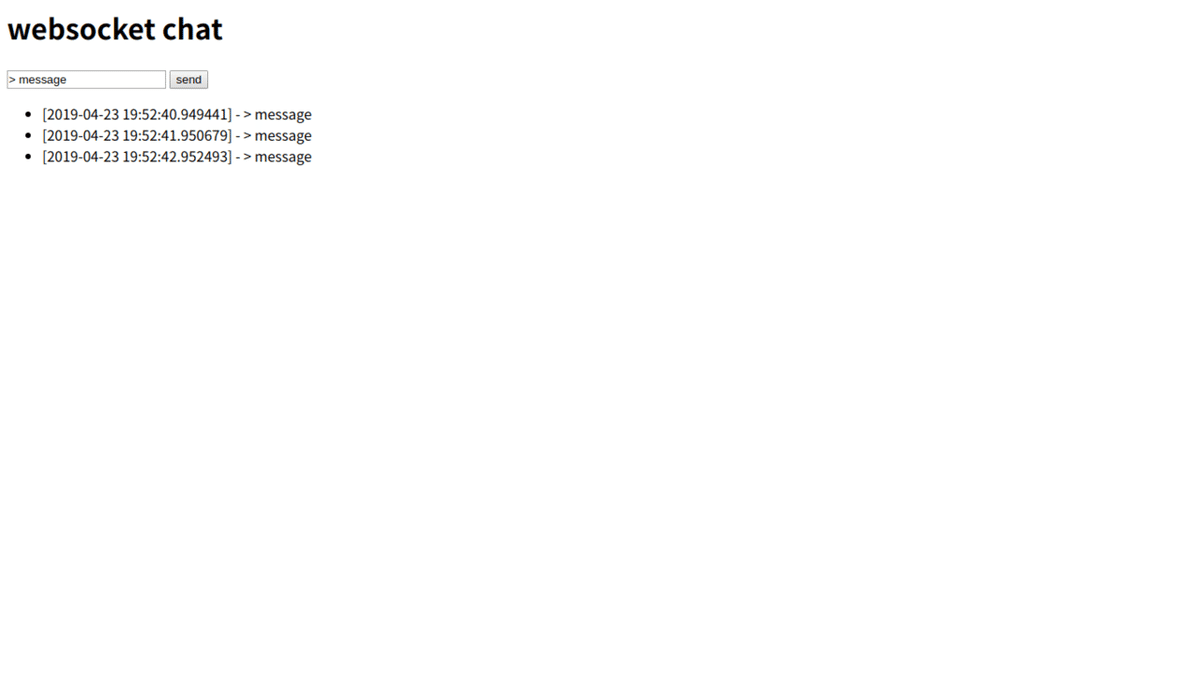
$ python app.pyデフォルトではlocalhostの8080番ポートを開けているため、「http://localhost:8080」にブラウザでアクセスします。以下のように表示されており、テキストエリアに文字列を入れてsendボタンをクリックし、時刻とテキストエリアに入れた文字列が表示されていれば成功です。websocket経由で文字列を拾って表示しています。
gunicorn経由で動作させる
上記では受け付けられるアクセス数などに制限があるため、本番環境などでも動作できるようにgunicorn経由で動作できるようにする必要があります
gunicornの使い方は以下のコマンドです。gunicornを動かすと、以下のようなものが表示されるはずです。
$ gunicorn app:app -b 0.0.0.0:8080
[2019-04-23 21:26:41 +0900] [32000] [INFO] Starting gunicorn 19.9.0
[2019-04-23 21:26:41 +0900] [32000] [INFO] Listening at: http://0.0.0.0:8080 (32000)
[2019-04-23 21:26:41 +0900] [32000] [INFO] Using worker: sync
[2019-04-23 21:26:41 +0900] [32003] [INFO] Booting worker with pid: 32003
しかし、これではwebsocketが使用できないため、動かすことができません。
gunicornのkオプションではworkerを指定することが可能です。どちらかのコマンドでwebsocketを使用してアプリケーションを立ち上げることが可能です。
$ gunicorn -k flask_sockets.worker -b 0.0.0.0:8080 app:app又はpip installでgeventとgevent-websocketを入れたため、以下のようにgeventwebsocketをworkerで動作させます。
$ gunicorn -k geventwebsocket.gunicorn.workers.GeventWebSocketWorker -b 0.0.0.0:8080 app:app問題なく動作できているはずです。
ソースコード自体はこちらのGitHubに載せておきます。次回はもう少し工夫うして、docker-compose上で動作させるような方法を紹介していきます。