Nuxt × TypeScript でTodoListとユーザ認証を実装してFirebase Hostingにデプロイ [Tutorial - Part 5/5 - ユーザ認証の追加]
概要
Nuxt×TypeScriptでTodoListを実装し、Firebase Hostingにデプロイするチュートリアルです。簡単なCRUD(Create, Read, Update, Delete)アプリを作成することで、NuxtとTypeScriptの概要を掴んでもらうことが目的です。
これまでの完成物は下記です。(サイトはしばらくしたら消すと思います。)
本Part5では、Firebase Auth を用いてユーザ認証機能を追加します。一旦、一番簡単なGoogleアカウント認証だけ実装します。完成物はこちらです。
1. firebase のライブラリを追加する
firebase のライブラリを追記して npm update を実行します。
# package.json (一部抜粋)
...
"dependencies": {
    "@nuxtjs/axios": "^5.3.6",
    "@nuxtjs/bulma": "^1.2.1",
    "@nuxtjs/pwa": "^2.6.0",
    "cross-env": "^5.2.0",
    "node-sass": "^4.5.2",
    "nuxt": "^2.4.0",
    "vuex-class": "^0.3.2",
    "nuxt-fontawesome": "^0.4.0",
    "@fortawesome/free-solid-svg-icons": "^5.8.1",
    "@fortawesome/fontawesome-svg-core": "^1.2.17",
    "@fortawesome/vue-fontawesome": "^0.1.6",
    "sass-loader": "^7.1.0",
    "ts-node": "^8.1.0",
    "vue-property-decorator": "^7.3.0",
    "firebase": "^5.11.1" #これを追加
  },
...
2. 認証情報を設定する。
Firebase Console の該当のプロジェクト (ここでは nuxt-ts-app-tkugimot ) のページを開くと、下記のような画面が開きます。

ここのアプリを追加をクリックし、更にウェブをクリックすると、下記のような認証情報が表示されます。
<script src="https://www.gstatic.com/firebasejs/5.11.1/firebase.js"></script>
<script>
  // Initialize Firebase
  var config = {
    apiKey: "******",
    authDomain: "nuxt-ts-app-tkugimot.firebaseapp.com",
    databaseURL: "******",
    projectId: "nuxt-ts-app-tkugimot",
    storageBucket: "******",
    messagingSenderId: "******"
  };
  firebase.initializeApp(config);
</script>
これを利用して plugins/ の下に firebase.ts を作成します。
# plugins/firebase.ts
import firebase from "firebase"

const config = {
  apiKey: process.env.apiKey,
  authDomain: process.env.authDomain,
  databaseURL: process.env.databaseURL,
  projectId: process.env.projectId,
  storageBucket: process.env.storageBucket,
  messagingSenderId: process.env.messagingSenderId
}
const googleProvider = new firebase.auth.GoogleAuthProvider()

export default !firebase.apps.length ? firebase.initializeApp(config) : firebase.app()
export { googleProvider }
ここで process.env.apiKey などと書いているのは、direnv というツールを用いて .envrc に環境変数として設定した値を用いているからです。ここに書いてある情報はファイルにベタで書いてしまっても良いようなのですが、この辺の情報をpublicにアクセス可能な状態にしておくのは若干怖かったので、念の為環境変数で管理することにしました。
direnv をインストールしていない方は、brew install direnv で入ります。プロジェクトのルートに .envrc という名前でファイルを作成し、export apiKey="***" などと書いて、direnv allow コマンドを打って反映します。
direnvについては任意なので、詳しい情報は僕が参考にしたページを引用させて頂きます。
3. ログインページの作成
bulmaのテンプレートから適当に引っ張って作成します。
# pages/login.vue
<template>
  <div>
      <section class="hero">
        <div class="hero-body">
            <div class="container has-text-centered">
                <div class="column is-4 is-offset-4">
                    <h3 class="title has-text-grey">Login</h3>
                    <div class="box">
                        <GoogleSignin />
                    </div>
                </div>
            </div>
        </div>
    </section>
  </div>
</template>

<script lang="ts">
import { Component, Vue } from 'vue-property-decorator';
import TodoList from '~/components/TodoList.vue';
import GoogleSignin from '~/components/GoogleSignin.vue';
import * as todos from '~/store/modules/todos';
import firebase from "~/plugins/firebase"
import { UserClass } from '../store/modules/userTypes';

@Component({
  components: {
    GoogleSignin
  }
})
export default class Login extends Vue {
  mounted() {
    this.$nextTick(() => {
      this.$nuxt.$loading.start();
      firebase.auth().onAuthStateChanged(async user => {
        if (user) {
          await this.$store.dispatch("users/setUser", new UserClass(true, user.displayName, user.email));
          this.$nuxt.$loading.finish()
          this.$router.push("/");
        } else {
          this.$nuxt.$loading.finish()
        }
      });
    });
  }
}
</script>
mounted() で、login ページが描画された段階でユーザがログイン状態であればホームにredirectします。
次に、GoogleSigninのコンポーネントを用意します。
# components/GoogleSignin.vue
<template>
  <a class="google-signin" @click="signInWithGoogleRedirect"></a>
</template>

<script lang="ts">
import { Component, Vue } from 'vue-property-decorator'
import firebase, { googleProvider } from "~/plugins/firebase"
import { namespace } from 'vuex-class';
import * as users from '~/store/modules/users';

const Users = namespace(users.name);
@Component
export default class GoogleSignin extends Vue {
  public signInWithGoogleRedirect () {
    firebase.auth().signInWithRedirect(googleProvider);
  }
}
</script>

<style scoped>
  a.google-signin {
    display: block;
    cursor: pointer;
    background-image: url(../assets/images/btn_google_signin_dark_normal_web.png);
    width: 191px;
    height: 46px;
    margin: 0 auto;
  }
</style>

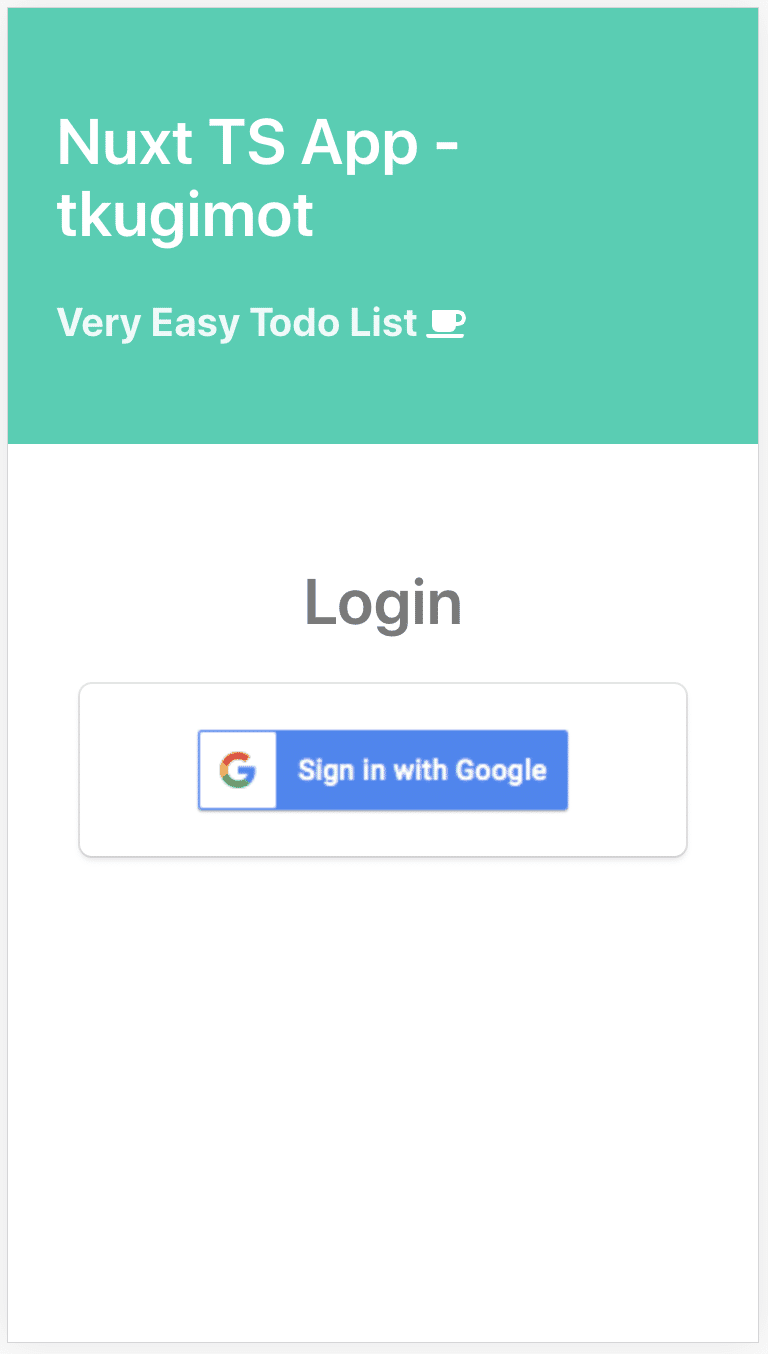
localhost:3000/login にアクセスすると、上のようなログイン画面が表示されるようになりました。これで一応、ログイン機能自体は作成できました。
4. User情報の保存
3まででは、ログインできたのかできてないのか分かりません。ログインが成功したら、ログイン中だと分かるように名前を表示するなどする必要があります。Todoの時と同じように、今回もUser情報をmoduleで管理します。
# modules/userTypes.ts
export interface User {
    isLoggedin: boolean
    displayName: string | null
    email: string | null
}

export class UserClass implements User {
    isLoggedin: boolean;
    displayName: string | null;
    email: string | null;

    constructor(isLoggedin: boolean, displayName: string | null, email: string | null) {
      this.isLoggedin = isLoggedin;
      this.displayName = displayName;
      this.email = email;
    }
}

export interface State {
    user: User
}
Userについては必要最小限の情報だけGoogleのUserInfoから取得します。displayName と email は nullable であるため、この型でも nullable で表現しています。
# modules/users.ts
import { RootState } from 'store'
import { GetterTree, ActionTree, ActionContext, MutationTree } from 'vuex';
import { User, UserClass, State } from './userTypes';

export const name = 'users';
export const namespaced = true;

export const state = (): State => ({
  user: new UserClass(false, "", "")
});

export const getters: GetterTree<State, RootState> = {
    user: state => {
        return state.user;
    }
}

export const types = {
    SETUSER: 'SETUSER',
}

export interface Actions<S, R> extends ActionTree<S, R> {
    setUser (context: ActionContext<S, R>, document): void
}

export const actions: Actions<State, RootState> = {
    setUser ({ commit }, user: User) {
        commit(types.SETUSER, user);
    },
}

export const mutations: MutationTree<State> = {
    [types.SETUSER] (state, user: User) {
        state.user = user;
    },
}
userを取得するgetter, userの状態を更新する action と mutation のみ定義します。状態を更新する時は action を呼び出しますが、その時は UserClass のコンストラクタで初期化したUserを渡してあげるようにします。
更に、ログイン時 -> loginページにアクセスできないように、未ログイン時 -> loginページにredirectするように、pluginを用意します。
# plugins/auth.ts

import firebase from "~/plugins/firebase"
import { UserClass } from "~/store/modules/userTypes";

export default ({ app, redirect, store, nuxtState, nextTick }) => {
  app.router.afterEach(async (to, from) => {
    await firebase.auth().onAuthStateChanged(async user => {
        if (user) {
            await store.dispatch("users/setUser", new UserClass(true, user.displayName, user.email))
            if (to.name === "login") {
                return new Promise((resolve) => {
                    redirect("/")
                })
            }
        } else {
            console.log("not loggedin");
            redirect("/login")
        }
    })
  })
}
また、ローディング中のデフォルトのプログレスバーが分かりづらかったので、カスタムのLoadingを用意します。
# components/loading.vue
<template>
  <div v-if="loading" class="loading-page">
    <p>Loading...</p>
  </div>
</template>

<script>
export default {
  data: () => ({
    loading: false
  }),
  methods: {
    start() {
      this.loading = true
    },
    finish() {
      this.loading = false
    }
  }
}
</script>

<style scoped>
.loading-page {
  position: fixed;
  top: 0;
  left: 0;
  width: 100%;
  height: 100%;
  background: rgba(255, 255, 255, 0.8);
  text-align: center;
  padding-top: 200px;
  font-size: 30px;
  font-family: sans-serif;
}
</style>
最後に、plugin と loading を反映させるために、nuxt.config.tsを修正します。
# nuxt.config.ts
import NuxtConfiguration from '@nuxt/config'

const config: NuxtConfiguration = {
  mode: 'spa',
  loading: '~/components/loading.vue', #これを追加
  head: {
    title: 'nuxt-ts-app-tkugimot',
    meta: [
      { charset: 'utf-8' },
      { name: 'viewport', content: 'width=device-width, initial-scale=1' },
      { hid: 'description', name: 'description', content: 'Nuxt TS project' }
    ],
    link: [{ rel: 'icon', type: 'image/x-icon', href: '/favicon.ico' }]
  },
  css: [
  ],
  modules: [
    '@nuxtjs/bulma',
    'nuxt-fontawesome'
  ],
  plugins: [ #これも追加
    { src: "~/plugins/auth.ts" }
  ],
  env: {
    apiKey: process.env.apiKey || "apiKey",
    authDomain: process.env.authDomain || "authDomain",
    databaseURL: process.env.databaseURL || "databaseUrl",
    projectId: process.env.projectId || "projectId",
    storageBucket: process.env.storageBucket || "storageBucket",
    messagingSenderId: process.env.messagingSenderId || "messagingSenderId"
  },
  fontawesome: {
    imports: [
      {
        set: '@fortawesome/free-solid-svg-icons',
        icons: ['fas']
      }
    ]
  }
}

export default config;
以上で終了です。
記事を書いていて思ったのですが、慣れていない技術分野について、自分でも調べつつだとかなり余計に時間がかかってしまいますね。終盤に近づくにつれてどんどん雑になってしまいました。
次は SpringBoot * Java で書くバックエンドについてもう少し実用的な内容を書きたいと考えていますが、ちょっと作りたいWebアプリがあるのでしばらく空きそうです。
この記事が気に入ったらサポートをしてみませんか?
