kintoneアプリにword帳票出力機能を自前で実装してみる!(前編)
kintoneアプリの拡張機能として、帳票を出力できるプラグインは結構多いですよね。
ただ、wordの帳票を出力できるプラグインが少ないんです!
プラグインがないなら自分で作ってしまえ!ということで、本記事ではword帳票出力機能をkintoneアプリに実装していきたいと思います。
前後編に分かれていますが、前編ではkintoneアプリからデータを取得しwordファイルを作成する方法をまとめます。
本記事はこんな方にお勧め!
・プログラミングの経験あり
・プラグインにお金を使いたくない人
・ないなら作ってしまえの精神の持ち主

開発環境
今回は下記環境で実装します。
・開発環境:node.js
・kintoneのデータ取得:kintone JS SDK
・Word出力:officegen
拡張機能実装の前にやっておくべき準備
まずは開発環境をインストールしましょう。下記コマンドを実行してください。
$ npm install --save @kintone/kintone-js-sdk
$ yarn add form-data
$ npm install officegen
$ yarn add fs
package.jsonは下記の通り編集してください。
"dependencies": {
 "@kintone/kintone-js-sdk": "^0.4.2",
 "form-data": "^2.5.1",
 "fs": "^0.0.1-security",
 "nodemon": "^1.19.2",
 "officegen": "^0.6.3"
}
ここまで完了したら、いよいよ実装していきましょう!まずは完成形をお見せしましょう。
Word出力機能の実装(完成形)
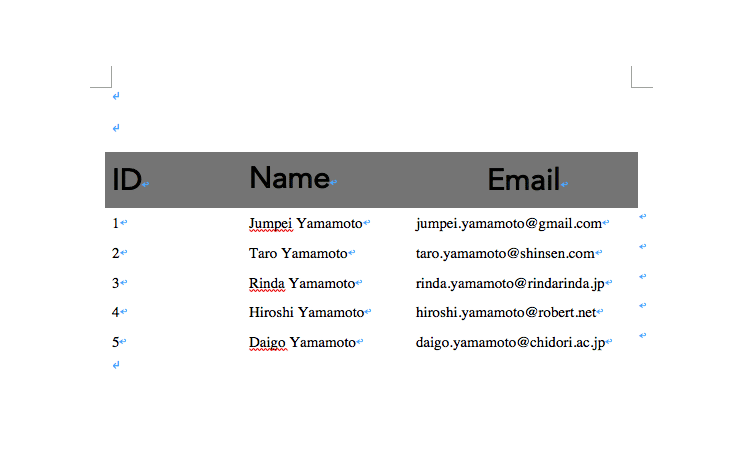
今回は、Wordに社員情報として社員ID、氏名、Emailを出力してみました。サンプルコードがこちらです。
var kintone = require('@kintone/kintone-js-sdk');
var officegen = require('officegen');
var fs = require('fs');

var domain = "xxx";
var APIToken = 'xxx';
var kintoneAuth = new kintone.Auth();
kintoneAuth.setApiToken(APIToken);
var kintoneConnection = new kintone.Connection(domain, kintoneAuth);
var kintoneRecord = new kintone.Record(kintoneConnection);

var appID = xxx; // target appID
kintoneRecord.getRecords(appID, "","",true)
.then((rsp) => {
 // Create an empty Word object:
 var docx = officegen('docx');

 // Officegen calling this function after finishing to generate the docx document:
 docx.on('finalize', function(written) {
   console.log('Finish to create a Microsoft Word document.');
 })

 // Officegen calling this function to report errors:
 docx.on('error', function(err) {
   console.log(err);
 })

 // Create a new paragraph:
 var pObj = docx.createP();


 // Outpput File Name
 var fileName = 'test.docx';
 var out = fs.createWriteStream(fileName);

 out.on('error', function(err) {
   console.log(err);
 });


 // Table
 var table = [
   [
     {
       val: "ID",
       opts: {
         cellColWidth: 4261,
         b:true,
         sz: '48',
         spacingBefor: 120,
         spacingAfter: 120,
         spacingLine: 240,
         spacingLineRule: 'atLeast',
         shd: {
           fill: "7F7F7F",
           themeFill: "text1",
           "themeFillTint": "80"
         },
         fontFamily: "Avenir Book"
       }
     },
     {
       val: "Name",
       opts: {
         cellColWidth: 4261,
         b:true,
         sz: '48',
         spacingBefor: 120,
         spacingAfter: 120,
         spacingLine: 240,
         spacingLineRule: 'atLeast',
         shd: {
           fill: "7F7F7F",
           themeFill: "text1",
           "themeFillTint": "80"
         },
         fontFamily: "Avenir Book"
       }
     },
     {
       val: "Email",
       opts: {
         cellColWidth: 4261,
         b:true,
         sz: '48',
         spacingBefor: 120,
         spacingAfter: 120,
         spacingLine: 240,
         spacingLineRule: 'atLeast',
         shd: {
           fill: "7F7F7F",
           themeFill: "text1",
           "themeFillTint": "80"
         },
         fontFamily: "Avenir Book"
       }
     }
   ],
 ]

 for(var i=0; i<rsp.records.length; i++){
   var data = [
     rsp.records[i].id.value, // 社員ID
     rsp.records[i].name.value, // 氏名
     rsp.records[i].email.value // Email
   ]
   table.push(data)
 }

 var tableStyle = {
   tableColWidth: 4261,
   tableSize: 48,
   tableColor: 'ada',
   tableAlign: 'left',
   tableFontFamily: 'Times',
   fontFamily: 10
 }
 docx.createTable (table, tableStyle);

 // Async call to generate the output file:
 docx.generate(out);
})
.catch((err) => {
 // The promise function always reject with KintoneAPIExeption
 console.log(err.get());
});
こちらのサンプルコードを実行すると、下記のようなWordファイルが作成されます。

では、少しずつ解説していきましょう。
kintoneアプリのレコード情報の取得
var kintone = require('@kintone/kintone-js-sdk');

var domain = "xxx"; // ドメイン名( https://xxx/k/#/portalのxxxの部分)
var APIToken = 'xxx'; // 対象アプリのAPIトークン(レコード閲覧権限)
var kintoneAuth = new kintone.Auth();
kintoneAuth.setApiToken(APIToken);
var kintoneConnection = new kintone.Connection(domain, kintoneAuth);
var kintoneRecord = new kintone.Record(kintoneConnection);

var appID = xxx; // 対象となるアプリのアプリID
kintoneRecord.getRecords(appID, "","",true)
.then((rsp) => {
 // Success
 console.log("record_no = " + rsp.records[0].$id.value);
})
.catch((err) => {
 // The promise function always reject with KintoneAPIExeption
 console.log(err.get());
});
今回はAPIトークン認証を行い、kintoneのレコード情報を取得しています。対象アプリに登録されているレコードを全て取得する内容となっていますが、クエリを書く場合は、
var query = xxx;
kintoneRecord.getRecords(appID, query,"",true)
こちらのように書き替えてください。
officegenを用いたテーブル出力
 // Table
 var table = [
   [
     {
   }    val: "ID",
       opts: {
         cellColWidth: 4261,
         b:true,
         sz: '48',
         spacingBefor: 120,
         spacingAfter: 120,
         spacingLine: 240,
         spacingLineRule: 'atLeast',
         shd: {
           fill: "7F7F7F",
           themeFill: "text1",
           "themeFillTint": "80"
         },
         fontFamily: "Avenir Book"
       }
     },
     {
       val: "Name",
       opts: {
         cellColWidth: 4261,
         b:true,
         sz: '48',
         spacingBefor: 120,
         spacingAfter: 120,
         spacingLine: 240,
         spacingLineRule: 'atLeast',
         shd: {
           fill: "7F7F7F",
           themeFill: "text1",
           "themeFillTint": "80"
         },
         fontFamily: "Avenir Book"
       }
     },
     {
       val: "Email",
       opts: {
         cellColWidth: 4261,
         b:true,
         sz: '48',
         spacingBefor: 120,
         spacingAfter: 120,
         spacingLine: 240,
         spacingLineRule: 'atLeast',
         shd: {
           fill: "7F7F7F",
           themeFill: "text1",
           "themeFillTint": "80"
         },
         fontFamily: "Avenir Book"
       }
     }
   ],
 ]

 for(var i=0; i<rsp.records.length; i++){
   var data = [
     rsp.records[i].id.value, // 社員ID
     rsp.records[i].name.value, // 氏名
     rsp.records[i].email.value // Email
   ]
   table.push(data)
 }
officegenを用いることで、フォントやサイズなど、細かく指定が可能になります。作成したいフォーマットに合わせて、適宜修正してください。
Word帳票作成機能の実装まとめ(前編)
前編では、node.js・kintone JS SDK・officegenを用いて、kintoneアプリに登録されているレコード情報をWordに出力する方法についてまとめました。
次回は生成されたファイルをkintoneアプリにアップロードする方法について執筆したいと思います。

1987年生まれ。慶應義塾大学大学院を修了後、キャリアコンサルティング・IoTコンサルティング・新規事業立ち上げなど幅広い業務に携わる。2019年にワークログ株式会社創業。現神奈川県庁DX推進アドバイザー。 https://www.worklog-inc.com/
