MapleSimでマルチボディ入門#2

今回はMapleSimのマルチボディブロックを使って図1のようなボールのバウンドシミュレーションをしてみましょう。

図1 ボールのバウンド
ブロックの配置
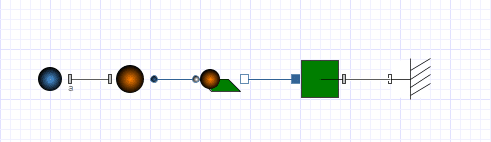
まず、図2のように5つのブロックを配置します。
ボディフレームの中なの「Fixed Frame」、機械要素の中の「Ball」
接触の中の要素にある「Sphere」と「Rectangle」、接触の中の要素にある「Sphere Rectangle Contact」を配置して図2のように結線します。
ブロックの設定
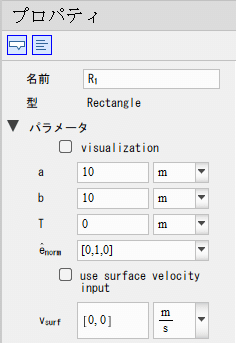
「Rectangle」の設定
図3のように設定します。aとbを共に10[m]とします。要するに縦横10[m]の板にします。面をx-y平面と設定するため、e[norm]を[0, 1, 0]と設定します。
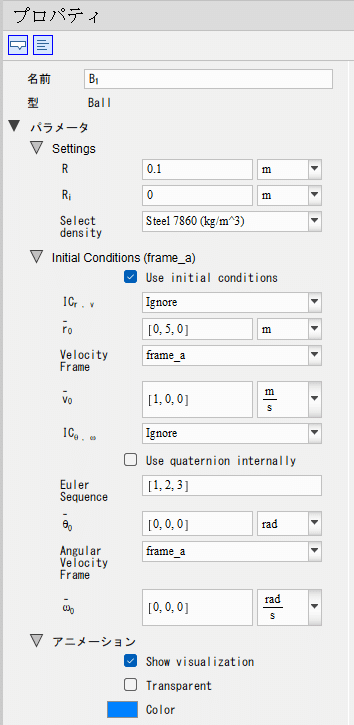
「Ball」の設定
use initial conditionsのチェックを付けます。
r0の値を[0, 5, 0]として高さ5[m]のところを初期位置にします。
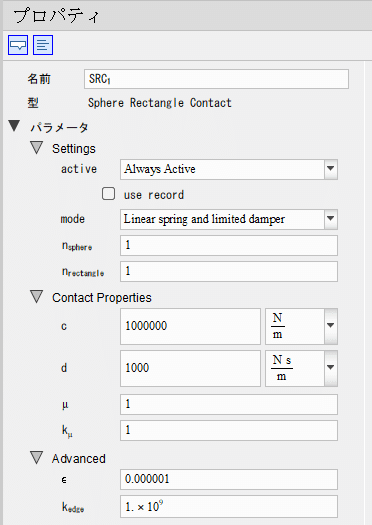
「Sphere Rectangle Contact」の設定
Contact Propertiesの「c」を1000000[N/m]、「d」を1000[Ns/m]に設定します。これをいろいろと変えると反射の仕方が変わりますので、試してみましょう!
なお、「Sphere」の設定はデフォルトのままとします。
シミュレーション実行
シミュレーションを実行すると図5のような結果(アニメーション)になります。
もう少し改造して遊んでみよう!
「Ball」のx方向の速度を1[m/s]にしてみます。
図6のようにv0を[1, 0, 0]にします。
設定を変えてからシミュレーションを実行すると図7のようにx方向に進みながらバウンドしていのがわかります。

ボールの軌道を見てみたいので可視化してみましょう。
可視化の中の「Path Trace」を配置して図8のように結線します。
シミュレーションを実行すると図9のようにボールの軌道が可視化されます。


今回はここまで。
今後もちょっとしたTIPSを思いついたら作っていこうと思います。
【English】
In this article, we will use MapleSim's multi-body block to simulate a ball bouncing as shown in Figure 1.
Figure 1. Ball bouncing
Block Layout
First, five blocks are placed as shown in Figure 2. "Fixed Frame" in the body frame, "Ball" in the machine element, "Sphere" and "Rectangle" in the element in contact, and "Sphere Rectangle Contact" in the element in contact are placed and connected as shown in Figure 2.
Block Settings
"Rectangle" Setting
Set up as shown in Figure 3, where "a" and "b" are both 10[m]. In short, make the board 10[m] in length and width. To set the plane as x-y plane, set e[norm] to [0, 1, 0].
"Ball" Setting
Check the "use initial conditions" checkbox. r0 is set to [0, 5, 0] to set the initial position at a height of 5[m].
"Sphere Rectangle Contact" Setting
In Contact Properties, set "c" to 1000000[N/m] and "d" to 1000[Ns/m]. Changing this in various ways will change the bouncing, so experiment!
Note that the "Sphere" setting is left as the default.
Simulation
When the simulation is run, the result (animation) is shown in Figure 5.
Let's play with a few more modifications!
Let's set the velocity of the "Ball" in the x-direction to 1[m/s]. Set v0 to [1, 0, 0] as shown in Figure 6.
After changing the settings and running the simulation, you can see that it bounces while advancing in the x direction as shown in Figure 7.
We want to see the trajectory of the ball, so let's visualize it. Place the "Path Trace" in the visualization and connect the wires as shown in Figure 8. When we run the simulation, the path of the ball is visualized as shown in Figure 9.
That's all for this article. I will continue to make little TIPS as I think of them.
【Sample Model】
Created by MapleSim 2023
この記事が気に入ったらサポートをしてみませんか?