【Cloud Run, Nextjs】デプロイまでの流れ

概要
この記事はCloud Run、Nextjsを使用してアプリをカスタムドメインにマッピングしデプロイする手順の備忘録用でざっくりまとめています。
1. Nextjsアプリの作成
Nextjsアプリを作成する。Cloud Runでデプロイする際にDockerfileが必要なので、Dockerfileを作成する。テンプレートを使用する場合は以下のコマンドでアプリを作成する。
npx create-next-app --example with-docker nextjs-docker
# or
yarn create next-app --example with-docker nextjs-docker
# or
pnpm create next-app --example with-docker nextjs-docker
詳細は以下のリンク先に記載されています。
https://github.com/vercel/next.js/tree/canary/examples/with-docker
既存のアプリがある場合は、Dockerfileをルートディレクトリに配置しても問題ないです。Dockerfileのテンプレートは下記を参考にしてください。
https://github.com/vercel/next.js/blob/canary/examples/with-docker/Dockerfile
FROM node:18-alpine AS base

# Install dependencies only when needed
FROM base AS deps
# Check https://github.com/nodejs/docker-node/tree/b4117f9333da4138b03a546ec926ef50a31506c3#nodealpine to understand why libc6-compat might be needed.
RUN apk add --no-cache libc6-compat
WORKDIR /app

# Install dependencies based on the preferred package manager
COPY package.json yarn.lock* package-lock.json* pnpm-lock.yaml* ./
RUN \
  if [ -f yarn.lock ]; then yarn --frozen-lockfile; \
  elif [ -f package-lock.json ]; then npm ci; \
  elif [ -f pnpm-lock.yaml ]; then yarn global add pnpm && pnpm i --frozen-lockfile; \
  else echo "Lockfile not found." && exit 1; \
  fi


# Rebuild the source code only when needed
FROM base AS builder
WORKDIR /app
COPY --from=deps /app/node_modules ./node_modules
COPY . .

# Next.js collects completely anonymous telemetry data about general usage.
# Learn more here: https://nextjs.org/telemetry
# Uncomment the following line in case you want to disable telemetry during the build.
# ENV NEXT_TELEMETRY_DISABLED 1

RUN yarn build

# If using npm comment out above and use below instead
# RUN npm run build

# Production image, copy all the files and run next
FROM base AS runner
WORKDIR /app

ENV NODE_ENV production
# Uncomment the following line in case you want to disable telemetry during runtime.
# ENV NEXT_TELEMETRY_DISABLED 1

RUN addgroup --system --gid 1001 nodejs
RUN adduser --system --uid 1001 nextjs

COPY --from=builder /app/public ./public

# Set the correct permission for prerender cache
RUN mkdir .next
RUN chown nextjs:nodejs .next

# Automatically leverage output traces to reduce image size
# https://nextjs.org/docs/advanced-features/output-file-tracing
COPY --from=builder --chown=nextjs:nodejs /app/.next/standalone ./
COPY --from=builder --chown=nextjs:nodejs /app/.next/static ./.next/static

USER nextjs

EXPOSE 3000

ENV PORT 3000
# set hostname to localhost
ENV HOSTNAME "0.0.0.0"

# server.js is created by next build from the standalone output
# https://nextjs.org/docs/pages/api-reference/next-config-js/output
CMD ["node", "server.js"]
また、next.config.jsに下記のように output: 'standalone' オプションを設定してください。
/** @type {import('next').NextConfig} */
const nextConfig = {
  output: 'standalone',
  reactStrictMode: true,
  swcMinify: true,
}

module.exports = nextConfig
2. GitHubリポジトリの作成
作成したアプリをGitHubのリポジトリにpushします。
3. Cloud Runでデプロイ
Cloud Runの設定方法は以下の記事等でまとめられているので、そちらを参考にしてください。
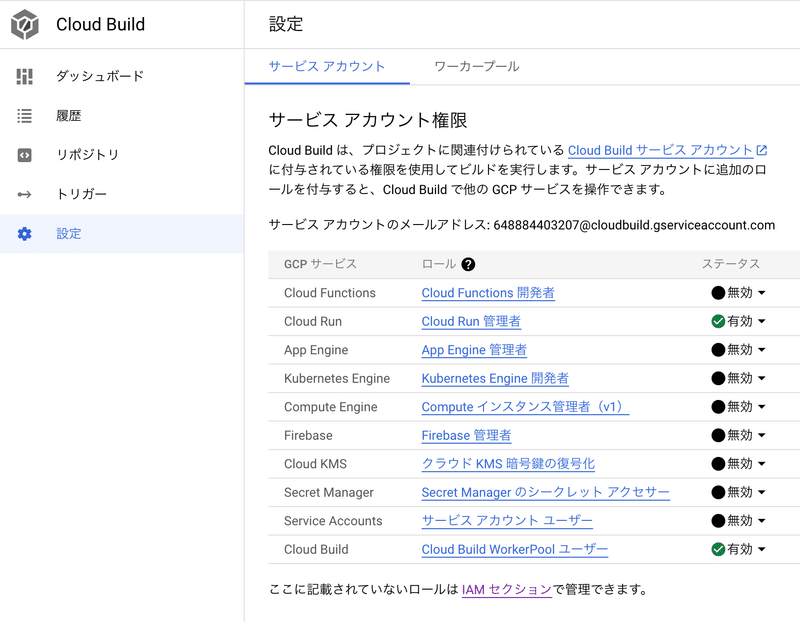
注意点として、Identity and Access Management (IAM) APIの有効化をしていない場合、ビルド時に権限エラーになります。
また、以下のようにCloud Build>設定からCloud RunとCloud Buildのステータスも有効にします。
この記事が気に入ったらサポートをしてみませんか?