[Flutter]同じデザインをコンポーネント化しよう!

本日やること
画像で確認
下記の画像をみてください。
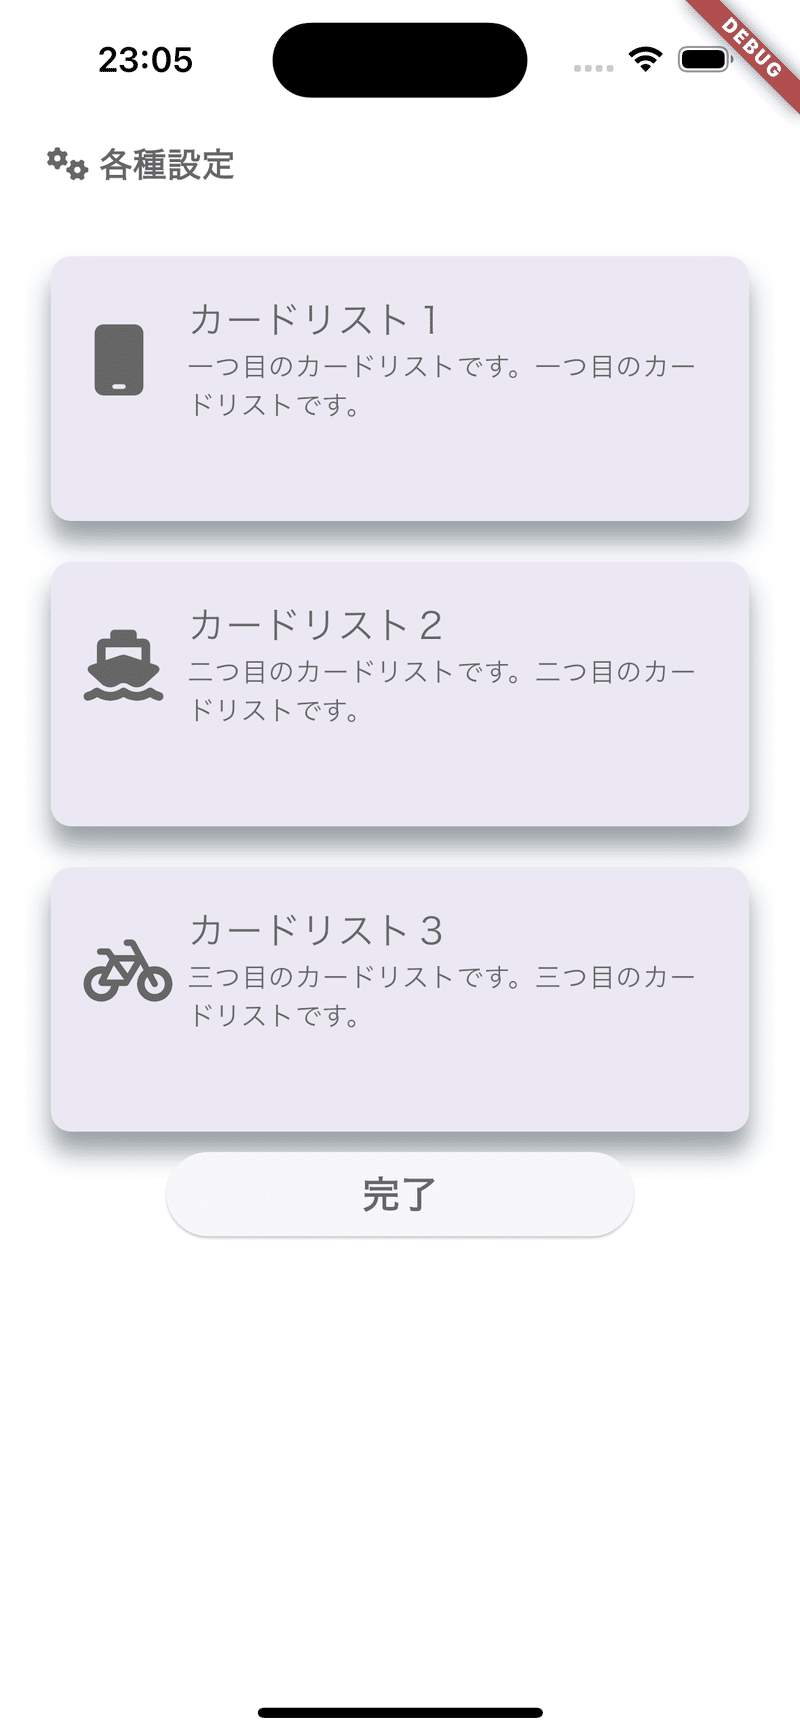
あ、「23:05とか夜更かししてんな〜。」ではなくて、同じ形をしたカードリストが3つ並んでる方です。
今回やることを確認
このような同じ形をしたデザインは、ほぼ同じようなコードで書かれています。違うのは、アイコン、タイトル、サブタイトル、そしてカードをタップ時のメソッドの4つです。
この場合は、一つのフォーマットを用意して、中身だけ変えらるようにした方が、スッキリしていて見やすいですし、デザインの色合いが変わっても一括で変更できるのでやるべきです。
このまとめることを、コンポーネント化やウィジェットの再利用と呼んだりします。
今回はその方法をお伝えします。👏
カードリスト1のコードを見てみる
コードは下記のようになります。カードリスト2も3も同じ作りとなっていて、変わっているのは、アイコン、タイトル、サブタイトル、タップ時のメソッドの4つです。
    Container(
        color: Colors.white.withOpacity(0),
        height: 150,
        width: 400,
        child: Card(
          color: Colors.white,
          shadowColor: Colors.blueGrey,
          shape: RoundedRectangleBorder(
            borderRadius: BorderRadius.circular(10.0),
          ),
          elevation: 10.0,
          margin: const EdgeInsets.symmetric(
            vertical: 10.0,
            horizontal: 25.0,
          ),
          child: InkWell(
            splashColor: Colors.blue.withAlpha(30),
            onTap: () async {},  //ここが1、2、3のリストで違う挙動になるはずだよ!
            child: const Column(
              children: [
                SizedBox(
                  height: 10.0,
                ),
                ListTile(
                  leading: Icon(
                    FontAwesomeIcons.mobile, //ここが1、2、3のリストで違うよ!
                    size: 35,
                    color: Colors.black54,
                  ),
                  title: Text(
                    'カードリスト1', //ここが1、2、3のリストで違うよ!
                    style: TextStyle(
                      fontSize: 18.0,
                      color: Colors.black54,
                    ),
                  ),
                  subtitle: Text(
                    '一つ目のカードリストです。一つ目のカードリストです。', //ここが1、2、3のリストで違うよ!
                    style: TextStyle(
                      fontSize: 13.0,
                      color: Colors.black54,
                    ),
                  ),
                )
              ],
            ),
          ),
        ),
      ),
コンポーネント化する順序を把握しよう
ステップとしては5つ
コンポーネント化するためのファイルを作成する
必要なファイルを作成し、プロジェクト構造を整理。
コンポーネント化するクラスを作成する
特定の機能やUI要素を持つカスタムコンポーネントのクラスを定義。
変更する部分をプロパティ化する
変更が予想される部分(テキスト、色、アイコンなど)をプロパティとして外部から設定できるようにする。
そのクラスを呼び出してみる
作成したカスタムコンポーネントを実際に使用する。
プロパティ化した所を設定する
プロパティに具体的な値を設定する。
1.コンポーネント化する為のファイルを作成
まずは、ファイルを作ります。僕は、こんな感じでファイルを分けています。
よければ、参考にしてくださいませ。
test_page.dartが、最初の画像で見せたページになります。
card_list.dartに、コンポーネント化するクラスを書いていきます。
lib
 ┣━ main.dart
  ┣━ ui
      ┣━ test
         ┣━ widgets
         ┃     ┗━ card_list.dart
                  ┣━ test_page.dart
2.コンポーネント化するクラスを作成する
次に、クラスを書いていきます。
先ほどのカードリストのコードをそのままコピペで問題ありません。
タップ時の挙動も考える為、StatefulWidgetで書きます。
下記がコードになります。
import 'package:flutter/material.dart';
import 'package:font_awesome_flutter/font_awesome_flutter.dart';

class CardList extends StatefulWidget {
  const CardList({super.key});

  @override
  State<CardList> createState() => _CardListState();
}

class _CardListState extends State<CardList> {
  @override
  Widget build(BuildContext context) {
    return Container(
      color: Colors.white.withOpacity(0),
      height: 150,
      width: 400,
      child: Card(
        color: Colors.white,
        shadowColor: Colors.blueGrey,
        shape: RoundedRectangleBorder(
          borderRadius: BorderRadius.circular(10.0),
        ),
        elevation: 10.0,
        margin: const EdgeInsets.symmetric(
          vertical: 10.0,
          horizontal: 25.0,
        ),
        child: InkWell(
          splashColor: Colors.blue.withAlpha(30),
          onTap: () async {},
          child: const Column(
            children: [
              SizedBox(
                height: 10.0,
              ),
              ListTile(
                leading: Icon(
                  FontAwesomeIcons.mobile,
                  size: 35,
                  color: Colors.black54,
                ),
                title: Text(
                  'カードリスト1',
                  style: TextStyle(
                    fontSize: 18.0,
                    color: Colors.black54,
                  ),
                ),
                subtitle: Text(
                  '一つ目のカードリストです。一つ目のカードリストです。',
                  style: TextStyle(
                    fontSize: 13.0,
                    color: Colors.black54,
                  ),
                ),
              )
            ],
          ),
        ),
      ),
    );
  }
}
3.変更する部分をプロパティ化
プロパティとするのは、先ほども記載したように、4つです。
・アイコン
・タイトル
・サブタイトル
・タップ時のメソッド
下記のコードのように、コンストラクタ、インスタンスを作成します。
class CardList extends StatefulWidget {
  const CardList({
    super.key,
    required this.onTap,
    required this.icon,
    required this.mainText,
    required this.subText,
  });

  final Future<void> Function() onTap;
  final IconData icon;
  final String mainText;
  final String subText;

  @override
  State<CardList> createState() => _CardListState();
}
プロパティ化できたので、対応する場所に設定していきましょう。
変更前
        child: InkWell(
          splashColor: Colors.blue.withAlpha(30),
          onTap: () async {},
ListTile(
leading: Icon(
FontAwesomeIcons.mobile,
size: 35,
color: Colors.black54,
),
title: Text(
'カードリスト1',
style: TextStyle(
fontSize: 18.0,
color: Colors.black54,
),
),
subtitle: Text(
'一つ目のカードリストです。一つ目のカードリストです。',
style: TextStyle(
fontSize: 13.0,
color: Colors.black54,
),
),
)
変更後
child: InkWell(
splashColor: Colors.blue.withAlpha(30),
onTap: widget.onTap, //ここ!! ListTile(
leading: Icon(
widget.icon, //ここ!!
size: 35,
color: Colors.black54,
),
title: Text(
widget.mainText, //ここ!!
style: TextStyle(
fontSize: 18.0,
color: Colors.black54,
),
),
subtitle: Text(
widget.subText, //ここ!!
style: TextStyle(
fontSize: 13.0,
color: Colors.black54,
),
),
)4.クラスを呼び出す
では、test_page.dartで、上記のCardListクラスを呼び出しましょう。
import 'widgets/card_list.dart';5.プロパティ化した所を、それぞれ設定
カードリストのところを、CardListウィジェットに差し替えましょう。
CardListウィジェットを挿入すると、requiredに設定しているプロパティが入力されます。
CardList(onTap: onTap, icon: icon, mainText: mainText, subText: subText),設定したプロパティに値を入れていきましょう。
CardList(
onTap: () async {},
icon: FontAwesomeIcons.mobile,
mainText: 'カードリスト1',
subText: '一つ目のカードリストです。一つ目のカードリストです。',
),CardList(
onTap: () async {},
icon: FontAwesomeIcons.ship,
mainText: 'カードリスト2',
subText: '二つ目のカードリストです。二つ目のカードリストです。',
),CardList(
onTap: () async {},
icon: FontAwesomeIcons.bicycle,
mainText: 'カードリスト3',
subText: '三つ目のカードリストです。三つ目のカードリストです。',
),これで完成です!
完成!比較してみよう
それでは、変更前と変更後のコードを見てみましょう!
変更前(最初に提示したコードです)
Container(
color: Colors.white.withOpacity(0),
height: 150,
width: 400,
child: Card(
color: Colors.white,
shadowColor: Colors.blueGrey,
shape: RoundedRectangleBorder(
borderRadius: BorderRadius.circular(10.0),
),
elevation: 10.0,
margin: const EdgeInsets.symmetric(
vertical: 10.0,
horizontal: 25.0,
),
child: InkWell(
splashColor: Colors.blue.withAlpha(30),
onTap: () async {},
child: const Column(
children: [
SizedBox(
height: 10.0,
),
              ListTile(
                leading: Icon(
                  FontAwesomeIcons.mobile,
                  size: 35,
                  color: Colors.black54,
                ),
                title: Text(
                  'カードリスト1',
                  style: TextStyle(
                    fontSize: 18.0,
                    color: Colors.black54,
                  ),
                ),
                subtitle: Text(
                  '一つ目のカードリストです。一つ目のカードリストです。',
                  style: TextStyle(
                    fontSize: 13.0,
                    color: Colors.black54,
                  ),
                ),
              )
],
),
),
),
),変更後
CardList(
  onTap: () async {},
  icon: FontAwesomeIcons.mobile,
  mainText: 'カードリスト1',
  subText: '一つ目のカードリストです。一つ目のカードリストです。',
),これでスッキリしましたね!
この記事が気に入ったらサポートをしてみませんか?