シンプルAPIで構築したStable-Diffusion SDXL専用の画像生成サーバーを公開(全コード公開)-1

前回の記事で作成したDiffusersPipelieManagerを使い、FastAPIでラップして画像生成サーバを構築しました。DiffusersPipelineManagerはSDXLモデル専用のDiffusersクラスで構成されています。SDXL特有の処理や、画像関係の事前準備などのユーティリティクラスも提供しており、FastAPIと組み合わせることで、クライアント側で煩雑なDiffusersのpipeline手続きを省略出来ます。連載2回の記事として、第1回目はコードの説明と簡単な使い方を記事にしました。次回第2回目は各パラメータによる生成画像の変化や、SDXLが持つ2つのtokenizerと text encoderによる自然言語プロンプトの効果などについて解説する予定です。
動作環境
ハードウエア
SDXLは比較的大きなモデルです。GPUは性能が高いものをご使用ください。LCM対応なので中級機程度の性能があれば生成速度が遅く感じることは無いと思います。基本的にCPUの性能は必要としませんが、numpyを動かすのでAVX命令が実行できるCore-i3以上が必要です。
最低ライン
CPU Corei 3 以上
GPU 3060-12G 以上 推奨:4060-16G/4070ti-Super16G
MEM 16G 以上
開発と検証で用いたPCのSPEC
CPU Core i5-13600K
MEM 32G
GPU RTX4090
サーバー側環境
Python,CUDAとPyTorchが事前インストールされたLinux(Ubuntu20.04)
Python 3.10
CUDA12.2
PyTorch 2.20
Diffusers関連
Diffusers 0.25.0
SDXLモデル
Compel
OpenCV
Openpose
PEFP
pip install torch torchvision torchaudio
pip install -q diffusers transformers accelerate omegaconf
pip install compel --upgrade
pip install opencv-python
pip install -q controlnet-aux
pip install peft
その他
FastAPI
Pillow
numpy
クライアント側
ほとんどの処理をサーバで行うのでクライアント側は画像を扱えるpillowが必要な程度です。サーバアクセスのためのrequestはPython標準モジュールです。
Python 3.9以上
Pillow
DiffusersPipelineManagerについて
DiffusersPipelineManagerはSDXLモデル専用のDiffusersクラスで、この記事の1つ前の記事でコードを公開しています。
利用できるクラス
pipeline_init()
→pipelineの初期化とCUDAへのロード
prompt_embedding()
→Compelを用いたプロンプトの重み付けとエンベデッド
load_image_img()
→イメージのロード
get_canny()
→Cannyイメージの作成
get_openpose()
→openpose画像の作成
get_depth_map()
→Depthマップ画像の作成
generate()
→t2i/i2/inpaint用画像生成
generate_controlnet()
→ContorolNet用画像生成
generate_t2a_adapter()
→T2A-Adapter用画像生成
各クラスのパラメータは前記事を参照ください。今回のAPIサーバが内部で利用しているだけなので、クライアントから直接呼び出せるわけではないのですが、DiffusersPipelineManagerが何が出来るかをご理解いただくために全クラスを列挙しています。
FastAPIによるAPI提供と画像サーバ
APIサーバ全体のコードは最後に記載しています。
DiffusersPipelineManagerクラスを初期化して各クラスを利用しながら、クライアント側でDiffusers関係の負担が無いよう、FastAPIエンドポイント内にコードを追加しています。主な追加点は以下のとおり。
1)piplelineの指定を文字列にしてサーバ側で判別しgeneraterに渡す
2)Compelによるプロンプトウエイト/エンべデッドはサーバ側で処理
3)受信後画像の適切なフォーマットへの変換(load_imageが使えない)
4)seed生成方法の指定
5)pipelineの種類に依存しないシームレスなgenerate-APIクラスの提供
pipelineの初期化
pipelineの初期化はクライアントが独自に行うことも出来ないわけでは無いですが、複数クライアントが利用することも考慮すると、サーバ側で固定するしかありません。今回のコードではpipelineの初期化で使用するモデルや各LoRAについて、ハードコードしています。少し改造すればサーバ起動時のコマンドライン引数から取得することも可能です。SDXLモデルはVRAMを多く専有します。ロード出来るpipeline数はVRAM容量次第です。
t2i/i2i/inpaintについてはpipelineの共用が出来るので3種類を同時に初期化して問題はありません。一方でContorolNETは各々の生成方式毎にpipelineが異なるので厄介です。なお、LCM無効のpipelineのロードも可能ですが、生成時間が長くなるので現実的ではないと思います。ただしLCM無効でないと動かないDiffusersの機能があるこてゃ事実です。
VRAM占有はstable-diffusion-xl-base-1.0モデルで概ね7.7GByte弱なので、ContorolNET追加毎に同様のVRAMが必要になります。16G-VRAMですと1つのContoroleNET用piplineの追加ロードがギリギリです。
注意)初期化で使用するモデルはあらかじめダウンロードしているモデルです。自動ダウンロード仕様に変更するためにはfrom_single_fileを へ変更すれば可能です。T2Aに関しては自動ダウンロードされます。
画像のアップロード
t2iを除く全ての生成方法で何らかの画像アップロードが必要です。アップロードする画像の形式はPillowに統一してコードの簡素化をしました。Diffusersではload_image()が提供されていて、様々な形式の画像をpipelineで利用できる画像に変換してくれます。しかし、クライアントからload_image()を呼び出すと、再度generationでアップロードすることになるので、シンプルに画像形式を固定しています。サーバ側ではRGBA→RGB変換だけは行ってRGBA形式画像入力時のエラーを回避しています。
canny、depth、openpose(画像→棒人間変換)画像の取得
Diffusersで準備されている変換をDiffusersPipelineManagerでも提供しているので、各変換用のAPIを準備しています。生成された画像は一旦、クライアント側へ戻します。その後クライアント側はgenerationを呼ぶときに生成された各画像を画像入力として指定します。cannyの変換例。
image_file_path="MIKU.png"
file_data = open(image_file_path, "rb").read()
files={ "image": ("img.png", BytesIO(file_data), "image/png"),}
data= {"low_threshold":100,"high_threshold":200, }
# POSTリクエストを送信
url = 'http://0.0.0.0:8000/get_canny/'
response = requests.post(url, data=data ,files=files)
print(response)
# レスポンスを表示
if response.status_code == 200:
    print("get data OK")
    image_data = response.content
    canny_image=(pickle.loads(image_data)) #元の形式にpickle .loadsで復元
    #canny_image .show()
    # 画像をバイトデータに変換
    image_bytes = io.BytesIO()
    canny_image.save(image_bytes , format="PNG")
    canny_image_bytes = image_bytes.getvalue()
画像の生成
生成に必要な全てのパラメータを受け取ることができるgenerate-APIクラスを準備しています。pipeline以外のパラメータは省略可能でデフォルト値が利用されますが、生成方式毎に最適なパラメータは異なるので、サンプルテストプログラムに従い、多少の設定は行ってください。以下、generate-APIクラスのパラメータ受け取り部分です。
pipeline: str = Form(...),となっていて、pipelineのみ必須であることがわかります。
@app.post("/generate/")
def generate(
    pipeline: str = Form(...),
    image: UploadFile = File(None),
    mask_image: UploadFile =  File(None),
    embe:bool =  Form(False),
    prompt_embe:list =  Form(None),
    prompt_embe0:str =  Form(None),
    prompt_embe1:str =  Form(None),
    prompt:str = Form(None),
    negative_prompt:str = Form(None),
    num_inference_steps:int =Form(4),
    strength:float = Form(0.1),
    guidance_scale:float = Form(1.0),
    seed:int= Form(0),
    auto_seed:bool = Form(True),
    height :int= Form(None),
    width:int = Form(None),
    num_images_per_prompt:int = Form(1),
    guess_mode:bool = Form(None),
    freeu:bool = Form(False),
    output_type:str = Form("pil"),
    crops_coords_top_left:list = Form([0,0]),
    controlnet_conditioning_scale:float = Form(1.0),
    adapter_conditioning_scale:float=Form(None),
    adapter_conditioning_factor:int=Form(None),
    ):
多くのパラメータがあることがわかります。画像データはfilesで受け取りパラメータはForm()で受け取ります。pipeline以外のパラメータは初期値が設定されているので省略可能です。
各パラメータの意味は以下の通り。生成時に設定出来るオプションです。
pipeline: str = Form(...)
利用するpipeを指定。必ず指定しなければならない。
”t2i"/"pipe_i2i"/"pipe_inpaint"/"canny"/"openpose"/"depth"/"t2i_adapter"
を指定できます。
image: UploadFile = File(None),
入力イメージを指定する。パスではなくPillowイメージオブジェクト
mask_image: UploadFile = File(None),
インペイントなどのマスクイメージを指定。パスではなく
Pillowイメージオブジェクト
embe:bool = Form(False),
プロンプトエンべデッディング有効・無効。
有効時はCompelによるエンべディングを行う。
プロンプト中でウエイト指定も可能
prompt_embe:list = Form(None),
利用していない。(Compelを使わないエンベデッド模索中)
prompt_embe0:str = Form(None),
Compelで使うプロンプト0
prompt_embe1:str = Form(None),
Compelで使うプロンプト1
prompt:str = Form(None),
プロンプト 文章も使えます。ただし英語のみ
negative_prompt:str = Form(None),
ネガティブプロンプト
num_inference_steps:int =Form(4),
生成時のSTEP、大きと画像が綺麗になる。lmcは4が標準、適時上げる
strength:float = Form(0.1),
プロンプトの効きを調整する0〜1.0
guidance_scale:float = Form(1.0),
ガイダンススケール 1.0で無効、大きいと生成時間が伸びる。
上げればプロンプトが反映される。画像がきれいになるわけででない
seed:int= Form(0),
SEEDを指定する。
auto_seed:bool = Form(True),
False:seed指定があればtorch.manual_seed(seed)
無ければgenerator = Noneでseed無しとなる
True:ランダムなseedx生成しtorch.manual_seed(seedx)
height :int= Form(None),
高さ指定(指定なし=Noneはデフォルト1024)
width:int = Form(None),
幅指定(指定なし=Noneはデフォルト1024)
num_images_per_prompt:int = Form(1),
プロンプトあたりの生成画像数を指定して複数生成させることが出来る
guess_mode:bool = Form(None),
ガウシアン効果の有効無効指定
freeu:bool = Form(False),
freeu効果の有効無効指定。有効にすると生成画像が鮮やかな色になる。
output_type:str = Form("pil"),
画像出力形式を指定する。"pil"以外にndarreyが指定可能("nd")
crops_coords_top_left:list = Form([0,0]),
主画像の生成位置を指定する。0,0は標準でセンターになる
controlnet_conditioning_scale:float = Form(1.0),
コントロールネットの効き具合を指定する
adapter_conditioning_scale:float=Form(None),
T2I-Adaper特有のパラメータ。アダプタの効き具合の設定をする
adapter_conditioning_factor:int=Form(None),
T2I-Adaper特有のパラメータ。アダプタの効き具合の設定をする
生成方式と利用するパラメータのマトリックスを以下に纏めます。

利用できないパラメータを指定すると生成エラーになる事があるので注意してください。サンプルテストプログラムを参照してください。
生成画像の返送
画像データのバイト化はpiklで行いました。ここは様々な方法がありますので、適時変更すればいいと思います。クライント側で処理しやすい変換を用いれば良いと思います。生成イメージ画像はnum_images_per_prompt で複数毎指定できますから、返送は各画像オブジェクト毎ではなく、画像オブジェクトが要素となるリストで返しています。大きなサイズの複数画像の返信でも速度が落ちないよう、メディアタイプはmedia_type="application/octet-stream"を指定しています。
    #−−−−−生成画像を返信
    images_data = pickle.dumps(image_list, 5)  # tx_dataはpklデータ
    return Response(content= images_data, media_type="application/octet-stream")
ククライアント側生成テストプログラム
t2iの生成
最も単純化した生成パラメータを用いた場合の例です。requests.postのボディーに記述するパラメータはpipeline名の"pipe_t2i"とプロンプトのみです。他のパラメータは全てデフォルトで綺麗な画像が生成されます。画像サイズはSDXLデフォルトの1021 x 1024 が生成されます。
import requests
from PIL import Image
from io import BytesIO
import pickle
# t2i TEST
data= {
    "pipeline":"pipe_t2i",
    "prompt":"masterpiece, best quality, 1girl, solo, flower, long hair, outdoors, letterboxed, school uniform, day, sky, looking up, short sleeves, parted lips, shirt, cloud, black hair, sunlight, white shirt, serafuku, upper body, from side, pink flower, blurry, brown hair, blue sky, depth of field",
  }
url = 'http://0.0.0.0:8000/generate/'
response = requests.post(url, data=data ) # POSTリクエストを送信
print(response)
# レスポンスを表示
if response.status_code == 200:
    print("get data OK")
    image_data = response.content
    image =(pickle.loads(image_data))#元の形式にpickle.loadsで復元
    image[0].show()
else:
    print("リクエストが失敗しました。ステータスコード:", response.status_code)

パラメータを追加した例
データ内のパラメータが多数設定されています。以下はプロンプトエンベデッドを利用しています。2つのプロンプトを指定しているので2枚の画像が生成されています。2枚目のプロンプトは単語ではなく文章で記述しています。SDXLモデルではこのような文章によるプロンプトも利用できます。
import requests
from PIL import Image
from io import BytesIO
import pickle

# t2i TEST
print("+++++t2i  TEST")
data= {
    "pipeline":"pipe_t2i",
    "seed" : 1,
    "auto_seed":False,
    "embe":True,
    #"prompt":"masterpiece, best quality, 1girl, solo, flower, long hair, outdoors, letterboxed, school uniform, day, sky, looking up, short sleeves, parted lips, shirt, cloud, black hair, sunlight, white shirt, serafuku, upper body, from side, pink flower, blurry, brown hair, blue sky, depth of field",
    "prompt_embe0":"masterpiece, best quality, 1girl, solo, flower, long hair, outdoors, letterboxed, school uniform, day, sky, looking up, short sleeves, parted lips, shirt, cloud, black hair, sunlight, white shirt, serafuku, upper body, from side, pink flower, blurry, brown hair, blue sky, depth of field",
    "prompt_embe1":"This image depicts a beautiful garden with pink and white flowers and a white gazebo in the background. The garden is surrounded by tall trees and a pathway leading to the gazebo. The sky is a light blue with clouds and a few birds flying in the sky. The overall atmosphere of the image is peaceful and serene.",
    #"prompt_embe1":"shcool",
    #"negative_prompt" :"worst quality",
    "height" : 512,
    #"width" : 512,
    "num_images_per_prompt": 1,
    "freeu" : True ,
    #"guess_mode": True,
    #"crops_coords_top_left":[5,0],
    "num_inference_steps": 4,
    "guidance_scale":1.3,
  }
# POSTリクエストを送信
url = 'http://0.0.0.0:8000/generate/'
response = requests.post(url, data=data )
print(response)
# レスポンスを表示
if response.status_code == 200:
    print("get data OK")
    image_data = response.content
    image =(pickle.loads(image_data))#元の形式にpickle.loadsで復元
    image[0].show()
    image[1].show()
else:
    print("リクエストが失敗しました。ステータスコード:", response.status_code)
プロンプト
"masterpiece, best quality, 1girl, solo, flower, long hair, outdoors, letterboxed, school uniform, day, sky, looking up, short sleeves, parted lips, shirt, cloud, black hair, sunlight, white shirt, serafuku, upper body, from side, pink flower, blurry, brown hair, blue sky, depth of field"

2番目のプロンプト
以前の記事のMinigpt4で画像を呼んだ時の文章をプロンプトに使いました。
"This image depicts a beautiful garden with pink and white flowers and a white gazebo in the background. The garden is surrounded by tall trees and a pathway leading to the gazebo. The sky is a light blue with clouds and a few birds flying in the sky. The overall atmosphere of the image is peaceful and serene."

i2iの生成
import requests
from PIL import Image
from io import BytesIO
import json
import pickle
# i2i TEST
print("+++++i2i TEST")
image_file_path="MIKU.png"
file_data = open(image_file_path, "rb").read()
mask_file_path="mask_body.jpg"
mask_img = open(mask_file_path, "rb").read()
files={"image": ("img.png", BytesIO(file_data), "image/png"),}
data= {
"pipeline":"pipe_i2i",
"seed" : 0,
"auto_seed":False,
"embe":True,
#"prompt":"masterpiece, best quality, 1girl, solo, flower, long hair, outdoors, letterboxed, school uniform, day, sky, looking up, short sleeves, parted lips, shirt, cloud, black hair, sunlight, white shirt, serafuku, upper body, from side, pink flower, blurry, brown hair, blue sky, depth of field",
#"prompt_embe":["masterpiece,best quality,1girl,long hair,outdoors,letterboxed,school uniform,day,sky,looking up,short sleeves,parted lips,shirt,cloud,black hair,sunlight,white shirt,serafuku,upper body,from side,pink flower,blurry,brown hair","shcool"],
"prompt_embe0":"masterpiece, best quality, 1girl, solo, flower, long hair, outdoors, letterboxed, school uniform, day, sky, looking up, short sleeves, parted lips, shirt, cloud, black hair, sunlight, white shirt, serafuku, upper body, from side, pink flower, blurry, brown hair, blue sky, depth of field",
"prompt_embe1":"shcool",
#"negative_prompt" :"worst quality",
#"height" : 512,
#"width" : 512,
#"strength":0.5,
#"num_images_per_prompt": 2,
#"freeu" : True ,
#"guess_mode": True,
"strength":0.5,
#"crops_coords_top_left":[5,0],
#"num_inference_steps": 8,
#"guidance_scale":1.5,
}
# POSTリクエストを送信
url = 'http://0.0.0.0:8000/generate/'
response = requests.post(url, data=data ,files=files)
print(response)
# レスポンスを表示
if response.status_code == 200:
print("get data OK")
image_data = response.content
image =(pickle.loads(image_data))#元の形式にpickle.loadsで復元
image[0].show()
image[1].show()
else:
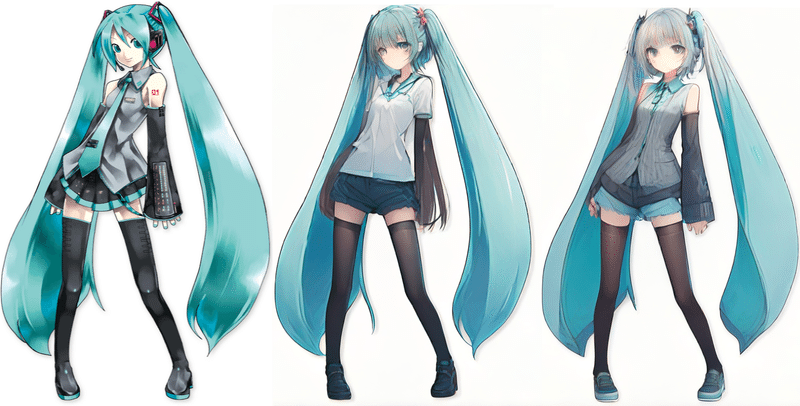
print("リクエストが失敗しました。ステータスコード:", response.status_code)生成された画像。こちらも"embe":True,なので2枚の画像が生成されます。2枚めのプロンプトは"shcool"のみですが、サーバ側でpipelineにStyle-LoRAが適応されているのでLoRa学習済み画像の特徴が強く出ています。
inpaintの生成
体部分のみマスクから外して服装を入れ替える操作をしましした。
import requests
from PIL import Image
from io import BytesIO
import pickle

# inpaint TEST
print("+++++inpaint TEST")
image_file_path="image_lcm_lora_3.png"
file_data = open(image_file_path, "rb").read()
mask_file_path="mask_body.jpg"
mask_img = open(mask_file_path, "rb").read()

files={
     "image": ("img.png", BytesIO(file_data), "image/png"),
     "mask_image": ("mask_image.png", BytesIO(mask_img), "image/png"),
    }
data= {
    "pipeline":"pipe_inpaint",
    "seed" : 19872631,
    "auto_seed":False,
    "embe":False,
    "prompt":"masterpiece, best quality, 1girl, solo, long hair, red t-shirt,simple background,white background",
    #"prompt_embe0":"masterpiece, best quality, 1girl, solo, flower, long hair, outdoors, letterboxed, school uniform, day, sky, looking up, short sleeves, parted lips, shirt, cloud, black hair, sunlight, white shirt, serafuku, upper body, from side, pink flower, blurry, brown hair, blue sky, depth of field",
    #"prompt_embe1":"shcool",
    #"negative_prompt" :"worst quality",
    "height" : 512,
    "width" : 512,
    "num_images_per_prompt": 1,
    "freeu" : True ,
    "guess_mode": True,
    "strength":0.95,
    #"crops_coords_top_left":[5,0],
    "num_inference_steps": 30,
    "guidance_scale":1.0,
  }
# POSTリクエストを送信
url = 'http://0.0.0.0:8000/generate/'
response = requests.post(url, data=data ,files=files)
print(response)
if response.status_code == 200: # レスポンスを表示
    print("get data OK")
    image_data = response.content
    image =(pickle.loads(image_data))#元の形式にpickle.loadsで復元
    image[0].show()
else:
    print("リクエストが失敗しました。ステータスコード:", response.status_code)
cannyによる生成
import requests
from PIL import Image
from io import BytesIO
import io
import pickle

# canny TEST
print("+++++canny TEST")
image_file_path="MIKU.png"
file_data = open(image_file_path, "rb").read()
files={ "image": ("img.png", BytesIO(file_data), "image/png"),}
data= {"low_threshold":100,"high_threshold":200, }
# POSTリクエストを送信
url = 'http://0.0.0.0:8000/get_canny/'
response = requests.post(url, data=data ,files=files)
print(response)
# レスポンスを表示
if response.status_code == 200:
    print("get data OK")
    image_data = response.content
    canny_image=(pickle.loads(image_data)) #元の形式にpickle .loadsで復元
    canny_image.show()
    # 画像をバイトデータに変換
    image_bytes = io.BytesIO()
    canny_image.save(image_bytes , format="PNG")
    canny_image_bytes = image_bytes.getvalue()

files={"image": ("img.png", BytesIO(canny_image_bytes ), "image/png"),}
data= {
    "pipeline":"pipe_canny",
    "seed" : 19872631,
    "auto_seed":False,
    "embe":False,
    "prompt": "masterpiece, best quality, 1girl, solo, long hair,  white shirt, serafuku,  brown hair,looking at viewer,blush,smile, bangs,blue eyes, simple background,t-shirt,white background,closed mouth,standing,white t-shirt,shorts, short shorts,headphones,black shorts,light brown hair,blue shorts ,running",
     #"prompt_embe0":"masterpiece, best quality, 1girl, solo, flower, long hair, outdoors, letterboxed, school uniform, day, sky, looking up, short sleeves, parted lips, shirt, cloud, black hair, sunlight, white shirt, serafuku, upper body, from side, pink flower, blurry, brown hair, blue sky, depth of field",
    #"prompt_embe1":"shcool",
    "negative_prompt" :"worst quality",
    #"height" : 512,
    #"width" : 512,
    "num_images_per_prompt": 1,
    #"freeu" : True ,
    #"guess_mode": True,
    #"strength":0.95,
    #"crops_coords_top_left":[5,0],
    "num_inference_steps":12,
    "guidance_scale":1.1,
  }
# POSTリクエストを送信
url = 'http://0.0.0.0:8000/generate/'
response = requests.post(url, data=data ,files=files)
print(response)
# レスポンスを表示
if response.status_code == 200:
    print("get data OK")
    image_data = response.content
    image =(pickle.loads(image_data))#元の形式にpickle.loadsで復元
    image[0].show()
else:
    print("リクエストが失敗しました。ステータスコード:", response.status_code)
こちらも生成画像はStyle-LoRAが強く出てます。もう少しnum_inference_stepを大きくするとcannyに近くなると思います。

openposeによる生成
import requests
from PIL import Image
from io import BytesIO
import io
import pickle

# canny TEST
print("+++++canny TEST")
image_file_path="nissinIMGL0853.jpg"
file_data = open(image_file_path, "rb").read()
files={ "image": ("img.png", BytesIO(file_data), "image/png"),}
# POSTリクエストを送信
url = 'http://0.0.0.0:8000/get_openpose/'
response = requests.post(url, files=files)
print(response)
# レスポンスを表示
if response.status_code == 200:
    print("get data OK")
    image_data = response.content
    openpose_image=(pickle.loads(image_data)) #元の形式にpickle .loadsで復元
    openpose_image.show()
    # 画像をバイトデータに変換
    image_bytes = io.BytesIO()
    openpose_image.save(image_bytes , format="PNG")
    openpose_image_bytes = image_bytes.getvalue()

files={"image": ("img.png", BytesIO(openpose_image_bytes ), "image/png"),}
data= {
    "pipeline":"openpose",
    "seed" : 19872631,
    "auto_seed":False,
    "embe":False,
    "prompt": "masterpiece, best quality, 1girl, solo, long hair,  white shirt, serafuku,  brown hair,looking at viewer,blush,smile, bangs,blue eyes, simple background,t-shirt,white background,closed mouth,standing,white t-shirt,shorts, short shorts,headphones,black shorts,light brown hair,blue shorts ,running",
     #"prompt_embe0":"masterpiece, best quality, 1girl, solo, flower, long hair, outdoors, letterboxed, school uniform, day, sky, looking up, short sleeves, parted lips, shirt, cloud, black hair, sunlight, white shirt, serafuku, upper body, from side, pink flower, blurry, brown hair, blue sky, depth of field",
    #"prompt_embe1":"shcool",
    "negative_prompt" :"worst quality",
    #"height" : 512,
    #"width" : 512,
    "num_images_per_prompt": 1,
    #"freeu" : True ,
    #"guess_mode": True,
    #"strength":0.95,
    #"crops_coords_top_left":[5,0],
    "num_inference_steps":8,
    "guidance_scale":1.0,
    "controlnet_conditioning_scale":0.8,
  }
# POSTリクエストを送信
url = 'http://0.0.0.0:8000/generate/'
response = requests.post(url, data=data ,files=files)
print(response)
# レスポンスを表示
if response.status_code == 200:
    print("get data OK")
    image_data = response.content
    image =(pickle.loads(image_data))#元の形式にpickle.loadsで復元
    image[0].show()
else:
    print("リクエストが失敗しました。ステータスコード:", response.status_code)
Dtepth Mapによる生成
import requests
from PIL import Image
from io import BytesIO
import io
import pickle

# canny TEST
print("+++++depth TEST")
image_file_path="nissinIMGL0853.jpg"
file_data = open(image_file_path, "rb").read()
files={ "image": ("img.png", BytesIO(file_data), "image/png"),}
# POSTリクエストを送信
url = 'http://0.0.0.0:8000/get_depth_map/'
response = requests.post(url, files=files)
print(response)
# レスポンスを表示
if response.status_code == 200:
    print("get data OK")
    image_data = response.content
    depth_image=(pickle.loads(image_data)) #元の形式にpickle .loadsで復元
    depth_image.show()
    # 画像をバイトデータに変換
    image_bytes = io.BytesIO()
    depth_image.save(image_bytes , format="PNG")
    depth_image_bytes = image_bytes.getvalue()

files={"image": ("img.png", BytesIO(depth_image_bytes ), "image/png"),}
data= {
    "pipeline":"depth",
    "seed" : 19872631,
    "auto_seed":False,
    "embe":False,
    "prompt": "masterpiece, best quality, 1girl, solo, long hair,  white shirt, serafuku,  brown hair,looking at viewer,blush,smile, bangs,blue eyes, simple background,t-shirt,white background,closed mouth,standing,white t-shirt,shorts, short shorts,headphones,black shorts,light brown hair,blue shorts ,running",
     #"prompt_embe0":"masterpiece, best quality, 1girl, solo, flower, long hair, outdoors, letterboxed, school uniform, day, sky, looking up, short sleeves, parted lips, shirt, cloud, black hair, sunlight, white shirt, serafuku, upper body, from side, pink flower, blurry, brown hair, blue sky, depth of field",
    #"prompt_embe1":"shcool",
    "negative_prompt" :"worst quality",
    "height" : 512,
    "width" : 512,
    "num_images_per_prompt": 1,
    #"freeu" : True ,
    #"guess_mode": True,
    #"strength":0.95,
    #"crops_coords_top_left":[5,0],
    "num_inference_steps":30,
    "guidance_scale":1.0,
    "controlnet_conditioning_scale":0.5,
  }
# POSTリクエストを送信
url = 'http://0.0.0.0:8000/generate/'
response = requests.post(url, data=data ,files=files)
print(response)
# レスポンスを表示
if response.status_code == 200:
    print("get data OK")
    image_data = response.content
    image =(pickle.loads(image_data))#元の形式にpickle.loadsで復元
    image[0].show()
else:
    print("リクエストが失敗しました。ステータスコード:", response.status_code)
モデルが異なっています。"stabilityai/stable-diffusion-xl-base-1 なので、生成画像の雰囲気が今までの生成画像と少し異なります。

T2I-Adapterによる生成
import requests
from PIL import Image
from io import BytesIO
import io
import pickle

# canny TEST
print("+++++canny TEST")
image_file_path="MIKU.png"
file_data = open(image_file_path, "rb").read()
files={ "image": ("img.png", BytesIO(file_data), "image/png"),}
data= {"low_threshold":100,"high_threshold":200, }
# POSTリクエストを送信
url = 'http://0.0.0.0:8000/get_canny/'
response = requests.post(url, data=data ,files=files)
print(response)
# レスポンスを表示
if response.status_code == 200:
    print("get data OK")
    image_data = response.content
    canny_image=(pickle.loads(image_data)) #元の形式にpickle .loadsで復元
    # 画像をバイトデータに変換
    canny_image=canny_image.resize((1024, 1216))
    image_bytes = io.BytesIO()
    canny_image.save(image_bytes , format="PNG")
    canny_image_bytes = image_bytes.getvalue()
    canny_image_bytes = canny_image_bytes
files={"image": ("img.png", BytesIO(canny_image_bytes ), "image/png"),}
data= {
    "pipeline":"t2i_adapter",
    "seed" : 19872631,
    "auto_seed":False,
    "embe":False,
    "prompt": "masterpiece, best quality, 1girl, solo, long hair,  white shirt, serafuku,  brown hair,looking at viewer,blush,smile, bangs,blue eyes, simple background,t-shirt,white background,closed mouth,standing,white t-shirt,shorts, short shorts,headphones,black shorts,light brown hair,blue shorts ,running",
    #"prompt_embe0":"masterpiece, best quality, 1girl, solo, flower, long hair, outdoors, letterboxed, school uniform, day, sky, looking up, short sleeves, parted lips, shirt, cloud, black hair, sunlight, white shirt, serafuku, upper body, from side, pink flower, blurry, brown hair, blue sky, depth of field",
    #"prompt_embe1":"shcool",
    "negative_prompt" :"worst quality",
    #"height" : 512,
    #"width" : 512,
    "num_images_per_prompt": 1,
    #"freeu" : True ,
    #"guess_mode": True,
    #"strength":0.95,
    #"crops_coords_top_left":[5,0],
    "num_inference_steps":34,
    "guidance_scale":1.0,
    "adapter_conditioning_scale":0.8,
    "adapter_conditioning_factor":1,
  }
# POSTリクエストを送信
url = 'http://0.0.0.0:8000/generate/'
response = requests.post(url, data=data ,files=files)
print(response)
# レスポンスを表示
if response.status_code == 200:
    print("get data OK")
    image_data = response.content
    image =(pickle.loads(image_data))#元の形式にpickle.loadsで復元
    image[0].show()
else:
    print("リクエストが失敗しました。ステータスコード:", response.status_code)
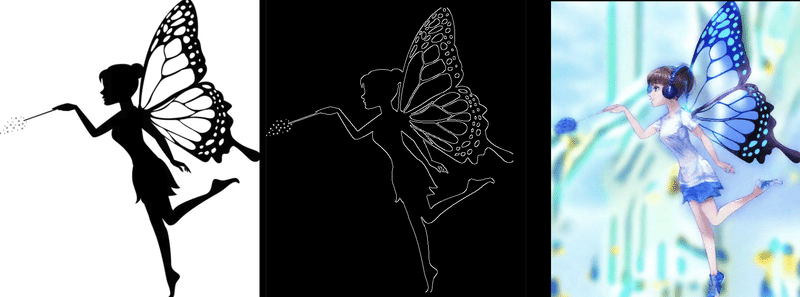
こちらもモデルは"stabilityai/stable-diffusion-xl-base-1です。プロンプトが妖精ではなく、アニメキャラ向けなので、Diffusersのサンプルとはかなり印象が違います。
まとめ
アプリケーションで画像が必要なとき、インタラクティブに画像を変えたいとき、など事前に画像を複数準備しておくことも可能です。しかし、インタラクティブなアプリで毎回画像を変えたい場合に生成AIを使えば変化をつけることができます。画像生成AIは高度なクオリティーを追求する使い方だけではなく、アプリから手軽に必要な画像を生成する使い方もあります。今回の実装はクライアント側の作り方次第で両方に対応はできますが、私の個人的な用途は後者を想定しています。Stable-DiffusionのAPIはWebUIなどでも提供されているので、あえて作りこむ必要はあるのか、と考えますが、Diffusersの概念にある、「改造も容易」というコンセプトを尊重しDiffusersを使う簡易なコードでAPIサーバを実装することにしました。今後、Diffusersに新しい機能が追加されても、比較的簡単に対処できるはずですし、クライアント側の変更も殆ど必要は無いはずです。引き続き改良は進めたいと思います。
追記
適切なソースコードのご提供方法を検討中です。GitHubリポジトリになると思います。準備でき次第、リポジトリ名は公開します。しばらくはご不便をおかけしますが、コードのコピペで試していただけたら有難いです。
サーバ側全ソースコード
import torch
import cv2
from PIL import Image
from  n_lcm_lora_sdxl_i2i_t2i_class_v1 import DiffusersPipelineManager
import pickle

# ===================================     FastAPI  ==============================
from fastapi import FastAPI, File, UploadFile, Form,  Query
from fastapi.responses import HTMLResponse,StreamingResponse,JSONResponse,Response
from pydantic import BaseModel
from io import BytesIO
import io
import json
import base64
import datetime
import string

app = FastAPI()

#------ DiffusersPipelineManagerの定義と初期化
Df=DiffusersPipelineManager()

#------ 独自LoRAの定義
lola_models=[
            ["./models/animagine-xl-2.0/megu_sports_sdxl_v02.safetensors","style",0.8],
            ["./models/animagine-xl-2.0/anime-detailer-xl.safetensors","detaile",1.0],
            ["./models/animagine-xl-2.0/style-enhancer-xl.safetensors","enhancer",0.5]]
 #----- model定義
model="./models/animagine-xl-2.0/animagine-xl-2.0.safetensors"
model_t2i="stabilityai/stable-diffusion-xl-base-1.0"

 #----- pipelineのロード "t2i"・"i2i_pipe"・"inpaint_pipe"はデフォルトでロードでOK、他はVRAMの容量次第
pipe_t2i=Df.pipeline_init("t2i",model=model, lola_models=lola_models)
pipe_i2i=Df.pipeline_init("i2i_pipe",pipeline=pipe_t2i)#pipelineの使い回し
pipe_inpaint=Df.pipeline_init("inpaint_pipe",pipeline=pipe_t2i)#pipelineの使い回し
pipe_t2i_adapter=Df.pipeline_init("t2i_adapter_canny",model=model_t2i, lora_en=False)#2i_adapter用
 #pipe_canny =Df.pipeline_init("canny",model=model) #Canny  ContorolNET用pipeの新規定義
 #pipe_openpose =Df.pipeline_init("openpose",model=model) #openpose  ContorolNET用pipeの新規定義
 #pipe_openpose =Df.pipeline_init("openpose",model=model,  lola_models=lola_models) #lola_models指定
 #pipe_depth  = Df.pipeline_init("depth",model=model)

# 利用できるpipeline名 → i2i/canny/pipe_i2i/pipe_inpaint/canny/openpose//depth/t2i_adapter
#--------pipeline名からpipeを選択して返す
def pipline_sel(pipeline):
    if pipeline=="t2i":
         return pipe_t2i
    elif  pipeline=="pipe_i2i":
         return pipe_i2i
    elif  pipeline=="pipe_inpaint":
         return pipe_inpaint
    elif  pipeline=="canny":
         return pipe_canny
    elif  pipeline=="openpose":
         return pipe_openpose
    elif  pipeline=="depth":
         return pipe_depth
    elif  pipeline=="t2i_adapter":
         return pipe_t2i_adapter
    else:
        return pipe_t2i

#-------------------- FastAPI エンドポイント--------------------------

@app.post("/get_canny/")
def get_canny(image: UploadFile = File(...),  low_threshold : int = Form(100) , high_threshold: int = Form(200)):
    image_data = image.file.read()
    image_data = Image.open(BytesIO( image_data))  # バイナリデータをPIL形式に変換
    image_data = image_data.convert("RGB")
    canny_image = Df.get_canny(original_image=image_data , low_threshold = low_threshold , high_threshold =high_threshold)
    canny_data = pickle.dumps(canny_image, 5)  # tx_dataはpklデータ
    return Response(content=canny_data , media_type="application/octet-stream")

@app.post("/get_openpose/")
def get_openpose(image: UploadFile = File(...)):
    image_data = image.file.read()
    image_data = Image.open(BytesIO( image_data))  # バイナリデータをPIL形式に変換
    image_data = image_data.convert("RGB")
    openpose_image = Df.get_openpose(image_data )
    openpose_data = pickle.dumps(openpose_image, 5)  # tx_dataはpklデータ
    return Response(content= openpose_data , media_type="application/octet-stream")

@app.post("/get_depth_map/")
def get_depth_map(image: UploadFile = File(...)):
    image_data = image.file.read()
    image_data = Image.open(BytesIO( image_data))  # バイナリデータをPIL形式に変換
    image_data = image_data.convert("RGB")
    depth_image = Df.get_depth_map( image_data)
    depth_data = pickle.dumps(depth_image , 5)  # tx_dataはpklデータ
    return Response(content= depth_data, media_type="application/octet-stream")

@app.post("/generate/")
def generate(
    pipeline: str = Form(...),
    image: UploadFile = File(None),
    mask_image: UploadFile =  File(None),
    embe:bool =  Form(False),
    prompt_embe:list =  Form(None),
    prompt_embe0:str =  Form(None),
    prompt_embe1:str =  Form(None),
    prompt:str = Form(None),
    negative_prompt:str = Form(None),
    num_inference_steps:int =Form(4),
    strength:float = Form(0.1),
    guidance_scale:float = Form(1.0),
    seed:int= Form(0),
    auto_seed:bool = Form(True),
    height :int= Form(None),
    width:int = Form(None),
    num_images_per_prompt:int = Form(1),
    guess_mode:bool = Form(None),
    freeu:bool = Form(False),
    output_type:str = Form("pil"),
    crops_coords_top_left:list = Form([0,0]),
    controlnet_conditioning_scale:float = Form(1.0),
    adapter_conditioning_scale:float=Form(None),
    adapter_conditioning_factor:int=Form(None),
    ):
    #−−−−−pipeの設定
    pipe = pipline_sel(pipeline)
    #−−−−−conditioning, pooledがGPUにTensor形式でロードされるのでprompt_embeddingをサーバ側で実行
    if embe:
        prompt_embe=[prompt_embe0,prompt_embe1]
        conditioning, pooled = Df.prompt_embedding(pipe , prompt_embe)
    else:    #embeがFalseならconditioning 、pooled はNoneを設定
        conditioning = None
        pooled = None
    #−−−−−Seed値を取得 auto_seedがTrueならtorch.initial_seed( )
    if auto_seed:
        seedx= torch.initial_seed( )
        generator = torch.manual_seed(seedx )
    else:
        if seed == None:    #auto_seedがFalseでseedがない場合
            generator = None
        else:                          #auto_seedがFalseでseedが指定された場合
            generator = torch.manual_seed(seed )
    # −−−−− 受け取ったイメージをPIL(RGB)へ変換
    if image:                    #inpaint  input イメージ
        image_data =image.file.read()
        image = Image.open(BytesIO(image_data))  # バイナリデータをPIL形式に変換
        image = image.convert("RGB")
    else:
        image = None
    if mask_image:       #inpaint  マスク イメージ
            mask_data =mask_image.file.read()
            mask_image = Image.open(BytesIO( mask_data))  # バイナリデータをPIL形式に変換
            mask_image = mask_image.convert("RGB")
    else:
        mask_image = None

    #−−−−−こから画像の生成
    # t2i_adapter専用
    if pipeline=="t2i_adapter":
        image_list = Df.generate_t2a_adapter(
         pipe,
         image=image,
         prompt=prompt ,
         negative_prompt = negative_prompt,
         generator=generator,
         height = height,
         width = width,
         num_images_per_prompt = num_images_per_prompt,
         freeu=freeu,
         output_type=output_type,
         num_inference_steps= num_inference_steps,
         adapter_conditioning_scale=adapter_conditioning_scale,
         adapter_conditioning_factor= adapter_conditioning_factor,
        guidance_scale=guidance_scale,
        )
    # t2i/i2i/inpaint/canny/openpose/depth
    else:
        image_list = Df.generate(
         pipe,
         image=image,
         mask_image=mask_image,
         embe=embe,
         prompt=prompt ,
         conditioning=conditioning ,
         pooled=pooled ,
         negative_prompt = negative_prompt,
         generator=generator,
         height = height,
         width = width,
         num_images_per_prompt = num_images_per_prompt,
         guess_mode=guess_mode,
         freeu=freeu,
         output_type=output_type,
         num_inference_steps= num_inference_steps,
         strength=strength,
         guidance_scale=guidance_scale,
        )
    #−−−−−生成画像を返信
    images_data = pickle.dumps(image_list, 5)  # tx_dataはpklデータ
    return Response(content= images_data, media_type="application/octet-stream")

if __name__ == "__main__":
    import uvicorn
    uvicorn.run(app, host="0.0.0.0", port=8000)