WebCAM画像をキャプチャしてキャラ絵にリアルタイム変換-StreamDiffusionの凄さ

StreamDiffusionは爆速で画像生成ができることが驚異的ですが、この生成速度の速さ故に、今までとは違う可能性が広がります。今回はPCのWebカメラでキャプチャーした画像をリアルタイムで自分キャラに変換して、なりきることに挑戦しました。
StreamDiffusion
リポジトリのメインに有るi2iのコードを改良して実現しています。
環境構築
以下の記事で簡単に説明しています。基本的なi2iのコードの説明も記載しているので参考にしてください。
追加した機能(コード)
WebCAMキャプチャ
カメラから画像を読み込むコードです。何処にでもあるごく普通のコードを
使いやすいように修正しています。難しいところは無いので説明は省きます。capture.pyとして独立しています。
capture.pyのコード
import os
from PIL import Image
import cv2

def init_cam():
    global  cap
    # Webカメラのキャプチャを開始
    cap = cv2.VideoCapture(0)
    # キャプチャがオープンしていることを確認
    if not cap.isOpened():
        print("カメラを開けません")
        status=False
        return  status
    ret, frame = cap.read()
    print("caputure init")
    cv2.imshow('Frame',frame )
    status=True
    return  status

def cap_img():
    global  cap
    # カメラからフレームを読み込む
    ret, frame = cap.read()
    # フレームの表示と返送
    cv2.imshow('Frame', frame)
    return frame
 #get  pil and cv2イメージ
def cap_img_pil():
    img_cv2=cap_img()
    img_cv2= cv2.resize( img_cv2, dsize=(512, 512))
    # cv2-> PIL
    new_image = cv2.cvtColor(img_cv2, cv2.COLOR_BGR2RGB)
    pil_image= Image.fromarray(new_image)
    return pil_image, img_cv2

def cap_close():
    cap.release()
i2iコードへの追加
Style-LoRAを使用
今回はキャラなりきりなので学習済みのキャラLoRAをpipeにバインドします。ここも上記記事で説明しているとおり、Diffuserで記述する方法とstreamで記述する方法が有ります。どちらを使用しても効果は有りますが、前者の方が設定値に対してソフトに調整が出来るように感じます。streamでバインドする方法はかなりピーキーな感じです。以下はstreamで設定する例でです。LoRAの強度は0.2とかなり低めです。このコードをlcm_loraの読み込みの後に記述します。
stream.load_lora("./models/LoRA/megu_sports_v02.safetensors")
stream.fuse_lora(lora_scale=0.2)
カメラ初期化と画像を取得
カメラの初期化とStreamパイプラインのウォームアップ用画像の取得をしてす。Streamパイプラインのウォームアップについては上記記事を参照ください。このコードを
#Warmup >= len(t_index_list) x frame_buffer_size
の直前に記述します。
# Webカメラの設定
import cv2
from capture import init_cam,cap_img_pil,cap_close
# Webカメラのイニシャライズ
status=init_cam()
# キャプチャがオープンしていることを確認
if status==False:
    print("カメラを開けません")
# Webカメラのキャプチャを開始--Warmup用画像の取得
image, init_image=cap_img_pil()
画像生成部分
画像を生成するループ内にカメラからのキャプチャ画像の取り込みと、取り込んだ画像の表示、及び生成した画像の表示を記述します。本来ならばカメラ画像の取得と表示はマルチプロセッシングで並列処理をすべきなのですが、簡便のために埋め込んでいます。なのでフレームレートは12fpsまで落ちてしまっています。
# Run the stream infinitely
times = []
count=600 #Caputure -> 変換 frame数
for n in range(count):
start_time = time.time()
in_image,cv2_image=cap_img_pil()
x_output = stream(in_image )
image=postprocess_image(x_output, output_type="pil")[0]
#WebCAM画像表示
cv2.imshow("WebCAM",cv2_image)
cv2.waitKey(1)
#生成画像表示
imgCV_RGB = np.array(image, dtype=np.uint8)
imgCV_BGR = np.array(imgCV_RGB)[:, :, ::-1]
cv2.imshow("i2i",imgCV_BGR)
cv2.waitKey(1)
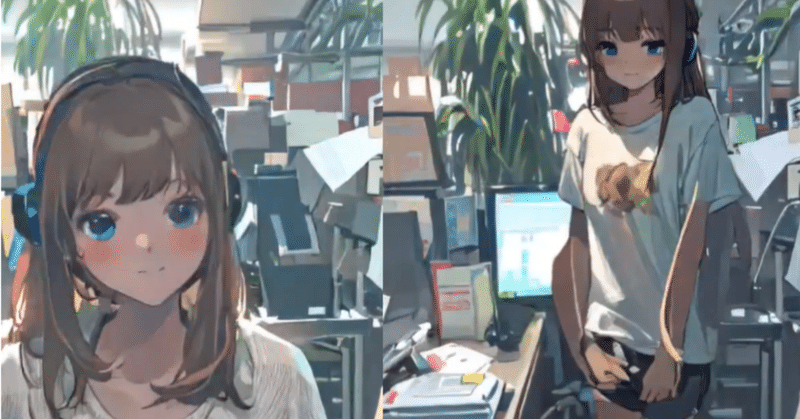
times.append(time.time() - start_time)コードを実行した結果
#StreamDiffusion
— ゆずき (@uzuki425) December 28, 2023
i2i+LoRAでリアルタイムでめぐに変換。上半身だけでなく動いても変換続くところが今までと違う所では?ちらつきの止め方考えないとね。
t_index_list=[40,42,44,45]
RCFG=”initialize"
LoRA=0.5で今回はDiffuserのpipeへバインド
お見苦しくて申しわけないです。ご容赦ください。 pic.twitter.com/XPZSqFcge3
全体のコード
StreamDiffusion部分のみです。このコードとカメラキャプチャ用のコード(capture.py)で動いています。
import torch
from diffusers import AutoencoderTiny, StableDiffusionPipeline,StableDiffusionImg2ImgPipeline
from diffusers.utils import load_image,make_image_grid
from streamdiffusion import StreamDiffusion
from streamdiffusion.image_utils import postprocess_image

import numpy as np
import time
from tqdm import tqdm

pipe = StableDiffusionImg2ImgPipeline.from_single_file(
    "/home/animede/auto1111/models/Counterfeit-V3.0/Counterfeit-V3.0_fix_fp16.safetensors").to(
    device=torch.device("cuda"),
    dtype=torch.float16,
) #pipeへLoRAバインド  #pipe .load_lora_weights("latent-consistency/lcm-lora-sdv1-5", adapter_name="lcm") #Stable  Diffusion 1.5 のLCM LoRA #pipe .load_lora_weights("./models/LoRA/megu_sports_v02.safetensors", adapter_name="papercut") #pipe .set_adapters(["lcm", "papercut"], adapter_weights=[1.0,0.5])

# Wrap the pipeline in StreamDiffusion
cfg_type ="initialize"
stream = StreamDiffusion(
    pipe,
    t_index_list=[40,42,44,45],
    torch_dtype=torch.float16,
    cfg_type=cfg_type,
)
# If the loaded model is not LCM, merge LCM
stream.load_lcm_lora()
stream.fuse_lora()
stream.load_lora("./models/LoRA/megu_sports_v02.safetensors")
stream.fuse_lora(lora_scale=0.2)

# Use Tiny VAE for further acceleration
stream.vae = AutoencoderTiny.from_pretrained("madebyollin/taesd").to(device=pipe.device, dtype=pipe.dtype)
# Enable acceleration
pipe.enable_xformers_memory_efficient_attention() #prompt  = "1girl with dog hair, thick frame glasses"
prompt = "masterpiece, best quality, 1girl, solo, long hair,  white shirt, brown hair,looking at viewer,blush,smile,bangs,blue eyes,simple background,t-shirt,white background,closed mouth,white t-shirt,shorts,short shorts,headphones,black shorts,light brown hair,blue shorts "
# Prepare the stream
stream.prepare(prompt)

# Webカメラの設定
import cv2
from capture import init_cam,cap_img_pil,cap_close
# Webカメラのイニシャライズ
status=init_cam()
# キャプチャがオープンしていることを確認
if status==False:
    print("カメラを開けません")
# Webカメラのキャプチャを開始--Warmup用画像の取得
image, init_image=cap_img_pil()

# Warmup >= len(t_index_list) x frame_buffer_size
for _ in range(4):
    stream(image)

# Run the stream infinitely
times = []
count=600 #Caputure -> 変換 frame数
for n in  range(count):
    start_time = time.time()
    in_image,cv2_image=cap_img_pil()
    x_output = stream(in_image )
    image=postprocess_image(x_output, output_type="pil")[0]
    #WebCAM画像表示
    cv2.imshow("WebCAM",cv2_image)
    cv2.waitKey(1)
     #生成画像表示
    imgCV_RGB = np.array(image, dtype=np.uint8)
    imgCV_BGR = np.array(imgCV_RGB)[:, :, ::-1]
    cv2.imshow("i2i",imgCV_BGR)
    cv2.waitKey(1)
    times.append(time.time() - start_time)
cap_close()
print(f"Average time: {np.mean(times)}")
print(f"FPS: {1 / np.mean(times)}")
まとめ
高速生成ができると、今まで困難だったことが一気に解決します、このコードもチラツキが大きくこのままでは実用的ではありませんが、どんんどん改良が進むと、カメラとStreamDiffusionがあればVtuberになったりアバターにになることも容易になるのでは、と期待しています。