
note でエクスポートしたXMLをPythonで読みやすくしたい(その2)

さて。
こちらの続きです。
(1)XMLファイルを読み込む
(2)読み込んだデータを木構造でアクセスする
前回やったのはここまで。
今回は、木構造の中身のデータを表示してみようと思います。
「Element.tag」を表示する関数を用意する
まず、「Element」を表示する関数を用意しておきます。ついでに、「Element」そのものを表示するのではなく、「Element.tag」を表示します。
すると、こんな感じ。
import xml.etree.ElementTree as ET
tree = ET.parse('country_data.xml')
root = tree.getroot()

def show_element(el):
    print(el.tag)

def show_child(el):
    for child in el:
        show_element(child)
        show_child(child)

show_child(root)
実行するとこんな感じになります。
country
rank
year
gdppc
neighbor
neighbor
country
rank
year
gdppc
neighbor
country
rank
year
gdppc
neighbor
neighborここでは各「Element」の「tag」が表示されています。
「tag」というのはココですね。
この赤字の部分です。
でも、tagだけの表示じゃあ、さっぱりわからん。
もう少し表示してみます。
「attrib」と「text」を表示する
「attrib」と「text」もあわせて表示してみます。
import xml.etree.ElementTree as ET
tree = ET.parse('country_data.xml')
root = tree.getroot()

def show_element(el):
    print(el.tag, el.attrib, el.text)

def show_child(el):
    for child in el:
        show_element(child)
        show_child(child)

show_child(root)
結果、次のようになります。
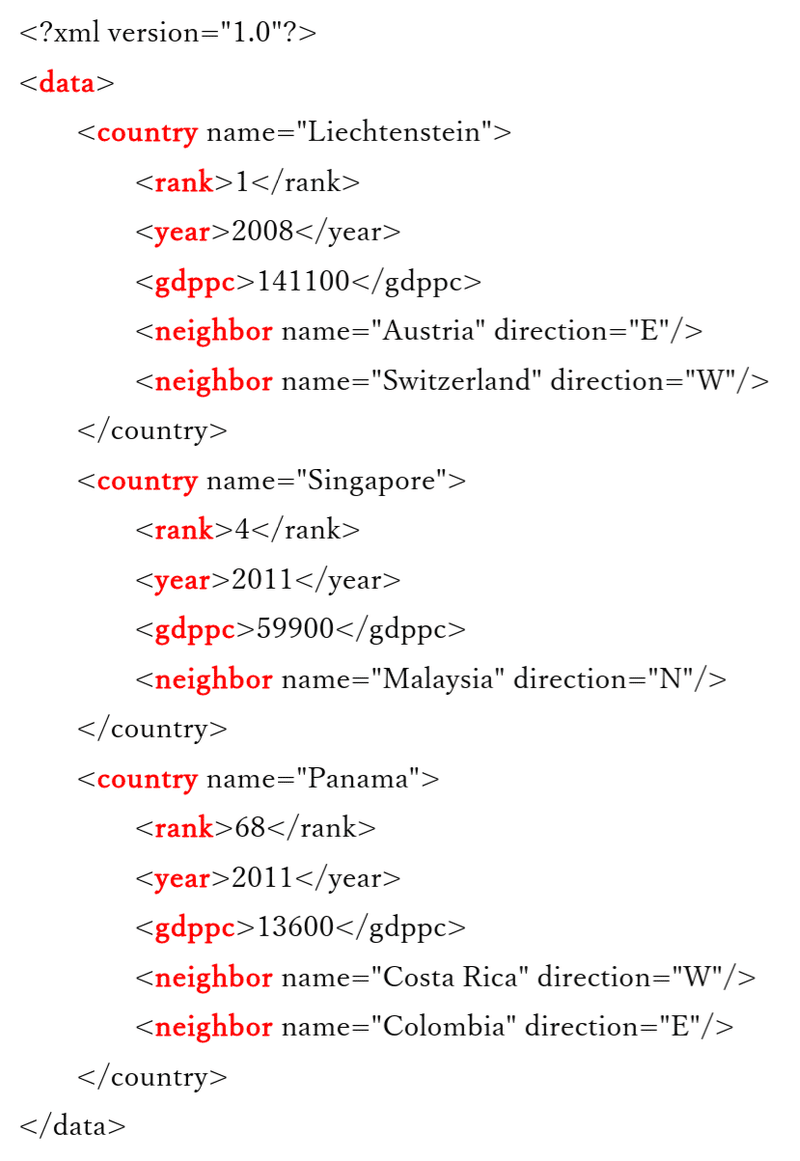
country {'name': 'Liechtenstein'}

rank {} 1
year {} 2008
gdppc {} 141100
neighbor {'name': 'Austria', 'direction': 'E'} None
neighbor {'name': 'Switzerland', 'direction': 'W'} None
country {'name': 'Singapore'}

rank {} 4
year {} 2011
gdppc {} 59900
neighbor {'name': 'Malaysia', 'direction': 'N'} None
country {'name': 'Panama'}

rank {} 68
year {} 2011
gdppc {} 13600
neighbor {'name': 'Costa Rica', 'direction': 'W'} None
neighbor {'name': 'Colombia', 'direction': 'E'} None
国名やランクが具体的に表示されるようになりました。
木構造のレベルを表示する
ただ、これだと木構造のどのレベルにいるのかわからない。とりあえず、数字でいいからレベルを表示してみます。ついでに、root が表示されていないので表示しておきます。
import xml.etree.ElementTree as ET
tree = ET.parse('country_data.xml')
root = tree.getroot()

def show_element(level, el):
    print(level, el.tag, el.attrib, el.text)

def show_child(level, el):
    level = level + 1
    for child in el:
        show_element(level, child)
        show_child(level, child)

level = 1
show_element(level, root)
show_child(level, root)
結果は・・・。
1 data {}

2 country {'name': 'Liechtenstein'}

3 rank {} 1
3 year {} 2008
3 gdppc {} 141100
3 neighbor {'name': 'Austria', 'direction': 'E'} None
3 neighbor {'name': 'Switzerland', 'direction': 'W'} None
2 country {'name': 'Singapore'}

3 rank {} 4
3 year {} 2011
3 gdppc {} 59900
3 neighbor {'name': 'Malaysia', 'direction': 'N'} None
2 country {'name': 'Panama'}

3 rank {} 68
3 year {} 2011
3 gdppc {} 13600
3 neighbor {'name': 'Costa Rica', 'direction': 'W'} None
3 neighbor {'name': 'Colombia', 'direction': 'E'} None
ベタなテキストではありますけど、情報は全て表示できたようです。
なんですけども・・・。
改良
ちょっと、この★の部分がね、ダブっていて、なんか気持ち悪い。
def show_child(level, el):
    level = level + 1
    for child in el:
        show_element(level, child)★
        show_child(level, child)★

level = 1
show_element(level, root)★
show_child(level, root)★
なので直しておく。
となると「level = level + 1」もなくしちゃう。
そうしたら、こうなった。
import xml.etree.ElementTree as ET
tree = ET.parse('country_data.xml')
root = tree.getroot()

def show_element(level, el):
    print(level, el.tag, el.attrib, el.text)

def show_child(level, el):
    show_element(level, el)

    for child in el:
        show_child(level+1, child)

show_child(1, root)
ちょっとはすっきりしたかしらね(笑)。
次回は、note のエクスポートデータで試してみよう。
この記事が気に入ったらサポートをしてみませんか?