
TikZ 入門(4) ~円を描く~

今回は円の描き方です。
円を描く
中心 (a,b) ,半径 r の円を描くときは
\draw (a,b) circle [radius=r];
と入力します。例えば
\begin{tikzpicture}
\draw (0,0) circle[radius=1];
\draw [red,very thick](1,0)circle[radius=2];
\end{tikzpicture}
とすると(以下、\begin{tikzpicture} と \end{tikzpicture} は省略します)

となります。
ちなみに、入力の順番を変えて
\draw[red,very thick](1,0)circle[radius=2];
\draw(0,0)circle[radius=1];
とすると

となります。
左端の重複部分に違いが出ますね。
TikZ では原則「入力した順」に描かれているので、後から入力したものが上に現れます。
また、楕円を描くときは
\draw(0,0) circle (3 and 2);
とすれば

となります。つまり
\draw (位置) circle (x半径 and y半径);
ということですね。
円を塗りつぶす
円を塗りつぶしたいときは
\fill [cyan] (0,0) circle [radius=1];
\filldraw [fill=black!10!white] (3,0) circle [radius=1];
などと入力すれば

となります。つまり
\fill [色] (位置) circle [radius=半径]; で縁取り無しの円
\filldraw [色] (位置) circle [radius=半径]; で縁取り有りの円
を [色] で塗りつぶすということになります。
ちなみに、上の例の black!10!white は「黒を白に10%混ぜた色」を意味します。これは white を省略して black!10! としても同じです。
この円の塗りつぶしを利用して、点を表したりします。例えば
\draw [step=1,very thin,gray] (-1.5,-1.5) grid (2.5,2.5);
\draw [->,>=stealth,semithick] (-1.5,0)--(2.5,0) node[right]{$x$};
\draw [->,>=stealth,semithick] (0,-1.5)--(0,2.5) node[left]{$y$};
\draw (0,0) node[below left]{O};
\fill (0,0) circle [radius=0.1];
\fill (2,1) circle [radius=0.1] node[above right]{A};
とすると
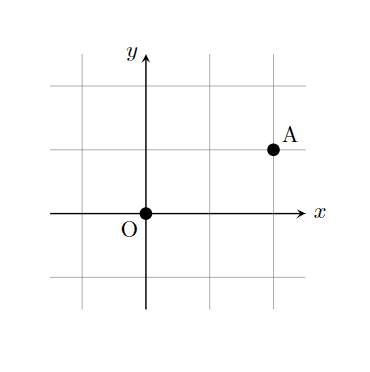
となります。
ちなみに 1 行目の
\draw [step=1,very thin,gray] (-1.5,-1.5) grid (2.5,2.5);
でグリッド線を描いています。
ベン図を描く
例えば
\draw (0,0) circle [radius=1];
\draw (1,0) circle [radius=1];
\draw ({cos(pi*3/4 r)},{sin(pi*3/4 r)}) node[fill=white]{A};
\draw ({1+cos(pi/4 r)},{sin(pi/4 r)}) node[fill=white]{B};
とすると

となります。
AとBの共通部分だけを塗りつぶしたいときは scope 環境が便利です。
まず、上述のコードの上側に
\fill[black!10!] (0,0) circle [radius=1];
と付け足すと

となります。
で、この領域を円Bで切り取ってあげるために
\begin{scope} \clip (1,0) circle [radius=1];
\fill[black!10!] (0,0) circle [radius=1];
\end{scope}
とします。すると

となってイイ感じ♪
それでは、また!
この記事が気に入ったらサポートをしてみませんか?