
Photo by
dngri
pythonでプログラミング!--Tkinterで!

下記参考に作ってみましょう!
基本的なところをみていきます。
import tkinter as tk
from tkinter import *
from tkinter import messagebox as mbox

# ウィンドウを作成 --- (*1)
win = tk.Tk()
win.geometry("500x250") # サイズを指定
win.title("tkinterのtest")

pngfile=PhotoImage(file="back.gif")
cv=Canvas(bg="red",width=500-1,height=266-1)
cv.create_image(1,1,image=pngfile,anchor=NW)
cv.grid(row=1, column=1)

# 部品を作成 --- (*2)
# ラベルを作成
label = tk.Label(win, text='名前は?')
label.pack()
label.place(x=150, y=20)

# テキストボックスを作成
text = tk.Entry(win)
text.pack()text.place(x=150, y=50)
text.insert(tk.END, 'Taro') # 初期値を指定

# OKボタンを押した時 --- (*3)
def ok_click():
   # テキストボックスの内容を得る
   s = text.get()
   # ダイアログを表示
   mbox.showinfo('挨拶', s + 'さん、こんにちは!')

# ボタンを作成 --- (*4)
okButton = tk.Button(win, text="ok",bg='#f0e68c', fg='#ff0000',command=ok_click)
okButton.pack()
okButton.place(x=200, y=170)

# ウィンドウを動かす
win.mainloop()
$ python3 test.pyと実行すると、
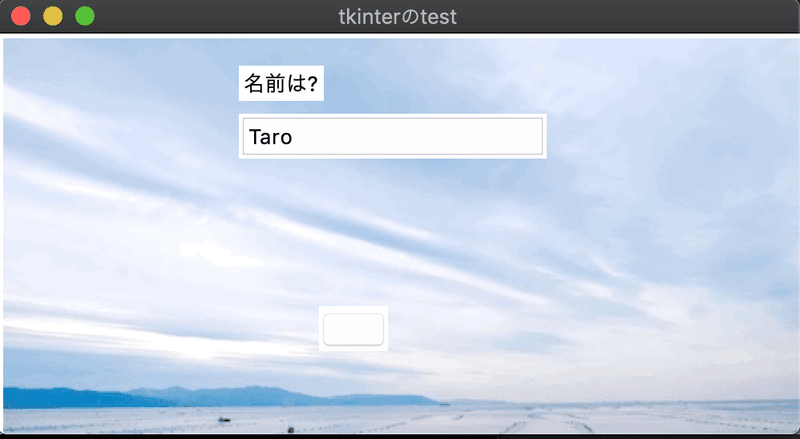
と表示されます。
それで、ここで使っている部品としては
tkinter.Label
tkinter.Entry
tkinter.messagebox
tkinter.Button
tkinter.messagebox
あと、
イメージは
pngfile=PhotoImage(file="back.gif")
cv=Canvas(bg="red",width=500-1,height=266-1)
cv.create_image(1,1,image=pngfile,anchor=NW)
cv.grid(row=1, column=1)
となっています。ここで注意はgifを使っているところです。使えるフォーマットが限定されています。
ボタンを押した時の挙動は
# OKボタンを押した時 --- (*3)
def ok_click():
   s = text.get()
   mbox.showinfo('挨拶', s + 'さん、こんにちは!')
と規定していて、
okButton = tk.Button(win, text="ok",bg='#f0e68c', fg='#ff0000',command=ok_click)
okButton.pack()
okButton.place(x=200, y=170)
とボタンを作り、押した時に ok_click()が動きます。
okButton.pack()
okButton.place(x=200, y=170)
ですが、okButton.place()で表示場所を指定するのですが、okButton.pack()のあとにokButton.place()を置かないとちゃんと動きません。注意するところですね。
今回ボタン名が表示されていません。原因はなんでしょう。今の所、不明です。
この記事が気に入ったらサポートをしてみませんか?