Pythonでやってみた(画像処理編3):OAK-D OpenCV DepthAIカメラで遊んでみた

1.概要
2021年7月にLuxonis社より販売された簡単に様々な画像処理ができる(らしい)「Depth AI」なるものを使用してみました。
2.Depth AIの説明
2-1.購入品
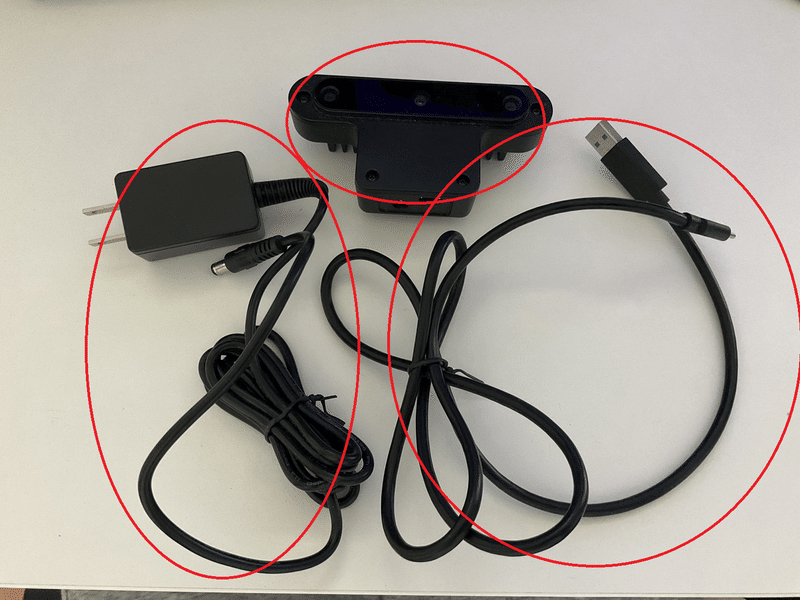
必要な物はPCとDepthAIカメラのみです。DepthAIはスイッチサイエンス(SS)など購入可能でありSSでの付属品は下記の通りです。
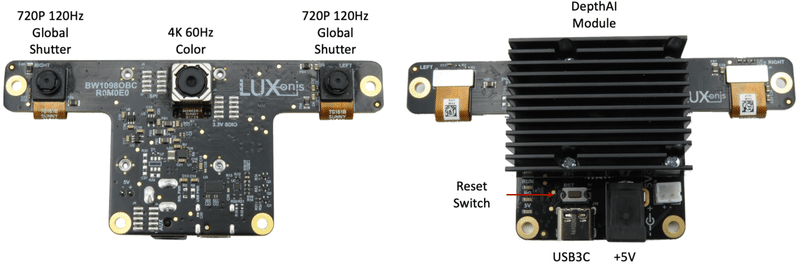
Luxonis OAK-D Depth AIカメラ
USB Type-Cケーブル(1m)
ACアダプタ(スイッチサイエンス選定の電気用品安全法の準拠品)
公式Docs「First steps with DepthAI」よりPCはUSB3ポートが必要です。
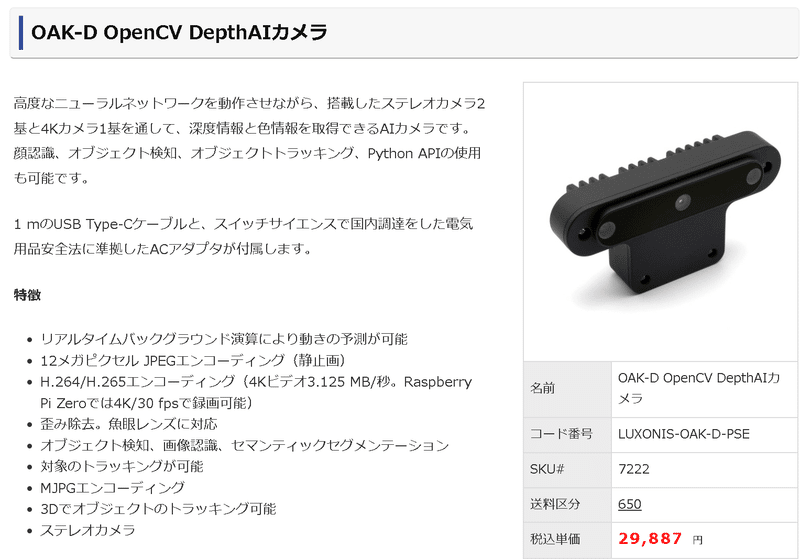
モジュール内にいろいろ組み込んでいるため価格は安くはないですが、開発のしやすさを考慮すればコスパはいいと思います。
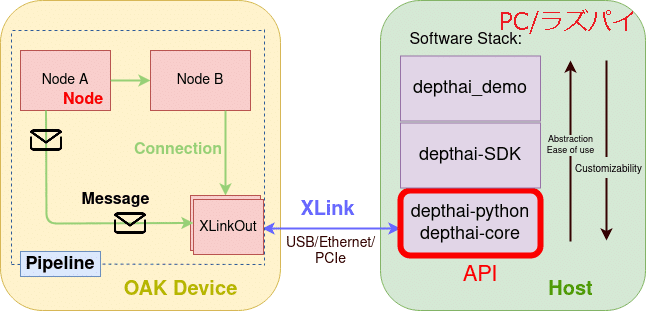
2-2.Depth AIの仕組み
下図がそれっぽいやつですが正直理解できないため追って修正予定
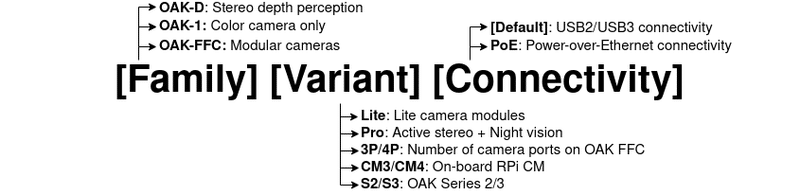
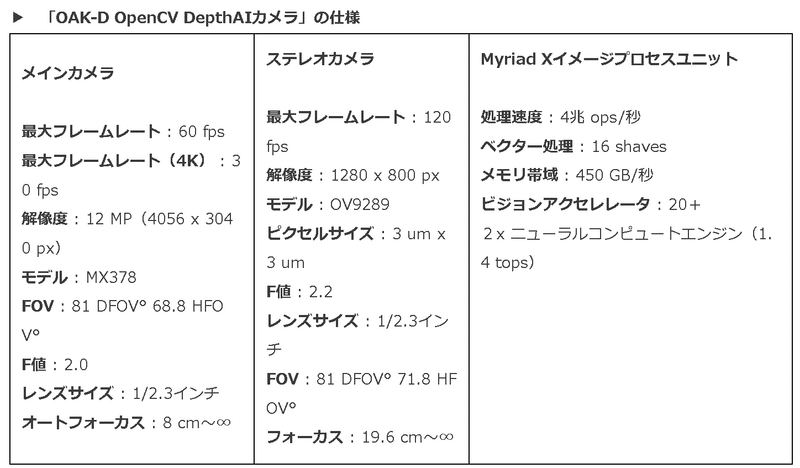
2-3.Depth AIの仕様・構成
仕様は「製品概要」、「DepthAI Hardware Documentation」、「OAK-D」、「PRTIMESの記事」を参照しました。
DepthAIはMovidius VPU(Intel® Movidius™ Vision Processing Units)を中心に構成されておりDepthAIで1つのエコシステムとして完成されているため、簡単に他の製品(ロボットやPC)に接続可能です。
(DepthAI’s Documentation参照)
2-4.DepthAIでできること
DepthAIはSpatial AI(空間AI)による3次元的な物体認知(物体検出)ができます。AIとDepthを合わせたいくつかのアプローチがあります。
【Spatial AIの特徴】
1.Neural inference fused with depth map:3次元での物体位置検出
2.Semantic depth:3次元(奥行方向)のSemantic Segmentation
3.Stereo neural inference:-
3.環境構築
Depth AIを使用するための環境構築を実施していきます。なお複数のライブラリをインストール(特にOpenCV周り)するため仮想環境で実行することを推奨します。
3-1.レポジトリのクローン
希望する作業ディレクトリ上で下記コマンドを実行します。結果として"depthai"フォルダが作成されます。
フォルダが作成されたらcdコマンドで作業ディレクトリを変更します。
[Terminal]
git clone https://github.com/luxonis/depthai.git
cd depthai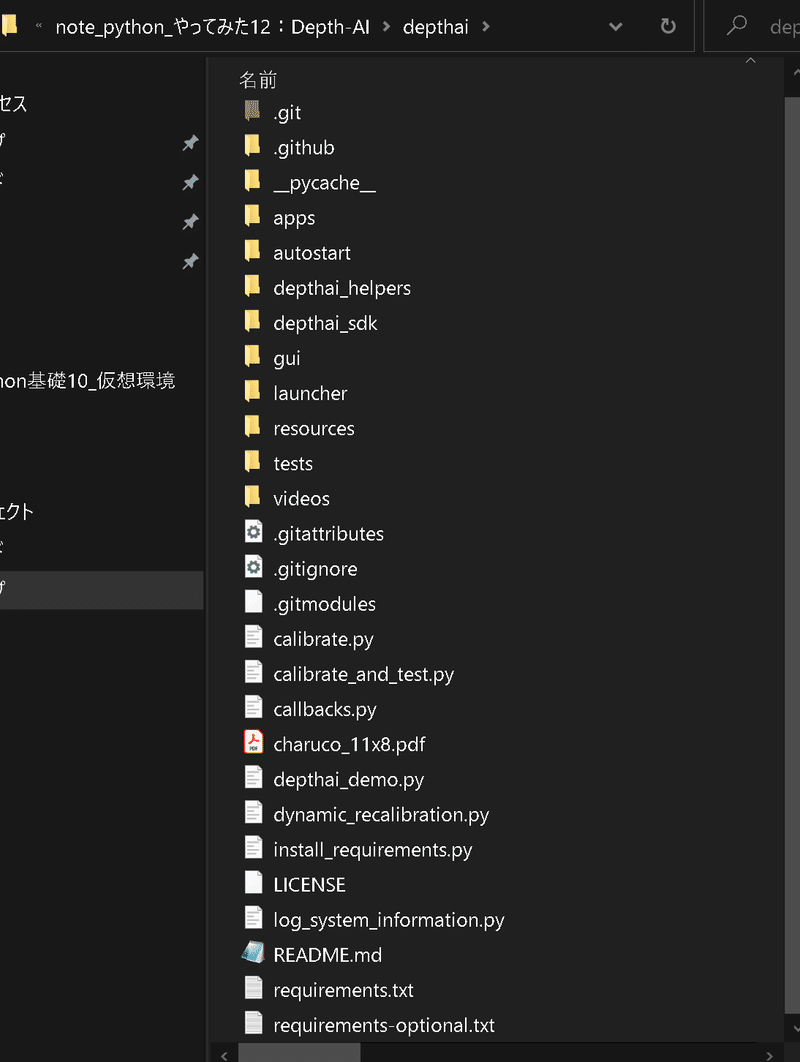
3-2.ライブラリのインストール:
必要なライブラリをインストールしていきます。下記コードは"pip install -r requirements.txt"とは異なりますのでご注意ください。
[Terminal]
python install_requirements.py
参考までに"requirements.txt"の中は下記の通りであり上のコマンドを実行すると下記ライブラリがインストールされます。
[requirements.txt]
requests==2.26.0
--extra-index-url https://www.piwheels.org/simple
opencv-python==4.5.4.58 ; platform_machine != "aarch64" and platform_machine != "armv6l" and platform_machine != "armv7l" and python_version == "3.10"
opencv-python==4.5.1.48 ; platform_machine != "aarch64" and platform_machine != "armv6l" and platform_machine != "armv7l" and python_version != "3.10"
opencv-contrib-python==4.5.4.58 ; platform_machine != "aarch64" and platform_machine != "armv6l" and platform_machine != "armv7l" and python_version == "3.10"
opencv-contrib-python==4.5.1.48 ; platform_machine != "aarch64" and platform_machine != "armv6l" and platform_machine != "armv7l" and python_version != "3.10"
opencv-python==4.4.0.46 ; platform_machine == "armv6l" or platform_machine == "armv7l"
opencv-contrib-python==4.4.0.46 ; platform_machine == "armv6l" or platform_machine == "armv7l"
-e ./depthai_sdk
--extra-index-url https://artifacts.luxonis.com/artifactory/luxonis-depthai-data-local/wheels/
pyqt5>5,<5.15.6 ; platform_machine != "armv6l" and platform_machine != "armv7l" and platform_machine != "aarch64"
--extra-index-url https://artifacts.luxonis.com/artifactory/luxonis-python-snapshot-local/
depthai==2.17.3.
4.Demoプレイ
Depth AIを試してみます。チュートリアルは公式を参照しました。なおDemoスクリプト実行時は自動的にデバイスデータが取得されており、いやな場合は"Usage statistics”に記載の対応が必要になります。
4-1.デモスクリプトの実行:depthai_demo.py
作業ディレクトリ上で下記コマンドを実行するだけです。実行後にウィンドウが立ち上がりカメラとともにデフォルトの物体検出モデルが動きます。
[Terminal]
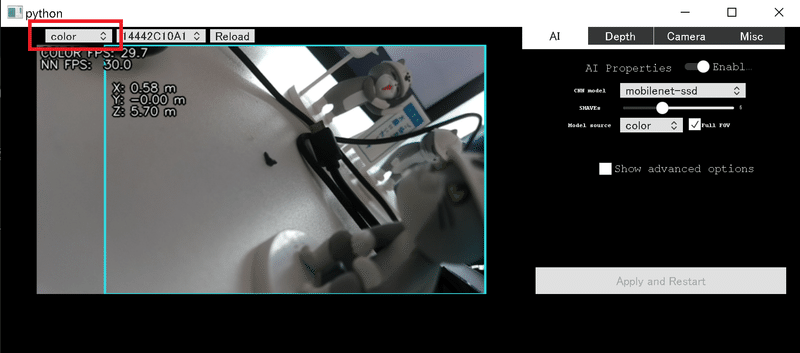
python depthai_demo.py【起動時のデフォルト値】
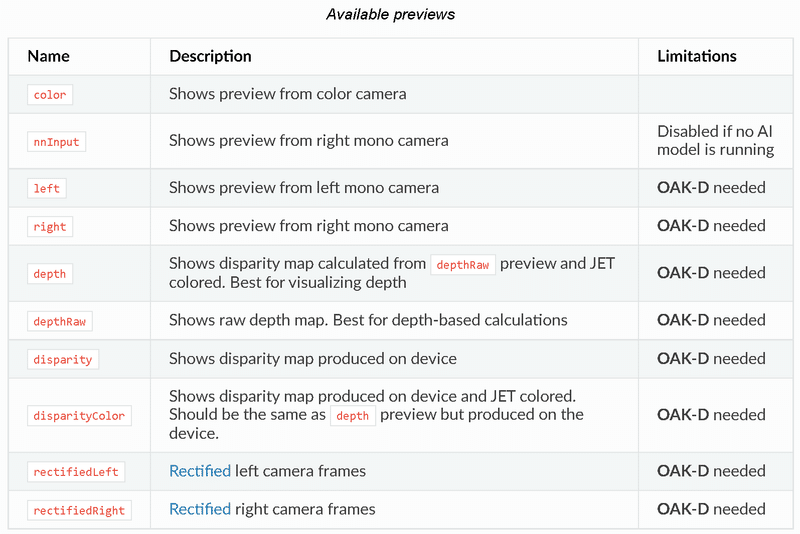
画面の種類:color
CNN model:mobilenet-ssd

公式Docsよりデフォルトの「MobileNetv2」はPASCAL 2007 VOCのクラスを学習しており20クラス程度しか認識できません。次節以降に別モデルで物体検出を実施してみます。
4-2.画面の種類変更
左上を選択すると画面の種類を変更できます。
4-3.AIモデルを選択
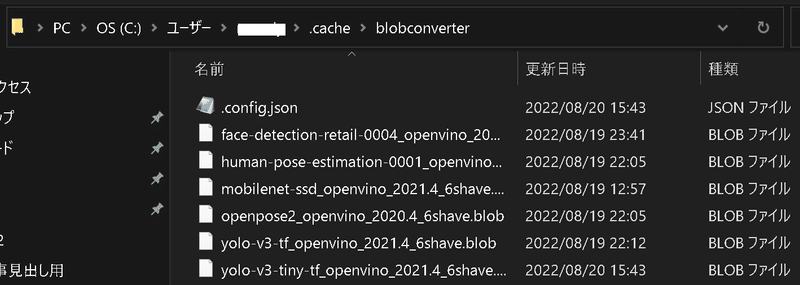
別モデルの選択は"CNN model"をクリックしてモデル選択後に"Apply and Restart"をクリックします。下記ではYOLOv3を選択しました。
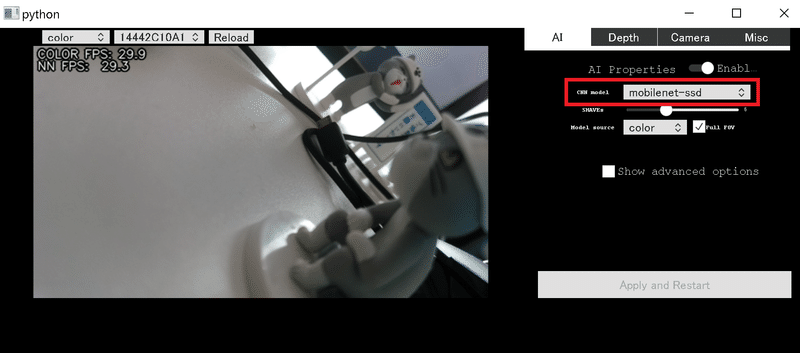

なお初めて使用するモデルは"C/Users/<user名>/.cache"フォルダの中にblobファイル(学習モデル)が保存されるためしばらく時間がかかります。2回目以降は素早くモデルの切り替えが可能です。
【補足:起動時のMLモデル指定】
起動時に"python depthai_demo.py -cnn <モデル名>"よりモデルを指定して実行できます。参考として公式のモデルリストを下表に示しますが一部はエラーとなります(おそらく適宜更新されている)ので使いたいモデルは"CNN model"から確認する必要があります。
(python depthai_demo.py -cnn yolo-v3で実行するとエラーがでました)
[Terminal]
python depthai_demo.py -cnn yolo-v3-tf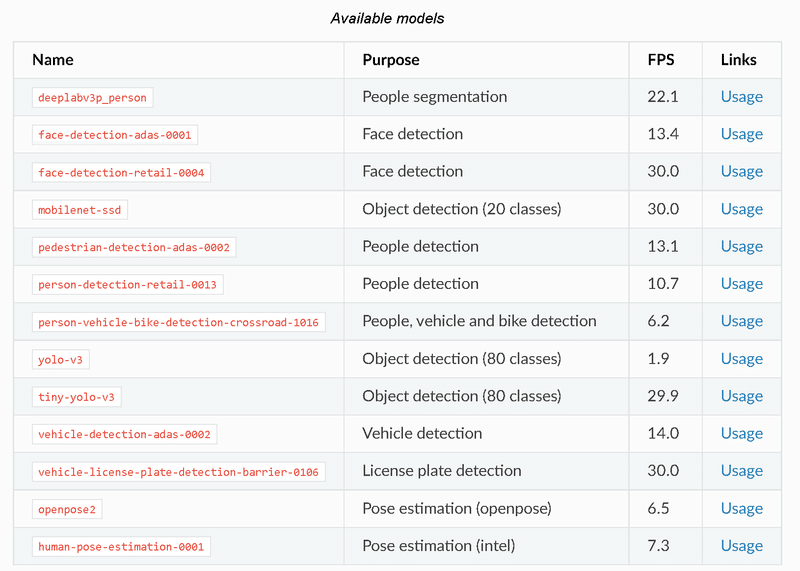
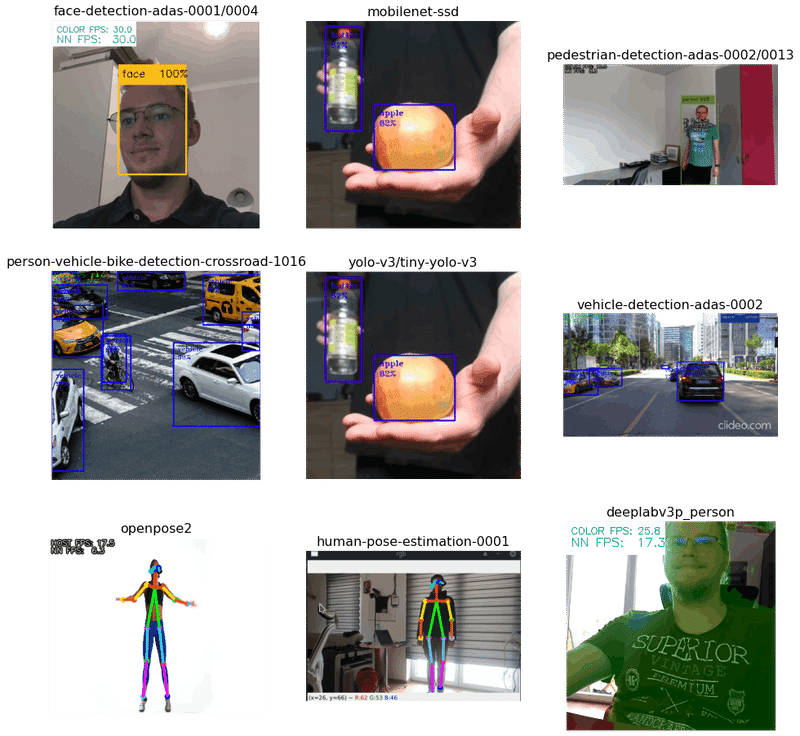
参考としてそれぞれのモデルの動作は下記の通りです。
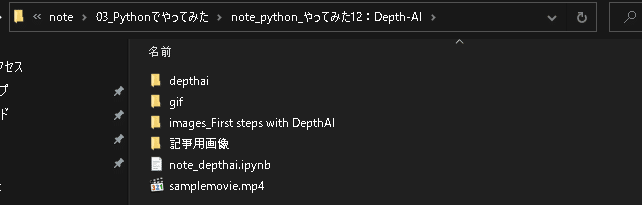
4-4.動画へのAIモデル適用
動画にAIモデルを適用する場合は"python depthai_demo.py -gt cv -vid <動画のパス>"で実行可能です。参考として"samplemovie.mp4"を処理しました。
[Terminal ※作業ディレクトリはdepthaiのため動画パスや親フォルダの..を指定]
python depthai_demo.py -gt cv -vid ../samplemovie.mp4
4-5.プロパティの設定
ウィンドウ右のタブから下記4つを選択でき、「Apply and Restart」を押すことで反映できます。
AI:AIモデルの詳細
Depth:Depthに関する詳細
Camera:カメラの設定
Misc:その他(色など)
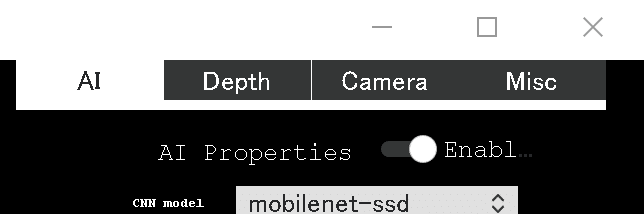
4-5-1.Al Properties
本タブの機能は下記の通りです。
【機能一覧】
●Enable:AI機能をoff(ただのWebカメとして使用)にできます。
●CNN Model::AIモデルを選択
●SHAVEs:NNのSHAVE cores数を設定。高い値ほどモデルは早く動くが一度にできる特徴が制限されます
●Model source:モデルの入力にどのカメラを使用するか
●Full FOV:ONにするとNNのインプットサイズに合わせてカメラの画像サイズをスケールダウンする。OFFの場合はNNのアスペクト比に合うように画像を切り取る。
※NN:ニューラルネットワーク

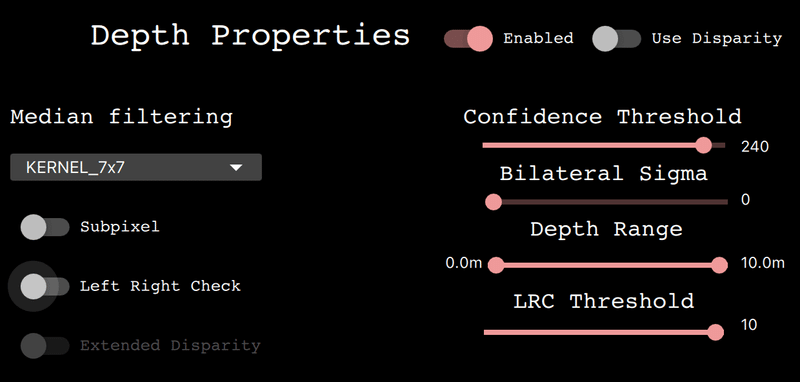
4-5-2.Depth Properties
本タブの機能は下記の通りです。
【機能一覧】
Switches:
●Enabled:Depthのon/off切り替え
ー>ステレオノードの使用を制限(深さを気にしない処理の場合に利用)
ー>offにするとDepthタグがグレーアウトするため再起動が必要
●Use Disparity:(意味が分からないので)原文は下記の通り
If not set (default), the demo script will calculate the disparity map on host, based on the depth map. If enabled, the same processing will be performed on the device, consuming some of the memory but limiting host resource usage.
Basic properties:
●Median Filtering:Depth mapに使用するノイズ除去フィルターのtype
●Subpixel:subpixel modeの有効化|depth精度の増加であり特にlong-range測定に有効
●Left Right Check:left-right checkの有効化|物体検出の領域でのOcclusions(閉塞?)により間違って計算された"disparity pixels"の除去
●Extended Disparity:extended disparity modeの有効化|与えられたベースラインに最も近い最小距離
●Depth Range:デバイスで計算される最大・最小距離を選定
●LRC Threshold: disparity pixels間の最大差を指定
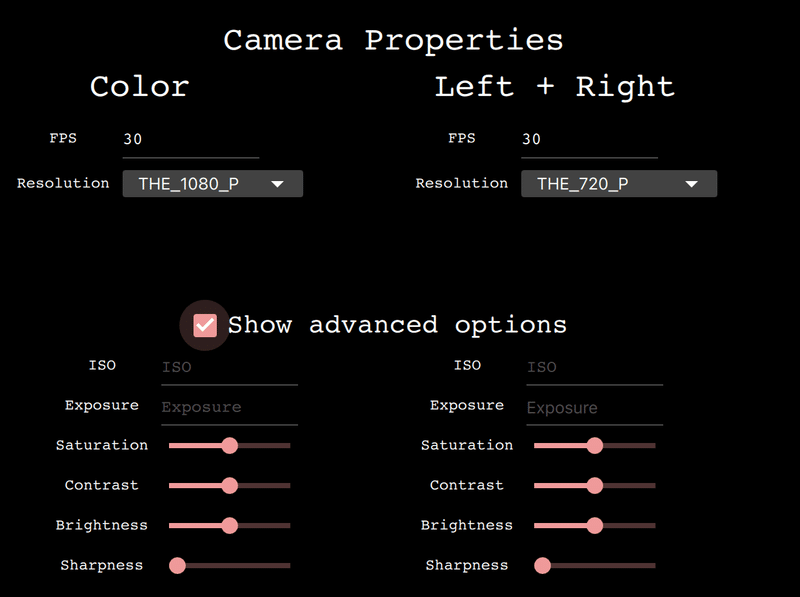
4-5-3.Camera Properties
本タブの機能は下記の通りです。
【機能一覧】
Basic properties:
●FPS:カメラのフレーム取得速度を設定
●Resolution: カメラセンターの解像度およびフレームサイズ
Advanced:
●ISO:カメラのライト集合能を制御
●Exposure: カメラの光の量(露出量)を制御
●Saturation: フレームの色の輝度を制御
●Contrast: フレームのコントラストを制御
●Brightness: フレームの色の明るさを制御
●Sharpness: フレームのシャープさを制御
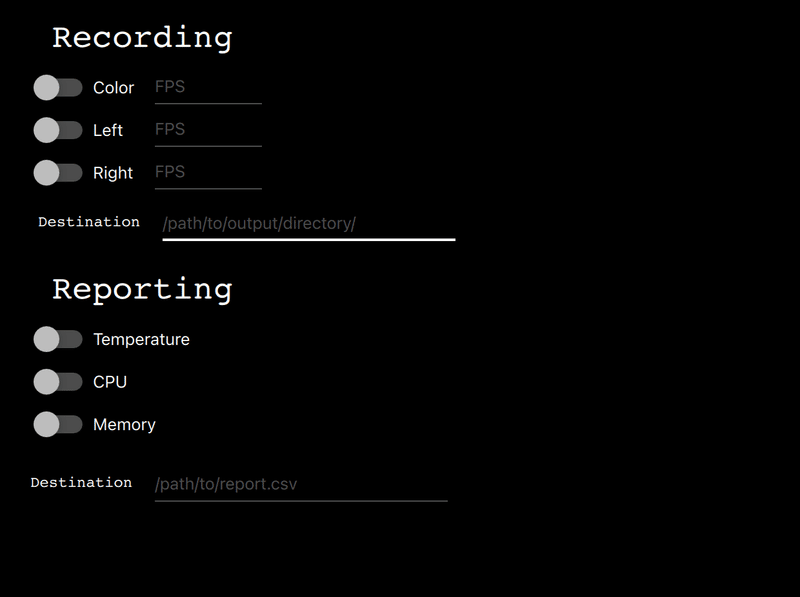
4-5-4.Misc
本タブの機能は下記の通りです。
【機能一覧】
Recording:
●Switches:enable recording of specified camera
●FPS inputs: FPS を設定(default 30)
●Destination::レコードがどこに保存されるか指定
Reporting:
●Switches: enable logging of the specified feature
●Destination: レポートファイルがどこに保存されるか指定
5.Luxonis提供のAIモデル実演
Luxonis社が提供しているモデルを利用可能です。Depth AIで使用できるAIモデル一覧は下記の通りです。詳細はは公式Docsをご確認ください。
【Depth AIでできること】
●Gaze Estimation
●Age and Gender Recognition
●Automated Face-Blurring
●Spatial Calculation - On Host to Show/Explain Math That Happens in OAK-D for the Spatial Location Calculator
●Stereo Depth from Camera and From Host
●Automatic JPEG Encoding and Saving Based on AI Results
●Face Mask Detection
●Crowd Counting
●Cumulative Object Counting
●How to Run Customer CV Models On-Device
●Semantic Segmentation of Depth
●Multi-Class Semantic Segmentation
●Depth-Driven Focus
●Monocular Depth Estimation - Neural Network Based
●Tutorial on How To Display High-Res Object Detections
●Running EfficientDet Object Detector On-Camera
●Running EfficientNet Image Classifier On-Camera
●Facial Expression (Emotion) Recognition On-Camera
●Face Detection On-Camera (libfacedetection)
●Face Recognition On-Camera
●Facial Landmarks On-Camera
●Fire Detection On-Camera
●Head Posture Detection On-Camera
●Human-Machine Safety Example On-Camera
●Human Skeletal Pose Estimation
●LaneNet Lane Segmentation On-Camera
●License Plate Recognition On-Camera
●Lossless Zooming (4K to 1080p Zoom/Crop) On-Camera
●Running Mask-RCNN On-Camera
●MegaDepth Neural Depth Running On-Camera
●MJPEG Streaming From On-Camera
●Class Agnostic Object Detector Running On-Camera
●How to Use Multiple Cameras Simultaneously
●How to Sync NN Data with Image Data for Custom Neural Networks
●Optical Character Recognition in the Wild On-Camera
●Palm Detection On-Camera
●Pedestrian Re-Identification
●People Counting On-Camera
●People Direction-Tracker and Counter
●Playing an On-Camera Encoded Stream on the Host
●Recording and Playing Back Depth in RealSense -Compatible Format
●Road Segmentation On-Camera
●Roboflow Integration
●Social Distancing Example
●Text Blurring On-Device
●Image Classification On-Device
●Facial Key-point Triangulation On-Camera
●WebRTC Streaming Example
●YOLO V3 V4 V5 X and P On-Camera
参考として情報抽出したスクレイピングコードも記載しておきます。
[IN]
import requests
import numpy as np
import pandas as pd
import matplotlib.pyplot as plt
import japanize_matplotlib
from bs4 import BeautifulSoup

url = 'https://github.com/luxonis/depthai-experiments'

res = requests.get(url)
soup = BeautifulSoup(res.text, 'html5lib')

body = soup.select_one('readme-toc .SelectMenu-modal')
items = body.select('.filter-item')
for item in items:
    print('●'+ item.text.replace(' (here)',''))

[OUT]
同上
5-1.環境構築:モデルのダウンロード
作業ディレクトリ内で下記コードを実行すると"depthai-experiments"フォルダが作成され、中には様々なAIモデルが入っております。
特定のモデルのみ使用したい場合はGitHubから直接DLも可能です。
[Terminal]
git clone https://github.com/luxonis/depthai-experiments.git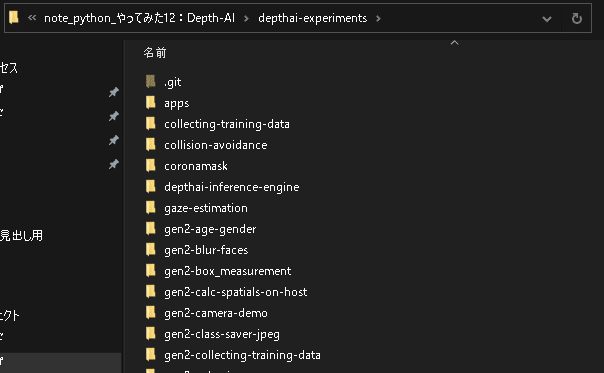
なおそれぞれのフォルダ内に"requirements.txt"がありますが3-2節の環境構築を実施済みであればエラーは出ませんでした。
5-2.AIモデル1:Automated Face-Blurring
顔にぼかしを入れるAIモデルを使用しました。
手順は①作業ディレクトリに移動、②mainスクリプトを実行だけです。
[Terminal]
cd gen2-blur-faces
python main.py
5-3.AIモデル2:Spatial Calculation
DepthAIの空間座標の計算手法を可視化してくれます。
手順は①作業ディレクトリに移動、②mainスクリプトを実行だけです。
[Terminal]
cd gen2-calc-spatials-on-host
python main.py
6.Webカメラ利用1:UVC
DepthAIをWebカメラとして利用することも可能です。本章ではZoomに利用できるか確認しました。
6-1.環境構築
まずは環境構築を実施します。手順は下記の通りです。既に実行済みのプロセス(仮想環境作成など)があれば飛ばしてください。
※depthaiレポジトリをクローン×環境構築は3章で対応済みのため省略
仮想環境の作成
仮想環境の有効化
GitHubからdepthai-pythonのレポジトリをクローン
作業ディレクトリを"depthai-python"に変更
Gitコマンドで”develop”ブランチに切り替え
必要なライブラリのインストール
[Terminal]
conda create -n depthai python=3.9
conda activate depthai

git clone https://github.com/luxonis/depthai-python.git
cd depthai-python

git checkout develop
python examples/install_requirements.py
6-2.Webカメラの起動
起動方法は2種類あります。結論としては現状ではどちらも期待通りには動きませんでした。
DepthAI Demo Script:depthaiの"depthai_demo.py"を使用
UVC:depthai-pythonのrgb_uvc.pyを利用
【DepthAI Demo Script】
depthaiディレクトリで下記を実行します。実行中はWebカメラとして認識はしてくれますが、画面をキャプチャーしてくれませんでした。
[Terminal]
python depthai_demo.py --app uvc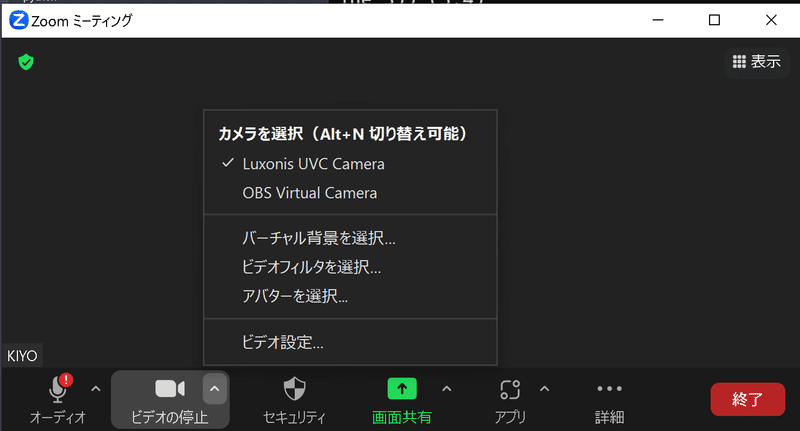
【UVC】
depthai-pythonディレクトリで下記を実行します。数秒程度は画面キャプチャしてくれるのですが、それ以降では画面が固まり更新されなくなりました。
[Terminal]
python examples/ColorCamera/rgb_uvc.py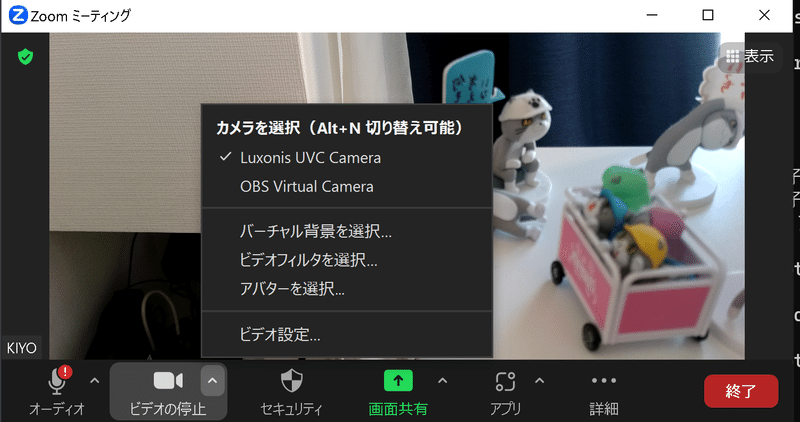
7.Webカメラ利用2:仮想カメラ
公式ドキュメント記載の通りUVCだと全てのアプリには対応しておらず、特にWindowsではパイプラインがうまく機能しない問題も存在します。
公式では対策として下記が紹介されていますが、今回は仮想カメラを使用しました。
Python virtual camera
OBS forwarding UVC stream
OBS capturing cv2 window
7-1.pyvirtualcamのインストール
仮想カメラを扱うPythonモジュールとして”pyvirtualcam”を使用します。環境構築はpipでインストールするだけとなります。
[Terminal]
pip install pyvirtualcam7-2.Pythonスクリプト実行
”pyvirtualcam”も用いて仮想カメラを作るスクリプト作成します。コードは公式のデモコードをそのまま使用しました。エラーなく完了すると”UVC runnging”と表示されます。
※カメラの同時利用はできないため"rgb_uvc.py"など別のスクリプトを実行している場合はそちらの方を停止してください。
[vcam.py]
import pyvirtualcam
import depthai as dai

# Create pipeline
pipeline = dai.Pipeline()
cam = pipeline.create(dai.node.ColorCamera)
cam.setColorOrder(dai.ColorCameraProperties.ColorOrder.RGB)
cam.setPreviewSize(1280,720)
xout = pipeline.create(dai.node.XLinkOut)
xout.setStreamName("rgb")
cam.preview.link(xout.input)

# Connect to device and start pipeline
with dai.Device(pipeline) as device, pyvirtualcam.Camera(width=1280, height=720, fps=20) as uvc:
    qRgb = device.getOutputQueue(name="rgb", maxSize=4, blocking=False)
    print("UVC running")
    while True:
        frame = qRgb.get().getFrame()
        uvc.send(frame)
[Terminal]
python vcam.py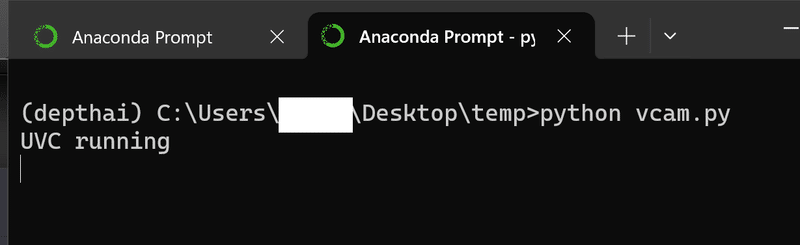
”UVC runnging”中にZoomを開いて”OBS Virtual Camera”を選択すると通常通りのWebカメラとして利用することが可能となります。
※もし”OBS Virtual Camera”が選択できない場合、OBS Studioのダウンロードが必要かもしれないです。
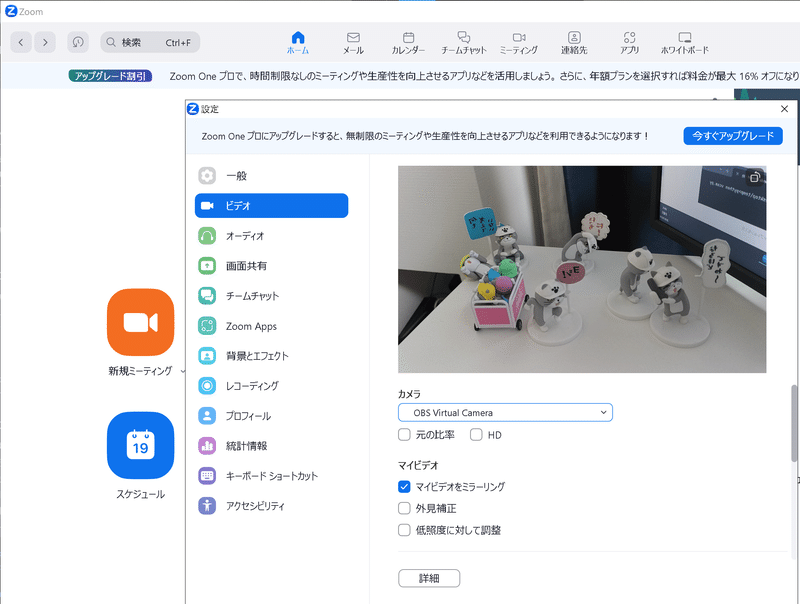
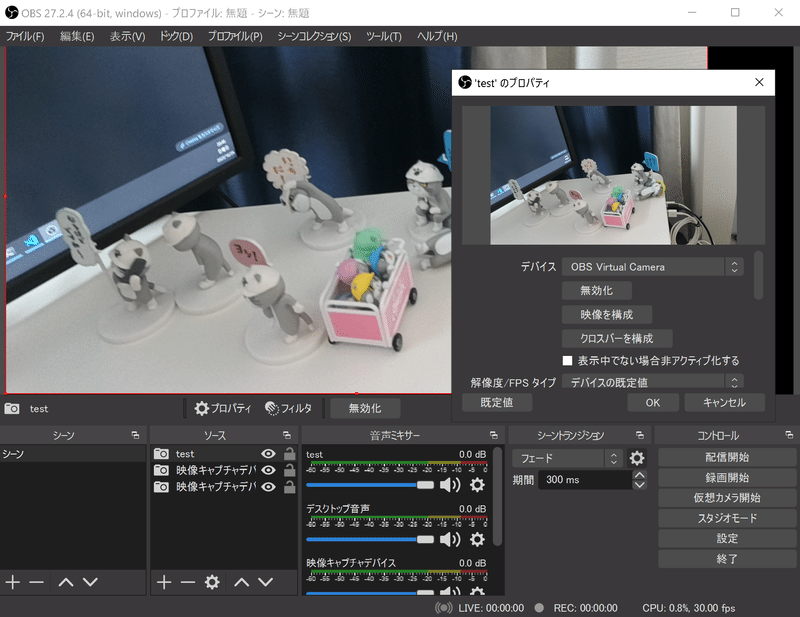
参考として「OBS Studio」を用いて”映像キャプチャデバイス/OSB Virtual Camera”からWebカメラの情報を取得することも可能です。
8.Raspberry Pi環境で利用
Raspberry Piでも実施できるか試験しました。詳細は別記事で作成しましたのでご確認ください。
参考資料
あとがき
部屋で撮影すると処理がめんどくさい!!
この記事が気に入ったらサポートをしてみませんか?