【徒然iOS】気ままにUIKit52〜MapにPin立て〜
概要
このマガジンは四十を過ぎたおっさんが、
を参考にStoryboardでiOSアプリを完全に趣味で楽しんでいるだけな記事を気ままに上げてます。
今回
をレッツゴ🕺
前準備
念の為、
バックアップ
新しいクラス
ビューコントローラの追加
イニシャルビューの変更
をいつも通りやってから本題へ💃

本題
ピンとは、
目的地などを把握しやすくするためなどに使う地図上に刺す目印
⒈前回までの手順を組み込もう
を参考に、、、

実際に操作しながら読んでる人はわかると思うんだけど、
オブジェクト指向言語なんで、他のビュークラスにコードを貼り付けて、部分的にコードを直すだけ=使い回しができるから、
めちゃくちゃサクサク簡単でしょ
ここまでの操作をするだけなら実は数秒でできる🕺
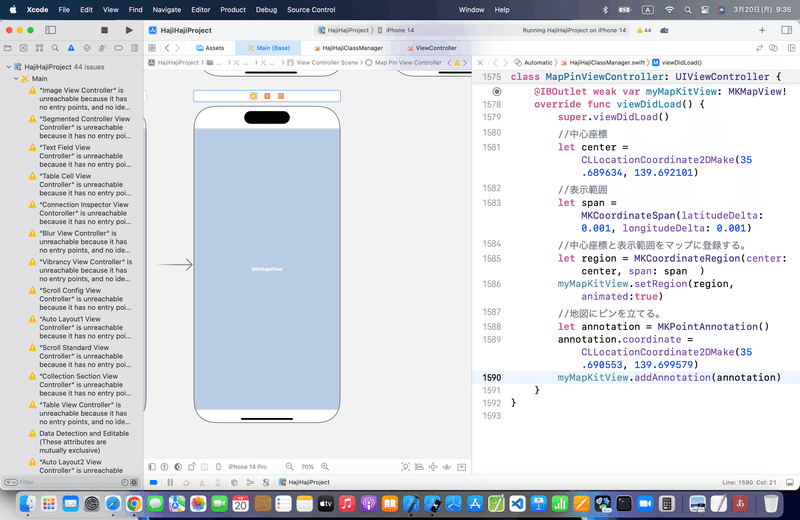
⒉今回のコードを組み込んでいこう
//地図にピンを立てる。
let annotation = MKPointAnnotation()
annotation.coordinate = CLLocationCoordinate2DMake(35.690553, 139.699579)
testMapView.addAnnotation(annotation)
を追加しろってことなんで、

⒊シミュレータで実行すると〜〜〜

てことで、、、
 //地図にピンを立てる。
 let annotation = MKPointAnnotation()
 annotation.coordinate = CLLocationCoordinate2DMake(35.689634, 139.692101)
都庁に変更すると、、、

⒋次は以下のコードで相対座標にピンを立てよう
//
//  ViewController.swift
//
import UIKit
import MapKit
class ViewController: UIViewController {
    @IBOutlet weak var testMapView: MKMapView!
    //最初からあるメソッド
    override func viewDidLoad() {
        super.viewDidLoad()
        let x = 140.000000 //経度
        let y = 35.000000  //緯度
        //中心座標
        let center = CLLocationCoordinate2DMake(y, x)
        //表示範囲
        let span = MKCoordinateSpanMake(1.0, 1.0)
        //中心座標と表示範囲をマップに登録する。
        let region = MKCoordinateRegionMake(center, span)
        testMapView.setRegion(region, animated:true)
        //中心にピンを立てる。
        let annotation = MKPointAnnotation()
        annotation.coordinate = CLLocationCoordinate2DMake(y, x)
        testMapView.addAnnotation(annotation)
        //左下のピン
        let annotation1 = MKPointAnnotation()
        annotation1.coordinate = CLLocationCoordinate2DMake(y-1.0, x-1.0)
        testMapView.addAnnotation(annotation1)
        //右下のピン
        let annotation2 = MKPointAnnotation()
        annotation2.coordinate = CLLocationCoordinate2DMake(y-1.0, x+1.0)
        testMapView.addAnnotation(annotation2)
        //左上のピン
        let annotation3 = MKPointAnnotation()
        annotation3.coordinate = CLLocationCoordinate2DMake(y+1.0, x-1.0)
        testMapView.addAnnotation(annotation3)
        //右上のピン
        let annotation4 = MKPointAnnotation()
        annotation4.coordinate = CLLocationCoordinate2DMake(y+1.0, x+1.0)
        testMapView.addAnnotation(annotation4)
    }
}
を参考に〜〜〜〜
以下のコードに修正〜〜〜〜
class MapPinViewController: UIViewController {
    @IBOutlet weak var myMapKitView: MKMapView!
    let x = 139.692101 //経度
    let y = 35.689634  //緯度
    override func viewDidLoad() {
        super.viewDidLoad()
        //中心座標
        let center = CLLocationCoordinate2DMake(y, x)
        //表示範囲
        let span = MKCoordinateSpan(latitudeDelta: 1.0, longitudeDelta: 1.0)
        //中心座標と表示範囲をマップに登録する。
        let region = MKCoordinateRegion(center: center, span: span)
        myMapKitView.setRegion(region, animated:true)
        //中心にピンを立てる。
        let annotation = MKPointAnnotation()
        annotation.coordinate = CLLocationCoordinate2DMake(y, x)
        myMapKitView.addAnnotation(annotation)
        //左下のピン
        let annotation1 = MKPointAnnotation()
        annotation1.coordinate = CLLocationCoordinate2DMake(y-1.0, x-1.0)
        myMapKitView.addAnnotation(annotation1)
        //右下のピン
        let annotation2 = MKPointAnnotation()
        annotation2.coordinate = CLLocationCoordinate2DMake(y-1.0, x+1.0)
        myMapKitView.addAnnotation(annotation2)
        //左上のピン
        let annotation3 = MKPointAnnotation()
        annotation3.coordinate = CLLocationCoordinate2DMake(y+1.0, x-1.0)
        myMapKitView.addAnnotation(annotation3)
        //右上のピン
        let annotation4 = MKPointAnnotation()
        annotation4.coordinate = CLLocationCoordinate2DMake(y+1.0, x+1.0)
        myMapKitView.addAnnotation(annotation4)
    }
}
⒌ピンにタイトルとサブタイトルを表示〜〜〜〜
//
//  ViewController.swift
//
import UIKit
import MapKit
class ViewController: UIViewController {
    @IBOutlet weak var testMapView: MKMapView!
    //最初からあるメソッド
    override func viewDidLoad() {
        super.viewDidLoad()
        let x = 140.000000 //経度
        let y = 35.000000  //緯度
        //中心座標
        let center = CLLocationCoordinate2DMake(y, x)
        //表示範囲
        let span = MKCoordinateSpanMake(1.0, 1.0)
        //中心座標と表示範囲をマップに登録する。
        let region = MKCoordinateRegionMake(center, span)
        testMapView.setRegion(region, animated:true)
        //中心にピンを立てる。
        let annotation = MKPointAnnotation()
        annotation.coordinate = CLLocationCoordinate2DMake(y, x)
        annotation.title = "中心"
        annotation.subtitle = "\(annotation.coordinate.latitude), \(annotation.coordinate.longitude)"
        testMapView.addAnnotation(annotation)
        //左下のピン
        let annotation1 = MKPointAnnotation()
        annotation1.coordinate = CLLocationCoordinate2DMake(y-1.0, x-1.0)
        annotation1.title = "左下"
        annotation1.subtitle = "\(annotation1.coordinate.latitude), \(annotation1.coordinate.longitude)"
        testMapView.addAnnotation(annotation1)
        //右下のピン
        let annotation2 = MKPointAnnotation()
        annotation2.coordinate = CLLocationCoordinate2DMake(y-1.0, x+1.0)
        annotation2.title = "右下"
        annotation2.subtitle = "\(annotation2.coordinate.latitude), \(annotation2.coordinate.longitude)"
        testMapView.addAnnotation(annotation2)
        //左上のピン
        let annotation3 = MKPointAnnotation()
        annotation3.coordinate = CLLocationCoordinate2DMake(y+1.0, x-1.0)
        annotation3.title = "左上"
        annotation3.subtitle = "\(annotation3.coordinate.latitude), \(annotation3.coordinate.longitude)"
        testMapView.addAnnotation(annotation3)
        //右上のピン
        let annotation4 = MKPointAnnotation()
        annotation4.coordinate = CLLocationCoordinate2DMake(y+1.0, x+1.0)
        annotation4.title = "右上"
        annotation4.subtitle = "\(annotation4.coordinate.latitude), \(annotation4.coordinate.longitude)"
        testMapView.addAnnotation(annotation4)
    }
}
を参考に〜〜〜〜
今回のコード(まとめ)
class MapPinViewController: UIViewController {
    @IBOutlet weak var myMapKitView: MKMapView!
    let x = 139.692101 //経度
    let y = 35.689634  //緯度
    override func viewDidLoad() {
        super.viewDidLoad()
        //中心座標
        let center = CLLocationCoordinate2DMake(y, x)
        //表示範囲
        let span = MKCoordinateSpan(latitudeDelta: 1.0, longitudeDelta: 1.0)
        //中心座標と表示範囲をマップに登録する。
        let region = MKCoordinateRegion(center: center, span: span)
        myMapKitView.setRegion(region, animated:true)
        //中心にピンを立てる。
        let annotation = MKPointAnnotation()
        annotation.coordinate = CLLocationCoordinate2DMake(y, x)
        annotation.title = "中心"
        annotation.subtitle = "\(annotation.coordinate.latitude), \(annotation.coordinate.longitude)"
        myMapKitView.addAnnotation(annotation)
        //左下のピン
        let annotation1 = MKPointAnnotation()
        annotation1.coordinate = CLLocationCoordinate2DMake(y-1.0, x-1.0)
        annotation1.title = "左下"
        annotation1.subtitle = "\(annotation1.coordinate.latitude), \(annotation1.coordinate.longitude)"
        myMapKitView.addAnnotation(annotation1)
        //右下のピン
        let annotation2 = MKPointAnnotation()
        annotation2.coordinate = CLLocationCoordinate2DMake(y-1.0, x+1.0)
        annotation2.title = "右下"
        annotation2.subtitle = "\(annotation2.coordinate.latitude), \(annotation2.coordinate.longitude)"
        myMapKitView.addAnnotation(annotation2)
        //左上のピン
        let annotation3 = MKPointAnnotation()
        annotation3.coordinate = CLLocationCoordinate2DMake(y+1.0, x-1.0)
        annotation3.title = "左上"
        annotation3.subtitle = "\(annotation3.coordinate.latitude), \(annotation3.coordinate.longitude)"
        myMapKitView.addAnnotation(annotation3)
        //右上のピン
        let annotation4 = MKPointAnnotation()
        annotation4.coordinate = CLLocationCoordinate2DMake(y+1.0, x+1.0)
        annotation4.title = "右上"
        annotation4.subtitle = "\(annotation4.coordinate.latitude), \(annotation4.coordinate.longitude)"
        myMapKitView.addAnnotation(annotation4)
    }
}
てな感じでコードを変更して〜〜〜

ブラッシュアップ
は、今回もここまででやってるので割愛〜〜〜💦
ポイント
前回が簡単すぎるくらい簡単にあっさりしてたけど、
すでに結構、マップアプリっぽくなってきてるでしょ👀
ま、あくまでも標準機能をオイラ自身振り返りがてら説明できたらって趣旨で書いてるだけなんで、
先にひとりで進むなり、緯度経度を色々変えてみたりして、楽しんでね。
ちなみに、
class MapPinViewController: UIViewController {
    @IBOutlet weak var myMapKitView: MKMapView!

    let x = 139.692101
    let y = 35.689634
    let latitudeDelta = 1.0
    let longitudeDelta = 1.0

    override func viewDidLoad() {
        super.viewDidLoad()
        //中心座標
        let center = CLLocationCoordinate2DMake(y, x)
        //表示範囲
        let span = MKCoordinateSpan(latitudeDelta: latitudeDelta, longitudeDelta: longitudeDelta)
        //中心座標と表示範囲をマップに登録する。
        let region = MKCoordinateRegion(center: center, span: span)
        myMapKitView.setRegion(region, animated:true)
        //中心にピンを立てる。
        let annotation = MKPointAnnotation()
        annotation.coordinate = CLLocationCoordinate2DMake(y, x)
        annotation.title = "中心"
        annotation.subtitle = "\(annotation.coordinate.latitude), \(annotation.coordinate.longitude)"
        myMapKitView.addAnnotation(annotation)
        //左下のピン
        let annotation1 = MKPointAnnotation()
        annotation1.coordinate = CLLocationCoordinate2DMake(y-1.0, x-1.0)
        annotation1.title = "左下"
        annotation1.subtitle = "\(annotation1.coordinate.latitude), \(annotation1.coordinate.longitude)"
        myMapKitView.addAnnotation(annotation1)
        //右下のピン
        let annotation2 = MKPointAnnotation()
        annotation2.coordinate = CLLocationCoordinate2DMake(y-1.0, x+1.0)
        annotation2.title = "右下"
        annotation2.subtitle = "\(annotation2.coordinate.latitude), \(annotation2.coordinate.longitude)"
        myMapKitView.addAnnotation(annotation2)
        //左上のピン
        let annotation3 = MKPointAnnotation()
        annotation3.coordinate = CLLocationCoordinate2DMake(y+1.0, x-1.0)
        annotation3.title = "左上"
        annotation3.subtitle = "\(annotation3.coordinate.latitude), \(annotation3.coordinate.longitude)"
        myMapKitView.addAnnotation(annotation3)
        //右上のピン
        let annotation4 = MKPointAnnotation()
        annotation4.coordinate = CLLocationCoordinate2DMake(y+1.0, x+1.0)
        annotation4.title = "右上"
        annotation4.subtitle = "\(annotation4.coordinate.latitude), \(annotation4.coordinate.longitude)"
        myMapKitView.addAnnotation(annotation4)
    }
}
てな感じで、表示範囲に設定してる数字も、引数にしておけば、、、
管理しやすいし。
    let latitudeDelta = 10.0
    let longitudeDelta = 10.0
にすると、シミュレータ起動時に、

色々、遊んでみてね〜〜〜〜🕺
Apple公式
さて、次回は
をレッツゴする〜〜〜〜
よもやま話
たしか、ひろゆきが、プログラマが趣味な人とゲームが趣味な人の違いは、
<積み上げができるか>の違い
みたいなことを過去に言ってたんだけど、まさにそれ。
過去の記事でも触れてると思うんだけど、
日本のサイトや本って、入門とか優しいって銘打ちながら、初学者には全然わからないような解説すっ飛ばし系とか、いきなり難しい機能を一発目に組ませるみたいな本が多い。
簡単すぎるくらい簡単なところ=基本
からやっていったほうが、その知識の積み上げで、色々と応用ができるようになる。
今回の記事でコード見ればわかるけど、必要なコードを追加する、削除する、再利用するで
自分が作りたいアプリを最終的に作れるようになればいいだけ
(業務でやろうが、個人でやろうが関係ない。
やってることはいっしょ)
だから、
色々と標準機能を見ていく中で、
「この機能を使って自分ならどんなアプリを作るだろう」
「自分が作りたいアプリに使える機能はどれだろう」
って感じで見ていってもらうと、長期記憶になっていいかもね。
その時に、
デザインの原則=引き算の美学
👉ビューを分ける、機能を削ぎ落とす
を忘れないこと
ひとつのビューに機能や情報を盛り込みすぎて、使いにくいとかわかりにくいってユーザーさんに感じさせたら意味がないし、せっかく多機能だったり、良いアイデアを使ってもらえないともったいないからね。
せっかちな人ほど、
「そんなことはどうでもいいし、簡単なことはすっ飛ばして、売れるアプリの作り方だけ知りたい。」
みたいに思って、簡単なことをすっ飛ばしがちなんだけど、
どんなアプリだって、最初は簡単な標準機能から始まってるからね〜〜〜
要は、
組み合わせ
今回の記事のコードが組み合わせの良い例だったのでちょっとよもやま話を最後に入れておいた💦
この記事が気に入ったらサポートをしてみませんか?
