
gradio 入門 (3) - Blocks

「gradio」のBlocksの使い方をまとめました。
前回
1. Blocksとイベントリスナー
1-1. Blocksの構造
「Blocks」は、with gr.Blocks 句で記述します。
コンポーネントは、Interfaceで使用されるものと同じですが、with句内で作成すると自動的にBlocksに追加されます。
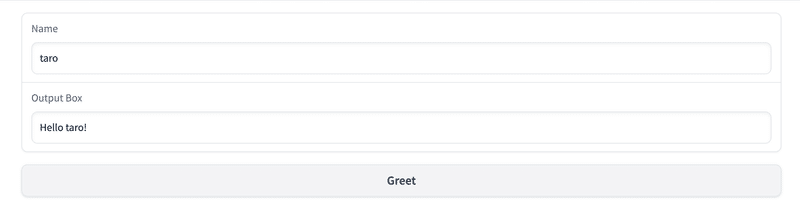
click()はイベントリスナーです。
import gradio as gr

# あいさつの関数
def greet(name):
    return "Hello " + name + "!"

# Blocksの作成
with gr.Blocks() as demo:
    # コンポーネント
    name = gr.Textbox(label="Name")
    output = gr.Textbox(label="Output Box")
    greet_btn = gr.Button("Greet")

    # イベントリスナー
    greet_btn.click(fn=greet, inputs=name, outputs=output, api_name="greet")

# 起動
demo.launch()
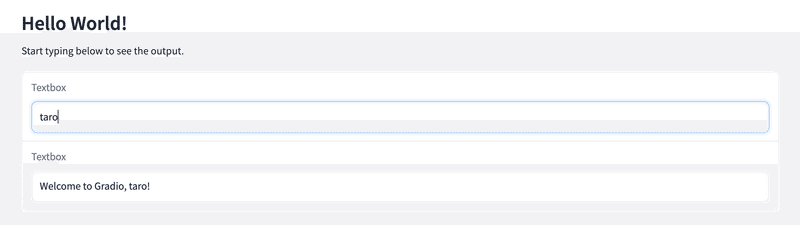
1-2. イベントリスナーとインタラクティビティ
上の例では、Nameは編集できますが、Output Boxは編集できません。これは、イベントリスナーへの入力として機能するコンポーネントがインタラクティビティになるためです。interactive 引数でインタラクティビティを直接指定できます。
output = gr.Textbox(label="Output", interactive=True)1-3. イベントリスナーの種類
welcome()は、クリックではなく、テキストボックス入力によってトリガーされます。 これは、change() イベントリスナーによるものです。 コンポーネントが異なれば、サポートされるイベントリスナーも異なります。 たとえば、Videoコンポーネントは、ユーザーが再生を押したときにトリガーされる play() イベントリスナーをサポートしています。 各コンポーネントのイベント リスナーについてはドキュメントを参照してください。
import gradio as gr

# ようこその関数
def welcome(name):
    return f"Welcome to Gradio, {name}!"

# Blocksの作成
with gr.Blocks() as demo:
    # コンポーネント
    gr.Markdown(
    """
    # Hello World!
    Start typing below to see the output.
    """)
    inp = gr.Textbox(placeholder="What is your name?")
    out = gr.Textbox()

    # イベントリスナー
    inp.change(welcome, inp, out)


# 起動
demo.launch()
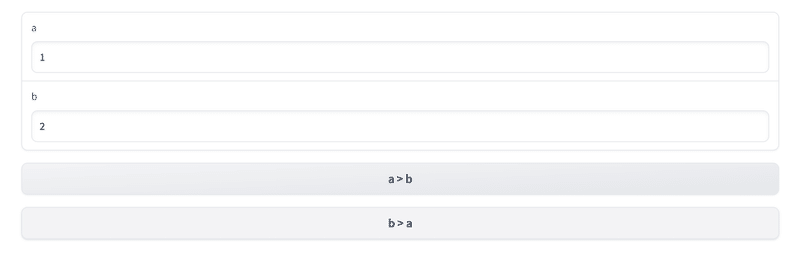
1-4. 複数のデータフロー
Blocksは、In terfaceのように単一のデータフローに限定されません。
以下では、num1 は num2 への入力として機能し、またその逆も可能です。アプリが複雑になるにつれて、さまざまなコンポーネントを接続する多くのデータ フローが発生します。
import gradio as gr

# 加算の関数
def increase(num):
    return num + 1

# Blcksの作成
with gr.Blocks() as demo:
    # コンポーネント
    a = gr.Number(label="a")
    b = gr.Number(label="b")
    btoa = gr.Button("a > b")
    atob = gr.Button("b > a")

    # イベントリスナー
    atob.click(increase, a, b)
    btoa.click(increase, b, a)

# 起動
demo.launch()
1-4. マルチステップ
以下は、「マルチステップ」の例です。音声をテキストに変換し、テキストを感情に変換しています。
import gradio as gr
from transformers import pipeline

# パイプライン
asr = pipeline("automatic-speech-recognition", "facebook/wav2vec2-base-960h")
classifier = pipeline("text-classification")

# スピーチ → テキスト の関数
def speech_to_text(speech):
    text = asr(speech)["text"]
    return text

# テキスト → 感情 の関数
def text_to_sentiment(text):
    return classifier(text)[0]["label"]

# Blcksの作成
with gr.Blocks() as demo:
    # コンポーネント
    audio_file = gr.Audio(type="filepath")
    text = gr.Textbox()
    label = gr.Label()
    b1 = gr.Button("Recognize Speech")
    b2 = gr.Button("Classify Sentiment")

    # イベントリスナー
    b1.click(speech_to_text, inputs=audio_file, outputs=text)
    b2.click(text_to_sentiment, inputs=text, outputs=label)

# 起動
demo.launch()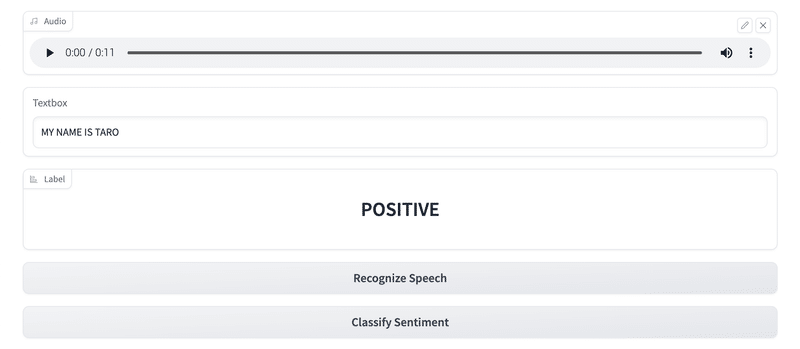
1-5. リストと辞書の関数入力
複数の入力コンポーネントで関数にデータを渡す場合、関数が入力コンポーネントの値を受け入れる方法が2つあります。
・引数のリスト
・コンポーネントをキーとした辞書
import gradio as gr

# Blocksの作成
with gr.Blocks() as demo:
    # コンポーネント
    a = gr.Number(label="a")
    b = gr.Number(label="b")
    with gr.Row():
        add_btn = gr.Button("Add")
        sub_btn = gr.Button("Subtract")
    c = gr.Number(label="sum")

    # イベントリスナー
    def add(num1, num2):
        return num1 + num2
    add_btn.click(add, inputs=[a, b], outputs=c)

    # イベントリスナー
    def sub(data):
        return data[a] - data[b]
    sub_btn.click(sub, inputs={a, b}, outputs=c)

# 起動
demo.launch()
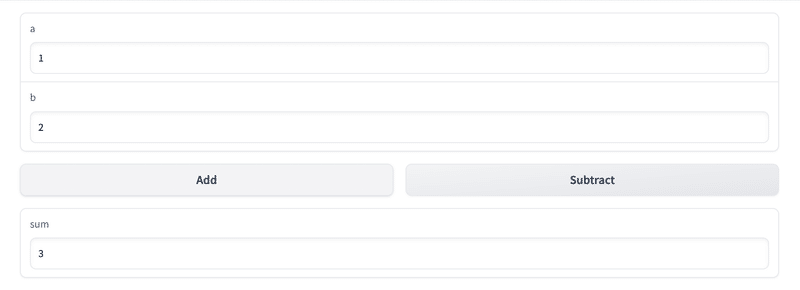
add() と sub() はどちらも a と b を入力として受け取ります。 ただし、これらのリスナー間では構文が異なります。
dd_btn リスナーには、入力を list として渡します。 関数 add() は、これらの各入力を引数として受け取ります。 a の値は引数 num1 にマップされ、b の値は引数 num2 にマップされます。
sub_btn リスナーには、入力を set として渡します (中括弧に注意)。 関数 sub() は単一の辞書引数データを受け取ります。ここで、キーは入力コンポーネント、値はそれらのコンポーネントの値です。
1-6. リストと辞書の関数戻り値
同様に、複数の出力コンポーネントの値を、次のように返すことができます。
・値のリスト
・コンポーネントをキーとした辞書
import gradio as gr

# Blocksの生成
with gr.Blocks() as demo:
    # コンポーネント
    food_box = gr.Number(value=10, label="Food Count")
    status_box = gr.Textbox()

    # イベントリスナー
    def eat(food):
        if food > 0:
            return food - 1, "full"
        else:
            return 0, "hungry"
    gr.Button("EAT").click(
        fn=eat,
        inputs=food_box,
        outputs=[food_box, status_box]
    )

# 起動
demo.launch()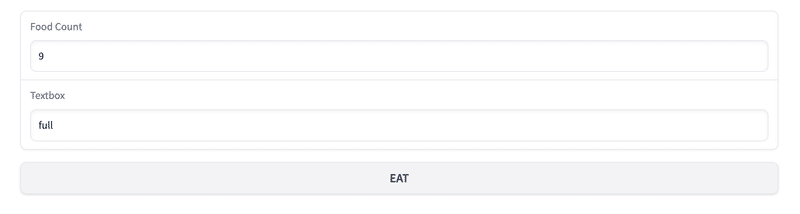
上記のreturnは、それぞれ food_box と status_box に対応する2つの値を返します。
各出力コンポーネントに対応する値のリストを順番に返す代わりに、出力コンポーネントに対応するキーと新しい値としての値を含むディクショナリを返すこともできます。
import gradio as gr

# Blocksの作成
with gr.Blocks() as demo:
    # コンポーネント
    food_box = gr.Number(value=10, label="Food Count")
    status_box = gr.Textbox()

    # イベントリスナー
    def eat(food):
        if food > 0:
            return {food_box: food - 1, status_box: "full"}
        else:
            return {status_box: "hungry"}
    gr.Button("EAT").click(
        fn=eat,
        inputs=food_box,
        outputs=[food_box, status_box]
    )

# 起動
demo.launch()
1-7. コンポーネント設定の更新
イベントリスナー関数の戻り値は、通常、対応する出力コンポーネントの更新値です。 場合によっては、コンポーネント設定 (visibilityなど) も更新したい場合があります。 この場合、更新値だけではなく、 gr.update() オブジェクトを返します。
import gradio as gr

# テキストボックス変更の関数
def change_textbox(choice):
    if choice == "short":
        return gr.update(lines=2, visible=True, value="Short story: ")
    elif choice == "long":
        return gr.update(lines=8, visible=True, value="Long story...")
    else:
        return gr.update(visible=False)

# Blocksの作成
with gr.Blocks() as demo:
    radio = gr.Radio(
        ["short", "long", "none"], label="Essay Length to Write?"
    )
    text = gr.Textbox(lines=2, interactive=True)
    radio.change(fn=change_textbox, inputs=radio, outputs=text)

# 起動
demo.launch()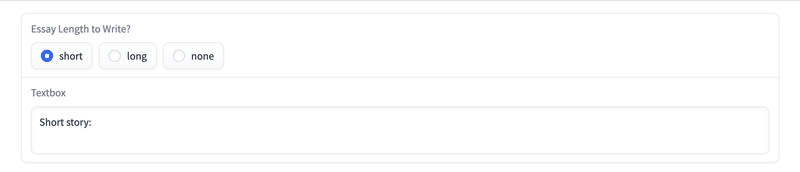
gr.update() を使用して Textbox 自体を設定しています。value で値を更新することもできます。
1-8. イベントの連続実行
イベントリスナーの then() を使用して、イベントの連続実行も可能です。前のイベントの実行が終了した後にイベントが実行されます。
以下のチャットボットの例では、まずユーザー メッセージでチャットボットを更新し、次にアシスタントの応答でチャットボットを更新しています。
import random
import time

import gradio as gr

# Blocksの作成
with gr.Blocks() as demo:
    # UI
    chatbot = gr.Chatbot()
    msg = gr.Textbox()
    clear = gr.ClearButton([msg, chatbot])

    # イベントリスナー
    def user(message, chat_history):
        chat_history.append((message, None))
        return "", chat_history
    def bot(chat_history):
        time.sleep(2)
        bot_message = random.choice(["How are you?", "I love you", "I'm very hungry"])
        chat_history[-1][1] = bot_message
        return chat_history
    msg.submit(user, [msg, chatbot], [msg, chatbot]).then(
        bot, chatbot, chatbot)

# 起動
demo.launch()then()は、前のイベントでエラーが発生したかどうかに関係なく、後続のイベントを実行します。 前のイベントが正常に実行された場合にのみ後続のイベントを実行したい場合は、success() を使用します。
1-9. イベントの継続実行
イベントリスナーの every 引数を使用すると、固定スケジュールでイベントを実行できます。 これにより、クライアント接続が開いている間、秒ごとにイベントが実行されます。秒にはイベント自体の実行時間は含まれてないため、every=5 で実行時間 1 秒の関数を実行した場合は、6秒毎に実行されます。
import math

import gradio as gr
import numpy as np
import plotly.express as px

plot_end = 2 * math.pi

# プロットの取得
def get_plot(period=1):
    global plot_end
    x = np.arange(plot_end - 2 * math.pi, plot_end, 0.02)
    y = np.sin(2*math.pi*period * x)
    fig = px.line(x=x, y=y)
    plot_end += 2 * math.pi
    if plot_end > 1000:
        plot_end = 2 * math.pi
    return fig

# Blocksの作成
with gr.Blocks() as demo:
    # コンポーネント
    with gr.Row():
        with gr.Column():
            gr.Markdown("Change the value of the slider to automatically update the plot")
            period = gr.Slider(label="Period of plot", value=1, minimum=0, maximum=10, step=1)
            plot = gr.Plot(label="Plot (updates every half second)")

    # イベントリスナー
    dep = demo.load(get_plot, None, plot, every=1)
    period.change(get_plot, period, plot, every=1, cancels=[dep])

# 起動
demo.queue().launch()
1-10. イベントデータの収集
関連するイベントデータクラスをイベントリスナー関数の引数に追加することで、イベントに関する特定のデータを収集できます。
たとえば、.select() のイベントデータは、gradio.SelectData 引数です。 このイベントは、ユーザーがコンポーネントの一部を選択するとトリガーされ、イベントデータにはユーザーが具体的に選択した場所に関する情報が含まれます。 ユーザーがテキストボックス内の特定の単語、ギャラリー内の特定の画像、またはデータフレーム内の特定のセルを選択した場合、イベントデータ引数には特定の選択に関する情報が含まれます。
import gradio as gr

# Blocksの作成
with gr.Blocks() as demo:
    # コンポーネント
    turn = gr.Textbox("X", interactive=False, label="Turn")
    board = gr.Dataframe(value=[["", "", ""]] * 3, interactive=False, type="array")

    # イベントリスナー
    def place(board, turn, evt: gr.SelectData):
        # セルが空でない
        if evt.value:
            return board, turn

        # ボードに書き込む
        board[evt.index[0]][evt.index[1]] = turn
        turn = "O" if turn == "X" else "X"
        return board, turn
    board.select(place, [board, turn], [board, turn])

# 起動
demo.launch()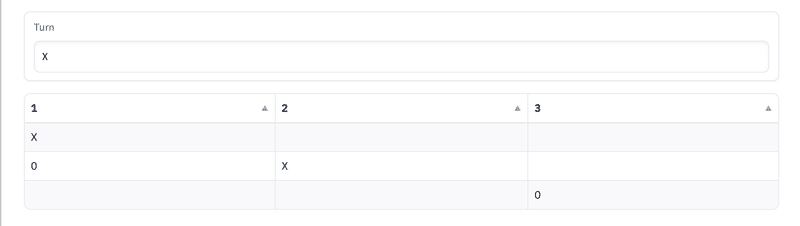
2. レイアウトの制御
デフォルトでは、with gr.Blocks 句内の要素は垂直に配置されます。
2-1. 行
with gr.Row 句内の要素は水平に配置されます。
with gr.Blocks() as demo:
    with gr.Row():
        btn1 = gr.Button("Button 1")
btn2 = gr.Button("Button 2")行内のすべての要素を同じ高さにするには、style() の equal_height 引数を指定します。
with gr.Blocks() as demo:
    with gr.Row().style(equal_height=True):
        textbox = gr.Textbox()
        btn2 = gr.Button("Button 2")
行内の要素の幅は、すべてのコンポーネントに存在するscale引数とmin_width引数の組み合わせによって制御できます。
scale は、要素が行内でどのようにスペースを占めるかを定義する整数です。 スケールが 0 に設定されている場合、要素はスペースを占めるまで拡張されません。 スケールが 1 以上に設定されている場合、要素は適切に拡大されます。 連続した複数の要素は、そのスケールに比例して拡大されます。 以下では、btn1 は btn2 の2倍に拡張しますが、btn0 はまったく拡張しません。
with gr.Blocks() as demo:
    with gr.Row():
        btn0 = gr.Button("Button 0", scale=0)
        btn1 = gr.Button("Button 1", scale=1)
        btn2 = gr.Button("Button 2", scale=2)
min_width は要素の最小幅を設定します。 すべての min_width 値を満たすのに十分なスペースがない場合、行は折り返されます。
行について詳しくは、ドキュメントを参照してください。
2-2. 列とネスト
列内のコンポーネントは互いに垂直方向に重ねて配置されます。垂直レイアウトは Blocks のデフォルトのレイアウトであるため、通常、列は行内にネストされます。
import gradio as gr

# Blocksの生成
with gr.Blocks() as demo:
    # 行の生成
    with gr.Row():
        text1 = gr.Textbox(label="t1")
        slider2 = gr.Textbox(label="s2")
        drop3 = gr.Dropdown(["a", "b", "c"], label="d3")

    # 行の生成
    with gr.Row():
        # 列の生成
        with gr.Column(scale=1, min_width=300):
            text1 = gr.Textbox(label="prompt 1")
            text2 = gr.Textbox(label="prompt 2")
            inbtw = gr.Button("Between")
            text4 = gr.Textbox(label="prompt 1")
            text5 = gr.Textbox(label="prompt 2")

        # 列の生成
        with gr.Column(scale=2, min_width=300):
            img1 = gr.Image("sample.png")
            btn = gr.Button("Go").style(full_width=True)

# 起動
demo.launch()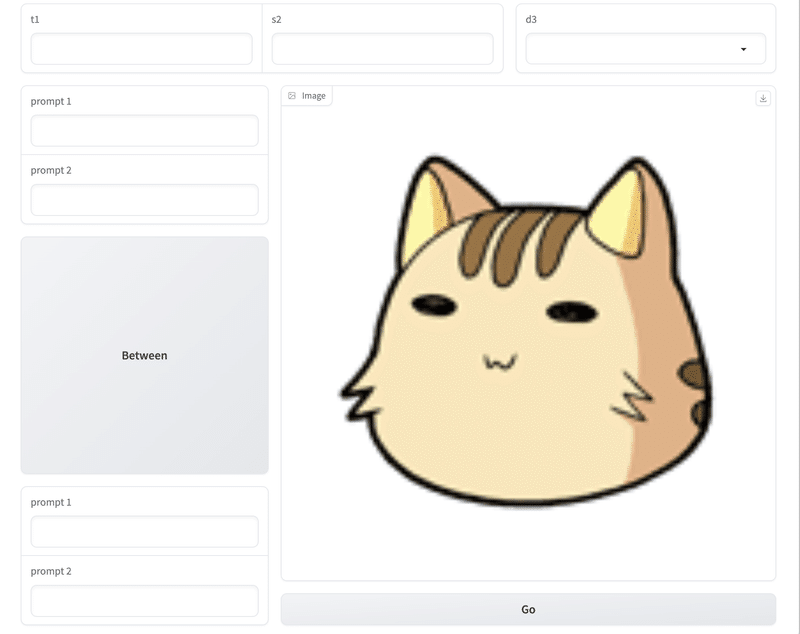
列について詳しくは、ドキュメントを参照してください。
2-3. タブとアコーディオン
with gr.Tab 句でタブを作成することもできます。with gr.Tab 句内で作成されたコンポーネントはすべて、そのタブに表示されます。連続する with gr.Tab 句はグループ化されるため、一度に1つのタブを選択でき、そのタブのコンテキスト内のコンポーネントのみが表示されます。
import gradio as gr
import numpy as np


# テキスト反転の関数
def flip_text(x):
    return x[::-1]

# 画像反転の関数
def flip_image(x):
    return np.fliplr(x)

# Blocksの生成
with gr.Blocks() as demo:
    # コンポーネント
    gr.Markdown("Flip text or image files using this demo.")
    with gr.Tab("Flip Text"):
        text_input = gr.Textbox()
        text_output = gr.Textbox()
        text_button = gr.Button("Flip")
    with gr.Tab("Flip Image"):
        with gr.Row():
            image_input = gr.Image()
            image_output = gr.Image()
        image_button = gr.Button("Flip")
    with gr.Accordion("Open for More!"):
        gr.Markdown("Look at me...")

    # イベントリスナー
    text_button.click(flip_text, inputs=text_input, outputs=text_output)
    image_button.click(flip_image, inputs=image_input, outputs=image_output)

# 起動
demo.launch()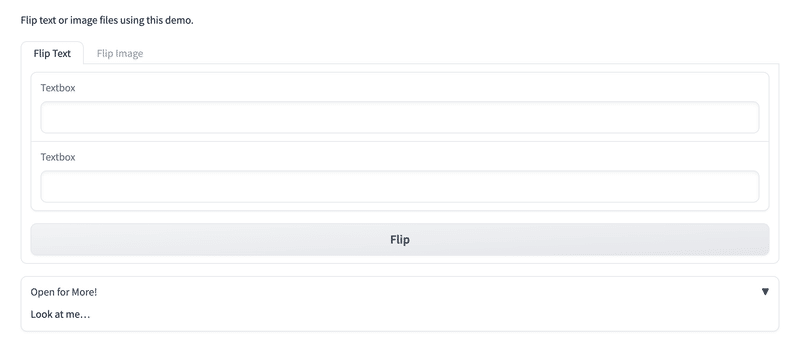
アコーディオンは、開閉を切り替えることができるレイアウトです。 タブと同様、コンテンツを選択的に非表示または表示できるレイアウト要素です。 gr.Accordion('label'): の内部で定義されているコンポーネントは、アコーディオンのトグルアイコンをクリックすると表示・非表示されます。
タブとアコーディオンについて詳しくは、ドキュメントを参照してください。
2-4. 可視性
ComponentsとLayoutの両方に、可視性の設定 (visible) があり、gr.update() を使用して更新することもできます。 列に gr.update(visible=...) を指定すると、一連のコンポーネントを表示・非表示できます。
import gradio as gr

# Blocks
with gr.Blocks() as demo:
    # コンポーネント
    error_box = gr.Textbox(label="Error", visible=False)
    name_box = gr.Textbox(label="Name")
    age_box = gr.Number(label="Age", minimum=0, maximum=100)
    symptoms_box = gr.CheckboxGroup(["Cough", "Fever", "Runny Nose"])
    submit_btn = gr.Button("Submit")
    with gr.Column(visible=False) as output_col:
        diagnosis_box = gr.Textbox(label="Diagnosis")
        patient_summary_box = gr.Textbox(label="Patient Summary")

    # イベントリスナー
    def submit(name, age, symptoms):
        if len(name) == 0:
            return {error_box: gr.update(value="Enter name", visible=True)}
        return {
            output_col: gr.update(visible=True),
            diagnosis_box: "covid" if "Cough" in symptoms else "flu",
            patient_summary_box: f"{name}, {age} y/o",
        }

    # イベントリスナー
    submit_btn.click(
        submit,
        [name_box, age_box, symptoms_box],
        [error_box, diagnosis_box, patient_summary_box, output_col],
    )

# 起動
demo.launch()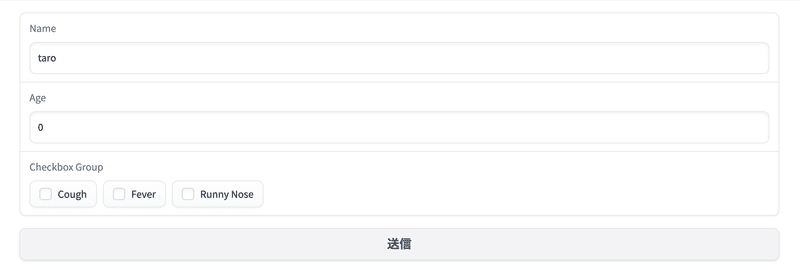
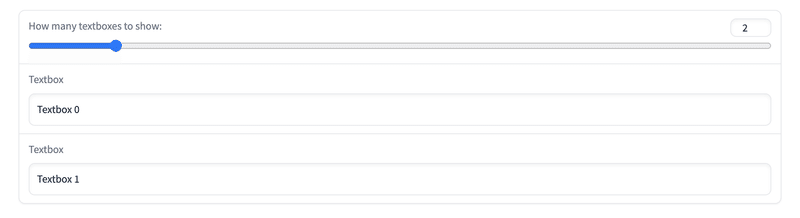
2-5. 可変出力数
コンポーネントの可視性を動的に調整することで、可変数の出力をサポートすることができます。 以下は、出力テキストボックスの数が入力スライダーによって制御される例です。
3. Blocksの状態
gradio のBlocksの状態には、「グローバル状態」と「セッション状態」があります。
3-1. グローバル状態
Blocksのグローバル状態は、Interfaceの場合と同様です。すべてのユーザー間で共有されます。
3-2. セッション状態
「セッション状態」は、ページセッション内でデータが永続化されます。ただし、異なるユーザー間ではデータが共有されません。
「セッション状態」の使用手順は、次のとおりです。
(1) 状態オブジェクトの作成。デフォルト値がある場合は、コンストラクタで指定。
(2) イベントリスナーに、状態オブジェクトを入力および出力として指定。
(3) イベントリスナー関数で、入力パラメータと戻り値に状態変数を追加。
import gradio as gr

secret_word = "gradio"

# Blocksの作成
with gr.Blocks() as demo:
    # 状態オブジェクトの作成
    used_letters_var = gr.State([])

    # 行の作成
    with gr.Row() as row:
        # 列の作成
        with gr.Column():
            input_letter = gr.Textbox(label="Enter letter")
            btn = gr.Button("Guess Letter")
        # 列の作成
        with gr.Column():
            hangman = gr.Textbox(
                label="Hangman",
                value="_"*len(secret_word)
            )
            used_letters_box = gr.Textbox(label="Used Letters")

    # イベントリスナー
    def guess_letter(letter, used_letters):
        used_letters.append(letter)
        answer = "".join([
            (letter if letter in used_letters else "_")
            for letter in secret_word
        ])
        return {
            used_letters_var: used_letters,
            used_letters_box: ", ".join(used_letters),
            hangman: answer
        }
    btn.click(
        guess_letter,
        [input_letter, used_letters_var],
        [used_letters_var, used_letters_box, hangman]
    )

# 起動
demo.launch()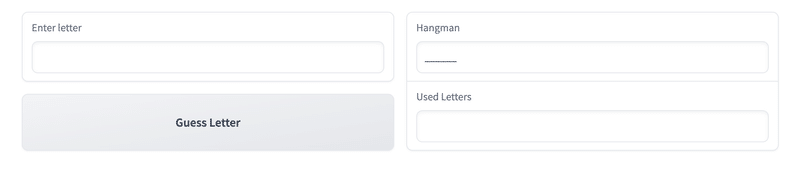
次回
この記事が気に入ったらサポートをしてみませんか?