
第8回 タケノマルの細部を語る その1 8th Talking about the details of Takenomaru Part 1

「これを敷き詰めて床を作ったらおもしろくない?」
解体してできた廃材が山になっているのを見た堀木は、渡辺さん(第2回参照)とそんなことを話しました。そこには廃材を捨てるにしても、木材を調達するにしても、できるだけ出費は抑えておきたいという現実的な思いもあったのは確かです。でもそれ以上に、おもしろいものができあがるのではないかという予感もありました。タケノマルの造作には廃材からアップサイクルした木材を使用しているのですが、その過程にはどんな苦労と工夫があったのか、振り返ってみます。
Wouldn't it be interesting to make a floor out of this?"
When Horiki saw the pile of scrap wood from the demolition, he talked about this with Mr. Watanabe (see Part 2). There was certainly a practical desire to keep expenses as low as possible, whether it was throwing away the scrap wood or procuring lumber. But more than that, I had a hunch that something interesting would come out of it. We used upcycled wood from scrap lumber for the construction of Takenomaru, and I would like to look back on the difficulties and innovations that were involved in the process.
〈床のこと〉
まず廃材から釘を抜いたり必要に応じてカットしたり、木材として使える状態にするところから始めました。それから似たような材質やサイズ感で選り分けるのですが、量が量なのでこの時点では大まかに。いちばん多かったのは厚み30ミリ×幅40ミリの角材です。ただ、もとが廃材だからか均一というわけにはいかず、寸法はどれも微妙に異なっていました。このときすでに手ごわいかもという予感あり。
窓際のあたりは、まだ材料にも気持ちにも余裕があった頃なので、木材の色味やサイズを揃えて並べることができました。その後です、地獄が始まったのは。ひどいときには1日に3列しか進められないという日もありました。実際に作業できるのは正味半日とは言え「3列かよ!」とショックも大きく、どれだけ時間がかかるのかと恐怖しかありませんでした。
〈The floor〉
We started by removing nails from scrap wood and cutting it as needed to make it usable as lumber. Then we sorted them by similar material and size, but at this point, we were only roughing it because of the quantity. The most common was 30 mm thick x 40 mm wide square lumber. However, the dimensions were not uniform, perhaps because they were originally scrap wood, and they all differed slightly in size. At this point, I already had a hunch that it might be tough.
Around the window, I was able to arrange the wood in an assortment of colors and sizes because I was still comfortable with the materials and my feelings. It was after that, that hell began. There were days when it was so bad that we could only proceed with three rows a day. Even though we only had a net of half a day to actually do the work, I was shocked and thought, "Three rows? I was shocked, and I was terrified of how long it would take.


やっかいだったのはもともとの床のレベルがいい加減だったことです。部屋の内側にいけばいくほど床が下がっていることに途中で気がつきました。最初に調べておけよという話ではあるのですが。高さを合わせるために薄い板紙やベニヤを差し込んだりして、ところどころふかしています(※1)。また、途中から高さがずれていくいうことも起こりました。つまり木材の厚みが端から端まで均一ではなかったのです。これも予め確認しておけよという話ですが、しかしこうなるともうお手上げ、段差もちょっとしたものならもういいやと目をつぶるようになりました。
※1. ふかす・・・建築用語で、壁、床、天井などを現状よりも厚くするなどして仕上げ面が平滑になるように納めること。
The tricky part was that the original floor level was not quite right. We noticed halfway through that the further inside the room, the lower the floor was. We were told that we should have checked this out first. We adjusted the height in places by inserting thin sheets of paperboard or veneer to match the height. It also happened that the height shifted from the middle of the floor. In other words, the thickness of the wood was not uniform from one end to the other. This is also something that should have been checked in advance, but when this happened, we were out of ideas, and we decided that we would just ignore the slight difference in height.

廃材の中には、材木屋の名前なのか木の銘柄なのかが印字されているものがありました。海外から届く荷物もそうですが、何か目的があって無造作に印刷されたり書かれた文字に惹かれます。ここでこの文字が入っていたらかっこいいだろうなとか、狙い過ぎてもいやらしくなってしまいますが、考えたりするのは楽しい。最後のほうは材料も足りなくなってきて、使うつもりのなかった鴨居や敷居まで並べています。色味や質感をそろえることにもだんだんこだわれなくなっていきましたが、そういったことも含めていいアクセントになったのではないかと思います。掃除が大変ですけれど。
Some of the scrap wood had printed on them whether it was the name of a lumberyard or a brand of wood. Like packages arriving from overseas, I am attracted to letters randomly printed or written for some purpose. I think it would be cool to have these letters here and there, and it would be too much of an aim, but it is fun to think about it. Toward the end, I ran out of materials, and I even put up duckboards and thresholds that I had no intention of using. I gradually became less and less particular about matching the colors and textures, but I think it was a good accent to include such things. It is hard to clean, though.

最後の最後まで決めかねていたのは床の表面を研磨すべきかどうかということでした。デコボコも少しはマシになるし、ヤスリをかけたほうがいいことは間違いない。こんなにザラザラしていたら素足はNGですから。アメリカのガレージのように土足OKにしようかと話していたこともありました。やはりこだわったのはタケノマル1.0(※2)、素材の表情です。最終的にファイヤープロテクト(※3)を塗ることにしましたが、結果として良かったのではないでしょうか。触り心地がよくなったわけではないですけれど、ちょうどよくコーティングできたと思います。
※2. タケノマル1.0・・・第7回参照
※3. ファイヤープロテクト・・・防炎効果が期待できる木部塗料
One thing I couldn't decide until the last minute was whether or not I should sand the floor surface. The bumps would be a little better, and it would definitely be better to file them. If it was so rough, bare feet would be a no-no. We were even talking about making it a dirt floor like American garages. We were also particular about Takenomaru 1.0 (※1), the look of the material. In the end, we decided to apply Fire Protect (※2), and I think the result was good. It did not make it more comfortable to the touch, but I think it coated it just right.
※1. Takenomaru 1.0: See Part 7.
※2. Fire Protect ... Paint for wood parts that can be expected to have a fire-retardant effect.

動画サイトを見ていると素人のDIYでさえ必ずといっていいくらいレーザーの墨出し(※4)を使っています。なぜ使わなかったのかといえば、そもそもタケノマルが目指しているのはそこではないからです。キレイなというか、部屋らしい部屋にするのであればちゃんと基準を出してから下地を整え、フローリング用の板を貼るべき。でも大した技術があるわけでもないので、格好つけずに成り行きにまかせたほうがいい。それこそ随神(※5)です。買っておけばよかったという場面が実際には多々ありましたが、やっぱり買うには至りませんでした。
※4. レーザーの墨出し・・・レーザーの光を壁や天井、床に照射して水平や垂直などの基準線を作る精密測定工具。基準線を引くことを墨出しといい、材木に直線を引く工具である「墨壺」に由来する。
※5. 随神(かんながら)・・・第6回参照
If you look at video sites, you will see that even amateur DIYers always use laser marking (※3). The reason why we did not use laser marking is because that is not what we are aiming for. If you want to make a room beautiful, or rather, a room that looks like a room, you should properly mark out the standards, prepare the base, and apply flooring boards. But since we don't have much skill, we should not dress it up and let things happen as they will. That is what Zuishin (※4) is all about. There were many times when I wished I had bought one, but I never did.
※3. Laser marking: A precision measuring tool that creates horizontal, vertical, and other reference lines by irradiating laser beams onto walls, ceilings, and floors. Drawing reference lines is called sumi-dashi, which is derived from sumi-tsubo, a tool used to draw straight lines on lumber.
※4. kannagara : See Part 6.
〈ドアのこと〉
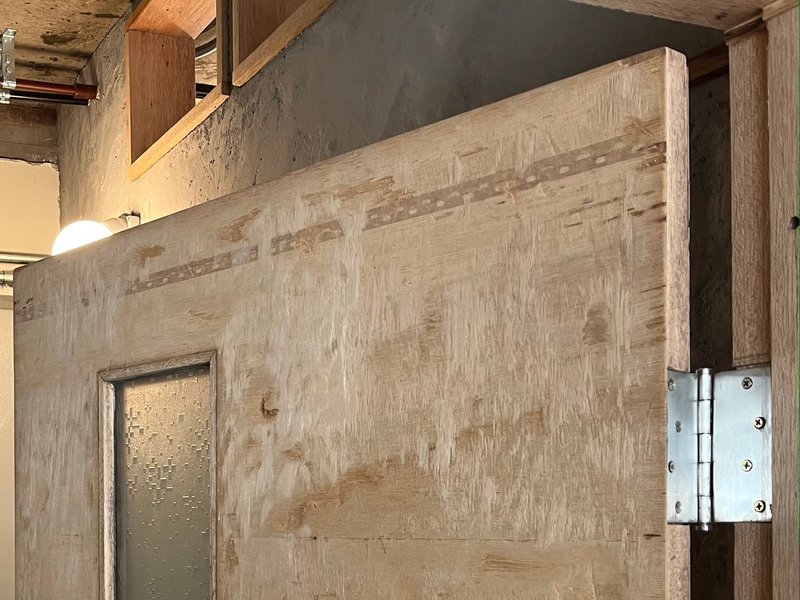
ドア枠の上のほう、柱の受けのところのズレ(※画像参照)はレーザーの墨出しがあれば一目瞭然だったかもしれません。この12ミリの差は「タケノマルの12ミリ(※6)」と呼んでいます。サイズを確認しながらドア枠を作ったはずなのに、水平器で測ってみたら狂いが出ていました。原因がわからず混乱しましたが、ともかく柱を削り端材をスペーサーにしてなんとか調整。柱のほうが歪んでいる可能性もありましたが、一事が万事こんな具合に調整の連続で、限られた技術の中でどう工夫できるのかということを問われました。
※6. タケノマルの12ミリ・・・「三笘の1ミリ」を判定したのも最先端のテクノロジーでした。
〈The door〉
The misalignment at the top of the door frame, at the pillar receptacle (*see image), could have been obvious with a laser marking. We call this 12mm difference "Takenomaru's 12mm (※5). I thought I had made the door frame while checking the size, but when I measured it with a leveler, I found that it was out of alignment. I was confused because I did not know the cause, but anyway, I managed to adjust it by shaving the pillar and using the end material as a spacer. There was a possibility that the pillar might be distorted, but as with all things, it was a series of adjustments, and we were asked how we could devise a solution within the limited skills we had.
※5. Takenomaru's 12mm : It was also cutting-edge technology that determined "one millimeter of Mitoma."

ドアの上のほうと枠の間に隙間(※画像参照)があるということは、ドア自体がまっすぐではないということ。このドア、よく見ると両端の高さが違っていました。もともとは別の場所に設置されていて、おそらくそこで床のレベルに合わせて削られたのではないかと思います。サイズを測ると左側が1777ミリ、右側が1773ミリ、真ん中が1779ミリ。まさか山状になっていたとは。隙間を塞ぐにしても市販の隙間テープでは間に合わないので、手をつけるべきかどうか悩ましいところ。ドアを取り付けた位置の床も実際には少し傾いています。沓摺(※7)は設けず、床を擦るか擦らないかギリギリのところで取り付けられた、上出来です。
※7. 沓摺・・・くつずり。ドア枠の床面の部分。部屋の気密性を高めたり、音漏れを防ぐために設けられる。細かな段差を避けるため、最近では設けないことも多い。
The gap between the top of the door and the frame (*see image) means that the door itself is not straight. If you look closely at this door, you will see that the height at both ends was different. It was originally installed in a different location and was probably cut there to match the floor level. When I measured the size, the left side was 1777 mm, the right side was 1773 mm, and the middle was 1779 mm. I had no idea they were mountainous. I am not sure if I should do something about it or not, because I can't close it up with commercial gap tape. The floor at the location where the door was installed is also actually slightly tilted. The door was installed at the very edge of scraping or not scraping the floor, without kutsuzuri (※6), which is a good job.
※6. kutsuzuri : A sliding door frame. A part of the floor surface of a door frame. It is installed to make the room airtight and to prevent sound leakage. Recently, it is often not provided in order to avoid small differences in level.


もともとドアは部屋側から見てもう少し左側に設置していたのですが、その場合、玄関側に作りつけてある棚とドアノブの位置が近く、握ろうと手を伸ばしたときに違和感がありました。また、入室するときに引いて開けることもあり、棚をよけるようにして通らなければならないことも導線が良いとは言えない。それで最終的に枠をキッチン側の柱(部屋側から見て右側)に寄せることにしました。ドアを付けたり外したり、何回も繰り返していい加減に疲れて力も入らないところにカクンッと落としたりするので作業中はイライラしっぱなしでした。
Originally, the door was installed a little more to the left when viewed from the room side, but in that case, the built-in shelf on the entrance side was close to the doorknob, and it felt uncomfortable when reaching out to grasp it. Also, when entering the room, one had to pull the door open, and the fact that one had to pass by the shelf did not make for a good conduit. So we finally decided to move the frame closer to the columns on the kitchen side (right side as seen from the room). It was frustrating to work on the door because I was tired of putting it on and taking it off over and over again and dropping it with a clunk where I couldn't even get a good grip.

From the entrance side.
Originally, the door should have been closer to the pillar in the center of the photo.
なんとか取り付けも終わり、いざ閉めようとするとドアの上のほうがガスンッと枠に当たりました。グッ、グッ、と少し力を加えて押し込むと閉まることは閉まるのですが、そのときはさすがに頭が真っ白に。しかし憤るよりも早く、枠をサンダーでグァーッと削り、ノミで平らにして蝶番の位置を調整していました。もう手馴れたものです。ドアを削ることも一瞬だけ考えましたが、中空構造だったとき余計に面倒なことになりそうだったので却下。うまくいったのでホッとしています。やっと完成したときにはスムーズに動くのが嬉しくて、何回も開け閉めを繰り返しました。いいねー、いいねー、という感じで。
I managed to finish the installation, and when I tried to close the door, the top of the door hit the frame with a gasp. I pushed it in with a little force and it closed, but then my mind went blank. But before I could get angry, I was sanding the frame, flattening it with a chisel, and adjusting the position of the hinges. I was already familiar with this. I thought for a moment about shaving the door, but rejected the idea because it would have been even more troublesome if the door had a hollow structure. I am relieved that it worked. When it was finally completed, I was so happy with its smooth operation that I repeatedly opened and closed it. It was nice, nice, nice.

この記事が気に入ったらサポートをしてみませんか?