【技術解説】Cases and Tips for Immersal

Introduction
I’m Matt (@mechpil0t) an AR Engineer at the Designium and for the last few years, I have been experimenting with Immersal and creating a variety of prototypes. Throughout this post, I will discuss some of my observations in using Immersal. When mentioning an Immersal map I will include the number of images that made the map in brackets.
はじめに
私はDesigniumのARエンジニアMatt (@mechpil0t) です。ここ数年でImmersalを使って様々なプロトタイプを作ってきました。この記事では、Immersalを使ってみて感じたことをいくつか紹介します。また、Immersalのマップを紹介する際には、そのマップを構成する画像の数も記載していますので参考にしてください。
Map Creation Tips
General Points
1.Use Landscape Mode
In my experience mapping in landscape mode creates higher quality maps than portrait mode.
2.Use an Android device.
I have found that sometimes ios devices will “hang” and stop uploading images after mapping for sometime if the device is not connected to a WiFi network. This wastes a lot of time so I always use an Android device for mapping.
3.Try to choose targets with lots of feature points and without large repeating shapes.
地図作成のポイント
一般的なポイント
1.ランドスケープモードを使う
私の経験では、ポートレートモードよりもランドスケープモードでマッピングした方が高品質な地図が作成できます。
2.Android端末を使用する。
iOSデバイスは、WiFiネットワークに接続されていないと、マッピング後に画像のアップロードが止まってしまうことがありました。これは時間の無駄なので、私は常にAndroidデバイスを使ってマッピングを行っています。
3.特徴点が多く、繰り返しの多い形状ではないターゲットを選ぶようにしましょう。
Scanning Method
Immersal scanning is much like photogrammetry and most of the same rules apply. Generally, the aim is to get many overlapping images of a target area from many different angles and distances. The challenge with Immersal is that we should also aim for the minimum number of images. This is because the number of images in a map directly affects the relocation attempt times for Immersal, the more images in a map the more time relocation attempts will take.
To get a good Immersal map a user should:
スキャン方法
Immersalのスキャンはフォトグラメトリに似ており、ほとんど同じルール原則かと思います。一般的には、対象となるエリアをさまざまな角度や距離から撮影して、重なり合う画像を多く取得します。しかし、Immersalの課題は、画像の数を最小限にすることです。これは、マップ内の画像数がImmersalのリローカライズ速度に直接影響するためで、マップ内の画像数が多ければ多いほどリローカライズに時間がかかることになります。
精度の高いImmersalのマップを作成するためには、以下のことが必要です。
1.Take photos that have lots of feature overlap.
1.特徴の重なりが多い写真を撮る。
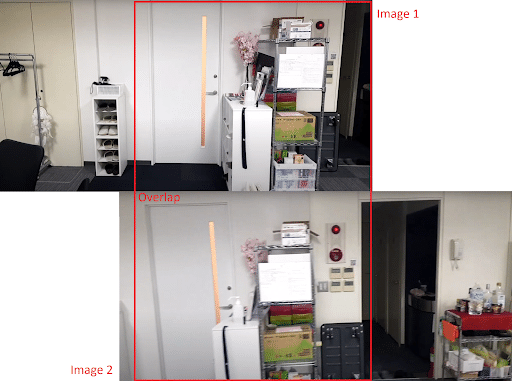
2. Move position between each photo. It is important to move position between each photo (while still maintaining feature overlap) and not just rotate on the spot. The larger the target the larger you can move between images. For example, if you were mapping your desk you could move 1 step between each image. When I mapped the Tokyo Dome I mapped from around 30 meters away and I moved around 5 meters between each image.
2. 写真撮影時に撮影位置を移動していく。その場で回転させるのではなく、1枚1枚の写真の間に(特徴の重なりを維持しながら)撮影位置を移動させることが重要です。ターゲットが大きければ大きいほど、画像間の移動量も大きくなります。例えば、自分のデスクをマッピングする場合、各画像間で1ステップ移動することができます。私が東京ドームをマッピングしたときは、約30m離れた場所からマッピングしたので、1枚の画像の間に約5m移動しました。
3.Avoid taking images with people or groups of people in them. People moving through an area while taking images will often cause maps to fail to process.
4.Try to keep the camera steady or stop while taking each image. If a photo is blurry due to motion it can create low quality maps.
5.Try to take scans when there is neutral lighting, for example an overcast day without strong shadows.
6.Try to map the area with the minimum number of images.
3.人が写っている画像は避ける。撮影中に人が動いていると、地図の処理に失敗することが多くなります。
4.撮影時にはカメラを止めるか、安定させるようにしましょう。手ブレなどで写真がぼやけていると、マップの精度は低くなってしまいます。
5.強い影のない曇りの日など、可能な限り通常の明るさの時に撮影するようにしましょう。
6.最小限の画像数で地図を作成するようにする。
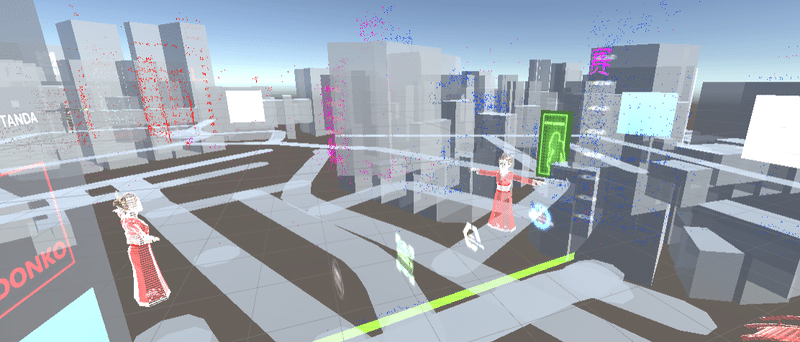
Mapping Large Areas
In large areas like Shibuya Crossing or Gotanda Station, I have found that it is better to try to create a number of smaller high quality maps, rather than try to cover the whole area with 1 map. For example, for Shibuya crossing I tried to make a map with the full 360 degree coverage of the area. However the processed map only covered around 60% of the skyline. Therefore for the Gotanda demo I created separate maps for each main building in the area with less images for each map.
広いエリアの地図作成
渋谷交差点や五反田駅のような広いエリアでは、1枚の地図で全体をカバーしようとするのではなく、小さな高品質の地図をいくつか作ってみるのが良いと思います。例えば、渋谷の交差点では、360度の範囲をカバーする地図を作ろうとしました。しかし、生成されたマップではスカイラインの60%程度しかカバーできませんでした。そこで、五反田のデモでは、主要なビルごとにマップを作成し、各マップの画像を少なくしました。
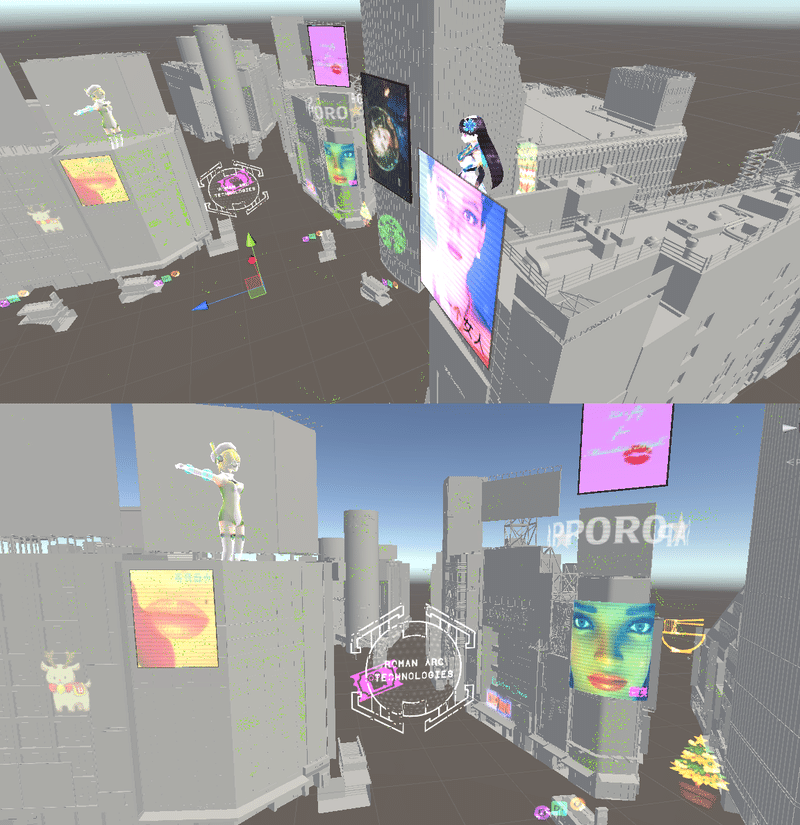
Map Evaluation: How do I know if a map is good quality?
To evaluate the quality of a map I check the textured glb mesh on Immersal Developer Portal.
地図の評価。マップの品質を知るにはどうすればいいですか?
マップの品質を評価するために、私はImmersal Developer Portalでテクスチャ付きのGLBメッシュをチェックしています。

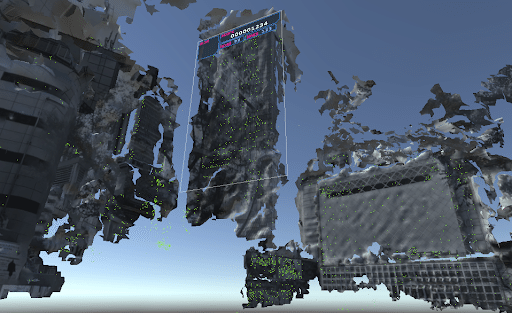
If a mesh looks good quality, it usually will be a good quality map. For example, these two maps are of the same area outside of Yurakucho station. The map on the left (21 images) has a clear high quality texture and accurate mesh. The map on the right (45 images) has more blurry textures and fragmented meshes.
メッシュの質が良ければ、たいていの場合、品質の高いマップになります。例えば、この2つのマップは有楽町駅の外にある同じエリアのマップです。左側のマップ(21枚)は、はっきりとした高品質のテクスチャと正確なメッシュになってます。右側のマップ(45枚)は、よりぼやけたテクスチャーと断片的なメッシュになってます。
Here are some other examples of good quality maps, note the high quality/detail textures.
これらは質の高いマップの一例です。ハイクオリティで詳細なテクスチャになってます。
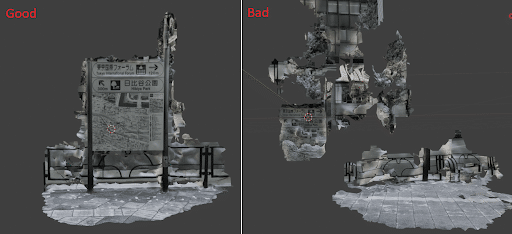
However, sometimes Immersal maps have highly accurate textures but are not good maps. For example, this map is accurate and has a high quality texture, but the map is not detailed, contains repeating patterns/shapes and therefore is not a good map.
しかし、Immersalのマップは精度の高いテクスチャーを持っていても、良いマップではない場合があります。例えば、このマップは正確で高品質なテクスチャーを持っていますが、マップは詳細ではなく、繰り返しの多いパターンや形状を含んでいるため、良いマップとは言えません
Mapping Examples
The following images are examples of the routes taken while scanning areas.
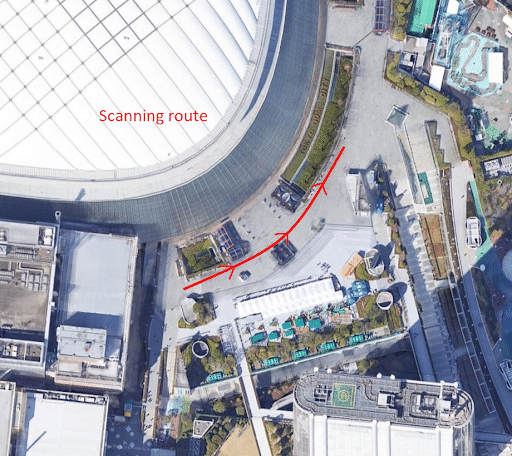
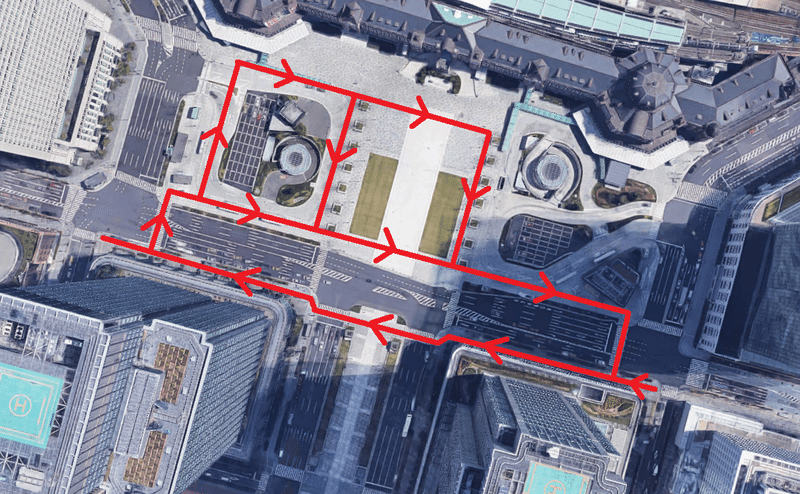
Tokyo Station
The map for Tokyo station was made with 296 images taken throughout the following route.
マッピング例
以下の画像は、エリアをスキャンする際のルートの一例です。
東京駅
東京駅の地図は、以下のルートで撮影された296枚の画像で作成されています。
😎 #AugmentedReality #AR #tokyo #madewithunity #tokyostationcity #tokyostation #designium #xmas #christmas pic.twitter.com/vzXUsxVIx4
— mechpilot (@mechpil0t) December 16, 2020
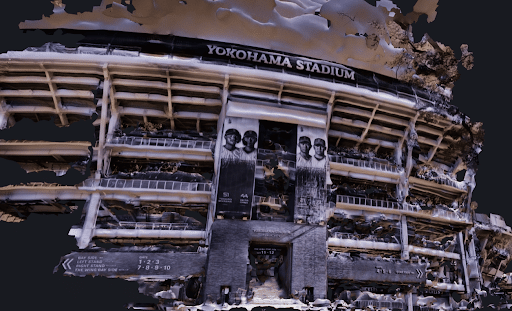
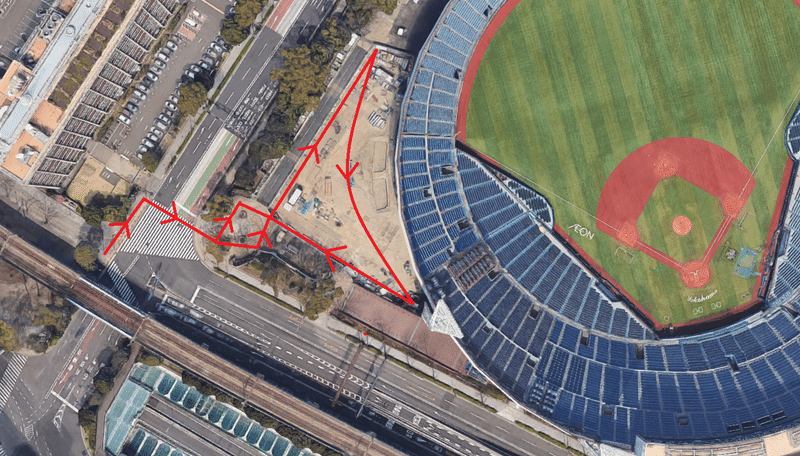
YokohamaThe Yokohama stadium map was made with 115 images taken throughout the following route.
横浜
横浜スタジアムマップは、以下のルートで撮影した115枚の画像で作成しました。
Object Placement
Textured glb Mesh
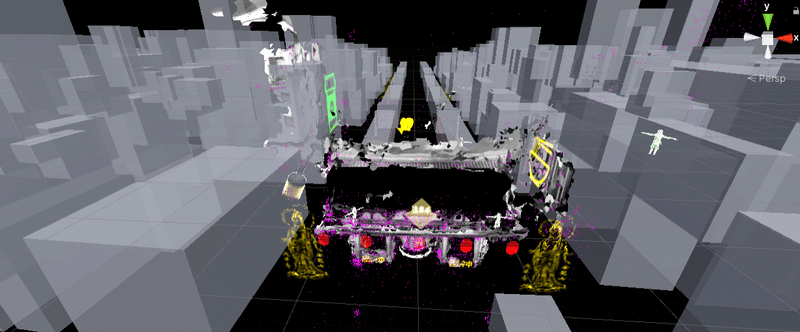
For most of the Immersal examples I make I use the textured glb mesh to position objects. To make the mesh more suited to Unity I convert the mesh from .glb to .fbx using blender.
For example in the Tokyo Station example (296 images) I used the textured glb mesh to position the flat objects (gifs) onto the distant buildings.
オブジェクトの配置
テクスチャ付きGLBメッシュ
Immersalの例では、オブジェクトの配置にテクスチャ付きのglbメッシュを使うことが多いです。このメッシュをUnityに最適にするために、blenderを使って.glbから.fbxに変換します。
例えば、東京駅の例(296枚の画像)では、遠くのビルに平面のオブジェクト(GIF)を配置するために、テクスチャ付きのglbメッシュを使用しました。
The following image shows how the Shibuya Crossing (162 images) Tetris object is placed on the building in the Unity scene.
次の画像は、Unityのシーンで「渋谷交差点(162枚)」のテトリスオブジェクトをビルに配置したものです。
#shibuya "ARcade" ... prototype on iphone 12. thanks to @takesenit for the idea 😅#AR #Tetris #AugmentedReality #designium #ARkit #madewithunity pic.twitter.com/EfDcIoVICZ
— mechpilot (@mechpil0t) March 15, 2021
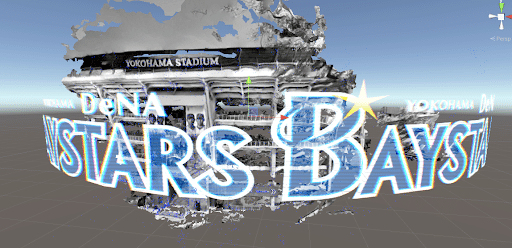
This image demonstrates how I used the Yokohama mesh (115 images) to match the curve of the Baystars sign.
次の画像は、横浜メッシュ(115枚)を使ってベイスターズの看板のカーブに合わせた様子です。
testing out some longer distance relocalisation at the #yokohama #baystars stadium 👌 works great#AugmentedReality #AR #Immersal #designium #横浜 #madewithunity #iPhone12ProMax pic.twitter.com/vGQQSTR3Gd
— mechpilot (@mechpil0t) December 20, 2020
Google Maps
The Google Maps Unity API contains a function to create a simple 1:1 scale 3D representation of an area. These 3D maps can be used to position content accurately beyond the textured glb mesh. For example, the Asakusa Gate demo (50 images) used the 3D Google map to place objects accurately behind the Gate.
グーグルマップ
Google Maps Unity APIには、対象エリアの1:1スケールのシンプルな3Dデータを作成する機能が含まれています。これらの3Dマップは、テクスチャ付きのglbメッシュではなく、コンテンツをより正確に配置するために使用できます。例えば、浅草門のデモ(50枚の画像)では、3D Googleマップを使って、門の後ろに正確にオブジェクトを配置しています。
neo asakusa#ar #AugmentedReality #designium #madewithunity #immersal #雷門 #浅草寺 #cyberpunk #tokyo #asakusa pic.twitter.com/J889Jrv3UE
— mechpilot (@mechpil0t) January 10, 2021
#AR neo asakasa on #nreal & #iPhone12ProMax 👌#AugmentedReality #designium #madewithunity #immersal #雷門 pic.twitter.com/jqBWI3GAZU
— mechpilot (@mechpil0t) January 12, 2021
In addition to object placement, we can also use the 3D Google Maps for environmental occlusion...
オブジェクトの配置だけでなく、3DのGoogleマップを使った環境オクルージョンにも使えます。
Environmental Occlusion
Google Maps
A number of Immersal prototypes I made use the world scale Google Maps Unity API 3D map for environmental occlusion.
環境オクルージョン
-Google Maps
私が作ったImmersalのプロトタイプの多くは、環境オクルージョンのためにGoogle Maps Unity API 3Dマップを使用しています。
time to cyberize our hometown#AR Gotanda 😎#immersal #designium #AugmentedReality #cyberpunk pic.twitter.com/2AajZiGR9p
— mechpilot (@mechpil0t) January 19, 2021
In the Gotanda Station example the 3D map is stored locally as a mesh prefab and is positioned and aligned using the Immersal maps.
In the Gotanda Office example the map is created on application load based on the GPS data from the device.
上の五反田駅の例では、3Dマップはメッシュプレハブとしてローカルに保存され、Immersalマップを使って位置合わせを行います。
下の五反田オフィスの例では、アプリケーションのロード時に、デバイスからのGPSデータに基づいて地図が生成されています。
かわいい怪獣 #AR 🦖
— mechpilot (@mechpil0t) October 28, 2020
testing out large scale environmental occlusion by combining Google Maps #Unity3D SDK & #Immersal#madewithunity #designium #AugmentedReality #GoogleDevelopers pic.twitter.com/7Y0omkLgHk
Accurate 3D models
For the Cyber Shibuya example I used an extremely accurate (in both scale and detail) 3D model of shibuya for environmental occlusion.
正確な3Dモデル
サイバー渋谷の例では、より精度の高い環境オクルージョンを実現するために、渋谷エリアの非常に正確な(スケールとディテールの両方で)3Dモデルを使用しました。後述のモデルがそれにあたります。
future #shibuya #AR#AugmentedReality #designium #madewithunity
— mechpilot (@mechpil0t) November 30, 2020
made with #Immersal running on #iPhone12 pic.twitter.com/g01EyKboaD
Simple Occlusion
Some uses of Immersal do not require extremely accurate occlusion. For example if content will only be viewed from a limited position and angle. In the Yokohama Landmark Tower Pikachu example (24 images) I used simple shapes to provide environmental occlusion.
シンプルなオクルージョン
Immersalを使ったコンテンツの中には、そこまで正確なオクルージョンを必要としないものがあります。例えば、限られた位置や角度からのみコンテンツを見る場合などです。横浜ランドマークタワーのピカチュウの例(24枚)では、シンプルな形で環境のオクルージョンを表現しています。
#pikachu on landmark tower #yokohama#AR #AugmentedReality #designium #Immersal pic.twitter.com/pgiStlsNbu
— mechpilot (@mechpil0t) April 4, 2021

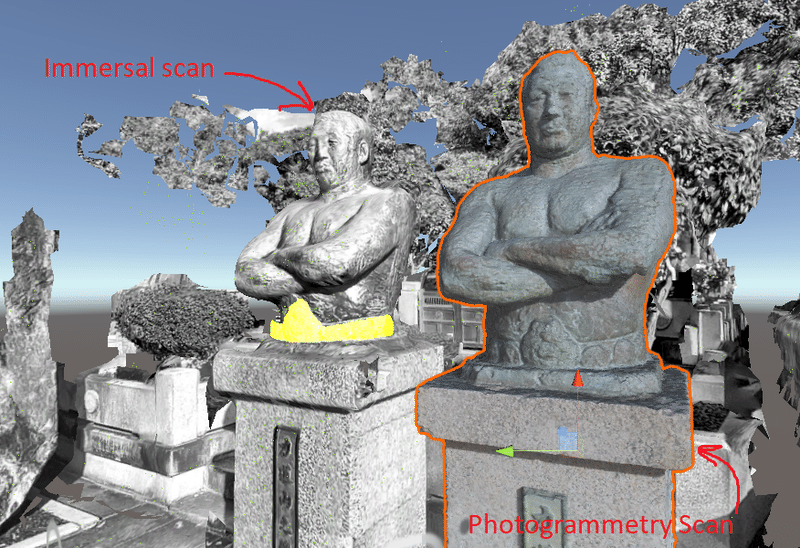
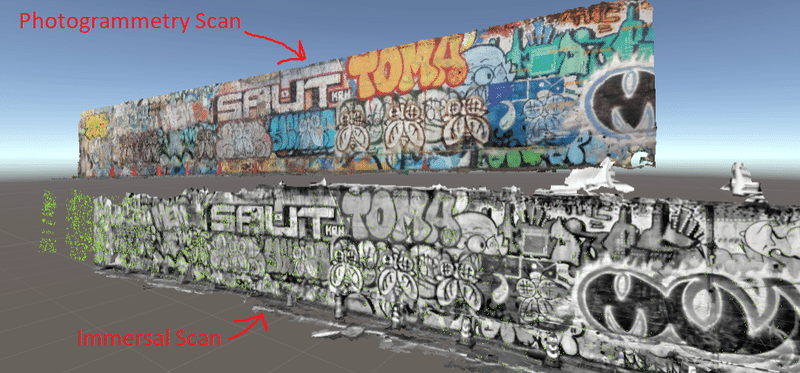
Immersal + Photogrammetry
In some examples I used photogrammetry in combination with the Immersal scans to provide environmental occlusion and environmental detail. For example in the Rikidozan example (48 images) used a photogrammetry scan of the statue for occlusion and to provide a mesh for the statue’s belt.
Immersal + Photogrammetry
いくつかの例では、環境のオクルージョンや環境のディテールを得るために、Immersalのスキャンとフォトグラメトリーを併用しました。例えば、力道山の例(48枚)では、オクルージョンのために像のフォトグラメトリー・スキャンを使用し、像のベルトのメッシュを作成しました。
experimenting with using a #photogrammetry mesh of an object for occlusion in #AR (at the Rikidozan statue)#designium #AugmentedReality #Rikidozan #力道山 #プロレス #immersal #madewithunity pic.twitter.com/2eYtKcGCWO
— mechpilot (@mechpil0t) December 8, 2020
In the Graffiti example (30 images) a modified photogrammetry mesh is used to provide the environmental detail (flashing coloured detail)
グラフィティの例(30枚)では、フォトグラメトリーのメッシュを修正して、環境のディテール(色のついたディテールの点滅)を表現しています。
#shibuya #AugmentedReality #graffiti #phonk music video prototype test thing
— mechpilot (@mechpil0t) January 18, 2021
video by @yung_maple#AR #designium #immersal pic.twitter.com/23f5Vpc8gN
Environment Collision
For the Tokyo Dome example (11 images) I added the mesh collider to the textured glb mesh.
環境コラージュ
東京ドームの例(11枚)では、テクスチャ付きのglbメッシュにメッシュコライダーを追加しました。
#tokyodome #ar sign & environment collision test 😎 placed using #Immersal#AugmentedReality #designium #tokyo #arcore pic.twitter.com/dZw2fbzGqi
— mechpilot (@mechpil0t) April 8, 2021
Other
In one example I combined two VPS technologies, Sturfee and Immersal. The difficulties with combining these technologies is that they both position virtual content differently. Sturfee seems to move the camera relative to the content, while Immersal moves the content relative to the camera. This means that each technology must be used in sequence.
The prototype worked but I don't recommend combining these technologies for any practical purpose.
その他
その他の試みとして、SturfeeとImmersalという2つのVPS技術を組み合わせてみました。この2つの技術を組み合わせることの難しさは、どちらもバーチャルコンテンツの配置が異なることです。Sturfeeはコンテンツに対してカメラを移動させ、Immersalはカメラに対してコンテンツを移動させているようです。つまり、それぞれの技術を順番に使っていく必要があります。
尚、今回の試作品はうまくいきましたが、これらの技術を組み合わせて使うことは、実用的にはお勧めできません。
#AR combining #Immersal & #sturfee #VPS 🙂#AugmentedReality #designium pic.twitter.com/Ca4p6facsL
— mechpilot (@mechpil0t) January 31, 2021
Additional cases - 追加事例
Sketchfab to AR Ver.2
#sketchfab to #AR version 2
— mechpilot (@mechpil0t) May 1, 2021
1. GPS is used to find the closest #Immersal map
2. the map ID is used to automatically load the #sketchfab model URL
3. once downloaded the model is automatically aligned#AugmentedReality #designium #Photogrammetry #madewithunity pic.twitter.com/j16DMfERM4
Godzilla vs Kingkong at TOHOシネマズ新宿
look out #Godzilla! #AR #KingKong climbing #tohoシネマズ #shinjuku#GodzillaVsKong #designium #Immersal #AugmentedReality pic.twitter.com/LUIFhdOPZI
— mechpilot (@mechpil0t) May 6, 2021
Editorial Note - 編集後記
こんにちは!広報のマリコです。ARクラウド技術の中でもいま大注目のImmersal をつかった事例とTipsの数々、いかがだったでしょうか?国内外で話題になり私も大好きな「渋谷のAR動画」や「ARテトリス」は、今回『Immersal勉強会』で登壇したMattが自主的にテーマを選び、デザイニウムのR&Dの一貫として作成したものです✨他のメンバーも様々な作品を公開しているので、ぜひTwitterやnoteをチェックしてくださいね❗

The Designium
・Wantedly (Unityエンジニア募集中)
・オフィシャルサイト
・Interactive website
・Twitter
・Facebook
この記事が気に入ったらサポートをしてみませんか?