Anacondaを使用してMacでDeepLabのデモを実行

前回はインストールまで実行したので今回はデモを実行。
インストール
前回記事を参照。
Deeplabデモ
Anaconda Navigatorを起動。
HomeでJupyter Notebookを起動。
tensorflow/models/research/deeplabへ移動。
deeplab_demo.ipynbをクリック。
deeplab_demo.ipynbの内容が表示されるのでRunを押して順番にブロックを実行していく。
4セル目のinを実行後、以下が表示される。
downloading model, this might take a while...
download completed! loading DeepLab model...
model loaded successfully!
6セル目のinを実行するとdead kernelが発生。
ターミナルを確認すると、以下が出力されていた。
OMP: Error #15: Initializing libiomp5.dylib, but found libiomp5.dylib already initialized.
OMP: Hint This means that multiple copies of the OpenMP runtime have been linked into the program. That is dangerous, since it can degrade performance or cause incorrect results. The best thing to do is to ensure that only a single OpenMP runtime is linked into the process, e.g. by avoiding static linking of the OpenMP runtime in any library. As an unsafe, unsupported, undocumented workaround you can set the environment variable KMP_DUPLICATE_LIB_OK=TRUE to allow the program to continue to execute, but that may cause crashes or silently produce incorrect results. For more information, please see http://www.intel.com/software/products/support/.
[I 15:54:38.093 NotebookApp] KernelRestarter: restarting kernel (1/5), keep random ports
WARNING:root:kernel 35bc43de-f089-418e-860c-1c6fe630268a restarted
[I 15:54:49.625 NotebookApp] Saving file at /tensorflow/models/research/deeplab/deeplab_demo.ipynbEnvironmentsでmklのパッケージをアンインストール。
Environmentsでnomklのパッケージをインストール。
Environmentsでtensowflowのパッケージをインストール。
EnvironmentsでMatplotlibのパッケージをインストール。
Jupyter Notebookを起動し、tensorflow/models/research/deeplabへ移動。
deeplab_demo.ipynbをクリックして1セル目から順番に実行。
6セル目を実行するとサンプル画像の処理結果が表示される。
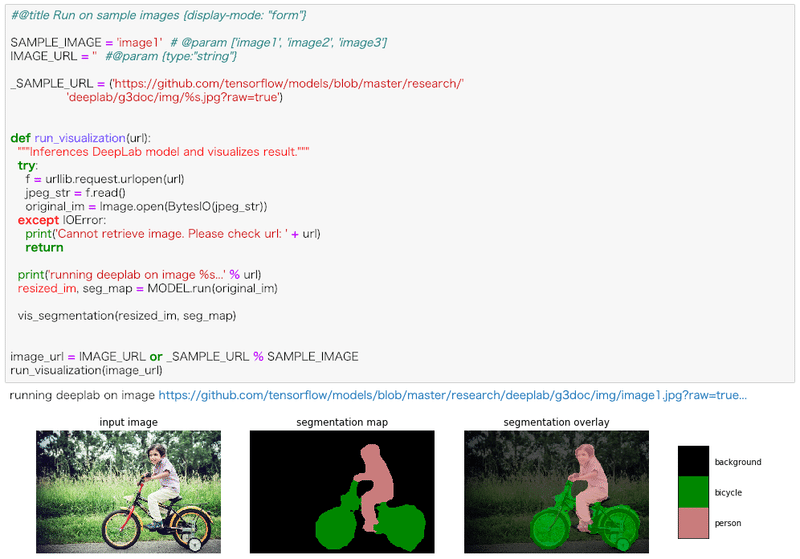
5セル目に書いてある通り、6セル目4行目のIMAGE_URLの値を任意のURLに変更することで好きな画像を処理できる。
使用環境
機種:MacBook AIr (13-inch, 2017)
OS:Mojave 10.14.2
この記事が気に入ったらサポートをしてみませんか?