動画生成AIで自分の生成した画像を動かしてみよう!

最近、AnimateDiffやStable Video Diffusionなどの1枚の画像から高品質な動画を生成する動画生成AIが次々と発表されて、動画生成ブームが起きています。さらに、1枚の画像からモーションデータと同じ動きをする動画を生成できるMagicAnimateも発表されました。
そうなると、自分でも是非、自分の生成した画像などを動かしてみたくなりますよね。そこで、今回、これらの動画生成AIを利用して、自分の生成したオリジナルの画像などを動かす方法を解説します。
1.MagicAnimate
TikTokを運営するByteDanceとシンガポール国立大学が共同開発した1枚の画像からモーションデータと同じ動きをする動画を生成できる動画生成AIです。
(1) 準備
今回もcamenduruさんの作成したColabノートを利用させてもらいます。
コードは以下のとおりです。
%cd /content
!git clone -b dev https://github.com/camenduru/MagicAnimate-hf

!pip install -q diffusers==0.21.4 transformers==4.32.0 accelerate==0.22.0 omegaconf==2.3.0 einops==0.6.1 av gradio
!pip install -q https://download.pytorch.org/whl/cu118/xformers-0.0.22.post4%2Bcu118-cp310-cp310-manylinux2014_x86_64.whl

!apt -y install -qq aria2
BaseModelUrl = "https://huggingface.co/runwayml/stable-diffusion-v1-5"
BaseModelDir = "/content/MagicAnimate-hf/stable-diffusion-v1-5"
!aria2c --console-log-level=error -c -x 16 -s 16 -k 1M {BaseModelUrl}/raw/main/model_index.json -d {BaseModelDir} -o model_index.json
!aria2c --console-log-level=error -c -x 16 -s 16 -k 1M {BaseModelUrl}/resolve/main/vae/diffusion_pytorch_model.bin -d {BaseModelDir}/vae -o diffusion_pytorch_model.bin
!aria2c --console-log-level=error -c -x 16 -s 16 -k 1M {BaseModelUrl}/raw/main/vae/config.json -d {BaseModelDir}/vae -o config.json
!aria2c --console-log-level=error -c -x 16 -s 16 -k 1M {BaseModelUrl}/resolve/main/unet/diffusion_pytorch_model.bin -d {BaseModelDir}/unet -o diffusion_pytorch_model.bin
!aria2c --console-log-level=error -c -x 16 -s 16 -k 1M {BaseModelUrl}/raw/main/unet/config.json -d {BaseModelDir}/unet -o config.json
!aria2c --console-log-level=error -c -x 16 -s 16 -k 1M {BaseModelUrl}/raw/main/tokenizer/vocab.json -d {BaseModelDir}/tokenizer -o vocab.json
!aria2c --console-log-level=error -c -x 16 -s 16 -k 1M {BaseModelUrl}/raw/main/tokenizer/tokenizer_config.json -d {BaseModelDir}/tokenizer -o tokenizer_config.json
!aria2c --console-log-level=error -c -x 16 -s 16 -k 1M {BaseModelUrl}/raw/main/tokenizer/special_tokens_map.json -d {BaseModelDir}/tokenizer -o special_tokens_map.json
!aria2c --console-log-level=error -c -x 16 -s 16 -k 1M {BaseModelUrl}/raw/main/tokenizer/merges.txt -d {BaseModelDir}/tokenizer -o merges.txt
!aria2c --console-log-level=error -c -x 16 -s 16 -k 1M {BaseModelUrl}/resolve/main/text_encoder/pytorch_model.bin -d {BaseModelDir}/text_encoder -o pytorch_model.bin
!aria2c --console-log-level=error -c -x 16 -s 16 -k 1M {BaseModelUrl}/raw/main/text_encoder/config.json -d {BaseModelDir}/text_encoder -o config.json
!aria2c --console-log-level=error -c -x 16 -s 16 -k 1M {BaseModelUrl}/raw/main/scheduler/scheduler_config.json -d {BaseModelDir}/scheduler -o scheduler_config.json
!aria2c --console-log-level=error -c -x 16 -s 16 -k 1M {BaseModelUrl}/resolve/main/safety_checker/pytorch_model.bin -d {BaseModelDir}/safety_checker -o pytorch_model.bin
!aria2c --console-log-level=error -c -x 16 -s 16 -k 1M {BaseModelUrl}/raw/main/safety_checker/config.json -d {BaseModelDir}/safety_checker -o config.json
!aria2c --console-log-level=error -c -x 16 -s 16 -k 1M {BaseModelUrl}/raw/main/feature_extractor/preprocessor_config.json -d {BaseModelDir}/feature_extractor -o preprocessor_config.json

%cd /content/MagicAnimate-hf
!python app.py
このコードをGoogle Colabの新しいセルにコピーし、「ランタイムのタイプを変更」からGPUに設定してセルを実行してください。最後にGradioのリンクが現れますので、これをクリックすると、以下のような操作画面が開きます。
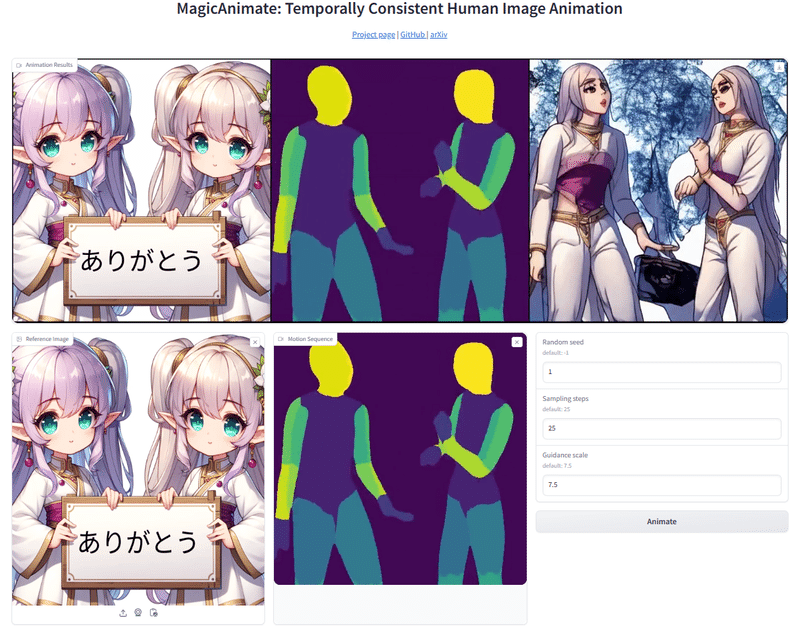
(2) 利用方法
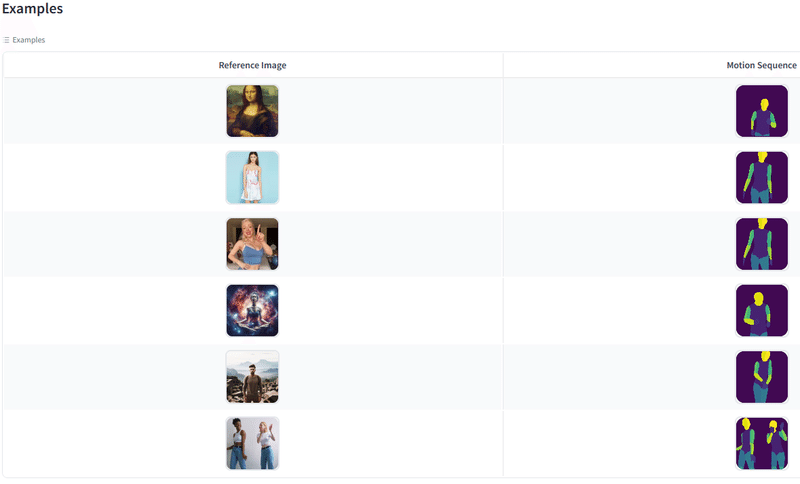
最初に、下側のExamplesから使用したいモーションデータ(と参照画像のペア)を選んでクリックすると、これらのデータが操作画面にセットされます。
次に、参照画像の右上の×ボタンをクリックして参照画像を削除し、代わりに、自分が使用したい画像データをアップロードします。
そして、Animateのボタンをクリックして10分ほど待つと、その上に生成された動画が表示されます。
この動画は、右上のダウンロードマークをクリックして保存することができます。
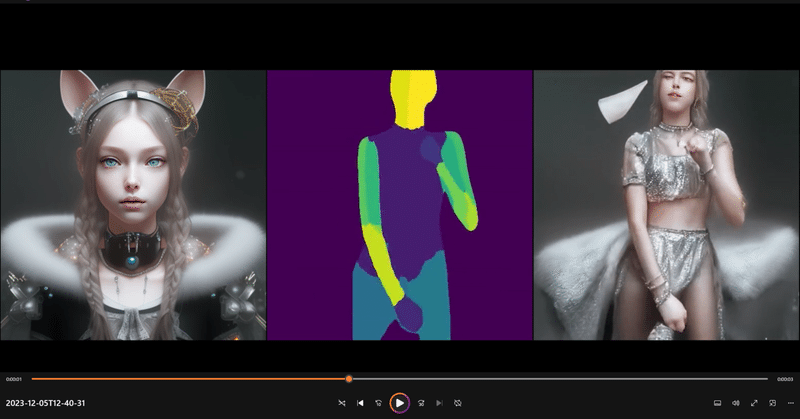
(3) 動画生成の実例


(4) モーションデータの作成
自分のビデオをモーションデータに変換できるVid2DensePoseもあります。
以下のバナーをクリックすると、Colabノートが開きます。
ここで、GPUに設定して、上から順にセルを実行します。
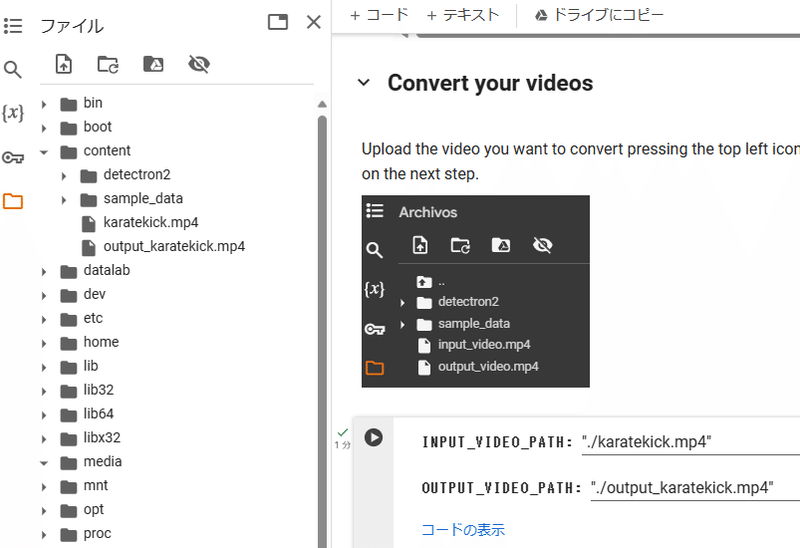
3番目のセルを実行する前に、contentフォルダに変換する動画ファイルをアップロードし、INPUT_VIDEO_PATH:にそのファイル名(例:karatekick.mp4)を、OUTPUT_VIDEO_PATH:に適当な出力ファイル名(例:output_karatekick.mp4)を記入してください。
それから、最後のセルを実行すると、アップロードした動画ファイルの下に先程名前を付けた出力ファイル(モーションデータファイル)が現れるので、これをダウンロードしてください。

2.Animate Anyone
MagicAnimateと同様に1枚の画像と骨格動画からアニメーションを生成する動画AIです。中国のAlibaba研究グループが発表しました。
こちらの方がMagicAnimateよりも先に発表されて大変話題になったのですが、残念ながらまだ実際に利用するためのコードなどが公開されていません。

3.Stable Video Diffusion
11月21日に、Stable Diffusionを提供しているStability AIが発表したテキストや画像から高解像度の動画を生成することができるAIモデルです。
(1) 利用方法
以下のバナーをクリックすると、Stable Video Diffusionを試せるColabノートが開きます。
上から順番に6つのセルを実行すると、最後にGradioのリンクが現れますので、これをクリックすると、操作画面が開きます。そこに自分が動かしたい画像をアップロードしてRunボタンをクリックすると、動画が生成されます。
576x1024の解像度で、14フレームのSVDと25フレームのSVD-XTの2種類のモデルを選ぶことができます。画像は自動的に調整されますが、縦横比が変にならないように横長の画像を使用してください。
(2) 動画生成の実例
4.AnimateDiff
AnimateDiffは、今年7月に発表された上海AIラボ、香港中文大学、スタンフォード大学の共同研究によって開発された技術で、1枚の画像から一貫性のある動画を生成することができます。その後、改善が進んで、ComfyUIなどで扱えるようになり、人気が出てきました。
(1) 利用方法
Google ColabでAnimateDiffを利用する方法については、以下のnpakaさんのnote記事を参考にしてください。
最初に以下のコードを新しいセルにコピーして実行します。
!git clone https://github.com/guoyww/AnimateDiff
!pip install -q torch==2.0.1+cu118 torchvision==0.15.2+cu118 torchaudio==2.0.2+cu118 torchtext==0.15.2 torchdata==0.6.1 --extra-index-url https://download.pytorch.org/whl/cu118 -U
!pip install einops omegaconf safetensors diffusers[torch]==0.11.1 transformers xformers==0.0.20 triton==2.0.0
!rm -rf /content/AnimateDiff/models/StableDiffusion
!git clone -b fp16 https://huggingface.co/runwayml/stable-diffusion-v1-5 /content/AnimateDiff/models/StableDiffusion/
%cd AnimateDiff

!wget -P /content/AnimateDiff/models/Motion_Module https://huggingface.co/camenduru/AnimateDiff/resolve/main/mm_sd_v15_v2.ckpt
!wget -P /content/AnimateDiff/models/DreamBooth_LoRA https://huggingface.co/gsdf/Counterfeit-V3.0/resolve/main/Counterfeit-V3.0_fix_fp16.safetensors次に、以下のコンフィグファイル「0-Counterfeit-V3.0.yaml」をダウンロードして、Colabノートのファイルの「AnimateDiff/configs/prompts/v2」のフォルダにアップロードしてください。
このコンフィグファイルは、使用モデルとプロンプトを指定しており、プロンプトを書き換えることによって、様々な動画を生成することができます。
次に、「AnimateDiff/animatediff/utils/convert_from_ckpt.py」のファイルを見つけて開き、その726行目を「text_model.load_state_dict(text_model_dict, strict=False)」に修正します。
最後に、以下のコードを新しい別のセルにコピーして実行すると、「AnimateDiff/samples」のフォルダにGIF画像「sample.gif」が出力されます。
!python -m scripts.animate --config /content/AnimateDiff/configs/prompts/v2/0-Counterfeit-V3.0.yaml --pretrained_model_path /content/AnimateDiff/models/StableDiffusion(2) 動画生成の実例
この記事が気に入ったらサポートをしてみませんか?