市販のベーコンは特別なのか Is store-bought bacon special?

レッスン・イン・ケミストリー Lesson in Chemistry
はじめに
Prologue
前に温度計が料理オタクの必須ギアであることを説明した。その実践編として、温度計と安価なオーブントースターを使って市販のベーコンを再現してみよう。みんなベーコン大好きだからね。
自家製だから市販のものとは違って、「これはこれで美味しい」とか「市販品よりも美味しい」とかいうことはあえて言わない。なぜかというと、僕はエンジニアなので、再現性にこだわるからだ。なんとなく美味しいものができるのと意図して狙った味や食感を作るのとは、180度違う。だから市販のものと全く同じものを作る。ブラインドテストをして誰も見破れないというのがゴールだ。
前もって断っておきますが、とても長文で、いつにも増して理屈っぽいです。
I previously explained that a thermometer is essential gear for cooking geeks. To put it into practice, let's try to recreate store-bought bacon using a thermometer and an inexpensive toaster oven. Everyone loves bacon, after all.
Because it's homemade, unlike store-bought bacon, I won't say that it's "delicious in its own way" or "better than store-bought." The reason is that I'm an engineer, so I'm particular about reproducibility. Making something that tastes good and intentionally making something with the taste and texture you're aiming for are completely different. So I'm going to make something that's exactly the same as the store-bought version. My goal is to do a blind test and have no one be able to tell the difference.
I should warn you up front that this is a very long piece and more argumentative than usual.
料理技術のイノベーション
Culinary innovation
エンジニアの観点で言わせてもらうと、工程や手順については、燻製フリークの大掛かりな仕掛けは使わない。同じものが再現できるなら手順はどうでも良いからだ。それどころか技術的には工程を大胆に変更するイノヴェーションが技術の要件の一つなのだ。技術といえば特許のことが思い浮かぶ。実はベーコンという完成品そのものに対し特許を取ることはできない。しかし製造の工程に対しては特許を取れるのだ。製造特許という奴だ。製薬の世界や半導体製造の話でも一緒だ。もしその工程がより簡易で、大きな設備投資を必要とせず、より少ない手間で済むのなら、製品のコストを下げることができる。他社が真似できないコスト削減は技術の成果の一つになる。
大袈裟な話になったが、家庭のキッチンの話に戻す。僕のキッチンでのゴールは「家庭で手間をかけず安価な設備で市販品よりもずっと安く市販のベーコンとと同じものを作る」ということになる。安価な設備が、ここでは温度計と一万円しないオーブントースターだ。実は理屈がわかれば必ずしもオーブントースターは必須ではないのだが、放って置けるのが仕事をしながらの僕にはメリットなので使っている。
「市販と同じベーコン」にはもう一つ意味がある。「市販品は特別なのか?」ということの検証である。市販品は特殊な添加物を使っているから真似できないという誤解を解くためだ。自分が再現できない市販の食品に出会うと、特殊な装置や添加物を使っていると思い込む人が意外に多い。でも実は基本的なところはそれほど驚くような手順を踏んでいるわけではなく、伝統製法の手業を機械によって置き換えている場合がほとんどだ。これから普及するだろう人工肉培養とか食品3Dプリントの技術は今までにない技術だけど、ハムやベーコンについては未だそうではない。だから、工夫さえすれば普通に家庭でも同じものが作れるのだ。
そこからもう一つこの再現作業のメリットが出てくる。同じものが再現できると、内容表示のラベルに書かれている添加物がなんのために使われているのかが明快に理解できるようになる。添加物についての良し悪しはここでは触れない。僕は医療や健康の専門家ではないからだ。ただ、技術者として添加物がどんな役割を演じているのか分からないブラックボックス状態は気持ち悪い。そして特殊な添加物を使わなくてもそれほどの手間をかけなくても、みんなの大好きなベーコンが作れるならば、断然自家製の方を選ぶということだ。
Speaking from an engineer's point of view, I don't use the elaborate processes and procedures of smoked food freaks. Because the procedure doesn't matter as long as I can reproduce the same thing. On the contrary, one of the requirements for technology is innovation to drastically change the process. When I think of technology, I think of patents. In fact, you can't patent the finished product itself, which is bacon. But you can patent the manufacturing process. It's called a manufacturing patent. It's the same in the pharmaceutical world or semiconductor manufacturing. If the process is simpler, doesn't require expensive equipment, and requires less effort, you can reduce the cost of the product. Cost reductions that other companies cannot imitate are one of the results of technology.
That was a bit of an exaggeration, but let's go back to the topic of my home kitchen. My goal in the kitchen is to "make the same bacon as commercial bacon at home, with inexpensive equipment and less effort, at a much cheaper price than commercial products." In this case, the inexpensive equipment is a thermometer and a toaster oven that costs less than 10,000 yen. Actually, if you understand the theory, a toaster oven is not necessary, but I use it because I can leave it alone while I work.
There is another meaning to "bacon the same as store-bought". It is to verify whether store-bought products are special. It is just to clear up the misconception that store-bought products cannot be imitated because they use special additives. Surprisingly, many people assume that special equipment or additives are used when they come across store-bought foods that they cannot reproduce. However, the basic steps are not so surprising, and in most cases, traditional handiwork is replaced by machines. Artificial meat culture and food 3D printing technologies, which will likely become widespread in the future, are new technologies, but this is not yet the case for ham and bacon. Therefore, if you are creative, you can make the same thing at home.
And from this comes another benefit of this reproduction work. If you can reproduce the same thing, you can clearly understand what the additives written on the label are used for. I will not go into the pros and cons of additives here, because I am not a medical or health expert. However, as an engineer, I feel uncomfortable with the black box situation where I don't know what role additives play. And if I can make the bacon that everyone loves without using special additives or going to so much trouble, I would definitely choose homemade.
試作にあたっての要素技術の確立
Establishment of elemental technologies for prototyping
ベーコン製作のプロセスを組み立てる前に、工程をいくつかの要素に分解して、個々の技術要件を個別検証しよう。意地悪にも思いっきりシステム技術者目線で書いてしまったけど、料理はいくつかの調理技術と、その適用順序から成り立っている。工業製品を作ったり、アプリを作るのと一緒なのだ。
ベーコンの作製のための技術要件は幾つかある。まずは味付けだ。ベーコンの味になっている必要がある。次は低温の火入れだ。ベーコンには豚バラ肉が使われるので、その脂肪や筋の部分をゼラチン化する必要がある。市販のベーコンは生でも食べられので、食中毒の心配がないことを担保しながら柔らかく噛み切れるように火入れをしなければならない。そして見た目が赤みがかった状態に仕上げるために通常は硝石などの発色剤を加える。さらに燻煙する必要がある。順番に検証していこう。
Before assembling the process of making bacon, let's break it down into several steps and verify each technical requirement individually. I've written this from a systems engineer's perspective, but cooking consists of several cooking techniques and the order in which they are applied. It's the same as making industrial products or creating apps.
There are several technical requirements for making bacon. First, seasoning. It needs to taste like bacon. Next, it needs to be cooked at a low temperature. Bacon is made from pork belly, so the fat and tendons need to be gelatinized. Commercially available bacon can be eaten raw, so it needs to be cooked so that it is soft and chewable while ensuring that there is no risk of food poisoning. Then, to give it a reddish appearance, a coloring agent such as saltpeter is usually added. It also needs to be smoked. Let's verify them in order.
ベーコンの味を作る Make the bacon flavor
味付けにはソミュール液と呼ばれる調味液を使う。主成分は塩と砂糖、そこにいくつかの香辛料が加わわる。塩と砂糖、香辛料を直接すり込んでもほぼ同じ結果だった。ソミュール液を使う方が肉も組織に水分が吸収されしっとり感が出ると言われているけれど、結論としては、どちらでもそれほどの違いは出なかった。僕は個人的にはソミュール液を使わずに直接すり込んでソミュール液を作る工程を省いている。それに僕は豚肉の仕込はパンチエッタ(豚の塩漬)とベーコン、ハムと3つの完成品を念頭に置いて、これらを一緒に仕込むからこちらの方法論の方が馴染みが良い。ただ、よくあるすり込み方法だと塩抜きの工程が増えてしまうので、軽くすり込んで塩抜きをしない方法論を取った。ソミュール液を使う方法も直接すり込む方法論も同じ再現性があるが、すり込む方法は多少のコツが必要で初回は塩辛すぎたり味が足りなかったりするリスクがある。そこで、ソミュール液を作る工程は増えてしまうが、ここでは、初めての人でも失敗しにくいソミュール液に漬け込む方法論を採用する。個人の楽しみでなく仕事としてレシピを提供する場合は場合、職人が居なくても失敗しない安全な方法論を提案するのが普通だからだ。ソミュール液は前もって味見をできる点でも有利だ。試行錯誤を楽しみたいなら両方試してみていただきたい。スパイスとハーブはは胡椒の粒、月桂樹、オールスパイス、ジェニパーベリー、ニンジン、セロリ、パセリの茎を選んだ。スパイスやハーブについては、お好みのメーカーのベーコンがあるなら、それに似せて好みの配合に変更しても良いし、簡単にはクレージーソルトなどのハーブソルトで手間を省いても良い。ジェニパーベリーはちょっと大人の味に寄せるために使っているが、ウイスキーやジンを代わりに入れても良いし、甘めの香りが良いなら代わりにシナモンスティックや玉ねぎの皮やオニオンパウダーを入れても良い。
For seasoning, a seasoning liquid called Saumur liquid is used. The main ingredients are salt and sugar, with some spices added. I got almost the same results when I rubbed the salt, sugar, and spices directly into the meat. It is said that using Saumur liquid allows the moisture to be absorbed into the tissues of the meat, making it moister, but in conclusion, there was not much difference between the two. Personally, I do not use Saumur liquid, but instead rub the meat directly into the meat, eliminating the process of making Saumur liquid. Also, when I prepare the pork, I prepare the three finished products, pancietta (salted pork), bacon, and ham, together, so this methodology is more familiar to me. However, the common method of rubbing the pork requires an additional process of desalting, so I chose a method of rubbing the pork lightly and not desalting it. Both the method of using Saumur liquid and the method of rubbing the pork directly have the same reproducibility, but the rubbing method requires some skill and there is a risk that the meat will be too salty or not flavorful enough the first time. So, although the process of making the Saumur liquid will increase, here we will adopt a methodology of soaking in Saumur liquid that is unlikely to fail even for beginners. If you are providing a recipe as a job rather than for personal enjoyment, it is normal to propose a safe methodology that will not fail even if there is no craftsman. Saumur liquid is also advantageous in that you can taste it in advance. If you want to enjoy trial and error, I recommend trying both. For spices and herbs, I chose peppercorns, bay leaves, allspice, juniper berries, carrots, celery, and parsley stems. For spices and herbs, if you have bacon from a manufacturer you like, you can change the mixture to your liking to resemble it, or you can simply use herb salt such as Crazy Salt to save time. I use juniper berries to give it a slightly more adult taste, but you can use whiskey or gin instead, or if you prefer a sweeter aroma, you can use cinnamon sticks, onion skins, or onion powder instead.
ベーコンの火入れ Cooking the bacon
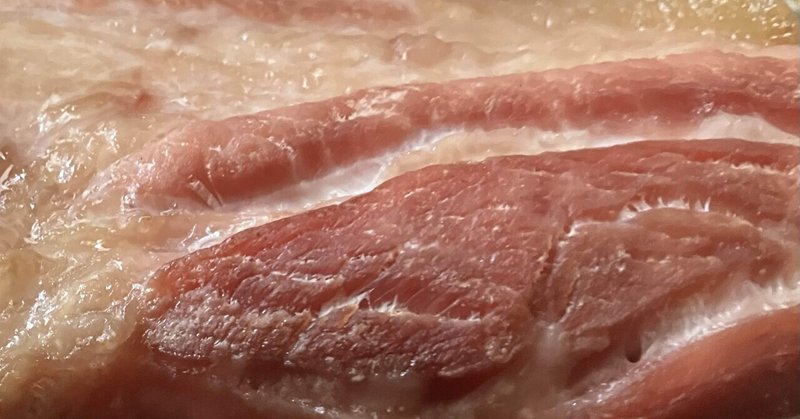
市販のベーコンは焼くと香ばしくて美味しいが、生でも食べられる。それはきちっと火入れがされているからだ。火入れには二つの目的がある。1つ目は食感の改善だ。肉には脂肪層や硬い筋がある。これが残っていると硬くて噛みきれないし脂がしつこくて食感が悪くなる。適切な火入れをするとあのベーコンの食感が作り出せる。2つ目は食中毒防止だ。大腸菌など食中毒の原因になるバクテリアを死滅させなければならない。ぐつぐつにてしまうのが殺菌には手っ取り早いが、それをやると触感が損なわれ、ガチガチに焼き固まった肉を食べる羽目になる。そこで必要になるのが温度計だ。
温度計で計測しながら火入れを実験すれば、食中毒リスクがなくベストな食感に仕上がる温度を見つけることができる。僕が実験した限りの結論は65度近辺で150分だ。この条件下で、脂肪層と硬い筋がゼラチン化して余計な脂肪が抜け、市販のベーコンの食感に仕上がる。
ただ、ネットや本に掲載されているレシピは、それが意図的なのかどうかは分からないけど、ラフな記述が多い。温度幅が10度以上あったり、詳細な調理条件の記述がないのだ。詳細な調理条件とは、温度計測の方法、肉の大きさ、スタート時の肉の温度、気温、加熱機材のサイズなどだ。例えばお湯を使って真空調理をする場合、容器の大きさや肉の大きさで熱伝導の状況が変わってくる。加熱終了後の後処理も問題だ。ただ放置では食中毒の問題が残るし、気温によっても影響を受ける。加熱には惰性があるので、ちょうど良い温度で止めたつもりが惰性で火が入り過ぎてしまうこともある。もちろん低温調理器なら温度センサーで自動で温度調節をしてくれるけれど、その装置のどこにセンサーが付いているのかによって結果も違ってくる。また計測しているのはお湯の温度に過ぎないので、その温度は肉の内部の温度を担保しているわけではない。だから低温調理器を使っても使わなくても、温度計による中心温度の計測が必要になる。中心温度とは一番火が入りにくい食材の中央部の温度のことを指す。
また、火入れは燻煙の工程とも絡んでくる。冷燻なら別だけど、温燻や熱燻だと火入れもかねているので、温度計による中心温度管理が必要になる。
僕の採用したのは、加熱工程と燻製工程を同時に行うやり方だ。その分工程の分割数が減るので、全体の工程数を減らすことができる。
Commercially available bacon is fragrant and delicious when cooked, but it can also be eaten raw. This is because it is properly cooked. Cooking has two purposes. The first is to improve the texture. Meat has fat layers and tough tendons. If these remain, it becomes tough and difficult to chew, and the fat is sticky and the texture becomes bad. Proper cooking creates the texture of bacon. The second is to prevent food poisoning. Bacteria that cause food poisoning, such as E. coli, must be killed. The quickest way to sterilize it is to boil it, but doing so will damage the texture and you will end up eating meat that is cooked and hard. That's where a thermometer comes in.
By experimenting with cooking while measuring with a thermometer, you can find the temperature that will give you the best texture without the risk of food poisoning. From my experiments, I came to the conclusion that it should be around 65 degrees for 150 minutes. Under these conditions, the fat layers and tough tendons gelatinize, the excess fat is removed, and the texture of commercial bacon is achieved.
However, recipes published on the Internet and in books are often written in a rough manner, whether intentionally or not. The temperature range is more than 10 degrees, and there is no detailed description of the cooking conditions. Detailed cooking conditions include the method of temperature measurement, the size of the meat, the temperature of the meat at the start, the temperature, the size of the heating equipment, etc. For example, when using hot water for vacuum cooking, the heat transfer conditions change depending on the size of the container and the size of the meat. Post-heating is also a problem. However, if you leave it alone, there will be the problem of food poisoning, and it will also be affected by the temperature. Since heating has inertia, even if you think you have stopped at the right temperature, it may end up overcooking due to inertia. Of course, a low-temperature cooker will automatically adjust the temperature with a temperature sensor, but the results will vary depending on where the sensor is attached to the device. Also, since it only measures the temperature of the hot water, that temperature does not guarantee the temperature inside the meat. Therefore, whether you use a low-temperature cooker or not, you need to measure the core temperature with a thermometer. Core temperature refers to the temperature of the center of the food, which is the hardest to cook.
Also, the heating process is also related to the smoking process. Cold smoking is a different story, but warm smoking and hot smoking also involve cooking, so temperature control is necessary.
I decided to do the heating and smoking process at the same time, which reduces the number of steps, and as a result, the total number of steps.
ベーコンの発色剤などの添加物 Additives such as bacon colouring agents
市販の硝石などなど発色剤を使ったベーコンはピンク色なのに、自家製のベーコンは灰色であることが多い。ただ、僕も自分で実験してわかったのだけど、自然塩を使って、塩抜き工程の必要ない薄味の塩のすり込みをする方法、あるいはソミュール液を使う方法をとるならば、自然塩に含まれる塩化ナトリウム以外の少量の塩類が同じ働きをして、仕上がりも薄いピンクになる。灰色に変色するのは塩化ナトリウム以外の成分が極端に少ない塩を使う場合や、塩抜きをする場合だと思う。
僕は普段から自然塩以外は使わない。だから、ここではわざわざ特別な発色剤は添加していない。
また、発色以外にも品質の安定や食感の向上を謳って添加されている添加物もあるのだが、特にこれらを入れ無くても市販のハムと見紛う製品に仕上がるので、やはりここでは使っていない。
やや悩ましいのは化学調味料(うまみ調味料)だ。発色剤不使用とか無添加を謳う製品でも大抵これは使われている。ただ、入れなくても気づいた人はいないので、特にここでは添加しなかった。僕個人の見解だけど、肉だけで十分美味いのにさらに化学調味料を入れる意味を見出せないし、少量の添加でも自然界の何倍ものアミノ酸ソーダの量なので、味覚を阻害するように思うからだ。添加するのは簡単なので、気にならない人は使っても良いと思う。
Commercially available saltpeter coloring agents are pink, but homemade bacon is often gray. However, I have found through experiments that if you use natural salt to rub in a light-flavored salt that does not require a desalting process, or if you use a method using Saumur solution, the small amount of salt other than sodium chloride contained in natural salt seems to have the same effect, and the finished product will be pale pink. I think the gray color occurs when you use salt that contains extremely little ingredients other than sodium chloride, or when you desalt it.
I don't usually use salt with a high degree of refinement. That's why I didn't bother to add any special coloring agents here.
In addition, there are also additives that are added to stabilize quality and improve texture other than coloring, but even without these, the finished product is indistinguishable from commercial bacon, so I don't use them here.
One thing that is a bit of a problem is chemical seasonings (umami seasonings). These are usually used even in products that claim to be free of coloring agents or additives. However, no one has noticed if they are not added, so I did not add them here. This is my personal opinion, but I don't see the point in adding chemical seasonings to meat that is already delicious, and even a small amount of added glutamate is tens of thousands of times the amount found in nature, so I think it inhibits the taste. It's easy to add, so if you don't mind, I think it's fine to use it.
Ingredients:
材料:
豚バラ肉(2、3百グラムくらいがの塊肉が良い)
自然塩
黒糖
月桂樹
黒胡椒の粒
ジェニパーベリー
クローブホール
ニンジン(切れ端で良い)
セロリ(切れ端で良い)
パセリの茎
燻製用チップ(茶葉でも良い)
Pork belly (A chunk of meat of about 200 to 300 grams is best.)
Sea salt
Brown sugar
Bay leaf
Black peppercorns
Juniper berries
Whole cloves
Carrots (scrap is fine)
Celery (scrap is fine)
Parsley stalks
Smoking chips (tea leaves are fine too
procedure:
手順:
豚バラ肉には、ソミュール液が染み込みやすいようにフォークなどで満遍なく穴をあけておく。
鍋に香辛料と調味料の全てを入れ加熱する。黒糖は自然塩の半量程度を目安とする。スパイスは好みの分量で良い。ジップロックなどでマリネするので量はいらない。
沸騰したら弱火にして10分煮て火を止め、味を見る。甘味が足りなければ黒糖を足し、そのまま冷ます。冷めると塩辛さは増すので、この時点で塩味は少し物足りな具感じるくらいでちょうど良い。
ジップロックなどの密閉のできる袋を用意し、豚バラ肉を入れて、冷めたソミュール液を注ぎ入れ、空気が入らないようにジップする。丸一日、時間があるなら4、5日間冷蔵庫に入れてマリネする。液が偏るようなら、ときどき上下を返してやる。
Poke holes evenly into the pork belly with a fork so that the Saumur liquid can soak in easily.
Put all the spices and seasonings in a pot and heat. Use about half the amount of brown sugar as salt. You can use the amount of spices to your liking. You don't need to add too much as you will be marinating in a Ziploc bag or similar.
Once it boils, reduce heat to low and simmer for 10 minutes, turn off the heat and taste. If it's not sweet enough, add more brown sugar and let it cool. It will become saltier as it cools, so at this point it's just right if it feels a little salty.
Prepare an airtight bag such as a Ziploc bag, put the pork belly in, pour in the cooled Saumur liquid, and zip it up so that no air gets in. Marinate in the refrigerator for a whole day, or 4-5 days if you have time. If the liquid is unevenly distributed, turn it over occasionally.


以下、特定の機器を使用するが、代替の方法についてはヒントの項にそのアイデアを示しておいた。
豚バラ肉をソミュール液から出してキッチンペーパーなどで水分をよく拭っておく。
温度計の中心温度計測用プルーフを斜めに肉の中心に先端が位置するように差し込んでおく。
オーブントレーなどにアルミホイルを敷き、その上に油切りの網を載せて豚バラを載せる、燻製用チップか茶葉をアルミホイルの上に散らしておく。
トレーを低温加熱機能のあるオーブントースター(普通のオーブントースターを使う場合の手順はヒントを参照)に入れて最大温度で加熱する。
加熱が進むと燻製チップが発煙し、同時に肉の表面に焦げ目がついて焼き固められていく。
肉の大きさにもよるが、20分から30分くらいで肉は燻煙され、中心温度が摂氏48度くらいまで上がってきているので、一旦加熱を止めて摂氏160度に温度を落としてさらに加熱を続ける。
中心温度が摂氏55度くらいまで上がったところで、一旦加熱を止めて、今度は摂氏100度に温度を落として加熱を続ける。
その後は、温度計の数値を見ながら中心温度が5度上がるごとに15度くらいオーブンの温度を下げ、最終的に中心温度が摂氏65度前後の時点でオーブンの温度を摂氏70度に固定する。
そのままの温度設定で約2時間半温度を保つ。中心温度は摂氏65度を中心に2、3度の誤差はあっても構わない。
焼き上がったらトースターの蓋を開け、粗熱が取れたところで、ジップロックなどに空気を抜きながら入れて、氷水などで急冷する。
完成品は冷蔵庫で10日程度、チルド室で1ヶ月は保存が可能。
Specific equipment is used below, but alternative methods are given in the Hints section.
Remove the pork belly from the Saumur liquid and wipe it dry with kitchen paper.
Insert the thermometer's core temperature measuring tip at an angle into the center of the meat.
Spread aluminum foil on an oven tray, place a grease drainer on top, and place the pork belly on top. Scatter smoking chips or tea leaves on the aluminum foil.
Place the tray in a toaster oven with a low-temperature heating function (see Hints for instructions when using a regular toaster oven) and heat at maximum temperature.
As the heating progresses, the smoking chips will start to smoke, and at the same time the surface of the meat will start to brown and harden.
Depending on the size of the meat, the meat will be smoked in about 20 to 30 minutes, and the core temperature will have risen to about 48°C, so stop heating and reduce the temperature to 160°C and continue heating.
When the core temperature has risen to about 55°C, stop heating, then reduce the temperature to 100°C and continue heating.
After that, while watching the thermometer, lower the oven temperature by about 15°C for every 5°C rise in the core temperature, and finally fix the oven temperature at 70°C when the core temperature is around 65°C.
Keep the temperature at this temperature setting for about two and a half hours. It's okay if the core temperature varies by 2 or 3 degrees from 65°C.
Once cooked, open the lid of the toaster, and once the meat has cooled down, place it in a Ziploc bag (removing the air), zip it up, and quickly cool it in ice water or something similar.
The finished product can be stored in the refrigerator for around 10 days, or in the chilled compartment for up to one month.


Tips and tricks:
コツと応用のヒント:
ここでは豚バラ肉を使っているが、肩ロースやもも肉などを使っても良い。その場合は形を整えるため凧糸などで縛って使うと見栄え良く作れ、火入れにムラが出ない。
ここで使った豚バラ肉もそうだが、塊肉の厚みを一定に加工する必要がある。熱は外側から中心部に向かって伝わっていくので、場所によって厚みに違いがあると、加熱し過ぎになる箇所があったり加熱不足な箇所があったりしてしまう。
ソミュール液への漬け込みは一晩でも良いが、数日漬け込んだ方がタンパク質の分解が進んで熟成度が上がり旨味が増える。ここでは僕は5日間漬け込んでいる。
僕は調味料を塩抜きが必要ない程度の塩味で直接肉にすり込み、半量をそのまま熟成させてパンチエッタ(塩豚)としてさらに長期熟成させ、残りの半分には追加で好みのスパイスを粉砕して塗り付け、5日後に取り出してベーコンの火入れをしている。常温なら保存のために大量の塩が必要で、塩抜きの工程も必須だけど、冷蔵庫を戦略的に使って肉熟成に適した気候を作り出してやれば、塩抜き工程は不要になる。
肉の熟成もそれ自体興味深いテーマなので別の機会に触れてみたい。
I used pork belly here, but you can also use shoulder or thigh meat. In that case, tie it with kite string to make it look nice and evenly cooked.
As with the pork belly used here, it is necessary to process the thickness of the block of meat to be consistent. Heat is transferred from the outside to the center, so if the thickness varies from place to place, some parts will be overcooked and some will be undercooked.
You can soak it in Saumur liquid overnight, but soaking it for several days will break down the proteins, improve the maturity, and increase the flavor. Here, I soak it for five days.
I rub the seasoning directly into the meat with a saltiness that does not require desalting, and then I age half of it as pancietta (salted pork) for a longer maturation period, and I apply crushed spices of my choice to the other half, and after five days I take it out and cook the bacon. At room temperature, a large amount of salt is needed for preservation, and a desalting process is also necessary, but if you use the refrigerator strategically to create a climate suitable for maturing the meat, the desalting process will not be necessary.
Meat aging is an interesting topic in itself, so I would like to touch on it on another occasion.

黒糖は蜂蜜など他の甘味料に変えても良い。甘味料をカットしても良いが、そうすると途端に市販品の味から遠ざかる。甘味は旨味を感じる重要な要素の一つだからだ。市販品メーカーはそのことをよく知っている。
シナモン、八角、山椒などの特徴のあるスパイスや、地域特産の柑橘類やベリー類などの果物をなどを使って、オリジナルなフレーバーを足すこともできる。
自然塩由来の成分が発色に一役買っているようなので(厳密な検証はしていないので、推測だが)特に硝石などの添加はしていない。確実に鮮やかな色を出すなら硝石などを添加すると良い。興味のある方は自然塩の種類を変えて発色の度合いを調べてみて欲しい。
個人的には、肉のアミノ酸だけで十分美味しく感じるので、化学系アミノ酸調味料の添加はあえてしていないけど、物足りなく感じるようなら、化学系アミノ酸やタンパク質加水分解物、酵母エキスなどの添加物を加えれば良い。これは憶測に過ぎないが、漬け込みの工程が短いと十分に肉の熟成が進まず、旨味成分が増えないので、漬け込み時間が短いことを補うために市販品にはこれらの化学系調味料が添加されているのかも知れない。熟成は工業的にはコントロールが難しいし、単純にコスト高になるので、値下げ競争の激しい肉加工品の分野では合理的な判断なのかも知れない。
You can replace the brown sugar with other sweeteners such as honey. You can also cut out the sweetener, but then the taste will be far from that of commercial products. Sweetness is one of the important elements for feeling umami. Commercial product manufacturers are well aware of this.
You can also add original flavors by using distinctive spices such as cinnamon, star anise, and Japanese pepper, or fruits such as citrus fruits and berries that are local specialties.
I don't add saltpeter or other additives because it seems that the ingredients derived from natural salt play a role in the coloring (this is just a guess, as I have not tested it rigorously). If you want to make sure you get a vivid color, it is a good idea to add saltpeter. If you are interested, please try changing the type of natural salt and check the degree of coloring.
Personally, I feel that the amino acids in the meat alone are delicious enough, so I don't dare add chemical amino acid seasonings, but if you feel that it is not enough, you can add additives such as chemical amino acids, protein hydrolysates, and yeast extract. This is only speculation, but if the marinating process is short, the meat will not mature sufficiently and the umami components will not increase, so these chemical seasonings may be added to commercially available products to compensate for the short marinating time. Since aging is difficult to control industrially and simply increases costs, this may be a rational decision in the field of processed meat products, where there is fierce price-cutting competition.
オーブントースターで段階的に温度を下げているのは、中心温度の目標値に向かって加熱の加速度を徐々に落としながら、最終的に目標値付近の温度に辿り着くため。
最初に高温で加熱するのは燻製用チップを発煙させるため、そして同時に肉の表面を焼き締めるためだ。最初から低温調理をすると理解できるが、2時間以上の長時間低温調理をするとかなりのドリップが出て、返ってジューシーさが失われてしまう。最初に高温で表面を炙り焼きするとほとんどドリップが出ない。肉の表面に近い部分に火が入り過ぎてしまうと心配する方がいるかも知れないが、肉の内部は冷たいので、表面を炙っても肉の中で水分の対流が起き、いきなり高温になることはない。これも温度計で測りながら火を通すと理解できる。
その後、温度上昇の加速度を確かめながら、何段階かに分けて温度を下げる。加速し過ぎた車が急に止まれないのと同じで、肉の内部が沸き立って過熱を止めても、しばらくは温度が上昇し続けてしまう。だから、少しづつ温度を下げて着地点を狙うわけだ。電車通勤したことのある人はわかると思うが、電車の運転手が駅に到着するだいぶ前から徐々にモーターへの出力を下げて行き、必要最低限のブレーキングで、ホームの停止線ピッタリに停車させるあの技と同じだ。僕が温度を計測しながら加速の度合いをみて、数段階に分けて温度設定を変更をしているのは、何度かの実験を通して、中心温度が目標値でピッタリ止まる減速パターンを知っているからだ。また、最終段階で僕が摂氏65度の目標値に対して摂氏70度の温度設定をしている理由は、僕の機材には何らかの熱損失があるからだ。摂氏70度というのはあくまでもトースターの庫内の空気温度であって、それが損失なく肉に伝わるわけではないからだ。空気の温度を摂氏70度に保つと、熱損出を計算に入れて肉の中心温度をほぼ目標値に2時間以上保っておけるということだ。
ただ、当然オーブンやトースターが違えばその特性も変化する。僕が示したタイミングで同じ結果を出せる保証はない。だから、自分の使い慣れた機器や環境で温度計を実際に使って計測することが重要なのだ。火入れを追求したい人は、是非ご自分の機材で実験してみて欲しい。一度計測結果が手に入れば、温度制御は自由自在なのだから。
ちなみに、最新鋭の業務用のスチコン(スチームコンベクションオーブン)はコンピューターを内蔵していて、この細かい温度調整を全自動でやってくれる。帰宅時に豚肉の塊を放り込んでおけば、出勤時には絶妙な火入れのローストポークが完成している。もちろん、実験結果を踏まえて、自分独自の火入れプロセスをプログラミングすることも可能だ。
The reason for gradually lowering the temperature in a toaster oven is to gradually slow down the heating acceleration toward the target core temperature, and finally reach a temperature close to the target value.
The reason for heating at a high temperature at first is to make the smoking chips smoke, and at the same time to brown the surface of the meat. This makes sense if you start cooking at a low temperature, but if you cook at a low temperature for a long time (more than two hours), a lot of dripping will occur and the juiciness will be lost. If you sear the surface at a high temperature first, there will be almost no dripping. Some people may worry that the parts near the surface of the meat will be overcooked, but since the inside of the meat is cold, even if you sear the surface, moisture convection will occur inside the meat and it will not suddenly become hot. This can also be understood by cooking it while measuring with a thermometer.
After that, lower the temperature in several stages while checking the acceleration of the temperature rise. Just like a car that has accelerated too much cannot stop suddenly, even if the inside of the meat boils and the overheating is stopped, the temperature will continue to rise for a while. That's why you lower the temperature little by little to aim for the landing point. Those who have commuted by train will know that this is the same technique that train drivers use to gradually reduce the power output to the motor long before arriving at the station, and then brake only as much as necessary to stop the train exactly at the stop line on the platform. I change the temperature setting in several stages, observing the degree of acceleration while measuring the temperature, because I know through several experiments the deceleration pattern that stops the core temperature exactly at the target value.
Also, the reason why I set the temperature at 70 degrees Celsius in the final stage, compared to the target value of 65 degrees Celsius, is because there is some heat loss in my equipment. 70 degrees Celsius is only the air temperature inside the toaster, and it does not transfer to the meat without loss. If the air temperature is kept at 70 degrees Celsius, the core temperature of the meat can be kept at almost the target value for more than two hours, taking into account the heat loss.
However, of course, the characteristics of different ovens and toasters change. There is no guarantee that the same results will be obtained at the timing I have shown. That is why it is important to actually use a thermometer to measure with equipment and environments that you are familiar with. If you want to explore the art of roasting, we encourage you to experiment with your own equipment. Once you have the measurement results, you can control the temperature freely.
By the way, the latest commercial steam convection ovens have built-in computers that can perform detailed temperature adjustments fully automatically. If you throw a chunk of pork in when you get home, it will be perfectly roasted by the time you come to work. Of course, you can also program your own unique roasting process based on the results of your experiments.
僕のオーブントースターは一万円もしないのに、ありがたいことに低温調理機能を持っている。だから最後までオーブントースターだけで完成まで持っていくことができる。では、低温調理機能がついていないオーブンやオーブントースターの場合はどうだろうか。その場合は2つの調理法を組み合わせることで、ほぼ同じ結果を作り出すことができる。最初の高温による燻煙と焼き締めは同じだ。ただ、その後で肉を取り出しジップロックなどの袋に、空気を抜いてパックする。そして温度計で湯温を測りながら、摂氏70度付近の温度をキープすれば良い。摂氏70度というのは仮定の値なので、実際には湯温と肉の中心温度の関係をときどき肉を取り出して中心温度を計測してよく理解してから、湯温を決めると良いだろう。蓋をするかしないかも鍋の大きさも熱損出に影響する。肉が小さいならヨーグルトメーカーを使っても良い。昔買ってしまいこんである低温調理器があるなら尚良い。摂氏70度といえばアジアの家庭には大抵装備されている炊飯器の保温機能を使うのもありだ。ただ、どの場合も温度計で実測して湯温と肉の中心温度の関係をよく理解しておくことだ。ベーコンのようなもの、ハムのようなものを作るなら適当でも良いけど、市販品と同じものを作りたいなら、温度計での計測は必須なのだ。
My toaster oven costs less than 10,000 yen, but thankfully it has a low-temperature cooking function. So I can finish the whole thing with just the toaster oven. But what about ovens and toaster ovens that don't have a low-temperature cooking function? In that case, you can combine two cooking methods to produce almost the same results. The initial high-temperature smoking and grilling are the same. However, after that, you take out the meat and pack it in a ziplock bag or similar, removing the air. Then, while measuring the water temperature with a thermometer, keep the temperature around 70 degrees Celsius. 70 degrees Celsius is a hypothetical value, so in reality, it's a good idea to take out the meat from time to time and measure the central temperature of the meat to understand the relationship between the water temperature and the central temperature of the meat before deciding on the water temperature. The size of the pot and whether to cover it or not also affect heat loss. If the meat is small, you can use a yogurt maker. If you have a low-temperature cooker that you bought a long time ago, it's even better. Speaking of 70 degrees Celsius, you can also use the warming function of a rice cooker, which is usually equipped in Asian homes. However, in any case, you should actually measure it with a thermometer and understand the relationship between the water temperature and the central temperature of the meat. If you're making something like bacon or ham, it's fine to just go with the flow, but if you want to make something identical to the store-bought version, it's essential to measure it with a thermometer.
最後に低温調理に関連するプロなら必須の知識なのだけど、触れられることが案外少ない事項を挙げておこう。知っておいて損はないと思う。
それは「急速冷却」だ。
前項で、適切な低温調理には2つの意味があることに触れた。一つは理想的な食感や味を作り出すこと。もう一つは食中毒を防ぐことだ。急速冷却は2番目の目的に密接に関連している。低温調理のレシピに「そのまま放置する」という指示が書かれていることがある。低温調理の成果品をその日のうちや翌朝に食べてしまうなら、何の問題もない指示だ。ただ、その後冷蔵庫で長期間保管したり、暖かい時期のお弁当に入れるとなると話は変わってくる。食中毒を引き起こす雑菌はおおよそ7、8度から50度くらいの間で盛んに増殖する。特に夏季の30度付近は最も危険な温度帯だ。また、低温調理の加熱では完全に死滅しない菌もある。加熱や冷却で休眠状態に入るけど、増殖温度に戻ればまた命を吹き返す。悪玉菌でもその数が極端に少なければ食中毒は出ない。ただ、数が爆発的に増えると食中毒の原因となる毒素を大量に生産する。だから増殖温度帯に長い時間食品を晒すのは厳禁なのだ。
商業的な調理の世界では、当然このことを踏まえて、調理、食材や成果品の保管をしなければならない。低温調理をした後が問題ということだ。調理をしたら、すぐに食べない成果品は速やかに冷却しなければならない。大量調理や先端の調理場に必ず備えられているのが「チラー」と呼ばれるこの急冷装置だ。最近コンビニにも導入されている「チルド冷蔵製品」がその成果品だ。食品を急冷し4度前後の温度で保管すれば、一週間程度鮮度が保てる。凍っていないから食感も損なわれないし、温め時間も短くて済む。エネルギー消費の面でも冷凍より優しい技術だ。
もちろん家庭にはそんな装置はない。ただ原理は簡単なので、少量の食材なら家庭でも同じことができる。食材を耐水性の袋にいれて空気を抜き氷水で冷やせば良い。調理後30分以内に5度まで中心温度を下げて冷蔵庫に仕舞えば良いのである。これでお惣菜の保ちが飛躍的に延びる。最近の冷蔵庫にはこの温度帯に対応した「チルド室」が備わっている。ただ、チルド室に暖かい食材をいきなり収納するのは厳禁。というのはチルド室は凍る寸前の4度前後の温度を保つ機能は持っているが、急冷する機能は持っていないからだ。だから、氷水で急冷してからチルド室にしまうのが正しい運用なのである。
低温調理したベーコンにこの処置をしてやればチルド室で1ヶ月は鮮度を保てる。
Finally, I would like to mention a technique that is essential for professionals related to low-temperature cooking, but is surprisingly rarely mentioned. I think it is worth knowing.
That is "rapid cooling".
In the previous section, I mentioned that proper low-temperature cooking has two purposes. One is to create the ideal texture and taste. The other is to prevent food poisoning. Rapid cooling is closely related to the second purpose. Some low-temperature cooking recipes include the instruction "Leave it at room temperature after heating." If you eat the product of low-temperature cooking on the same day or the next morning, there is no problem with this instruction. However, if you store it in the refrigerator for a long time after that or put it in a lunch box in warm season, the story changes. The germs that cause food poisoning grow actively between about 7 or 8 degrees and about 50 degrees. The most dangerous temperature range is around 30 degrees in summer. Also, there are some bacteria that are not completely killed by the heat of low-temperature cooking. They go into a dormant state when heated or cooled, but they come back to life when the temperature returns to the growth temperature. Even if there are bad bacteria, food poisoning will not occur if the number is extremely small. However, if their numbers increase explosively, they will produce large amounts of toxins that cause food poisoning. Therefore, it is strictly prohibited to expose food to the breeding temperature range for a long time.
In the world of commercial cooking, of course, this must be taken into consideration when cooking, storing ingredients, and finished products. The problem is what happens after low-temperature cooking. After cooking, finished products that are not to be eaten immediately must be cooled quickly. This rapid cooling device, called a "chiller," is always installed in large-scale cooking and state-of-the-art kitchens. The "chilled refrigeration products" that have recently been introduced in convenience stores are the result of this. If food is rapidly cooled and stored at a temperature of 4 degrees or less, it can maintain its freshness for about a week. Since it is not frozen, the texture is not affected and the heating time is short. It is also a technology that is more energy-efficient than freezing.
Of course, there is no such device at home. However, the principle is simple, so you can do the same thing at home for small amounts of food. Just put the cooked food in a waterproof bag, remove the air, and cool it in ice water. All you have to do is lower the core temperature to 5 degrees within 30 minutes of cooking and then store it in the refrigerator. This will dramatically extend the shelf life of your side dishes. Modern refrigerators are equipped with a "chilled compartment" that can handle this temperature range. However, it is strictly forbidden to store warm foods in the chilled compartment straight away. This is because, although the chilled compartment has the function of maintaining a temperature of below 4 degrees, just before freezing, it does not have the function of rapidly cooling food. Therefore, the correct way to use it is to rapidly cool food in ice water before storing it in the chilled compartment.
If you treat low-temperature cooked bacon in this way, it will stay fresh for up to a month in the chilled compartment.
Guide to where to find ingredients 材料入手先ガイド
この記事が気に入ったらサポートをしてみませんか?