Classic 3D Rendering 古典的 3D レンダリング

昔から使われている古典的な3Dレンダリングの手法を見てみましょう。今から見れば性能が低いコンピュータでも計算できるようにかなり単純化されていますが、その分とりつき安いと思います。また作りたい物によってはこのページのテクニックも十分現役で役に立ちます。
Let's take a look at classic 3D rendering techniques that have been around for ages. These are very simplified models so that they can be computed on less powerful computers compared to today's standards, but they are easy to learn for that very reason. And depending on what you want to make, the techniques on this page are still very useful.
This is a copy from kyndinfo.notion.site and is part of the articles on light and 3D rendering. Here's the original page. このページはkyndinfo.notion.site からの転載で、光と3Dレンダリングについて書いた記事の一部です。元のページはこちら。
Specular Reflection
スペキュラー(鏡面反射)
First, let’s look at the specular component. To simplify the discussion, we will use a point light source illuminating a plastic sphere.
まずはスペキュラー成分についてみてみましょう。話を単純にするために点光源でプラスチックの球体を照らす場合を考えます。
Light reflects so that the angle of incidence is the same as the angle of reflection. Since the surface of the plastic is not perfectly smooth and has fine bumps, the reflected light will actually be a little scattered.
光は入射角と反射角が同じになるように反射します。プラスチックの表面は完全に滑らかではなく細かな凸凹があるので、反射光は実際には少し散らばることになるでしょう。
Consider a vector ($${\vec{h}}$$) that lies halfway between the light source direction ($${\vec{l}}$$) and the viewpoint direction ($${\vec{v}}$$), as observed from a point on the object's surface. By examining its relationship with the normal vector ($${\vec{n}}$$), which represents the surface orientation, we can determine whether the reflected light is directed towards the eye. (We could calculate the direction of the reflected light, but this makes it simpler).
物体の表面のある一点から見た光源の方向($${\vec{l}}$$))と視点の方向($${\vec{v}}$$)の中間に当たるベクトル($${\vec{h}}$$)を考えて見ましょう。このベクトルと法線($${\vec{n}}$$)、つまり表面の向きを表すベクトルとの関係を調べると、反射光が目の向きに進んでいるかを調べることができます(反射光の向きを計算しても良いのですがこの方が簡単です)。
$${Specular = (\hat{h} \cdot \hat{n})^{s}}$$
The inner product of $${\vec{h}}$$ and $${\vec{n}}$$ represents how much they are aligned. $${\vec{h}}$$ and $${\vec{n}$$ have to be normalized beforehand. The larger the exponent($${s}$$), the smaller the highlight becomes. $${s}$$ is often called smoothness or shininess, but it is rather a parameter for adjusting the appearance of the image rather than a physical quantity.まず $${\vec{h}}$$ と $${\vec{n}}$$ の内積を取って向きがどれくらい揃っているかを調べます。$${\vec{h}}$$ と $${\vec{n}}$$ は計算の前に正規化します。冪乗の値 $${s}$$ を変えるとハイライトの大きさが変化します。$${s}$$ は滑らかさ(smoothness)や光沢(shininess)などと呼ばれますが、物理的な量というよりは見た目をそれっぽく調整するためのパラメータだと考えたほうが良いでしょう。
Diffuse Light ディフューズ(拡散光)
Assume that the diffuse light scatters equally in all directions. This model is called Lambertian reflectance.
ディフューズ(拡散光)は全方向に対して同じ量だけ散らばると仮定しましょう。このモデルはランバート反射と呼ばれています。
The amount of light striking an object depends on the angle of its surface with respect to the light. The demo below shows that the amount of light per unit area (the number of thin lines striking a thick line segment) is greatest when the surface is perpendicular to the light.
物体に当たる光の量はその表面と光の角度によって変わります。下のデモを見ると面が光に対して垂直なときに単位面積あたりの光の量(太い線分にぶつかる細い直線の数)が最大になることが分かります。
If the vector perpendicular to the object's surface is $${\vec{n}}$$ (normal), and the direction from the object to the light source is $${\vec{l}}$$, then the light intensity is proportional to the dot product of these two normalized vectors, $${\hat{n} \cdot \hat{l}}$$. If the angle between these vectors is $${\theta}$$, the dot product is $${cos \theta}$$, which is 1 when orientations of $${\vec{n}}$$ and $${\vec{l}}$$ are the same and 0 when they are perpendicular.
物体の表面に垂直なベクトルを $${\vec{n}}$$ (法線: normal)、物体から光源へ向きを $${\vec{l}}$$ とすると光の強さはそれぞれを正規化して内積をとったもの $${\hat{n} \cdot \hat{l}}$$ に比例します。このベクトルの間の角度を $${\theta}$$ とすると内積は $${cos \theta}$$ なので、$${\vec{n}}$$ と $${\vec{l}}$$ が同じ向きのときに1に、垂直のときに0になります。
$${Diffuse = \hat{n} \cdot \hat{l}}$$
Multiplying the intensity of the light obtained this way by the color of the light source and the color of the object determines the color of the visible surface (See also: Spectrum and Cones). The colors of light sources and objects here are technically spectral distributions, but we can just use RGB values in computer graphics.
こうして求めた光の強さに光源の色と物体の色を掛け算すると目に見える表面の色が決まります(スペクトルと錐体も参照)。ここでいう光源と物体の色は本来スペクトル分布ですが、コンピュータグラフィクスではRGB値を用います。
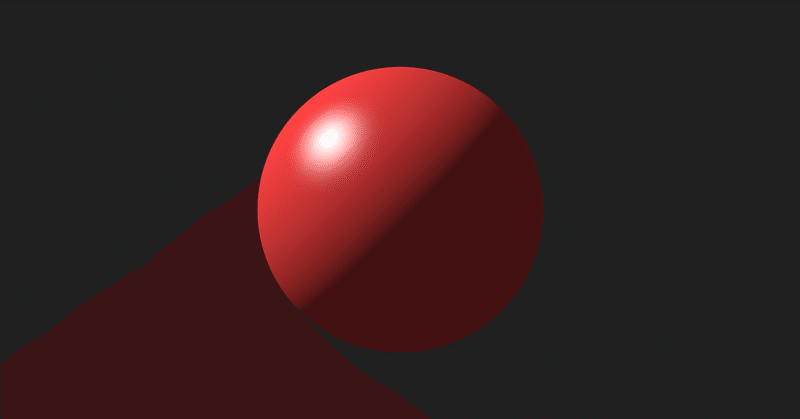
Adding up the specular and diffuse, we get this image.
スペキュラーとディフューズを足し合わせるとこうなります。
Ambient Light アンビエント(環境光)
In the demo above, the other side of the light source is completely dark. It might look like this if it is lit only with a flashlight in the middle of the night, but in a real environment, light comes from many different directions. A very simple way to reflect this idea is to assume that the light is coming uniformly from all directions. Since this is the diffuse component, you need to multiply the light by the color of the substance and add it to the entire surface.
上のデモでは光源の反対側が真っ暗になっています。真夜中に懐中電灯で照らしているならこんな感じかもしれませんが、実際の環境では光は様々な方向からやってきます。これを再現する非常に単純な方法として、全ての方向から一様に光が当たっていると仮定することができます。これはディフューズ成分なので、光に物質の色を掛けたものを全体に足し合わせます。
Another method, called half Lambert, raises the diffuse component using the following formula. Although physically incorrect, it was often used in games because it can create a somewhat plausible look.
ハーフランバートという別の手法ではディフューズ成分を下記の式で計算することで底上げします。物理的には全く正しくないのですが、それっぽく見えるのでゲームなどでよく使われました。
$${Diffuse = (0.5\hat{n} \cdot \hat{l} + 0.5)^2}$$$${Diffuse = (\frac{1}{2}\hat{n} \cdot \hat{l} + 0.5)^2}$$
Multiple light sources 複数の光源
If there are multiple light sources, each of them can be calculated separately and added together. Since the RGB values are capped at 1.0, it is advisable to adjust the values so that the areas where they overlap do not become too bright.
複数の光源がある場合にはそれぞれを計算して足し合わせます。RGBの値が1.0で頭打ちになってしまうので光が重なった部分が明るくなりすぎないように調整すると良いでしょう。
Next:
(Somewhat more) Physically based rendering 物理的に(もう少し)正しいレンダリング
この記事が気に入ったらサポートをしてみませんか?