
GeoJSONを活用して、HTML上で点を落とす方法

はじめに
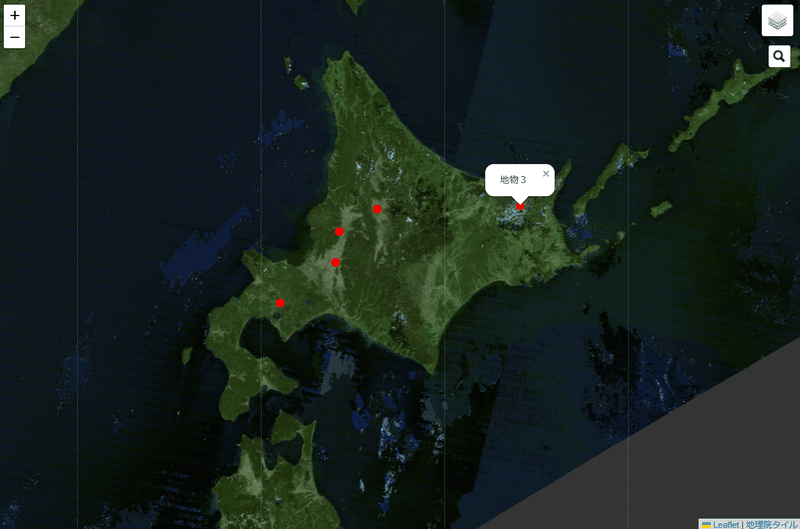
まずアウトプットのイメージからお伝えすると、こんな感じのHTMLファイルが作成可能です。HTMLというとWeb上でしか動作させるのが基本ですが、ローカルでも動くよう工夫しています。また下図は静止画になっていますが、実際は地図上で自由に移動・拡大縮小もできますし、地図の切り替えや検索機能も付けています。
GeoJSONとは
今回の特徴は外部のGeoJSONファイルからデータを読み込む、という部分になります。GeoJSONファイルとは地理情報をもったJSON形式のファイルのことで、上例でいうと赤点(地物)の情報になります。具体的なコードは以下の通りです。
var pointdata = {
"type": "FeatureCollection",
"name": "point_test",
"crs": { "type": "name", "properties": { "name": "urn:ogc:def:crs:OGC:1.3:CRS84" } },
"features": [
{ "type": "Feature", "properties": { "name": "地物1"}, "geometry": { "type": "Point", "coordinates": [ 142.40312, 43.79399 ] } },
{ "type": "Feature", "properties": { "name": "地物2"}, "geometry": { "type": "Point", "coordinates": [ 140.91673, 42.74747 ] } },
{ "type": "Feature", "properties": { "name": "地物3"}, "geometry": { "type": "Point", "coordinates": [ 144.59294, 43.83135 ] } },
{ "type": "Feature", "properties": { "name": "地物4"}, "geometry": { "type": "Point", "coordinates": [ 141.82152, 43.54530 ] } },
{ "type": "Feature", "properties": { "name": "地物5"}, "geometry": { "type": "Point", "coordinates": [ 141.76346, 43.20188 ] } }
]
};
上のコードをtextファイルにコピペして拡張子を.geojson にすればOKです。今は5つの点情報しかありませんが、この部分に行を追加すると点を増加させることもできます。
ちなみにGeoJSONファイルの一般的な形式は、
最初の行:{
最終の行:}
が正しい表記です。したがって、"var pointdata =" や ";" があると他のツール(例えばGoogleEarthやQGISなど)でインポートした際にエラーとなりますのでご注意ください。今回は無理やりHTMLファイルから呼び出す仕様にしたため、GeoJSONファイルの中身もJavaっぽくする必要がありました。
サンプルコード
サンプルコードは以下の通りです。
<!DOCTYPEThtml>
<html>
<head>
  <meta charset="UTF-8">
  <title>Test</title>
  <script type="text/javascript" src="https://unpkg.com/leaflet@1.8.0/dist/leaflet.js"></script>
  <script type="text/javascript" src="https://cdn.jsdelivr.net/npm/leaflet-search@3.0.2/dist/leaflet-search.src.min.js"></script>
  <script src="test_point.geojson"></script>
  <link rel="stylesheet" type="text/css" href="https://unpkg.com/leaflet@1.8.0/dist/leaflet.css">
  <link rel="stylesheet" type="text/css" href="https://cdn.jsdelivr.net/npm/leaflet-search@3.0.2/dist/leaflet-search.min.css">

</head>
<body>
  <div id="map" style="position:absolute;top:0;left:0;right:0;bottom:0;"></div>
</body>

<script>
  var map = L.map('map').setView([43, 142], 10);
  var map0 = L.tileLayer('https://cyberjapandata.gsi.go.jp/xyz/std/{z}/{x}/{y}.png',
    {attribution: "<a href='https://maps.gsi.go.jp/development/ichiran.html' target='_blank'>地理院タイル</a>"});
  var map1 = L.tileLayer('http://cyberjapandata.gsi.go.jp/xyz/pale/{z}/{x}/{y}.png',
    {attribution: "<a href='http://portal.cyberjapan.jp/help/termsofuse.html' target='_blank'>地理院タイル</a>"});
  var map2 = L.tileLayer('https://cyberjapandata.gsi.go.jp/xyz/blank/{z}/{x}/{y}.png',
    {attribution: "<a href='http://portal.cyberjapan.jp/help/termsofuse.html' target='_blank'>地理院タイル</a>"});
  var map3 = L.tileLayer('https://cyberjapandata.gsi.go.jp/xyz/seamlessphoto/{z}/{x}/{y}.jpg',
    {attribution: "<a href='http://portal.cyberjapan.jp/help/termsofuse.html' target='_blank'>地理院タイル</a>"});
  var map4 = L.tileLayer('http://tile.openstreetmap.jp/{z}/{x}/{y}.png',
    {attribution: "<a href='http://osm.org/copyright' target='_blank'>OpenStreetMap</a> contributors"});
  var baseMaps = {
    "国土地理院_標準" : map0,
    "国土地理院_淡色" : map1,
    "国土地理院_白" : map2,
    "国土地理院_航空" : map3,
    "OpenStreetMap" : map4,
  };
  L.control.layers(baseMaps).addTo(map);
  map3.addTo(map);

var point = L.geoJson(pointdata, {
    pointToLayer: function (feature, latlng) {
    return L.circle(latlng, 200, {
    stroke: true,
    color: "red",
    opacity: "1",
    weight: "10",
    fill: true,
    fillColor: "red",
    fillOpacity: "1"
    })},
    onEachFeature: function (feature, layer) {
    layer.bindPopup(feature.properties.name);
    }
});
point.addTo(map)

new L.Control.Search({
    layer: point,
    propertyName: "name",
    textPlaceholder: "検索対象を入力",
    initial: false,
    zoom: 15,
    marker: false,
    position: "topright"
}).addTo(map)

</script>
</html>
<script src="test_point.geojson"></script>
ここでgeoJSONファイルを読み込みます。この例だと、ファイル名を"test_point.geojson"とし、HTMLファイルと同じフォルダに格納する必要があります。
var point = L.geoJson(pointdata, {
"pointdata" とはGeoJSONファイル内で定義したJSONデータのことです。GeoJSONの一行目"var pointdata =" と連動しています。
return L.circle(latlng, 200, {
stroke: true,
color: "red",
opacity: "1",
weight: "10",
fill: true,
fillColor: "red",
fillOpacity: "1"
})},
点を打つための情報です。1行目の"200" は半径[m]です。その下のオプションはそれぞれ以下のようになっています。
stroke: 点(円)を線で囲うか(True: Yes / False: No)
color: 線の色(#RRGGBBの16進でも可)
opacity: 線の不透明度(0~1、0: 透明 / 1: 不透明)
weight: 線の太さ
fill: 点(円)の中の面の塗りつぶすか(True: Yes / False: No)
fillColor: 面の色(#RRGGBBの16進でも可)
fillOpacity: 面の不透明度(0~1、0: 透明 / 1: 不透明)
new L.Control.Search({
layer: point,
propertyName: "name",
textPlaceholder: "検索対象を入力",
initial: false,
zoom: 15,
marker: false,
position: "topright"
}).addTo(map)
GeoJSONファイルの中身を検索できるようにします。2行目"layer: point," の"point" とは ”var point = L.geoJson(… ” の"point"に相当します。つまり、GeoJSONの地物全部を指した変数です。
"propertyName" は検索にかける項目を指定します。改めてGeoJSONファイルのデータ部分を見てみると、
{ "type": "Feature", "properties": { "name": "地物1"}, "geometry": { "type": "Point", "coordinates": [ 142.40312, 43.79399 ] } },
という表現になっていますが、"propertyName" は上記の"properties" の中身から任意のものを指定する必要があるので、今回は"name" としました。
"initial" は前方一致にするかを決定するものです。例えば、検索対象が本例のように「地物1, 地物2, 地物3, 地物4, 地物5」だとした場合、
①"initial"=True で検索BOXに「地物」と検索
→「地物1, 地物2, 地物3, 地物4, 地物5」が候補として表示
②"initial"=Falseで検索BOXに「地物」と検索
→「地物1, 地物2, 地物3, 地物4, 地物5」が候補として表示
③"initial"=True で検索BOXに「物3」と検索
→検索ヒットなし
④"initial"=Falseで検索BOXに「物3」と検索
→「地物3」が候補として表示
となります。
"marker" は検索したときにヒットした対象にマーカーを塗るかどうかです。"position" は検索アイコン(虫眼鏡)をどこに表示するかを表現しています。
この記事が気に入ったらサポートをしてみませんか?