TWLogAIAN:Wails v2 + Svelteの環境でTensorFlow.jsを使って物体認識できた!

今年は正月休みが短くて今日から本業が始まります。昨日からTWLogAIANで使うためにTensorFlow.js
をWails+Svelteの環境
で試しています。
これは思ったより簡単でした。
簡単なサンプル
Wailsプロジェクトの作成
wails initコマンドでプロジェクトを作ります。
$wails init -g -t svelte -n tfjsTensorFlow.jsをインストール
npmコマンドでインストールできます。
$cd tfjs/frontend
$npm i @tensorflow/tfjs
App.svelteを編集
のGetting StartedにあるサンプルをApp.svelteに移植します。console.logを画面に表示するようにしただけです。
<script>
  import * as tf from "@tensorflow/tfjs";
  let result = "";

  function tfTest() {
    // Define a model for linear regression.
    const model = tf.sequential();
    model.add(tf.layers.dense({ units: 1, inputShape: [1] }));

    // Prepare the model for training: Specify the loss and the optimizer.
    model.compile({ loss: "meanSquaredError", optimizer: "sgd" });

    // Generate some synthetic data for training.
    const xs = tf.tensor2d([1, 2, 3, 4], [4, 1]);
    const ys = tf.tensor2d([1, 3, 5, 7], [4, 1]);

    // Train the model using the data.
    model.fit(xs, ys).then(() => {
      // Use the model to do inference on a data point the model hasn't seen before:
      result = model.predict(tf.tensor2d([5], [1, 1])).toString();
    });
  }
</script>

<main>
  <div id="input" data-wails-no-drag>
    <button class="button" on:click={tfTest}>Test</button>
  </div>
  {#if result}
    <div id="result">{result}</div>
  {/if}
</main>

<style>
  main {
    height: 100%;
    width: 100%;
  }

  #input {
    width: 95%;
    margin: 10% auto;
  }

  #result {
    margin-top: 1rem;
    font-size: 1.5rem;
  }

  button {
    -webkit-appearance: default-button;
    padding: 6px;
  }

</style>
試してみる
wails dev コマンドで試してみます。

動きました。でも、なんだか動きが寂しい感じです。もっとAIぽいアプリを試してみたくなってきました。
楽しくなってきたので物体認識のサンプルを試す
に学習済みのモデルを使ったサンプルが沢山あります。npmでインストールできるので試してみることにしました。試したのは
の物体認識です。
Wailsプロジェクトを作る
Wailsコマンドでプロジェクトを作ります。
$wails init -g -t svelte -n cocossdモデルとTensorFlow.jsのパッケージをインストール
npmコマンドでインストールできます。
$cd frontend
$npm i @tensorflow-models/coco-ssd
$npm i @tensorflow/tfjs-backend-cpu
$npm i @tensorflow/tfjs-backend-webgl
App.svelteを編集
のデモプログラムを移植してみました。
最初は、デモ付属の画像で結果は文字で表示するだけのを作りました。
ちゃんと動きました。
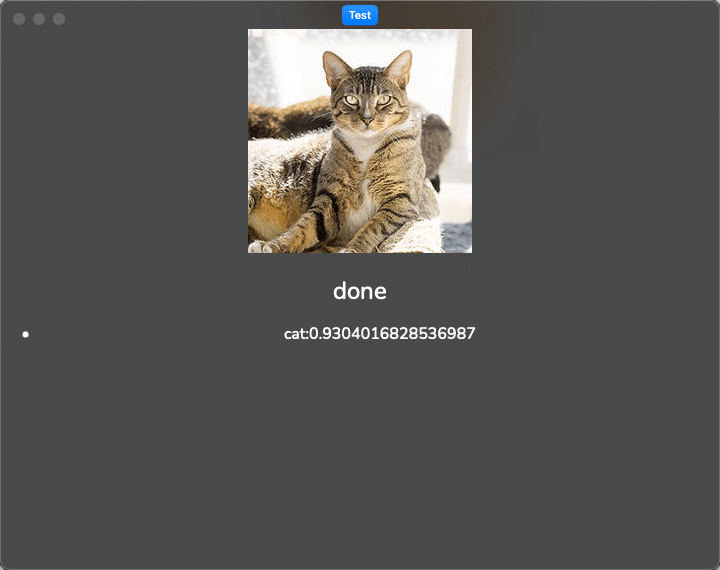
助手の猫の写真でもためしてみる
今は亡き助手の猫の写真で試してみることにしました。
楽しくなってきたので結果は文字だけでなく写真に位置と結果を表示するようにしました。

ちゃんとcatである確率96%と認識されました。天から猫は「わしは100%Human」と言っているかもしれません。
作ったコード
<script>
  import "@tensorflow/tfjs-backend-cpu";
  import "@tensorflow/tfjs-backend-webgl";

  import * as cocoSsd from "@tensorflow-models/coco-ssd";
  import { each } from "svelte/internal";
  let r = "";
  let predictions;
  async function testDetect() {
    r = "load image";
    const img = document.getElementById("img");
    // Load the model.
    r = "load model";
    const model = await cocoSsd.load();

    // Classify the image.
    r = "delect";
    predictions = await model.detect(img);
    if (predictions && predictions.length > 0) {
      r = "done";
      const c = document.getElementById("canvas");
      const context = c.getContext("2d");
      context.drawImage(img, 0, 0);
      context.font = "10px Arial";
      for (let i = 0; i < predictions.length; i++) {
        context.beginPath();
        context.rect(...predictions[i].bbox);
        context.lineWidth = 1;
        context.strokeStyle = "red";
        context.fillStyle = "red";
        context.stroke();
        context.fillText(
          predictions[i].score.toFixed(3) + " " + predictions[i].class,
          predictions[i].bbox[0],
          predictions[i].bbox[1] > 10 ? predictions[i].bbox[1] - 5 : 10
        );
      }
    } else {
      r = "error";
    }
    console.log("Predictions: ");
    console.log(predictions);
  }
</script>

<main>
  <div id="input" data-wails-no-drag>
    <button class="button" on:click={testDetect}>Test</button>
  </div>
  <div>
    <img id="img" src="assets/images/cat2.png" alt="cat" />
  </div>
  <div>
    <canvas id="canvas" width="800" height="420" />
  </div>
  {#if r}
    <div id="result">{r}</div>
  {/if}
  {#if predictions && predictions.length > 0}
    <ul>
      {#each predictions as p}
        <li>{p.class}:{p.score}</li>
      {/each}
    </ul>
  {/if}
</main>

<style>
  main {
    height: 100%;
    width: 100%;
  }

  #result {
    margin-top: 1rem;
    font-size: 1.5rem;
  }

  button {
    -webkit-appearance: default-button;
    padding: 6px;
  }
</style>
frontend/src/assets/imagesに別の画像ファイルを入れて<img>タグのsrcを変えれば他の画像も認識できます。
この方法を使えばTensorFlow.jsを利用したAIアプリを簡単に作れそうです。夢は広がりますが、今回はここまで。
明日に続く
開発のための諸経費(機材、Appleの開発者、サーバー運用)に利用します。 ソフトウェアのマニュアルをnoteの記事で提供しています。 サポートによりnoteの運営にも貢献できるのでよろしくお願います。