
Xamarin.Formsで標準アプリ詰め合わせ作ってみた

おひさしぶりです。クロセでございます。
今回はしっかり技術的な記事ですが、逐次更新という形で進めていきます。
まずはXamarin.Formsについて軽く説明
いかにもなタイトルの公式ドキュメントが載っていますのでこれを見ていただくと分かると思います。が、リンク開くのもめんどくせーという人がいるかもしれないでので一言で言うと「コードを共通化してアプリを作れるプラットフォーム」です。
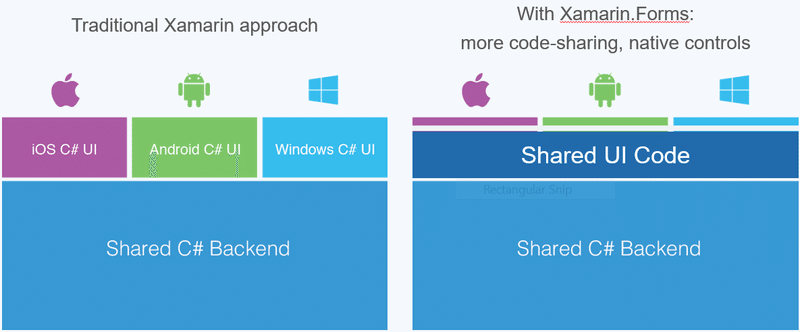
ちなみに、今回Xamarin.Formsを使いますが、他にもXamarin.AndroidやXamarin.iOSというのもあります。それが下の画像の左側です。Xamarin.Formsを使うと下の画像の右側のようにさらにコードを共通化することができます。素晴らしいですね!
ついでにXamarinの呼び方ですが「ザマリン」と呼びます。座間市のマスコットキャラクターの「ざまりん」が公式キャラクターというわけではありません。
名前の由来は「タマリン」だそうです。この記事の一番上のサルの画像、あれがタマリンです。まあ、種類によって見た目が変わるそうですが。
かわいいザマリンモンキーたち↓

「スマホによくある標準アプリの詰め合わせアプリ」
みなさん、スマホを買うと標準で入っているアプリがありますね。まずは何があるか思い浮かべてみよう。
時計、カレンダー、電卓、メモ帳、ギャラリー、音楽再生、電話、メール、カメラ、設定、YouTube、Twitter、ブラウザ、Playストア(Appストア)…
いっぱいありますね~!
色々ある中から今回は
メモ帳
電卓
タイマー
カレンダー(予定)
を作っていくことにしました。
ちなみになぜこれを作ろうと思ったか。
理由は、「なんかバラバラにアプリがあるけど一つにまとめられたら楽だな~」というのと「公式や誰かしらが作っていてWeb上にコードがあって手っ取り早そう」という安易な考えです...間違えた、効率重視な考えです。
環境は
・Windows10
・Microsoft Visual Studio2019
よって実行画面はAndroidのエミュレーター画面となっております。
出来上がった順に作り方を紹介していきたいと思います。
まずは下準備
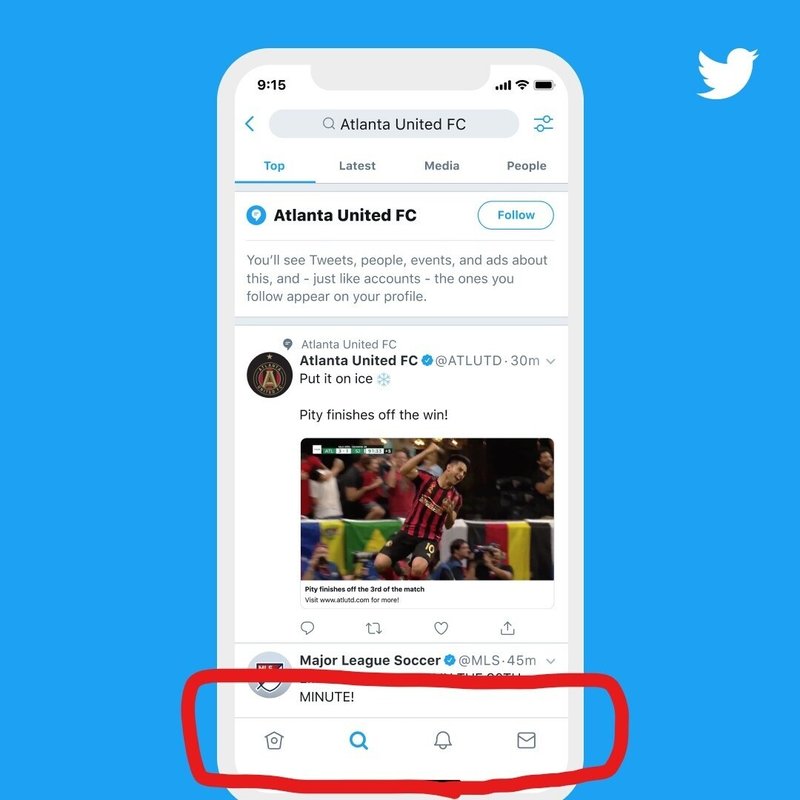
今回は複数のアプリを作るということでタブでアプリをきりかえれるようにします。(上画像の赤枠の部分みたいに)
0.VisualStudio2019でXamarinを使えるようにインストールしてください
0-1.プロジェクトを作成する際にモバイルアプリ(Xamarin.Forms)を選ぶ。
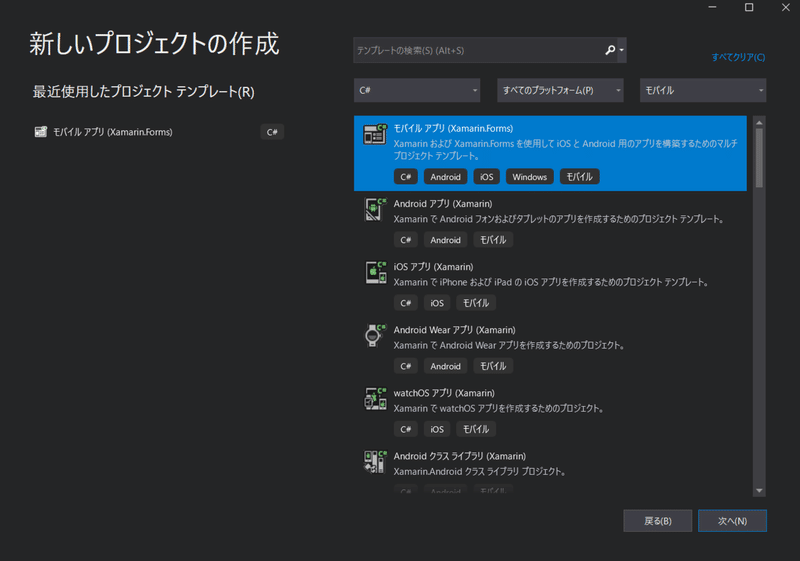
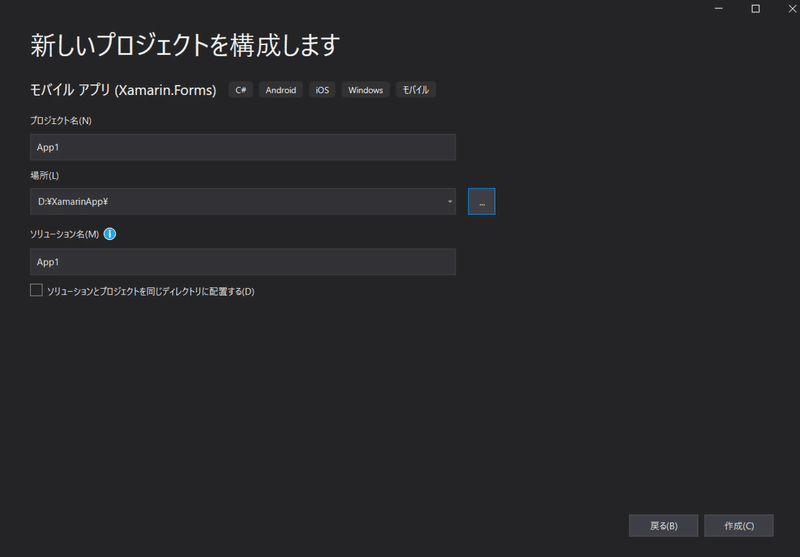
0-2.プロジェクト名の入力と保存場所を決める
0-3.「タブ付き」を選択し、AndroidとiOSにチェックを入れておき、「作成」を押下
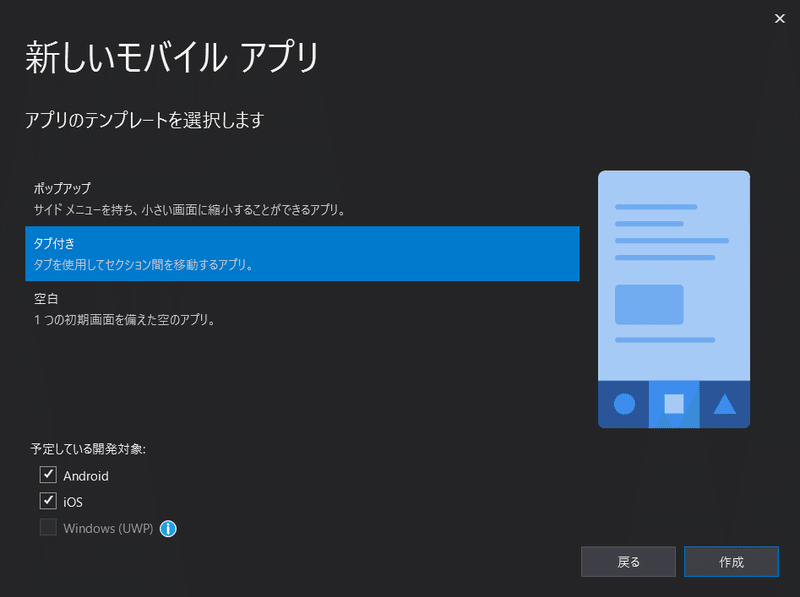
※Windowsのみで開発する場合はiOSはビルドできないことに注意しておこう
ちなみに「ポップアップ」を選ぶとハンバーガーメニューを使うことができるアプリを作れる。
「空白」は何もない状態から始められるので自分で色々カスタマイズできる。
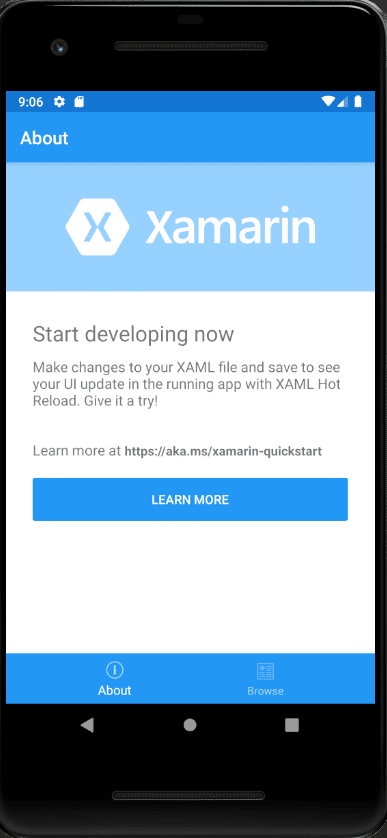
0-4.テンプレートができあがってる
中身はこんな感じ。
テキトーな文章が入っているのでそこを変えたり、さらにカスタマイズしていくことでアプリが簡単に作れます。

アプリ作成の仕方(超基本編)
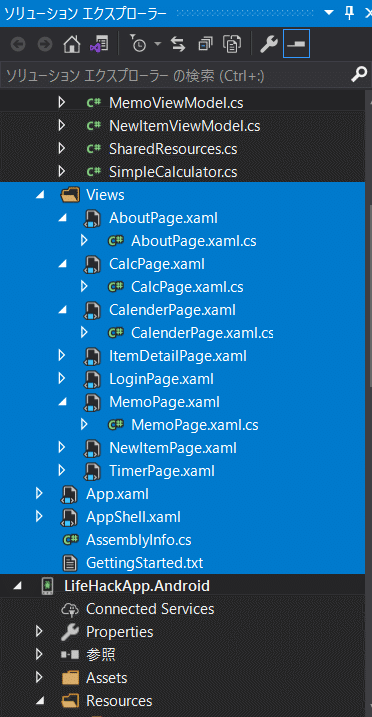
今回は「LifeHackApp」という名前でプロジェクト作成しました。
その中のViewsという中のファイル「〇〇.xaml」でアプリの見た目を作っていきます。そして「〇〇.xaml/〇〇.xaml.cs」の部分で画面内で行われる処理について記述(例:ボタンが押されたとき△△の処理をする)します。
下準備とアプリ作成の仕方が分かったので早速取り掛かりましょう!
電卓アプリ
上の画像は公式Microsoftがサンプルとして出している「ベーシックカルキュレーター」です。
今回は普通の電卓を作るのでこれをそのままコピペします。
初期状態だと演算子(÷×-+)をタップした時に演算子がどこにも表示されなくて分かりづらいので、左上に演算子が表示されるように表示(=押すと消すようにする)するのを追加で記述。
<!--CalcPageの見た目部分を作成-->
<?xml version="1.0" encoding="UTF-8"?>
<ContentPage x:Class="LifeHackApp.Views.CalcPage"
           xmlns="http://xamarin.com/schemas/2014/forms"
           xmlns:local="clr-namespace:LifeHackApp.ViewModels"
           xmlns:x="http://schemas.microsoft.com/winfx/2009/xaml">

   <ContentPage.Padding>
       <OnPlatform x:TypeArguments="Thickness">
           <OnPlatform.iOS>0,20,0,0</OnPlatform.iOS>
       </OnPlatform>
   </ContentPage.Padding>

   <Grid Padding="5,0" RowSpacing="1" ColumnSpacing="1" BackgroundColor="Black">

       <Grid.RowDefinitions>
           <RowDefinition Height="50" />
           <RowDefinition Height="2*" />
           <RowDefinition Height="*" />
           <RowDefinition Height="*" />
           <RowDefinition Height="*" />
           <RowDefinition Height="*" />
           <RowDefinition Height="*" />
       </Grid.RowDefinitions>

       <Grid.ColumnDefinitions>
           <ColumnDefinition Width="*" />
           <ColumnDefinition Width="*" />
           <ColumnDefinition Width="*" />
           <ColumnDefinition Width="*" />
       </Grid.ColumnDefinitions>

       <Label x:Name="SelectOperatorText" FontSize="40" FontAttributes="Bold" BackgroundColor="Black" Text=""
             TextColor="Yellow" HorizontalTextAlignment="Start" VerticalTextAlignment="Center"
             LineBreakMode="NoWrap" Grid.Row="0" Grid.Column="0" Padding="20,0"/>
       <Label x:Name="resultText" FontSize="60" FontAttributes="Bold" BackgroundColor="Black" Text="0"
             TextColor="White" HorizontalTextAlignment="End" VerticalTextAlignment="Center"
             LineBreakMode="NoWrap" Grid.ColumnSpan="4" Grid.Row="1" Padding="20,0"/>

       <Button Text="7" Grid.Row="2" Grid.Column="0"
              BackgroundColor="White" TextColor="Black"
              FontSize="36" BorderRadius="0" Clicked="OnSelectNumber" />
       <Button Text="8" Grid.Row="2" Grid.Column="1"
              BackgroundColor="White" TextColor="Black"
              FontSize="36" BorderRadius="0" Clicked="OnSelectNumber" />
       <Button Text="9" Grid.Row="2" Grid.Column="2"
              BackgroundColor="White" TextColor="Black"
              FontSize="36" BorderRadius="0" Clicked="OnSelectNumber" />

       <Button Text="4" Grid.Row="3" Grid.Column="0"
              BackgroundColor="White" TextColor="Black"
              FontSize="36" BorderRadius="0" Clicked="OnSelectNumber" />
       <Button Text="5" Grid.Row="3" Grid.Column="1"
              BackgroundColor="White" TextColor="Black"
              FontSize="36" BorderRadius="0" Clicked="OnSelectNumber" />
       <Button Text="6" Grid.Row="3" Grid.Column="2"
              BackgroundColor="White" TextColor="Black"
              FontSize="36" BorderRadius="0" Clicked="OnSelectNumber" />

       <Button Text="1" Grid.Row="4" Grid.Column="0"
              BackgroundColor="White" TextColor="Black"
              FontSize="36" BorderRadius="0" Clicked="OnSelectNumber" />
       <Button Text="2" Grid.Row="4" Grid.Column="1"
              BackgroundColor="White" TextColor="Black"
              FontSize="36" BorderRadius="0" Clicked="OnSelectNumber" />
       <Button Text="3" Grid.Row="4" Grid.Column="2"
              BackgroundColor="White" TextColor="Black"
              FontSize="36" BorderRadius="0" Clicked="OnSelectNumber" />
       <Button Text="0" Grid.Row="5" Grid.Column="0" Grid.ColumnSpan="3"
              BackgroundColor="White" TextColor="Black"
              FontSize="36" BorderRadius="0" Clicked="OnSelectNumber" />

       <Button Text="÷" Grid.Row="2" Grid.Column="3"
               BackgroundColor="{x:Static local:SharedResources.OpButtonBkColor}" TextColor="White"
               FontSize="36" BorderRadius="0" Clicked="OnSelectOperator" />
       <Button Text="×" Grid.Row="3" Grid.Column="3"
               BackgroundColor="{x:Static local:SharedResources.OpButtonBkColor}" TextColor="White"
               FontSize="36" BorderRadius="0" Clicked="OnSelectOperator" />
       <Button Text="-" Grid.Row="4" Grid.Column="3"
               BackgroundColor="{x:Static local:SharedResources.OpButtonBkColor}" TextColor="White"
               FontSize="36" BorderRadius="0" Clicked="OnSelectOperator" />
       <Button Text="+" Grid.Row="5" Grid.Column="3"
               BackgroundColor="{x:Static local:SharedResources.OpButtonBkColor}" TextColor="White"
               FontSize="36" BorderRadius="0" Clicked="OnSelectOperator" />

       <Button Text="C" Grid.Row="6" Grid.Column="0"
               BackgroundColor="#808080" TextColor="White"
               FontSize="36" BorderRadius="0" Clicked="OnClear" />

       <Button Text="=" Grid.Row="6" Grid.Column="1" Grid.ColumnSpan="3"
               BackgroundColor="{x:Static local:SharedResources.OpButtonBkColor}" TextColor="White"
               FontSize="36" BorderRadius="0" Clicked="OnCalculate" />

   </Grid>
</ContentPage>
//電卓アプリの処理部分を実装
using System;
using System.Collections.Generic;
using Xamarin.Forms;
namespace LifeHackApp.Views
{
public partial class CalcPage : ContentPage
{
int currentState = 1;
string mathOperator;
double firstNumber, secondNumber;
public CalcPage()
{
InitializeComponent();
OnClear(this, null);
}
void OnSelectNumber(object sender, EventArgs e)
{
Button button = (Button)sender;
string pressed = button.Text;
if (this.resultText.Text == "0" || currentState < 0)
{
this.resultText.Text = "";
if (currentState < 0)
currentState *= -1;
}
this.resultText.Text += pressed;
double number;
if (double.TryParse(this.resultText.Text, out number))
{
this.resultText.Text = number.ToString("N0");
if (currentState == 1)
{
firstNumber = number;
}
else
{
secondNumber = number;
}
}
}
void OnSelectOperator(object sender, EventArgs e)
{
currentState = -2;
Button button = (Button)sender;
string pressed = button.Text;
mathOperator = pressed;
this.SelectOperatorText.Text = button.Text;
}
void OnClear(object sender, EventArgs e)
{
firstNumber = 0;
secondNumber = 0;
currentState = 1;
this.resultText.Text = "0";
this.SelectOperatorText.Text = "";
}
void OnCalculate(object sender, EventArgs e)
{
if (currentState == 2)
{
var result = ViewModels.SimpleCalculator.Calculate(firstNumber, secondNumber, mathOperator);
this.resultText.Text = result.ToString();
firstNumber = result;
currentState = -1;
this.SelectOperatorText.Text = "";
}
}
}
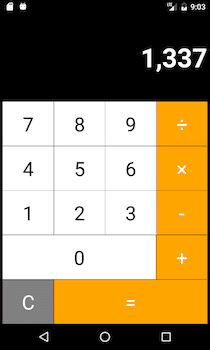
}そして出来上がったのがこちら↓
とりあえずXamarinで電卓作ってみた(ほぼコピペ) pic.twitter.com/KM8WTFzwjx
— KuRoSe (@kuroshinkur0108) December 19, 2020
タイマーアプリ
次にタイマーを設定し、時間になったら画面にポップアップが表示されるアプリを作りました。
こちらも公式ドキュメントを参照して、ほぼコピペですね。
コードはこんな感じ。
<!--タイマーアプリの見た目部分を作成-->
<?xml version="1.0" encoding="utf-8" ?>
<ContentPage xmlns="http://xamarin.com/schemas/2014/forms"
            xmlns:x="http://schemas.microsoft.com/winfx/2009/xaml"

            xmlns:local="clr-namespace:LifeHackApp.Views"
            x:Class="LifeHackApp.Views.TimerPage">
   <ContentPage.Content>

       <StackLayout Orientation="Vertical" HorizontalOptions="Center" Margin="0,30,0,0" >
           <Frame BorderColor="Black" BackgroundColor="Aquamarine" HasShadow="True" Margin="30,0" WidthRequest="200"
                      IsClippedToBounds="True" HorizontalOptions="Center" VerticalOptions="Center">
               <Label Text="アラームをセット" FontSize="Title" TextColor="Black"></Label>
           </Frame>
           <StackLayout Margin="20,50,20,0" Orientation="Horizontal" HorizontalOptions="Center" BackgroundColor="Transparent">
               <TimePicker x:Name="_timePicker" Format="HH:mm" Time="0:0" TextColor="DarkBlue" WidthRequest="300"
                           FontSize="110" HorizontalOptions="Center" PropertyChanged="OnTimePickerPropertyChanged"/>
           </StackLayout>

           <StackLayout Margin="20,20,20,10" Orientation="Horizontal" HorizontalOptions="Center">
               <Label Text="アラームON/OFF" FontSize="20"></Label>
               <Switch x:Name="_switch"
                   HorizontalOptions="Center"
                   Toggled="OnSwitchToggled" />
           </StackLayout>
       </StackLayout>

   </ContentPage.Content>
</ContentPage>
//タイマーアプリの処理部分を実装
using System;
using System.Collections.Generic;
using System.Linq;
using System.Text;
using System.Threading.Tasks;
using System.ComponentModel;
using Xamarin.Forms;
using Xamarin.Forms.Xaml;
namespace LifeHackApp.Views
{
[XamlCompilation(XamlCompilationOptions.Compile)]
public partial class TimerPage : ContentPage
{
DateTime _triggerTime;
public TimerPage()
{
InitializeComponent();
// 現在時刻の取得
DateTime dt = DateTime.Now;
// 取得した現在時刻の「時」「分」をTimeSpanに指定
_timePicker.Time = new TimeSpan(dt.Hour, dt.Minute, 0);
Device.StartTimer(TimeSpan.FromSeconds(1), OnTimerTick);
}
bool OnTimerTick()
{
if (_switch.IsToggled && DateTime.Now >= _triggerTime)
{
_switch.IsToggled = false;
DisplayAlert("Timer Alert", _timePicker.Time + "になりました!", "OK");
}
return true;
}
void OnTimePickerPropertyChanged(object sender, PropertyChangedEventArgs args)
{
if (args.PropertyName == "Time")
{
SetTriggerTime();
}
}
void OnSwitchToggled(object sender, ToggledEventArgs args)
{
SetTriggerTime();
}
void SetTriggerTime()
{
if (_switch.IsToggled)
{
_triggerTime = DateTime.Today + _timePicker.Time;
if (_triggerTime < DateTime.Now)
{
_triggerTime += TimeSpan.FromDays(1);
}
}
}
}
}出来上がったのがこちら↓
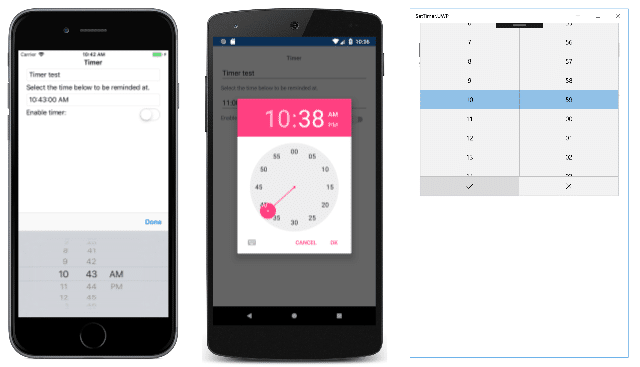
真ん中の時刻表示の部分をタップするとアラームがかかる時間を設定できる。アラームON/OFFのトグルスイッチでONにした状態で設定した時間になるとポップアップ表示。
そういえばアプリのタイマー部分も作れたから載せておこう
— KuRoSe (@kuroshinkur0108) December 23, 2020
めちゃ素朴… pic.twitter.com/8z895QENKG
追加機能としてアラームがかかるときに音楽、サウンドがなったり、日にちや曜日を設定できるようにすると目覚まし時計になりそう。
今回Androidのエミュレーターを使っていると冒頭に書きましたが、ここでOSごとのUIの差が顕著に出てきます。動画では時間を設定するときにかっちょいい時計がポップアップしてきましたね。
Android勢の皆さんはかなり見慣れていると思いますが、iPhone勢の皆さんは驚く人もいるかもしれません。
iOSの場合は下の画像の左側になります。右はWindows。
これはAndroidの一人勝ちだわ
メモ帳アプリ(準備中・・・)
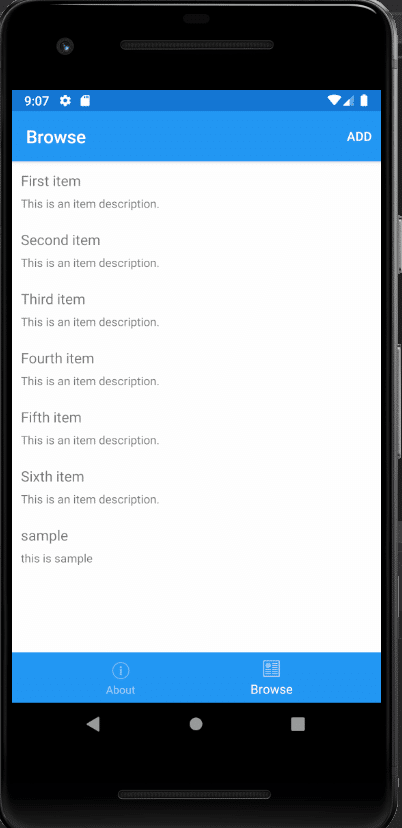
実はこれ、最初にテンプレートで作られていたBrowseというところがすでにメモ帳っぽい感じに作られている(どちらかというとToDoリストとかかも?)。
右上のAddボタンを押すと、要素を追加できるようになります。
しかし、もうすこし罫線引いたりとメモ帳っぽくしたかったので作り直すことにします。がんばります。
カレンダーアプリ(準備中・・・)
完成イメージとしては、1か月分のカレンダーが表示され、日にちをタップするとそこに予定を入れることができる、というものを考えています。がんばります。
さあ、今回はXamarinで標準アプリの詰め合わせを作ってきましたがいかがだったでしょうか?
基本的に公式ドキュメントにサンプルが載っていたり、Qiitaに誰かが書いていたりするので意外と簡単に作っていけるので興味わいたらやってみてください。Microsoftが6つのサンプルアプリを載せているのでそれを実装しながら学ぶのもいいと思います。
この記事が気に入ったらサポートをしてみませんか?