普段使いの田舎パン Mischbrot

世界の粉もん文化考
A look at flour-based food culture around the world
ストーリー
Recipe trivia
ひと昔に比べると、パンは随分と簡単に焼けるようになった。理由は高機能の石臼の登場とオーブン(石窯)の高性能化だ。パンは手作り品の代表のように考えている人が多いが、そうではない。穀物の粒食に比べてまず製粉という工程が必要だ。また、安定した火力を提供する窯も必要になる。中世のヨーロッパでは石臼と窯を持ったパン屋は特権階級だった。水車と石臼、高温でムラなく火を通せる窯は、領主や富裕層が持っているのが普通だった。普通の庶民はパンをパン屋から買うか、自分で作る場合は、製粉された小麦粉を購入してパンを捏ね、石窯の持ち主に使用料を払って焼いてもらうという仕組みを利用していた。パンの話ではないけど日本でも事情は同じで、江戸になって経済が安定して、粉もん文化が花開いていったのは、大陸から渡ってきた製粉機と水車の普及の結果である。
Compared to a long time ago, it has become much easier to bake bread. The reason is the appearance of high-performance stone mills and the high performance of ovens. Many people think of bread as a representative handmade product, but that is not the case. Compared to whole grain foods, it first requires a process called milling. It also requires an oven that provides stable heat. In medieval Europe, bakers who owned stone mills and ovens were a privileged class. Waterwheels, stone mills, and ovens that can cook evenly at high temperatures were usually owned by feudal lords and the wealthy. Ordinary people bought bread from bakeries, or if they made it themselves, they used a system in which they purchased milled flour, kneaded the bread, and paid a usage fee to the owner of the stone oven to have it baked. Although it is not about bread, the situation is the same in Japan, where the economy stabilized in the Edo period and flourishing flour culture was due to the spread of flour mills and waterwheels that were brought over from the continent.
オーブンが家庭にも普及するようになって、だんだんパン作りは身近になっていったけど、初期のオーブンは高価で温度管理や湿度管理が難しく、職人の腕前を必要とした。事情が決定的に変わってきたのは、ここ10年くらいだ。コンベクションオーブン、スチームコンベンションオーブンの技術が進歩し、マイコン制御でオーブンの職人的管理が必要なくなった。今では製パンは装置産業なのだ。その技術が民生用に低価格で提供され、コンベクションオーブン機能を持つトースターが五千円以下で手に入るようになったのだ。
As ovens became more common in homes, bread making gradually became more common, but early ovens were expensive, and temperature and humidity control was difficult, so the skill of a craftsman was required. Things have changed dramatically in the last 10 years or so. Advances in convection oven and steam convention oven technology have made microcomputer control obsolete the need for craftsmanship in managing ovens. Bread making is now an equipment industry. That technology is now available for consumer use at low prices, and toasters with convection oven functions can now be purchased for under 5,000 yen.
製粉事情も随分変わってきている。一昔前は少なくとも日本では大手製粉会社の独占だった。いわゆる穀物メジャーと呼ばれる仕組みに連なる流通の独占だ。もちろん小規模な製粉会社も存在していて、国産や有機の小麦粉、独自のブレンドを提供している。ただ、補助金を利用しても価格は高めになる。庶民の口に入るリーズナブルなパンにはならない。街の庶民派のパン屋さんは価格を考えれば大手製粉から購入するしかなかったのだ。最近ではこの事情は少しづつ変わってきていて、安価で小型の高性能製粉機がドイツやオーストリアから輸入され、高品質の製粉を小さな製粉会社や街のパン屋でもできるようになってきている。独自の小麦粉の製粉とブレンドがじぶんでもできる条件が揃ってきている。
この流れに沿うように、ここのところ日本では急激にパン屋さんが増えてきている。参入障壁が低くなり、料理研究家が、パン職人に弟子入りしなくても、個性的なパン屋を開けるようになってきたわけだ。この市場は大きく二極化しつつある。一つは冷凍の一時発酵済みの冷凍生地を仕入れて店の高性能オーブンで焼いて、焼きたてを提供するタイプのお店。もう一つは小麦など原料の仕入れや製粉、ブレンド、発酵整形テクニックにこだわって個性派、技巧派を目指すタイプのお店だ。前者は特に参入障壁が低い。フランスから輸入した高品質の冷凍生地をマイコン制御オーブンで焼けば、パン職人なしで本場の味を焼きたてで提供できる。あなたの街でも両方のタイプのパン屋さんが複数見つかるはずだ。
The situation of flour milling has also changed a lot. A long time ago, at least in Japan, it was a monopoly of major flour mills. It was a distribution monopoly linked to a system called the "grain majors". Of course, there are also small flour mills, offering domestic and organic flour, and their own blends. However, even with subsidies, the price is high. It does not become a reasonable bread that ordinary people can eat. Considering the price, ordinary bakeries in the city had no choice but to purchase from major flour mills. Recently, this situation has been changing little by little, and inexpensive, small, high-performance flour mills have been imported from Germany and Austria, and small flour mills and local bakeries are now able to produce high-quality flour. The conditions are now in place for people to mill and blend their own flour.
Following this trend, the number of bakeries in Japan has been increasing rapidly recently. The barrier to entry has been lowered, and it has become possible for culinary researchers to open unique bakeries without having to become apprentices to bakers. This market is becoming greatly polarized. One type of bakery purchases frozen dough that has already been fermented, bakes it in the store's high-performance oven, and serves it fresh. The other type of bakery aims to be unique and skilled, focusing on the procurement of wheat and other ingredients, milling, blending, and fermentation and shaping techniques. The former type has a particularly low barrier to entry. By baking high-quality frozen dough imported from France in a microcomputer-controlled oven, they can serve freshly baked bread with an authentic French taste without the need for a baker. You're sure to find multiple bakeries of both types in your town.
僕も仕事柄、パンの技術事情のリサーチをし、セントラルキッチンの提案をすることはあっても、小規模な飲食店の素人オーナーにパンのレシピを提供することはまず無かった。ただ、その後20年くらい前から国内の製粉会社が比較的安価に国産小麦をはじめとする独自の製品を出し始め、欧州で安価な高性能石臼が開発されたたのを見て、パンの専門店でないレストランにも自家製パンを焼くことを奨めるようになった。
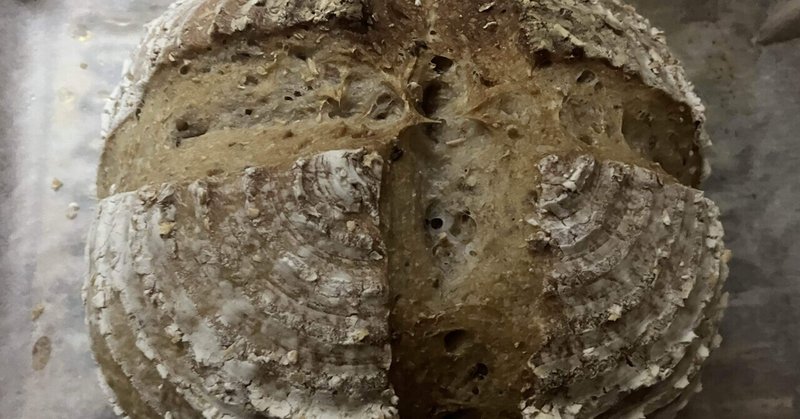
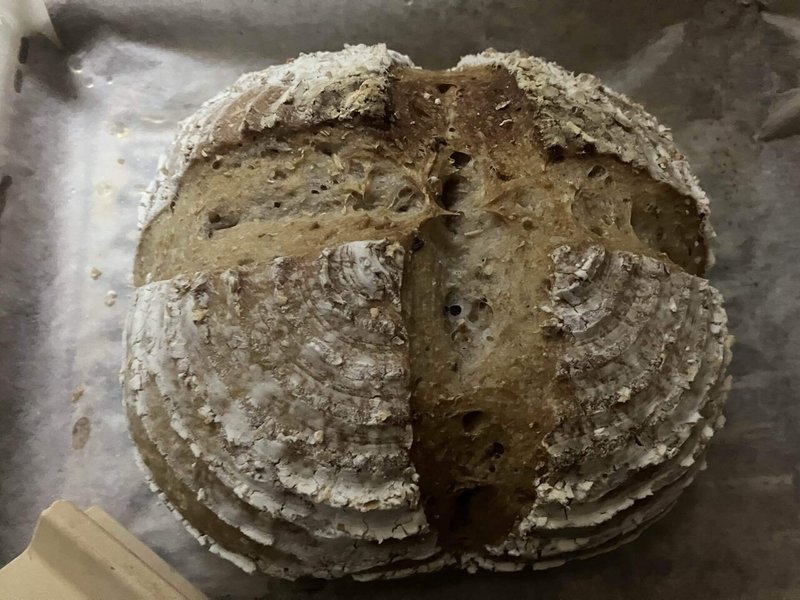
そして、パン職人でない経営者にオリジナルレシピを提供するため、自宅の安い器具でパンを試作する機会が多くなった。特に最近では数千円のオーブントースターでも、誰もそれに気づかないくらいの出来栄えのパンが焼けるので、自分自身もパンを買わなくなってしまった。僕自身、昔から白いパンをあまり食べる習慣がなく、僕のパートナーも出自がゲルマン系なので、自家用で焼く場合は全粒粉やライ麦のパンが中心になる。今回はそんな素朴な「田舎パン」を紹介する。日本ではフランスのパンドカンパーニュが有名だけど、ヨーロッパの地方地方にはそれぞれこういう素朴なパンが食べ繋がれている。ドイツ語でMischbrot(mix bread)と呼ばれるカテゴリーだ。全粒粉にライ麦を1、2割混ぜて使う。ただ、保存性を高めるために密度を高く固く焼き上げる本来のレシピよりも大分柔らかい仕上げに寄せている。ほとんど手間がかからず毎日でも焼けるレシピなので、あえて軽い仕上りのパンになっている。
実はこのレシピは、もう40年以上前だけど、学生の頃に読んだ本がヒントになっている。Raurie Colwin というジャーナリストが書いたものだ(日本語版は絶版だけど、古本で手に入ると思う。最後の購入ガイドにリンクを貼っておいた)。「Home Cooking -A Writer in the Kitchen-」という本だ。要は「パンのレシピ本にある儀式は不要」というアイデアだ。一般的にパンの調理は時間がかかると思われている(彼女によるとアメリカでも事情は同じだったらしい)。彼女は「パンのレシピに自分の生活を合わせるのではなく、自分の生活にパンのレシピを合わせれば良い」ことに気がついたのだった。僕のレシピはこのコンセプトを採用してしている。
Although I have researched the technical situation of bread and proposed central kitchens for my job, I have never provided bread recipes to amateur owners of small restaurants. However, after that, about 20 years ago, domestic flour mills began to produce their own products using domestic wheat at relatively low prices, and inexpensive high-performance stone mills were developed in Europe, so I began to encourage restaurants that are not specialized in bread to bake their own bread.
And in order to provide original recipes to managers who are not bakers, I have had many opportunities to try out bread using cheap equipment at home. Especially recently, even with a toaster oven that costs several thousand yen, you can bake bread that is so good that no one notices, so I have stopped buying bread myself. I myself have never been in the habit of eating much white bread, and my partner is of Germanic descent, so when we bake bread at home, we mainly make whole wheat or rye bread. This time, I will introduce such a simple "country bread". In Japan, the French pain de campagne is famous, but in each region of Europe, this kind of simple bread has been passed down. In German, it is a category called Mischbrot (mix bread). Whole wheat flour is mixed with 10 to 20 percent rye. However, in order to improve shelf life, the original recipe calls for a dense, hard bread, but this one is made much softer. Since this recipe requires very little effort and can be baked every day, it is intentionally made to be a light bread.
Actually, this recipe was inspired by a book I read as a student over 40 years ago. It was written by a journalist named Raurie Colwin (the Japanese version is out of print, but I think you can find it second-hand. I've included a link in the last buying guide). The book is called "Home Cooking -A Writer in the Kitchen-". The idea is that "the rituals found in bread recipe books are unnecessary". It is generally thought that cooking bread takes time (according to her, the situation is the same in America). She realized that "instead of adapting your life to the bread recipe, you can adapt the bread recipe to your life". My recipe adopts this concept.
あと一点。酵母のことに触れておこう。このレシピは、パンを焼くというハードルをあげないためにあえて市販の酵母を使っているけど、乳酸菌などと並んで酵母もそこいら中に住んでいる菌だ。だから天然酵母はいくらでも簡単に培養できる。それは応用問題としてまたの機会にレシピを紹介しよう。
ただ、ここで触れておくべきなのは市販の酵母に対する偏見についてだ。市販の酵母はいわゆる選別種だ。発酵力の強い、あるいは特定の用途に向く菌を培養して選別した優秀株なのだ。種の選別は野菜の品種改良にも畜産の分野でも使われている基本技術だ。品種改良の成果であるトマトを齧っている、あるいは霜降り和牛肉の焼肉にくらいついている人間が市販の酵母を警戒するのは本来筋違いだと思う。確かに培養液には化学肥料と有機肥料の違いのような観点はある。ただ、酵母というのは小麦粉の分量に対して使う量も高が知れている。小麦粉に市販の精製粉を使うなら、そっちの方が体への影響は圧倒的に大きい。数パーセントしか流通していない有機野菜を高値で購入する富裕層でなく、良心的な減農薬の野菜を希求している人が世の中には大部分なのだと考えれば、僕は特に市販の酵母を必要以上に否定する必要はないと思う。ただ、こだわりの嗜好品としてなら話は別だ。天然酵母の追求は面白いし、商機にもなる。市販の酵母で発酵とお友達になったのなら、天然酵母に挑戦してみよう。調理オタクとして技術を追求するなら、この順番での習得をおすすめする。市販の安定した味わいの味噌の使い方に慣れたら、自家製味噌にも挑戦する。同じことだ。
それに、僕のレシピでは、本当に少量しか酵母を使わないので、いわゆる「酵母臭い」という現象は起こらない。
One more thing. Let's touch on yeast. This recipe uses commercially available yeast so as not to raise the hurdle of baking bread, but yeast, like lactic acid bacteria, is a bacteria that lives everywhere. Therefore, natural yeast can be easily cultivated as much as you want. I will introduce a recipe for that as an applied problem another time.
However, what I should mention here is the prejudice against commercially available yeast. Commercially available yeast is what is called a selected species. It is an excellent strain that has been cultivated and selected from bacteria with strong fermentation power or suitable for a specific purpose. Seed selection is a basic technique used in vegetable breeding and livestock farming. I think it is unreasonable for people who bite into tomatoes, which are the result of breeding, or who bite into marbled Japanese beef barbecue to be wary of commercially available yeast. It is true that there is a difference between chemical fertilizer and organic fertilizer in the culture solution. However, the amount of yeast used is limited compared to the amount of flour. If you use commercially available refined flour for wheat flour, it will have an overwhelmingly greater impact on your body. Considering that most people in the world are looking for conscientious, reduced-pesticide vegetables, rather than the wealthy who buy organic vegetables at high prices, which only a few percent of the market is, I don't think there is any need to reject commercially available yeast more than necessary. However, if it's a particular luxury item, it's a different story. Pursuing natural yeast is interesting and can be a business opportunity. If you've become friends with fermentation using commercially available yeast, try natural yeast. If you're a cooking geek looking to pursue technology, I recommend learning in this order. Once you've gotten used to using commercially available miso with a stable taste, try making your own miso. It's the same thing.
Also, in my recipes, I only use a very small amount of yeast, so the so-called "yeasty smell" phenomenon doesn't occur.
Ingredients:
材料
全粒粉(微粒子製粉したもの)
ライ麦粉※
イースト(SAFの青ラベル)
自然塩
※入れなくても良い
Whole wheat flour (finely milled)
Rye flour*
Yeast (SAF blue label)
Natural salt
*Optional
procedure:
手順:
ボウルを秤に乗せ、全粒粉の1割程度のライ麦粉を混ぜ、好みで重量比1、2パーセントの自然塩、酵母をひとつまみ入れる。ここでは発酵籠に合わせて、260グラムの粉を使っている。
秤をリセットし、粉の分量に対して、重量比85パーセントくらいの水を加える。初回は75パーセントくらいから始めた方が扱いやすい。
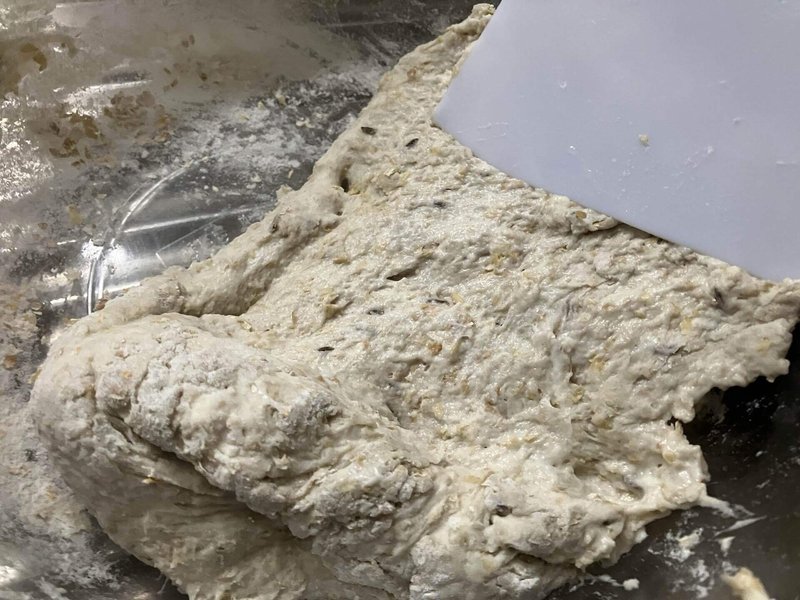
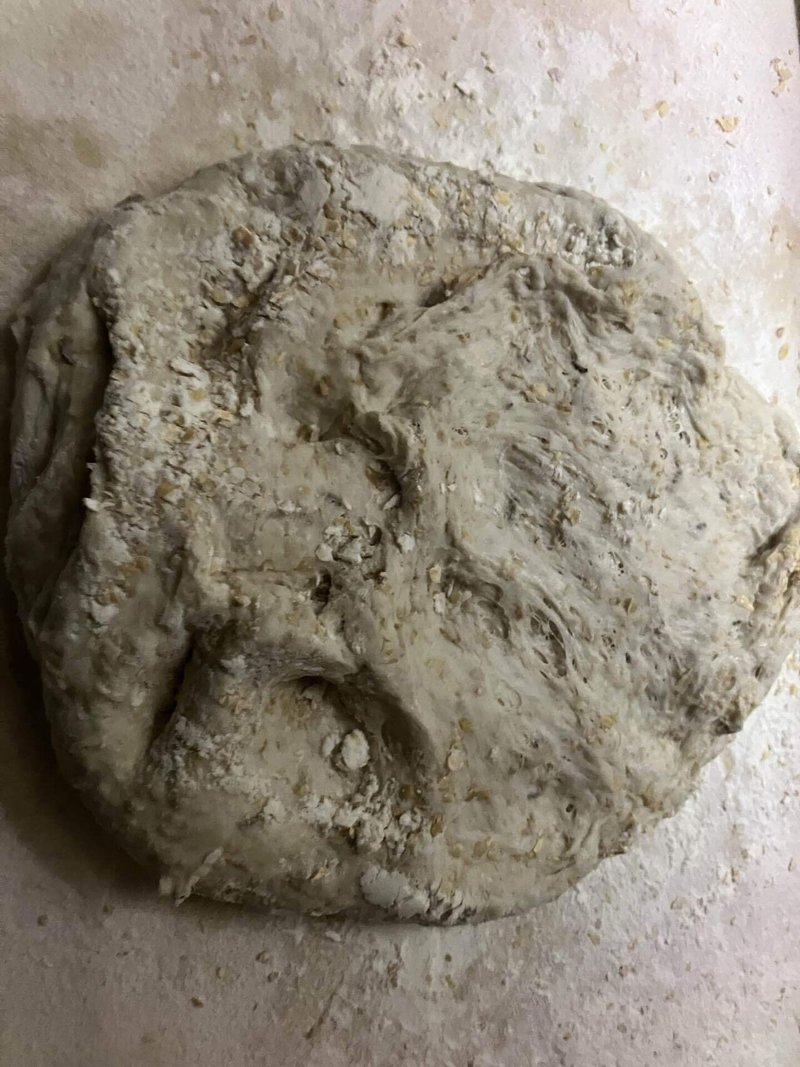
箸やフォークでかき混ぜて、全体を少し練る。手を使う必要はない。箸やフォークでそのまま混ぜ続け混ぜて粉っぽさがなくなれば良い。そのまま10分ほど(適当で良い。長くなっても構わない)放置する。
ゴムベラかパン用のスクレイバー(スキッパー)で、生地を平らに延ばして折りたたむ動作を7、8回繰り返す。
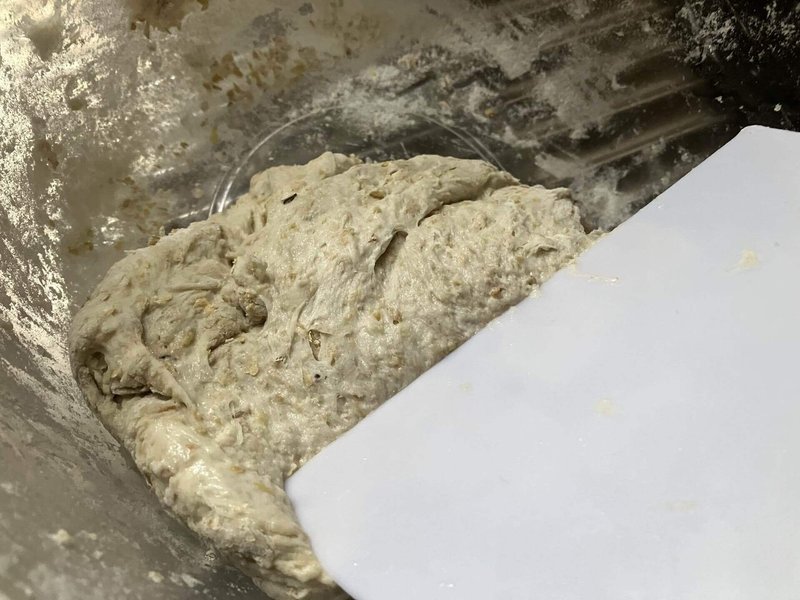
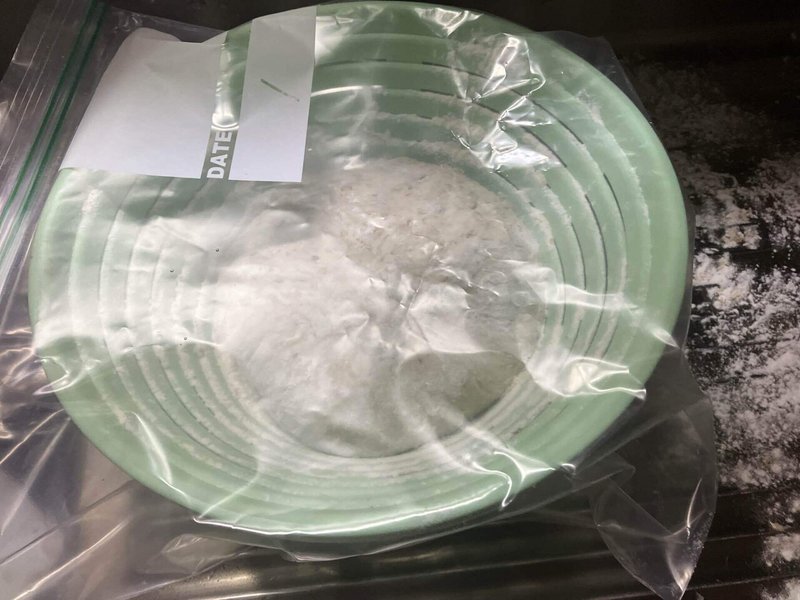
たっぷりの打ち粉(パン生地と同じ粉で良い)を塗して、てで取り上げ、軽く丸めて、ボウルかバットに入れ、乾燥防止に蓋をし(皿を乗っけてもラップで覆っても良い)、就寝時あるいは出勤時に放置する。10度以下の温度帯が適切。寒い季節は常温、暖かい季節は野菜庫に入れると良い。これを「一次発酵」という。
Put the bowl on a scale, mix in about 10% of the whole wheat flour, rye flour, and add 1-2% salt and a pinch of yeast if desired. Here, 260 grams of flour is used to match the fermentation basket.
Reset the scale and add about 85% water by weight to the amount of flour. It is easier to handle the first time if you start with about 75%.
Stir with chopsticks or a fork and knead the whole a little. There is no need to use your hands. Continue mixing with chopsticks or a fork until the powdery texture disappears. Leave it as it is for about 10 minutes (it's fine, it can be longer).
Use a rubber spatula or bread scraper (skipper) to flatten the dough and fold it 7-8 times.
Spread a generous amount of flour (the same flour as bread dough is fine), pick it up with your hands, lightly roll it into a ball, put it in a bowl or tray, cover it to prevent it from drying out (you can put a plate on top or cover it with plastic wrap), and leave it until you go to bed or go to work. A temperature below 10 degrees is appropriate. In cold seasons, leave it at room temperature, and in warm seasons, leave it in the vegetable cupboard. This is called the "first fermentation".


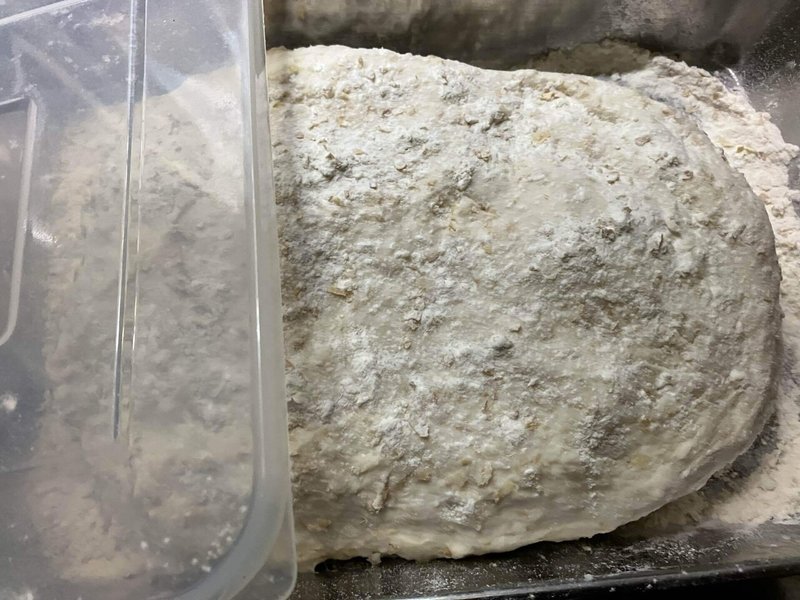
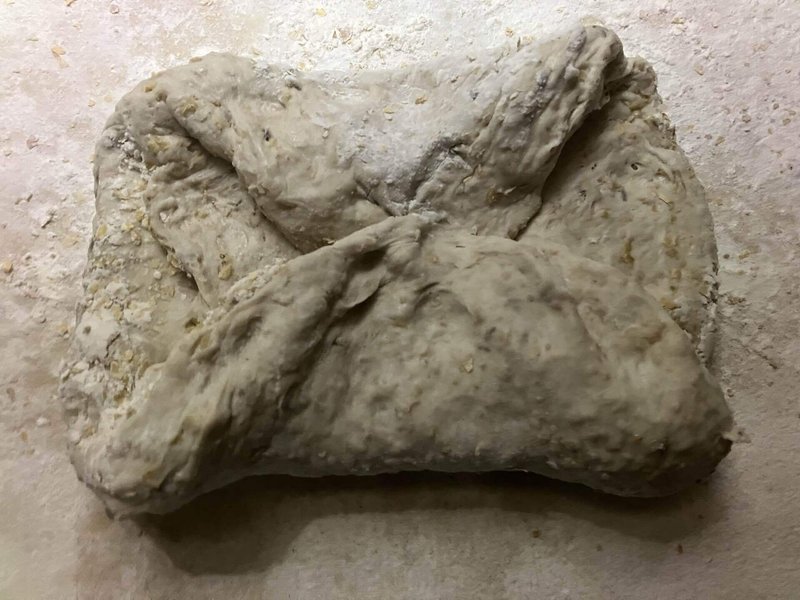
朝焼く場合は起床時、夜焼く場合は帰宅時に続きの作業を行う。忙しければ、野菜庫や冷蔵庫に入れて発酵を送らせて、もう1日か2日作業を先延ばししても良い。打ち粉をしたバットなどに生地を取り出し、平らに延ばして、両脇から折りたたむ。折り畳んだら、また平らに延ばして、方向を変えてまた折り畳む。これを3回ほど繰り返す。ベタつく場合は打ち粉をする。あえて捏ねる必要はない(力づくで扱うのは厳禁。要は捏ねない方が良い)。優しく延ばして、優しく折り畳むのがコツ。
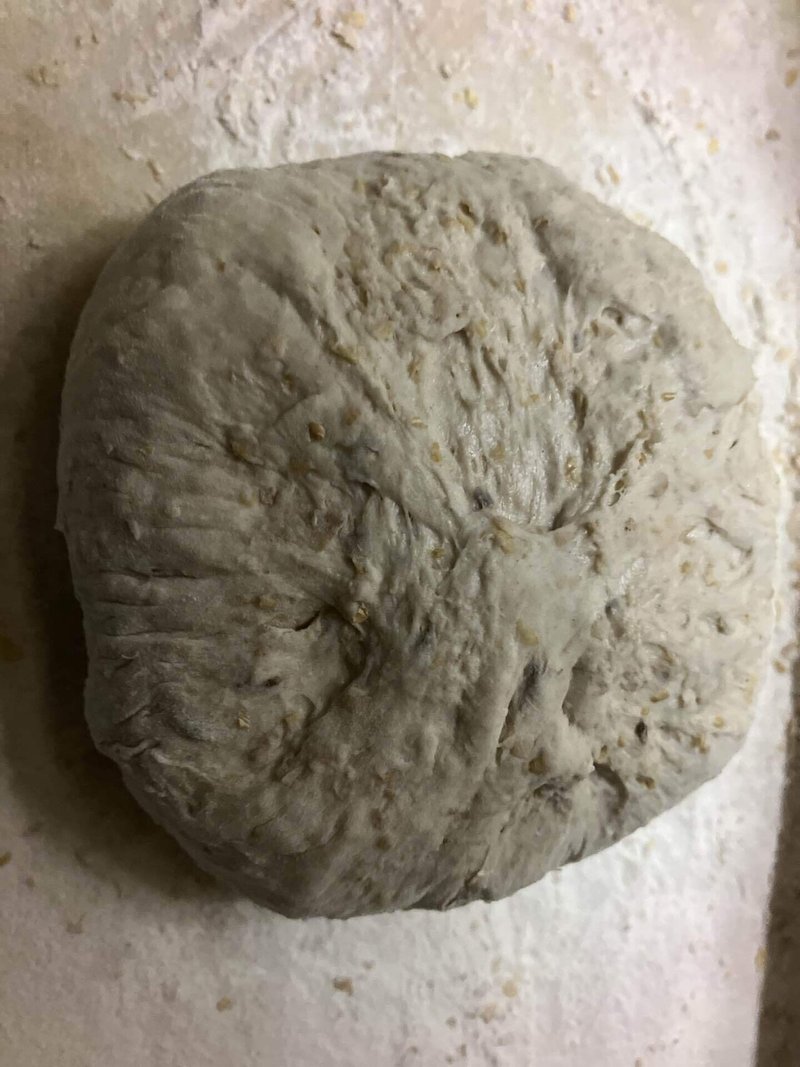
丸く整形するなら、折り畳見ながら生地が正方形になったタイミングで、折口を指で摘んで圧着する。長細く整形するなら、生地が長方形になったタイミングで端から巻いて、最後に指で摘んで巻き口を閉じる。
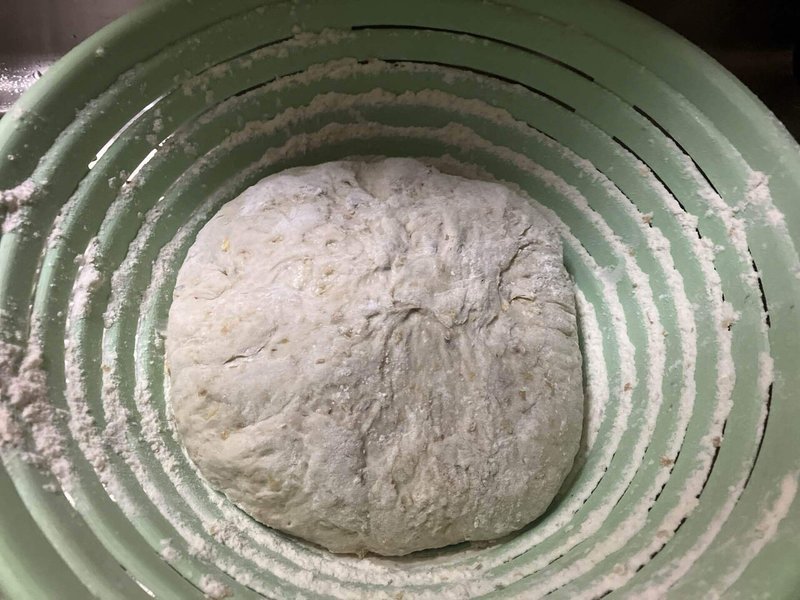
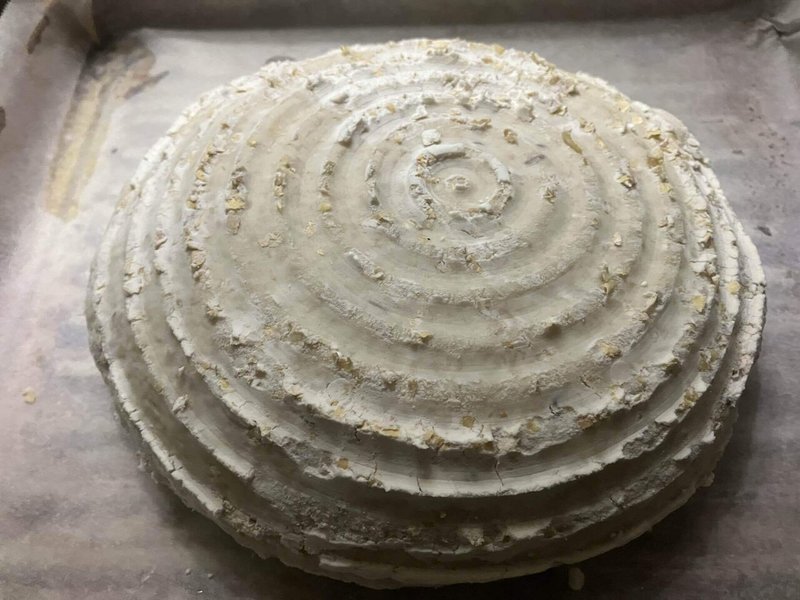
そのまま、室温で30分(適当で良い。長くなっても構わない)放置する。これを「二次発酵」という。寒い季節は暖房機の近くか風呂場など気温の高いところを選ぶ。ここでは丸く整形して二次発酵させるのに発酵籠を使っているが、最初から、閉じ口を下にして、クッキングシートを敷いたオーブントレーに乗せて発酵させても良い。そのまま焼くことができるので失敗しない。
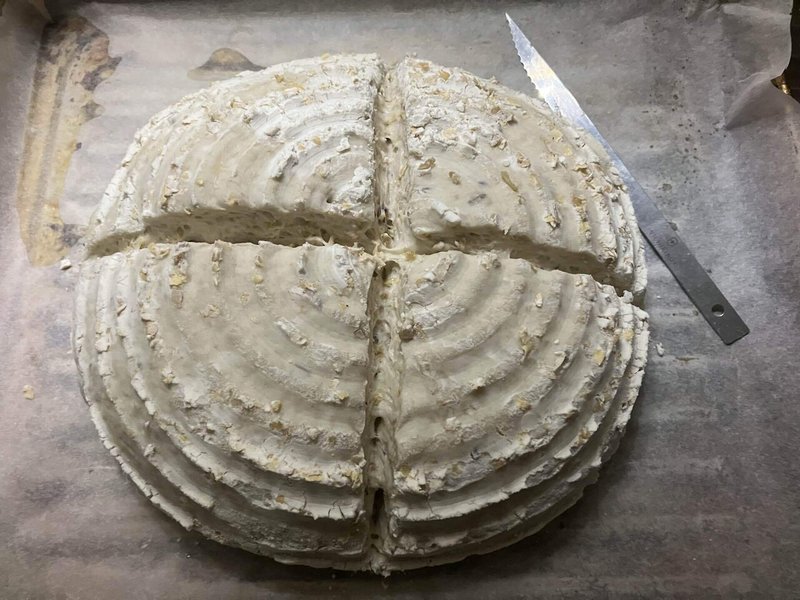
生地の真ん中に、カミソリなどでクープ(爆発防止の深い切れ込み)を入れる。
オーブントースターを摂氏200度(温度調節がない場合は5分ほど空焼きする)に予熱し、25分ほど焼く。生地の量が多く厚みのある場合は少し長めに焼く。
長々と説明したが、分量と形が決まり、オーブンの特性がわかってしまえば、作業時間は、仕込みに10分間、焼成前に10分間あれば良い。あなたの生活リズムや仕事に合わせて段取りは自由にやれば良い。
If you are baking in the morning, do the next step when you wake up, and if you are baking at night, do it when you get home. If you are busy, you can put it in the vegetable cupboard or refrigerator to allow it to rise and postpone the work for another day or two. Take the dough out onto a floured tray, roll it out flat, and fold both sides. After folding, roll it out flat again, change direction, and fold again. Repeat this about three times. If it is sticky, dust it with flour. There is no need to knead it (it is strictly forbidden to handle it with force. In fact, it is better not to knead it at all). The trick is to roll it out gently and fold it gently.
If you are shaping it into a round shape, fold it and when the dough becomes a square, pinch the folded edge with your fingers and press it together. If you are shaping it into a long, thin shape, roll it from one end when the dough becomes a rectangle, and finally pinch it with your fingers to close the opening.
Leave it at room temperature for 30 minutes (or as long as you like). This is called the "second fermentation". In cold seasons, choose a place with high temperature such as near a heater or a bathroom. Here, a fermentation basket is used to shape the dough into a ball and let it ferment for the second time, but you can also leave it on an oven tray covered with cooking paper with the closed end facing down from the beginning. You can bake it as it is, so you won't fail.
Make a coupe (a deep cut to prevent explosion) in the center of the dough with a razor or something similar.
Preheat the toaster oven to 200 degrees Celsius (if there is no temperature control, bake it empty for about 5 minutes) and bake for about 25 minutes. If the amount of dough is large and thick, bake it a little longer.
I've explained it at length, but once the amount and shape are decided and the characteristics of the oven are understood, the work time is only 10 minutes for preparation and 10 minutes before baking. You can freely arrange the work according to your lifestyle and work.
Tips and tricks:
コツと応用のヒント:
ここで使っている全粒粉は最新の微粉末まで粉砕できるタイプ。一般的に全粒粉で作ったパンはボソボソしている。もちもちの食感が好きな日本人は馴染めない人も多い。それは粒子が粗く水分の吸収が少なく食感に麦の胚芽部分が感じられるからだ。全粒粉の香りや滋味や栄養成分を保ちながら柔らかい食感のパンを作るためには、この微粉末製粉した全粒粉を使うと良い。玄米と白米の関係と同じと思えば良い。玄米でも発芽させたりパフ加工したものは白米のように柔らかくなる。
ライ麦粉の割合が増えるとパンは硬く焼きしまってくる。固い黒パン系が嫌いな人は10パーセントくらいにしておくと、ほぼ白いパンと同様な食感に仕上がる。逆に黒パン好きなら、20から30パーセントに増やすと良いだろう。僕は個人的にはそっち派だ。好みでその辺りは調整すると良いだろう。ライ麦を入れなくても良い。その場合は呼び名が変わり「Vollkornbrot(Whole grain bread)」となる。
The whole wheat flour used here is the latest type that can be ground into fine powder. Generally, bread made with whole wheat flour is dry. Many Japanese people who like a chewy texture cannot get used to it. This is because the grains are coarse, absorb less water, and the wheat germ can be felt in the texture. To make bread with a soft texture while maintaining the aroma, flavor, and nutritional components of whole wheat, it is best to use this finely milled whole wheat flour. Think of it as the same as the relationship between brown rice and white rice. Even brown rice that has been germinated or puffed becomes soft like white rice.
As the proportion of rye flour increases, the bread becomes harder and firmer when baked. If you don't like hard brown bread, keep it at about 10%, and it will have a texture almost the same as white bread. On the other hand, if you like brown bread, it would be better to increase it to 20 to 30%. I personally prefer that. You can adjust it to your preference. You don't need to add rye. In that case, the name will change to "Vollkornbrot (Whole grain bread)".
水を小麦粉に対し重量比で入れる割合を「加水率」という。ラーメンやうどんでも使う用語だ。粉の種類や製粉の仕方によってだいぶ違うけど、普通の手で捏ねるパンは60パーセント前後だ。60パーセント前後だと捏ねやすくしっかりしたパンに仕上がる。それに対して加水率が80パーセントくらいになると捏ねるのは非常に難しく、仕上がりは軽くもちっとしてくる。好みや用途で使い分けるが、ここで紹介しているのは後者のタイプだ。だから、ここでは普通のパン捏ねとは違う、延ばして折り畳むという工程を捏ねる工程に置き換えている。
こういう加水率の多いパンのグループを「高加水パン」と呼ぶ。フランスのバケットやイタリアのチャパタもこのグループに入る。加水率が上がると化学反応が起こりやすくなる。加水率が低いと反応が起きにくいので、捏ねて無理やりグルテンをくっつけてやるのだが、このレシピではその技は不要だ。加水率が高いと水を媒介として勝手にグルテンがくっついていくので、これを破らないように何度も延ばして折り畳んでグルテンの層を作っていくわけだ。だからよく粘土の菊練りのように力任せで生地を伸ばしている人を見るがこれは間違い。せっかく形成されたグルテンが破れてしまう。優しく延ばして折り畳んで上から押さえるのが正解。そのことを念頭に置いてイメージトレーニングするとすぐに上達する。しかも加水率が高い場合はグルテンはすでにくっついて発酵して気泡ができているので、気泡を潰さないように軽く押すことだ。
加水率が高いとベタつくので、打ち粉をたっぷり使うか手に油をつけて生地を扱う。ここでは打ち粉を多めに使っている。慣れるまで打ち粉はケチらないことだ。
最初に十分程度放置しているのは、小麦粉が十分に水分を吸って、化学反応が起こりやすい状態なるのを待つ意味がある。パンの教科書ではこういう時間を「ベンチタイム」と一派絡げに呼んでいるが、それぞれの工程での役割は違う。だからこそ僕はベンチタイムという曖昧さを含む言葉は使わない。
The ratio of water to flour by weight is called "hydration rate." It is also used for ramen and udon. It varies greatly depending on the type of flour and the milling method, but bread that is kneaded by hand is usually around 60%. Around 60% is easy to knead and produces a firm bread. On the other hand, when the hydration rate is around 80%, it is very difficult to knead and the finished product is light and chewy. It can be used depending on your preference and purpose, but the latter type is introduced here. Therefore, unlike normal bread kneading, the process of rolling and folding is replaced with the kneading process.
This group of breads with high hydration rates is called "high hydration bread." French baguettes and Italian ciapata also belong to this group. As the hydration rate increases, chemical reactions become more likely to occur. If the hydration rate is low, the reaction is difficult, so the gluten is kneaded to forcibly stick together, but this recipe does not require that technique. When the hydration rate is high, the gluten will stick together on its own, using the water as a medium, so you need to stretch and fold it repeatedly to avoid tearing it and create layers of gluten. I often see people stretching the dough using force, like kneading clay, but this is a mistake. This method tears the naturally formed gluten. The correct way is to gently stretch it, fold it, and press down from above. If you keep this in mind and do image training, you'll improve quickly. Furthermore, when the hydration rate is high, the gluten has already stuck together and fermented, creating air bubbles, so you need to press lightly to avoid crushing the air bubbles.
When the hydration rate is high, the dough will be sticky, so use plenty of flour or oil your hands when handling it. A generous amount of flour is used here. Don't be stingy with the flour until you get used to it.
The reason for leaving it for about ten minutes at the beginning is to wait for the flour to absorb enough water and become in a state where chemical reactions can easily occur. In bread textbooks, this time is generally called "rest time", but the role of each step is different. That's why I don't use the ambiguous term "rest time".
このレシピでは酵母はSAFの青ラベルを使っている。昔からあるゆっくりと時間をかけて発酵するタイプの酵母を選別したものだ。ちなみに赤ラベルはビタミンなどを添加してあってものすごいスピードで発酵する種を選別したもの、金ラベルは菓子パンなど糖分を大量に添加した環境で糖分で発酵しすぎないような種を選別したものだ。青ラベルは急ぐ場合は予備発酵させて使うのだけど、ここではそのまま入れている。一晩かけてゆっくり発酵させるし高加水なので予備発酵は要らない。また、量も表記の分量は不要でひとつまみあれば十分発酵する。僕のレシピが酵母臭くならない道理だ。また、経済的でもある。ほぼ2日に一回使っている僕のペースでも、一パックの消化には2年はかかりそうだ。物凄くゆっくりと発酵するので、実験して量を調整すれば、発酵のゴールを何時間後、何日後に持っていくかの調整もできるようになる。酵母は開封したら密閉して冷蔵庫で保管すれば2年は保つ。近所の仲間と共同購入するのも手だ。
酵母は摂氏35度近辺で最も増殖するけど、低温ではゆっくりと増殖する。だから7度前後の冷蔵庫の野菜室の温度だと一晩かけてゆっくり発酵してくれる。温度と酵母の量の関係がわかってくれば、そこは自由自在だ。仕事の都合に合わせて発酵してもらえるようにコントロールできるようになる。冬は涼しい室温で良いが、夏は冷蔵庫を戦略的に使って適切な気候を家庭でも作り出せる。
少ない量の酵母の発酵が理解できれば、天然酵母を使いこなすのに、それほどの苦労は要らない。まずは市販の酵母とお友達になってから、天然酵母とも仲良くすれば良いのだ。
ちなみに、生地を多めに作っておき、一次発酵した生地の一部を冷蔵庫に保管しておき、その次の生地に混ぜると、より豊かな香りが楽しめる。何度も継ぎ足していると乳酸発酵が合わさり、いわゆるサワー生地に近づいていく。サワー生地の好きな人はこういうやり方もある。
In this recipe, I use SAF blue label yeast. It is a type of yeast that has been around for a long time and ferments slowly. By the way, the red label yeast is a yeast that has been added with vitamin C and is selected to ferment at an extremely fast rate, and the gold label yeast is a yeast that does not ferment too much in an environment with a large amount of sugar added, such as sweet bread. If you are in a hurry, you can use the blue label yeast after pre-fermentation, but here I use it as is. It ferments slowly over night and has a high water content, so pre-fermentation is not necessary. Also, the amount indicated is not necessary, a pinch is enough to ferment. This is why my recipes do not smell yeasty. It is also economical. Even at my pace of using it about once every two days, it will take two years to use up one pack. It ferments very slowly, so if you experiment and adjust the amount, you can adjust the fermentation goal to how many hours or days later. If you open the yeast and store it in a sealed container in the refrigerator, it will last for two years. It is also a good idea to buy it together with your friends in the neighborhood. Yeast grows best at around 35 degrees Celsius, but grows slowly at lower temperatures. Therefore, if the temperature in the vegetable compartment of the refrigerator is around 7 degrees, it will ferment slowly overnight. Once you understand the relationship between temperature and amount of yeast, you can freely adjust it. You will be able to control the fermentation to suit your work schedule. A cool room temperature is fine in winter, but in summer you can create the right climate at home by strategically using the refrigerator.
Once you understand the fermentation of small amounts of yeast, it is not too difficult to master natural yeast. First, make friends with commercial yeast, and then work your way along with natural yeast.
By the way, if you make a lot of dough, store some of the dough that has risen once in the refrigerator, and mix it into the next batch, you can enjoy a richer aroma. If you add it repeatedly, the lactic acid fermentation will combine and it will become closer to sour dough. If you like sour dough, you can do this too.
一次発酵にはボールを使っても良いけど、場所をとって嵩張るので、僕は蓋つきののバットを使っている。2倍に膨れるので、それを想定したサイズのトレーだ。冷蔵庫に入れる時にスタックできるので、便利だ。
You can use a bowl for the first rise, but it takes up a lot of space, so I use a flat tray with a lid. It will expand to twice its size, so it's a tray of that size. It's convenient because you can stack them when you put them in the refrigerator.
一般的に二次発酵は一次発酵に比べて短時間で良い。すでにグルテン膜が形成されているので、暖かい室内や暖房機の近くでで十分なボリュームに膨らむからだ。
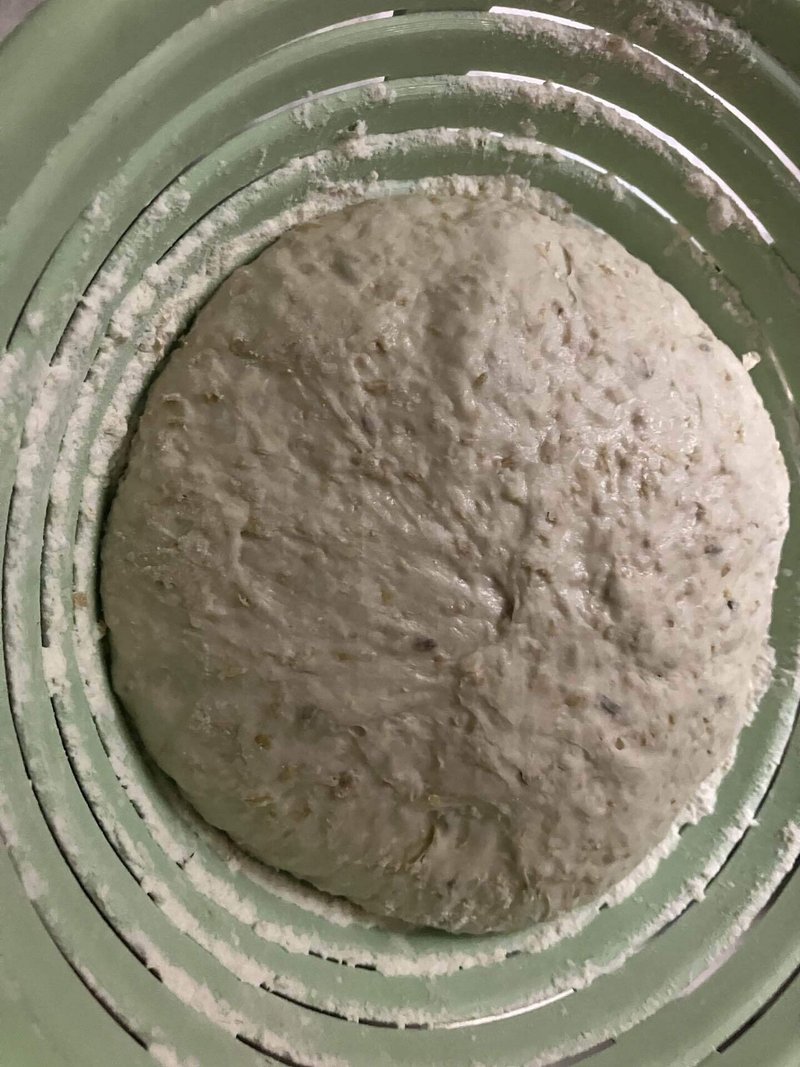
一晩かけて一次発酵した生地は大体2倍に膨らんでいる。この後の作業で延ばして折り畳むことで、生地のボリュームは一旦減少するけど、30分も暖かいところに置いておけば焼くのに十分な大きさに膨らむ。ただ、くれぐれも優しく延ばして折りたたみ、気泡を潰さないことだ。低加水のパンで、生地の木目を揃えるために、わざわざ気泡を潰してから二次発酵をする場合もあるけど、この高加水パンの場合は気泡を温存する。だから、さいごに丸型ないし楕円型に整形する時も優しく気泡を温存しながら整形を行う。
整形した後は、しっかり綴じ目をくっつけて、焼いている時に解けてこないようにする。水分量が多いので難しくはない。
全体的に高加水パンは柔らかいので、最初は仕上がりの形にこだわる必要はない。イタリアのチャパタのような雑な形に整形できれば十分なので、最初は仕上がりの形を気にしすぎて気泡を潰さないように注意しよう。慣れると、柔らかくても素早く整形できるようになる。ホットドックやバーガーバンズに整形するなら、シリコンの型を使っても良い。バケットの場合は型が崩れないようにキャンバス地の畝を使う。一次発酵を終えて整形したら、そのままオーブントレイに乗せて仕舞えば失敗は少なくなる。最初はそれが無難だと思う。
やわらいパンなので、クープは特に入れなくても良いのだが、整形の形によっては思わぬ箇所が破裂してしまうことがあるかもしれない。そういう場合はクープを入れよう。深さ1センチ以上の深い切れ目を入れて、そこが膨張するように意図的にコントロールする技術だ。よく失敗している人を見るが、深さが浅い場合が多い。思い切って切れ目を入れよう。柔らかくて綺麗なクープが入らない場合は、キッチンバサミを使って切れ込みを入れても良い。最初はやはり見栄えを気にしすぎるのはやめよう。技術は原理を理解しながら一つづつ習得していくものだから、いっぺんに何でも成功させたいと思いすぎないほうが、結局は早道になる。
Generally, the second fermentation can be done in a shorter time than the first. This is because the gluten membrane has already formed, so it will expand to a sufficient volume in a warm room or near a heater.
The dough that has been risen for the first time overnight will have expanded to about twice its size. The volume of the dough will decrease once it is stretched and folded in the following steps, but if you leave it in a warm place for 30 minutes, it will expand to a size large enough to be baked. However, be sure to stretch and fold gently and not crush any air bubbles. With low-hydration bread, some people take the trouble to crush the air bubbles before the second rise in order to align the grain of the dough, but with this high-hydration bread, the air bubbles are preserved. Therefore, when shaping into a round or oval shape at the end, you should do so gently while preserving the air bubbles.
After shaping, you should firmly seal the seams to prevent them from coming apart during baking. This is not difficult because of the high moisture content.
High-hydration bread is generally soft, so you don't need to worry about the final shape at first. It is enough if you can shape it into a rough shape like an Italian ciabatta, so at first, be careful not to crush the air bubbles by worrying too much about the final shape. Once you get used to it, you will be able to shape it quickly even if it is soft. If you are shaping it into hot dogs or burger buns, you can use a silicone mold. For baguettes, use canvas ridges to prevent the shape from collapsing. Once you have finished the first rise and shaped it, you can put it on an oven tray as is to reduce failure. I think that is the safest way to start.
Since it is a soft bread, you don't need to make any cuts, but depending on the shape you make it, it may burst in an unexpected place. In that case, make a cut. This is a technique to make a deep cut of more than 1 cm deep and intentionally control the expansion of that area. I often see people failing, but it is often because the depth is shallow. Make a cut as much as you can. If it is soft and you cannot make a nice cut, you can use kitchen scissors to make a cut. At first, don't worry too much about the appearance. Since skills are acquired one by one while understanding the principles, it will be a quicker process in the end if you don't try to succeed at everything at once.
温度制御のできないオーブントースターの場合は、そのままでも大体200度近くまで温度は上がるので、予熱代わりにしばらく空焼きしてからトレーを入れれば良い。
オーブントースターは小さいので、それほど焼きむらは出ないと思うが、焼きむらが出るようなら、一回途中でトレーの向きを変えてやると良い。コンベクション機能があるなら、それを使うと熱が均一に回るので、気を使う必要はない。
生地は大体焼けると1.5倍から2倍に膨らむので、高さがないオーブントースターの場合は小さめ平ら目の整形をして、焦げないように気を配ってやると良い。途中でアルミホイルを乗せて焦げ防止をするのも手だ。
高級なオーブンを使いこなしている方なら、これらの説明は不要だろう。
ピザ用のトレーなど、適当なトレーを使えば、日本の家庭に普及しているガスコンロやフライパンでもパンは焼ける。野外ならダッチオーブンを使えば、オーブンのように焼き上げることも可能だ。
オーブンやオーブントースター以外の器具で焼く方法は後日改めて説明したい。
If you have a toaster oven that cannot be controlled, the temperature will rise to about 200 degrees, so you can preheat it for a while and then put the tray in.
Because toaster ovens are small, I don't think there will be much unevenness in the toaster oven, but if there is, you can turn the tray once in the middle of the oven. If your oven has a convection function, you can use it to distribute the heat evenly, so you don't need to worry about it.
When the dough is cooked, it usually expands to 1.5 to 2 times its size, so if you have a toaster oven that is not tall, you can shape it into a small, flat shape and be careful not to burn it. You can also place aluminum foil on top of it to prevent it from burning.
If you are familiar with using high-end ovens, these explanations will not be necessary.
If you use a suitable tray, such as a pizza tray, you can bake bread on a gas stove or frying pan that is common in Japanese households. If you are outdoors, you can use a Dutch oven to bake it like you would in an oven.
I would like to explain how to bake bread with appliances other than ovens and toaster ovens at a later date.
Guide to where to get ingredients and equipment 材料と機材の入手先ガイド
この記事が気に入ったらサポートをしてみませんか?