
【無料&初心者でもできる】Spline.Designを使ってみよう!簡単3Dデザインwith React

読んで下さっている方の中で、たまにサムネのような3Dオブジェクトを見かけることもあると思います。
今回は以下のyoutube動画を見て基礎を学んだので備忘録として載せたいと思います。
2023/06/03時点で11ヶ月前にアップロードされ106万回再生されています。
必要な前提知識
この記事はかなり雑に書かれてるということ
Figmaの基礎知識
Reactの基礎知識(この動画はSplineとテキストを重ねるなど、簡単なコードの理解が必要です。でも動的&発展的じゃないので難しくないです!)
この記事の使い方
私はこの動画で学んでいる最中コーディング面で調べなきゃいけないことが多少ありました。
がっつり学びたい方は動画とこの記事を併用して見ていただくと、問題が起きたときに速く解決できると思います。
#筆者のレベル
3D編集ツールは触ったことがない
Figmaは日常的に使う
ReactはuseEffect,useStateの基本くらいまでわかる
それではメモ書きれっつらごー💪🔥
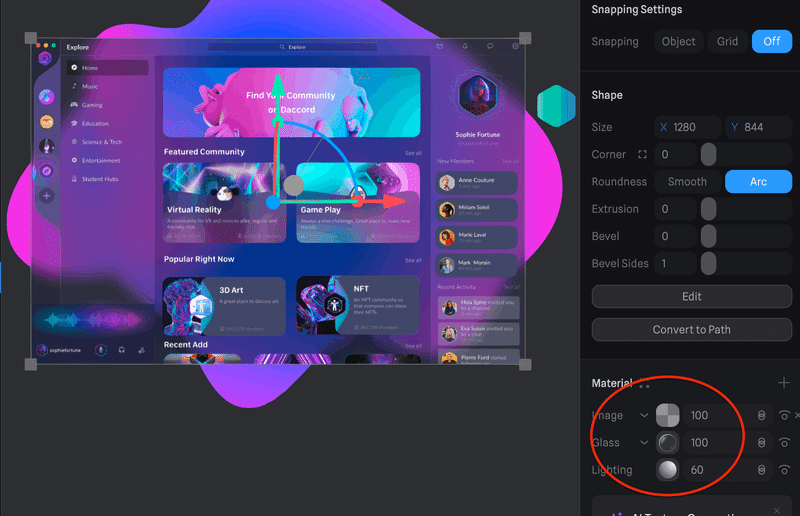
Shift押しながらだと we can create the perfect aspect ratio=きれいな図形が作れる
8:44
If we want to change the direction, we use Z
これできれいに縁取られたみたいなデザインになる

右クリックでcopy msterialをして新しいmaterialにまた右クリックでpaste materialをするとMaterialの部分が同じになる。Shapeなどはapplyされん
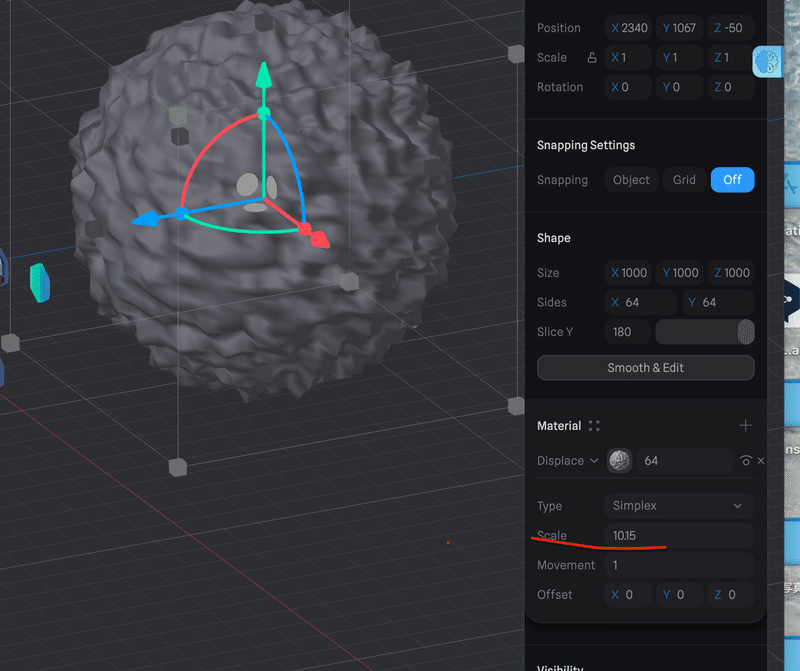
14:49
これでうねうね形が変わる + 下のmovementもいじってみよう

nearとfarで色の範囲が変わる

よりsmoothになるけどperformance落ちる

ここには順序がある。上が優先される
20:00~
Animation
base stateのzを10にする
stateはz 80
動画と違ってActionを選ばないとアニメーションができない
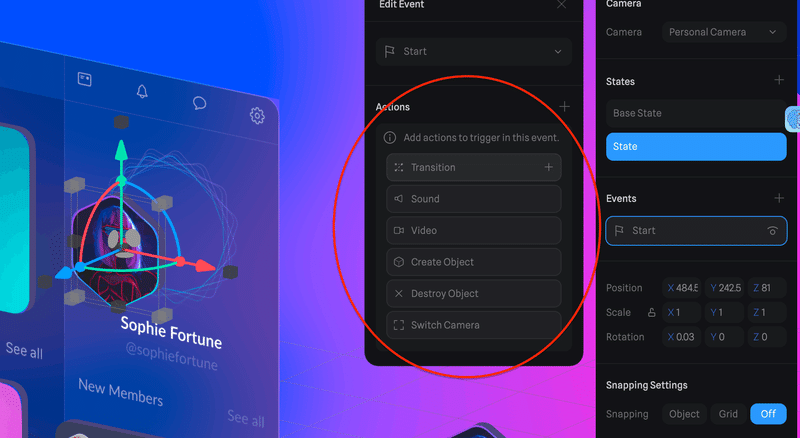
この場合はBase StateからStateまで出てくるアニメーションをしたいので
TransitionはBase State - State

New MembersはBase StateはZ10
動画と違って右の◯がDuration(s)
🚨Base StateじゃなくStateを編集!

Avatarのアニメーションを他のにも
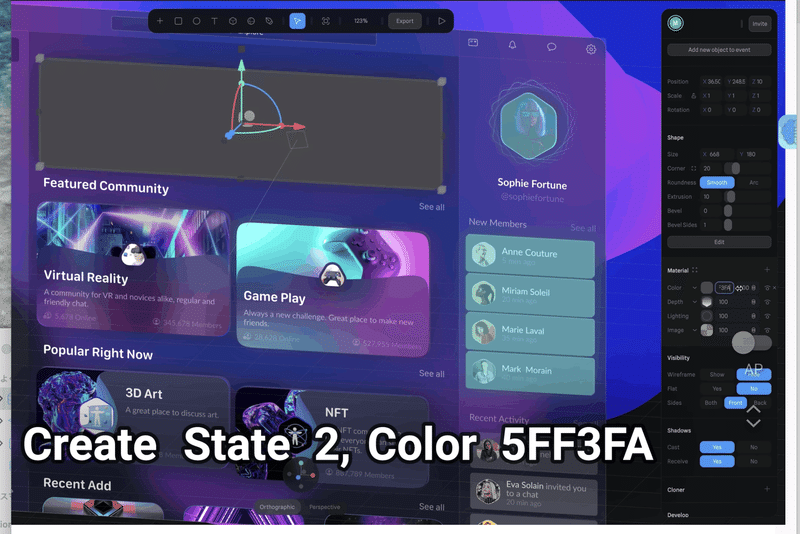
state2を作り > Mouse Hoverを作り > Transition > Colorを作りDepthの下に > 5FF3FA > Opacity 50% > Z 10
event、statesは今のところ複数変えられない
Group can have its own State and Events

28:36
we have to take care of lighting because it adds more depth to the design
BEFORE
lighting反映されてない

AFTER
影できた

光の方向はこの黄色い丸で調節

全体を選んで shadows soft にすると以下の項目が増える

34:25
pan is where you move things around
offにすると指2本で移動ができない= 裏側まで見られたくないときに便利

35:00
Limits the orbit
下にスクロールしたらある
これをしないとどんな方向からでも見られちゃう

.spline {
    position: relative;
    width: 80vw;
    height: 50vh;
    overflow: hidden;
    background: #fff;
    border-radius: 5px;
}

.spline_text {
    position: absolute;
    top: 0%;
    left: 10%;
    color: #fff;
    font-size: 3vw;
}
import React, { useEffect, useRef } from 'react';
import { Application } from '@splinetool/runtime';
import './Spline.css';

function Spline() {
  const canvasRef = useRef(null);

  useEffect(() => {
    const canvas = canvasRef.current;
    const app = new Application(canvas);
    app.load('<https://prod.spline.design/2Z1xfL0ICTXXmkfj/scene.splinecode>');
  }, []);

  return (
    <div className='spline'>
      <canvas ref={canvasRef} />
      <h5 className='spline_text'>わーい🥳</h5>

    </div>
  );
}

export default Spline;
import React from 'react'
import ReactDOM from 'react-dom/client'
import App from './App.jsx'
import Spline from './Spline.jsx'

import './index.css'

ReactDOM.createRoot(document.getElementById('root')).render(
  <React.StrictMode>
    <App />
    <Spline />
  </React.StrictMode>,
)
React
npm install @splinetool/react-spline
Js
npm install @splinetool/runtime
で
npm run dev
Git でユーザ名とパスワードを聞かれ、パスワードを入力したができなかったためこの記事で解決
なぜGithubだけだと見えないのか

回答ぽい?
うまく表示されているReactのロゴとViteのロゴの違いはなんでしょうか?
そうです、Reactロゴはsrc > assetsにファイルが入っていて、それを
importしています。一方、Viteロゴは相対パスで指定しています。
GitHub Pagesにデプロイする際にbuild処理を行いますが、この相対パスはうまく認識されません。
そのため、GitHub Pagesでの画面ではうまくパスが取得できておらず、非表示でした。
なので、このViteロゴを下記の様に変更します。
🤔 splineはURL
app.load('<https://prod.spline.design/2Z1xfL0ICTXXmkfj/scene.splinecode>');
になっているから相対パスと言うことで表示されない?
🌸(🌸=ChatGPTです。)一応聞いた。っぽい?
Build process: If you're using create-react-app or a similar tool, make sure you're building your project before deploying it. The build process compiles your JSX and other source code into a format that can be served statically by GitHub Pages. Netlify typically handles this process for you when you deploy, which might explain why you're seeing the changes there but not on GitHub.
ここ変えるだけでコード変えなくてもしっかりと変更が反映された!

styled-componentsがインストールできん
👩🏼🎓
npm install styled-components@5.3.10
vscodeでcommitできん
👩🏼🎓
% git config --global "user.name"
% git config --global "user.email"
🤔伸びちゃう
🙋♀️min-height: 70vh;を.splineの中に入れてたからだ!

const Wrapper = styled.div`
  width: 70%;
  height: 50%;
  margin: 0 auto;
  position: relative;

  font-family: 'Spline Sans', sans-serif;

  .spline {
    position: absolute;
    margin: 0;
    top: 0;
    left: 0;

min-height: 70vh

  }
`;
写真をフレームみたいに作る方法
ExtrusionとNear or Farの値を同じにする。 同じにしなかった方Near or Farの値 は同じにした場合と0.1差にする

番外編①
glow effect
Lighting をOverlay にすることを忘れないように

番外編②
Improve performance 公式サイト
On parametric objects (like the sphere, cube, cylinder, etc). You can control the number of ‘Sides’. You can reduce the sides to increase performance.
Avoid increasing the base subdivisions unless you need to.
!
他にもDiscord Communityでこんなコツも
背景消す
splineをトップに持ってこない
PowPowMay 8, 2023 10:07 AMMay 8, 2023 10:07 AM
that's just how it is, if you want faster, use three.js also, remove your background once it's cached, it's instant though
or don't put the spline content so close to the top
let it load while hidden so it looks seamless
zoom setting
max が小さいと最大ズームできる大きさが小さくなる

textureとは
画像も含まれる

Communityから
The car Object has many polygons, and there are many mateirals that can be converted into material assets and used. please try to reduce the texture images as well (use material asset for this too).
!https://media.discordapp.net/attachments/936730866896502834/1098780808438890588/Screenshot_2023-04-21_at_6.50.55_AM.png?width=764&height=700
@Abdur 👻
!https://cdn.discordapp.com/avatars/745969399579672596/c15503686bf23fdb8a0728d286f23314.webp?size=32
Try clearing out cache and opening the app again cc: @cedrick April 21, 2023 10:15 AM

camera 公式サイト
ここまで読んでいただきありがとうございます。今回はDaccord(?)を作りましたが、SplineのLibraryにある素材を自分なりにカスタムするとよりデザインの幅が広がると思います!
この記事が気に入ったらサポートをしてみませんか?